Act 2: Capture Shimura Castle - Ghost of Tsushima Walkthrough
On this page of our guide " Ghost of Tsushima » the walkthrough of Act 2 "Capture Shimura Castle" is described in detail .
- CHAPTER SELECTION
- (I.e. new horizon
- (I.e. Fire Message
- (I.e. Walls of Yarikawa
- (I.e. Coward Yarikawa
- (I.e. Ghosts of the Past
- (I.e. Ghost of Yarikawa
- (I.e. Bloody Fee
- (I.e. Fate of Tsushima
- (I.e. From Darkness
New Horizon

This task starts automatically after completion Shadow of the Samurai and serves as a kind of introduction to the second region of the world map - Toyotama . After watching the cutscenes, you and Yuna head towards the fortress. When you get there, talk to Mr. Shimura .
Before you leave the fortress, you can talk to your allies - Ishikawa , Kenji , Such и Masako . You will also find merchants in the fortress. After replenishing the supply, go to your horse. Talk with Young and jump on the horse.
Next, follow Lord Shimura. Dialogue options will appear throughout the ride, but again they don't play a significant role.
Ultimately, you must reach an open space next to burning buildings. Shimura spots a Mongol patrol in the distance and decides to attack them.
You can start attacking enemies on horseback, although it's okay if you happily jump off it or get kicked off after someone hits your horse.
remember, that archers can now fire multiple shots in a row . This is typical for the second region of Tsushima. Be prepared to skilfully dodge or parry multiple shots in a row.
Having dealt with the opponents, return to the horse and go with Lord Shimura to the Mongol-occupied Fort Ito .
Start engaging opponents near the main gate and those that spawn in the area after the fight has started. You don't have to protect Shimura — he'll do just fine. During hostilities, beware of mines. new guard dogs that can easily bite Jin if their red attack is successful.
Enter through the main gate of Ito Fort. Move towards the location with anxiety and start attacking any opponents nearby.
You will face stronger opponents (called brutes) and if you have already unlocked the Lunar Stance, use it to fight them. Luckily, kunai are also effective, you can use them to expose your enemies to katana attacks.
After destroying the enemies occupying the fort, retreat to the entrance gate of Fort Ito You have to deal with Mongolian reinforcements who arrived at Fort. During this battle, beware of yellow opponents who can plant bombs - quickly move away from the explosion zone.
Akashima lighthouse located next to the fort. Approach the place and listen to the conversation. Enter the lighthouse and reach its top. Light a fire at the lighthouse.
Returning downstairs, listen to the conversations with the peasant woman and monk Norio . Follow Norio to the north gate. The quest ends after reaching the gate.
Quest rewards: The legend grows stronger (xp), story quest « message on fire" story quest "Walls of Yarikawa" quest story " Ghosts from the Past" , additional side quests in the Toyotama region.
Fire Message

This is one of the missions unlocked after completing the quest " New Horizon" - shortly after reaching the Toyotama region.
The first part of this quest involves visiting the southern part of Umugi prefecture and search for Umugi bay. in the area marked with a yellow circle. The task is very simple - stay on the main path leading to the central part of the marked area.
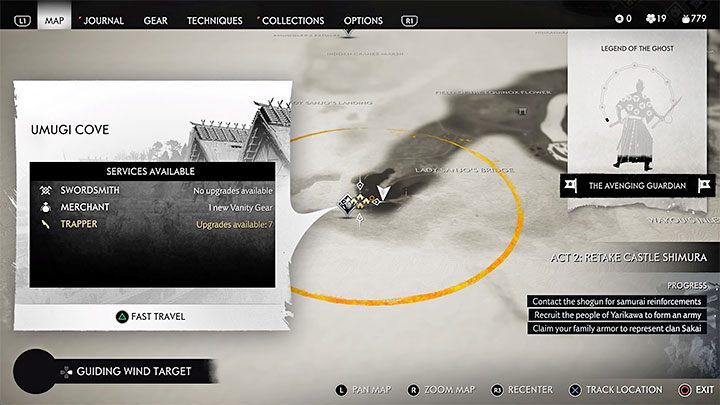
Upon reaching Umugi Bay, Jin is stopped by one of the guards, but he doesn't have to fear any fighting as it is an allied place. Follow the Guardian to the meeting point with Mrs. Sanzo .
After listening to the conversation, go down to the lower floor of the building and talk to Goro . Follow him to his cabin and take from him map - map Goro. Once you have the map, leave the building to chase off the Ronin looking for Goro.
You can already leave Umugi Bay (using the same route you came, or using fast travel). hunting camp located on the eastern edge of the region. When you get there, talk to Lord Shimura , hop on your horse and follow Shimura to his scheduled meeting point with Goro.
Goro will be waiting at the planned location. Get off your horse and go to his boat first.
After discussing the action plan and updating the mission objectives, start following Shimura, who this time follows the road leading to Fort Mitodake .
You and Shimura will reach a small hill next to the road. To surprise the patrol, use the bow (you will find a supply of arrows in this area). If you can, use flaming or explosive arrows . This may allow you to get rid of several Mongols during the initial strike.
You can keep shooting down or down the hill to fight opponents using your katana.
Sooner or later you will have to come down the hill and head towards the fort. During further battles, beware of strong, "elite" enemies. To easily get rid of them, use kunai, bombs or moon stance.
After winning the battle in front of the Fort, go to the big gate. They are not barricaded, so you can open them and enter the fort.
Watch out for the archers that spawn on the balconies on the left . Don't attack them from your current location, just get to the next gate with Shimura.
The passage through the fort will take a little time. As in the previous fights, you don't have to protect Lord Shimura. Focus on maintaining your hero and avoid attacks from stronger enemies (including defensive dogs). Along the way, you will pass through the balconies where the archers were placed, and you can deal with them now.
A short scene shows what the Mongols use hwachu . Enemies from the tower will use this weapon to target and attack heroes including your character .
Since you cannot stop the bombardment from the start, you must seriously change your combat tactics. When attacking new enemies, hit them 1-2 times and then move them. Don't stay anywhere long enough to not be the target. Be prepared to heal the hero if needed, and roll to put out the fire if you get hit.
Follow the linear path to the tower. Seeing her from a distance, do not stop, just go to her. Climb up the stairs and fight the two Mongols who were responsible for the shooting. Fortunately, they are archers, so they should die very quickly in close combat.
Now for the most enjoyable part of the mission - you will use hwacha to shoot mongolian targets .
Start by shooting at small ships and enemies standing on the shore. In the case of moving targets, make slight adjustments when aiming because it will take some time before the shots reach the target.
Now concentrate on shelling and sinking the big Mongol ships - aim mostly at the red barrels visible on their decks. Several new smaller ships will also appear.
Ensuring that Goro's ship safely leaves Tsushima will mean the mission is complete.
Mission rewards: Your legend grows stronger (xp).
Walls of Yarikawa
To start this quest, you must meet Yunu near Fortresses of Yarikawa . This is an allied place and is currently under siege by the Mongols. After listening to the conversation with Yuna and Takoy, go to the fortress on horseback. Along the way, you will run into a large Mongol patrol, but you won't have to fight them as the heroes will automatically wait for the Mongols to withdraw.
Once you reach the hill adjacent to the fortress, you need to will explore the area , which happens the same way as in the previous quests - you have to find interactive areas and confirm them by pressing X. The most important place to explore is shown in the accompanying image - a secret passage that the heroes decide to use to get into the besieged place.
In this part of the mission, the Mongols cannot detect you, as detection would mean failure.
Choose a path that will allow you to descend a small hill and continue towards the tents that the Mongol army has set up. You can easily kill the first sentry working in the van. However, try not to attack other opponents, as their corpses will remain in plain sight and may be discovered after a while.
As you make your way through the Mongol camp, you must be especially careful. with one soldier patrolling the area on horseback . His presence is also the reason for refraining from attacking "ordinary" opponents so that their bodies are not discovered.
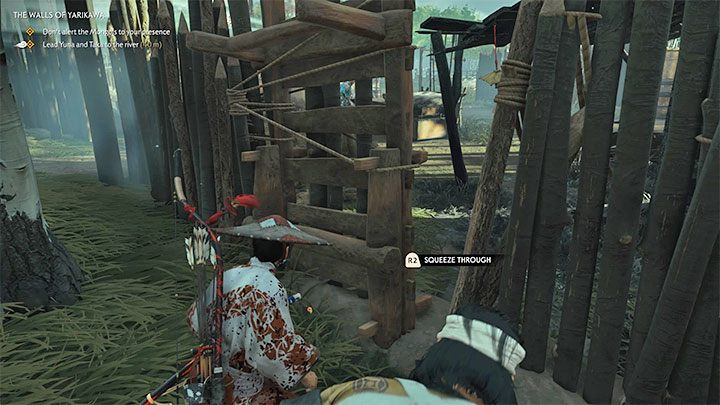
Wait until the enemy on horseback moves to the right and quickly crosses to the other side of the path. You will find hole in the fence shown in the picture - quickly squeeze through it.
On the left, new opponents appear. Walk a little to the right to bypass them, keeping as much distance as possible. Go to the river that separates the palisade of the fortress from the Mongol camp.
After jumping into the (shallow) river, turn right. Go and don't get out of the channel for a while. You must get to small waterfall. You need to go through this waterfall, because behind it is hidden a secret passage to the fortress.
Go into the short tunnel and use the stairs. After the heroes are stopped by the guards, follow them to the main gate of the fortress. Speech will be depicted in a short scene Mongolian general Temuge, trying to convince the inhabitants of the fortress to surrender.
The next part of this mission involves meeting with Uzhimasoy , ruler of the fortress. Listen to the conversation with him.
Your ultimate goal is to find sword shop, which is located inside the fortress. Approach Taka and listen to the conversation that ends the described quest.
Mission Rewards: the legend grows stronger (xp), story quest "Coward of Yarikawa" .
Coward Yarikawa
This quest will be added to Drin's diary after you complete the main quest. "Walls of Yarikawa" . Get to Yarikawa, where a group of allies defend themselves against the Mongol army.
The starting point for this quest is Old Yarikawa - You need to meet Yuna. After listening to Yuna and Tak, look around the area to find Mongols killed . Examine one of the corpses.
You will find a small path with footprints next to the killed enemies. You must follow them. As with all previous sequences of this type, stay on the path so you don't lose tracks.
The footprints will lead you to the house, and when you try to get close to it, bear. If you haven't fought bears before, it's worth knowing that you should focus primarily on avoiding their red attacks - they can deal heavy damage, knock you down, or even push Jin back.
Look for opportunities to perform solo attacks after each successful dodge. However, you can also weaken the bear, for example with bombs or kunai daggers.
Enter the house where the bear was and search it. You must look at the mats, bows and arrows left inside.
Exit the building and talk to Yuna. When you're at the camp, check out the building loaded with red barrels. Resume tracking the archers by following the tracks near the camp.
After a while, the heroes will notice the archers in the distance. Meet them on the hill to trigger a cutscene.
There is nothing special about the exploration sequence - just find the interactive areas and press X to listen to the commentary. You must watch the prisoner caravan and find other captured archers among the prisoners.
When preparing an ambush on a Mongol convoy, you will talk to Tako - the choice of dialogue option is not important.
Jin and the others will automatically tune in on the rooftops. Use any bow to start an ambush - You will find more arrows on the roof.
Wait for the Mongol column to stop at the cart with red barrels. Then shoot the barrels to cause a big explosion. It's worth adding that if you don't do this step yourself, one of the allied archers will.
Once the battle starts, you have free rein - you can stay on the rooftops and use your bow, or jump off and start attacking the Mongols in hand-to-hand combat. If you choose the first option, you can look for red barrels.
Beware enemy archers, which may appear on the left. If they start shooting at you, dodge and parry or retreat to the bottom of the roof. After dealing with all the opponents, talk to Daikoku. The quest will end soon.
Mission Rewards : Legend Fortified(xp) - Bigger Bonus, Main Quest "Ghost of Yarikawa" .
Ghosts of the Past

This is one of the missions unlocked after completing the quest " New Horizon" - shortly after reaching the Toyotama region.
You must return to Jin's hometown, Omi village . This is an abandoned place - you don't need to prepare for fights. Head to Sakai Manor, located on a hill adjacent to the main part of the village. Upon entering the mansion, Jin is greeted Yuriko .
Start walking around the manor with Yuriko. You will also meet Taichi. Go to the large circular area where Jin's father's grave is located. Stand in the marked place and write a haiku . As with other haiku in the game world, you can freely choose the next parts of the poem (look for interactive dots) - this will not affect the "final result".
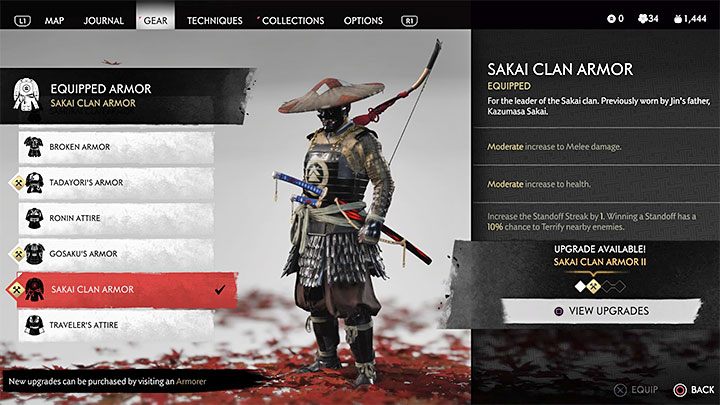
Return to Sakai Manor. Entering it, you will see a scene in which wearing Sakai clan armor и sakai mask . The mask has no special properties, but the armor offers unique stats:
- -Increased melee damage .
- ➤Increased health .
- Increased counter attack resistance by 1 .
- ➤A successful confrontation attack can inflict horror opponents and make them run.
This is an excellent armor, primarily for clearing places with opponents. Use the confrontation attack bonus to kill more enemies. After that, you can deal more damage and get more health points in combat. Try to upgrade your armor on a regular basis by spending weapon crafting materials on a gunsmith.
A group of Straw Hats will appear on the estate and you can immediately test the armor by challenging them to a duel - press on the d-pad (do it before they get close!) to start the confrontation.
The Sakai Clan Armor adds 1 extra attack during the confrontation. This means that you can kill another opponent if you react before his attack reaches Jin. This bonus can be combined with other skills that also increase the number of confrontation attacks. Also, upgrading Sakai Armor to the highest level will add one more attack (total +2 standoff attacks).
After dealing with the opponents, talk to Yuriko and then start following her. You will learn from a woman how to make a gun.
Go to old fisherman's house which is on the other side of the lake. Once you get there, you will have to deal with a group of bandits (you can check out the improved standoff). Look to the shore and find cane, shown in the picture. Return this ingredient to Yuriko.
After a new conversation with Yuriko, get on the horse and follow her. Get to a new location, where you will be given the task to get 3 flowers . All of them are located near the fire - you will recognize them by their purple color.
Return with flowers to Yuriko. You will receive a new gadget - a pistol . This is a silent weapon for single attacks. For now, you can only use Poison Darts which contains a deadly poison.
You can select an arc from the drop down menu for ranged weapons. Use it to target one of two nearby enemies. A wounded opponent will die in agony. His companion will fall into a terrible state and start running away (you can kill him with a bow, for example, or let him get away).
After successfully testing the gun, return to Yuriko. Talk to her to complete the quest.
Quest Rewards : increased legend (xp) - bigger bonus, Sakai clan armor, Sakai mask
Ghost of Yarikawa

You receive this quest after completing the main quest. "Coward of Yarikawa" — the one where you had to ambush the Mongol convoy.
Return to Yarikawa Fortress and find Taka. After that, go to the tower. Use the stairs to get to the top floor of the building. Watch video.
When the Mongol attack starts, make sure you have armor that is good for close combat. Go to main gate . The Mongols will arrive here soon.
The most important thing here is to avoid red attacks. It is also a good idea to attack from the side or behind those Mongols who are fighting with your allies. This will significantly weaken or kill opponents. Beware of attacking enemies with shields that can set weapons on fire. Perform perfect dodges, use kunai daggers or proper stances to expose them to attacks.
north gate are located near the place where you fought in the first battle - get ready to fight with the new Mongols.
First, try to deal with all the nearby archers. This is important because they can shoot multiple normal and flaming arrows. If you have an open position of the Moon, choose it when attacking larger opponents. Keep fighting until you activate the scene with the image of the running Mongols. Unfortunately, this is not the end of the battle - the Mongol army will start using catapults.
Mongolian catapults located on a hill adjacent to the fortress. remember, that you can sneak in the way of siege machines (change armor if necessary). This allows you to avoid certain battles and calmly deal with individual Mongols. If you feel confident, you don't need to use trickery.
You can reach the hill by following the main path or by climbing the rocks. Use focused hearing to avoid being surprised by your opponent.
Sabotage catapults not difficult - just get to each of the siege machines, stand in the right place and press R2.
Catapults will be protected by opponents. Again, keep an eye out for archers and larger Mongols - defeat the latter using Luna's stance and kunai daggers.
You must return to Yarikawa Fortress to help destroy the Mongols. You can go to any of the gates.
Fighting the Mongols while descending the hill is completely optional. You can kill them, or you can just run away and only focus on the main target. A group of enemies will head towards the hill. Hide in the grass or jump over the stone shelves if you don't want to fight them.
After entering the fortress, head towards the hill with the tower. Along the way, you will encounter more enemies - these battles are optional. If you want to kill the Mongols, take advantage of the fact that they will be standing in front of the tower. This makes it easy to sneak up on them and perform a stealth takedown.
Before opening a new gate, heal the hero and put on armor suitable for melee , such as the armor of the samurai clan or the armor of the Sakai clan. Soon you will have a duel with the boss.
Battle Boss - General Temuge

General Temuge - obligatory boss - You will fight him when you come to the stairs leading to the tower. The other Mongols will not interfere. You can only use your katana in this fight. You cannot use bows, kunai daggers, bombs, or anything else.
As soon as the fight starts choose a water stand - She works best when fighting opponents with shields.
The General is a stronger "variant" of enemies with shields that can set fire to the weapon . You must dodge all of the boss's attacks. If an enemy hits Jin, he will be set on fire. Quickly double-tap the Circle to put out the fire.
The fight against General Temuge is not difficult. Perform 2 or 3 dodges to avoid his red attacks . They are relatively slow - you shouldn't have too much trouble clicking on the circle at the right time.
Look for an opportunity to attack the boss after every successful dodge streak . Press or hold Triangle while in Water Stance. Don't worry if your attack hasn't worked yet - you'll get a little closer to breaking the general's defenses. Do this a few times in a row and the boss will reveal itself for a moment, giving you a chance to deal some damage.
Things that can help you win this battle faster:
- Parry at the last moment using a skill Perfect Parry .
- Dodge at the last moment using a skill perfect dodge .
You can recognize a perfect parry or a perfect dodge by a short slow motion effect. After that, perform a quick attack that will be much stronger than usual.
When you defeat the boss, click on the square to execute him. Jin kills the defeated general and unlocks the Ghost Stance .
Time for a tutorial on using the Ghost stance:
- Press L3 + R3 to activate Ghost's "charged" stance . Jin causes fear in the ranks of enemies and is able to kill several opponents without problems. Enemies will not be able to retaliate or block your attacks.
- The first way to charge the Ghost position bar is kill enemy leaders .
- The second rack charging method is kill normal enemies without taking damage . Get multiple kills in a row to make the stance usable. The game also counts stealth kills with a bow, as well as other gadgets.
When you kill several Mongols with the Ghost Stance, the rest of the opponents run away. You don't have to go after them, although it will give you some "easy" kills. After winning the battle, watch the cut-scene that ends the quest.
Mission Rewards : Legend increased (xp) - more bonus, Ghost Stance unlocked, Main Quest » Paying for Blood" unlocked.
Bloody Fee
You can start this quest after completing all the previous main quests from the Toyotama region.
You must get to Lord Shimura's camps . Meet Shimura himself. Yuna then leaves the camp and goes to Koyasan Fort, located in the northern part of the region.
You need to get to the hill adjacent to the Koyasan Fort, find the interactive zone and conduct reconnaissance. You only need to look at the Mongols in the main courtyard.
Така appears in the same place - he wants to help Jin distract a large number of enemies from the fort.
Before heading towards the fort, wait a few seconds for a large group of enemies to start chasing Taka.
You can enter the fort through main gate , through which the opponents chasing Taku fled. This entrance is currently unguarded.
Reach the upper gate using the stairs visible in the distance. Remember that the fort is still guarded by several enemies. You can easily eliminate them or enter into direct confrontation. If you choose the first option, you can, for example, lure them with bells and use a longbow to kill at least one archer located above.
After the fight, head towards the hill that will lead you to an interactive gate.
After watching two cut-scenes you have to try to get free - do this by pressing the X button several times. The second attempt (made after watching the following cut-scenes) will be successful.
This is a very simple task - all jina equipment stored in the box shown in the picture above. This container is located near the place where the main character was imprisoned. You will not lose the items you had before you were caught.
There is a group of opponents in the courtyard - if you react fast enough, you can make a standoff. With it, you will be able to eliminate several of them before the start of the battle. Use the Stone stance when fighting other Straw Hats.
After winning the battle, move to the gate and leave the courtyard. Yuna appears.
Start with Yuna to the place where Jin was tortured. This will trigger a cutscene.
Get ready for the final battle of this mission . The Mongols will start appearing in the courtyard. Since the opponents reach the courtyard through the same gate, you can start the battle with bombs or fire/explosive arrows. This will allow you to weaken or kill multiple enemies at once.
Don't forget to match the stance with the types of opponents, especially the animals - defeat them using the position of the Moon. You also have to quickly deal with the archers.
Yuna can be knocked down by enemies and start to bleed - This will happen if she takes too much damage in a short amount of time. Quickly kill nearby enemies or use a smoke bomb to get to Yuna and help her before she dies. Win the battle and then watch the final scene.
Mission Rewards : legend (xp) increased, quest unlocked "The Fate of Tsushima" .
Fate of Tsushima
Important note: once you start this quest, fast travel won't be available for a while . You won't be able to explore the area or complete any side quests. After completing this main quest and the next three quests, the situation will stabilize. That is, you will again be able to freely explore the game world, complete side missions and use the fast travel option.
You can start this mission after you have completed the main quest "Blood Payment".» , which happens after you leave Koyasan Fort. You must return to Shimura's camp where you started the previous mission.
Lord Oga will stop you at the entrance to the camp. After you are allowed to enter, you can additionally talk to four allies in different parts of the camp - Lady Masako , Sensei Ishikawa , Norio и Kenji . Then enter the building in which resides Yuna . After the conversation, return to Lord Ogi and decide to leave the camp.
Get on your horse and get to the meeting point. When you reach your destination, dismount and head towards watchtower . Shimura waiting for you at the top of the watchtower. After the conversation, the assault will begin Shimura Castle occupied by the Mongols.
Heading towards Shimura Castle, you will have to take part in many battles. Their great convenience is that many allies on the battlefield . You don't have to attack all the Mongols alone, and you can also look for ways to easily get rid of those enemies that are currently fighting with your allies.
In particular, pay attention to larger opponents (Brutes) - there are good chances to kill them with a blade stab in the back. Don't forget to activate the ghost stance, which will allow you to kill 2-3 enemies without any problems.
Get to first locked gate . A short cutscene will be shown showing the use of the battering ram and the destruction of the gate. As you enter a new location, engage in further battles and focus on effectively eliminating enemy archers.
Second gate will be destroyed soon. Keep looking for archers and easy targets, i.e. opponents that are currently fighting your allies.
archers on walls as shown in the figure may cause problems. You have two ways to deal with them - you can try using a bow (best to shoot from a long distance and stoop from behind cover) or use the left ladder to get to them and take them out in hand-to-hand combat.
In any case, you will have to climb the aforementioned walls in order to conduct reconnaissance and get to one of the shutters.
After watching the video, you will find that the Mongols use hwacha launchers, and this is a threat that you have already faced in one of your previous missions. The hwacha launcher will track Jin as the main target . Hvach operators will try to bombard the hero with arrows.
The best tactic is to ignore enemy fights and keep going. escape to the tower where is the Hwacha launcher located. Rely on evasion when necessary and don't worry about surrounding enemies because many of them will be attacked by your allies. Climb the stairs to the tower and defeat the two Hwacha Operators.
After you eliminate the Operators, interact with the Hwacha Tower to use it and bombard your opponents. Aim at large groups of Mongols that will appear in the way of your allies. Also destroy explosive red barrels. Luckily, you won't be punished anyway, even if you accidentally shoot one of your comrades.
Use the hwacha launcher until all visible Mongols have been defeated. Exit the tower and join Shimura and his men.
In the new part of the castle, you will have to resume intense battles with the Mongols. This time your task is to break through the enemy forces and get to of the bridge . As in the previous battles, try to attack the enemies that are currently engaged in fighting your comrades. If necessary, help yourself with bombs, kunai, or even change stance.
The heroes must reach the gate that separates this part of the castle from the bridge. The gate is closed, but your objective is connected to something else - climb the ladder to reach the watchtower.
After watching the first scene, shoot some arrows towards the burning horse. Unfortunately, you cannot stop this completely. Another splash screen will be shown. This is the end of this mission.
Mission Rewards : Legend Boost (XP) - higher bonus, unlocks the main quest From Darkness .
From Darkness
This mission will start automatically after completing the main quest "The Fate of Tsushima" . In the meantime, you can not return to the free exploration of the game world . First you must complete this task and the next main quest. Start the mission by meeting with Young .
Yuna will give you the Ghost armor, the Ghost mask and the Ghost headband. . Of course, only armor will have some stats. We highly recommend that you equip it during this mission. This armor has several important features, namely, it delays the detection time of enemies while running around, it reduces the number of kills required to unlock the Ghost stance, and it increases the chance of inflicting fear on your enemies. In this quest, you will only need the first bonus of this armor.
The correct task will begin after sunset. You must remain stealthy during this mission. . If you are spotted, the mission will not fail immediately, but you need to get rid of the enemies quickly before they can cause an alarm in the area.
Don't jump into the water because it will automatically complete the mission. Go to the right, that is, to the bridge bombarded by the Mongol archers. You don't need to enter the bridge, but you will have to walk next to it. Jump and grab the first hook using grapple. Jump onto the second hook. Swing on it too and jump over the rocks under the bridge.
Cross the waterfall while walking on the fallen tree. You must make a jump to the remote hook and press the latch button (R2) on the fly. This is shown in the attached picture. Climb up the cliff to a higher rocky ledge.
You must then jump to reach interactive edges visible in the distance. Start moving to the side on the cliff. Once you've reached the last edge, jump up and grab a new hook. Use the grappling hook to reach a higher ledge.
At the very end of the climb, you have to get to the place from the picture, make a jump, running to the hook, and grab it by the hook. Swing a little and jump to a new ledge. You will be right next to the open shutters of the first fortress .
You have to eliminate the Mongols located on three floors of the fortress. There are two opponents on the first floor . A safer option is to wait until they leave and sneak up behind each of them individually.
If you have an unlocked skill "Chain Kill» , you can wait for your opponents to stand next to each other, walk up to them and press the Triangle button twice to get rid of them both in two consecutive executions.
You will reach the first floor via stairs and there is 1 enemy there. . Help yourself with a focused ear and take action as soon as it goes in the opposite direction.
On the second floor there are two Mongols . Reaching them with the ladder can be dangerous, because one of the opponents looks at the gap with the ladder from time to time.
The solution to this problem is to squeeze through the hole in the wall on the first floor and climb to the lower parts of the fortress roof. As with the enemies on the first floor, you can hide and wait until the Mongols leave, or sneak up on them quickly when they are next to each other to activate Chain Kill .
The intelligence site is located in one of the corners of the balcony on the second floor of the tower. Traditionally there are several areas to discover and explore. The most important one is shown in the picture - this is the place where you have to go to add poison to the milk supply. Also, take a look at the path leading through the garden, straw hats and Mongolian fortifications.
Jump on the bottom of the roof but don't jump all the way down . Instead, choose to cross the first hanging rope . This will lead you to the watchtower with the first archer, which you can easily kill. After a successful execution, walk along the second hanging rope.
Land at the back of the tent and you will be taken to safety. Turn on your focused hearing for a moment and make sure no one is looking at Jin. Go straight and go through gap in the wall to get to the next area.
At the new location, climb onto the tent and take another opportunity to walk the rope. This will allow you to bypass some of the guards without having to attack them.
After reaching the last tent, wait for the arrival of one guard (as shown in the picture above) and jump on it. Thus, you can easily get rid of it.
Start making your way to the left yellow dot. You should not be detected if you sneak behind a traveling guard when he is looking the other way. A successful action will allow you poison the first supply of milk .
Go around the main camp on the left and try to stay in the shadows. Once again, wait for a good moment and approach second supply of milk . A cut scene depicting the poisoning of the Mongols will be shown.
you don't have to sneak around anymore. Take the opportunity to kill multiple opponents and upgrade your decision.
Before entering the main fortress, don't forget to put on good melee armor, because a new boss fight awaits you .
Ryuzo boss fight
Instead of Khan Ryuzo will wait for the hero in the main fortress. You already had a chance to confront this character in the first act of the story campaign. The main difference in this battle is the fact that this time you will be able to kill Ryuzo by winning a duel with him.
This duel will not surprise you with anything new compared to the previous battle against Ryuzo. What's more, you should be able to win more easily because you've been able to gain new skills and better gear since the last fight.
Ryuzo can use the following strikes and attacks:
- Standard attacks - You can easily block or parry them.
- Red attacks - You must dodge or jump to avoid getting hit. These attacks cannot be blocked or parried.
- Blue attacks - By default, you should behave the same as in the case of red attacks, that is, use dodges and jumps. An exception is the situation with Unyielding Sword Parry . Having this at your disposal will allow you to parry blue attacks.
Ryuzo can use combo attacks . The most important of them are:
- Red attack combined with blue attack.
- A red attack followed by a strike and 1 or 2 blue attacks.
Always make sure that after correctly dodging a red attack, you are immediately ready to block or (better) parry the next attack/wave of attacks.
You can deal a small amount of damage to Ryuzo by launching 2-3 attacks after each successful parry. The fastest way to weaken the boss is to rely on a perfect sword parry and perfect dodges . Of course, you must have the appropriate skills to use these movements.
After Ryuzo loses all of his health bar, you can watch an episode where Jin kills his old friend. After a moment, you will see another cut-scene that ends this quest.
Rewards for completing this quest : Increased Legend (XP) - more bonus, Ghost Armor, Ghost Mask, Ghost Headband, Unlocks Honor and Ashes main quest.