
Passage of the game Lost Lands 9: Tales of the First Brotherhood 100%. All the secrets, puzzles, mini games, collectibles and achievements in one place...
Creaks Walkthrough Guide
0
Our detailed Creaks walkthrough contains the location of all the paintings and solutions to all the puzzles that you will meet on your way to Creaks.
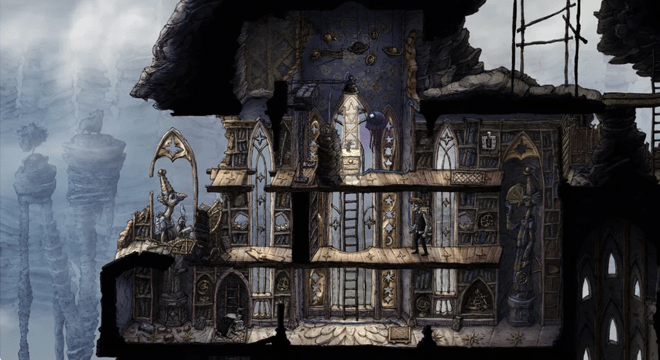
Creaks is the latest adventure game from Amanita Design. She has you going up and down stairs, wading through creaky floors, and avoiding robot dogs that turn into furniture. This is not a point-and-click adventure, but more of a puzzle platformer. The game can be difficult, so this guide will help you if you get stuck. Feel free to ask for more help in the comments section.
Creaks - Game Guide
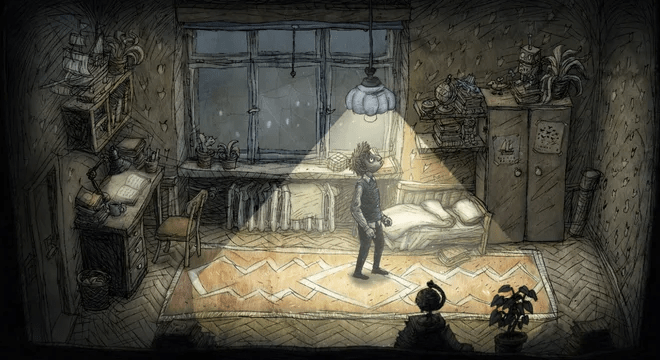
After the faulty bulb starts flashing, touch it by pressing the space bar. At this point, a mysterious door will appear on the wall.
Interact with the door and your journey will begin as you descend the stairs...
As you descend the stairs, the camera will zoom out to reveal a massive castle that has appeared nearby. Keep going down and you'll get more hints on how to get off the stairs, down the ledges, and jump over the pits.
This level is quite short since it's meant to teach you basic controls, so just keep following the path until you head down a ladder that leads to the next scene.
Scene 2
Here we present your first threat: the robot dog! These guys will be alerted to your presence when you walk on the same floor as them. When you get close enough, they will jump into the air and start chasing you.
Notice the small crack in the floor in the lower left corner of the room? You will need to get the dog's attention and get him to chase you and then jump over the gap. This way you will be able to climb up the second path and back to the exit.
Scene 3
Another dog is here. Go down the middle stairs, but not to the very end - get off in front of the dog. Get chased and run to the left, dropping down when you get to the hole. Climb the middle stairs and run to the right before the dog comes back.
Climb the stairs to the right, then you can reach the handle that raises the barrier. Jump down, then cross the gap to continue forward.
As you move forward, the plank in the wall will fall, revealing a small hole. If you look through it, you will see a light bulb with a dog refusing to walk through the light. Take advantage of this…
Either way, you will eventually climb into a room with two barriers that can be manipulated. Climb the ladder on the right and use the crank to lower the right barrier and raise the left one. Go down the middle stairs and lure the dog to the middle.
Use the handle again to raise the right barrier, then lure the dog all the way to the right. Use the handle to catch the dog from behind and move forward.
Scene 4
As we thought, dogs cannot enter bright light areas. Lower the stairs to the lowest floor and click on the chest of drawers to make a step. Head up the stairs and after a short cutscene, the dog is chasing you again.
Leave a hole. There are two dogs on the lower level and you will need to herd them on the right side of the room as you need to cross the gap on the left side. Use ladders to do this while keeping yourself safe.
Climb the ladder, then go straight to the right to use the crank. This will build a bridge at the bottom, but it will also attract the dog. Lure her to the left, then go up the stairs. Hit the switch and if the dog gets into the light, it will turn into a chest of drawers!
Slide the cabinet under a ladder that doesn't quite reach the floor. Climb up it and then go down to the next scene.
Scene 5
You will be presented with a peculiar picture. Lower down, then turn on the light switch to turn the dog into a chest of drawers. Jump over it and hit the next switch, creating an overlapping light. You will need to turn off the first switch, then turn on the third switch, and then turn off the second switch.
If you do it right, you will end up on the right side of the dog closer to the right switch. It will turn off, but the other switch you flip will turn it into a chest of drawers. Once you place the dog under the rightmost light, you can use the chest of drawers to get to the stairs.
Scene 6
After the splash screen, click on the switch to transform the correct dog. When you get to the next dog, go up the stairs and pull the chest of drawers on the switch to turn on the light.
Next comes the room with two dogs. First enticing the bottom dog to follow to the left to keep it under the light. Then lure the top dog to the left as well so that it stops at the switch. By transforming the bottom dog, you can move to the right safely.
Now you have to do it the other way around. Lure the top dog to the right to lead him to the lamp. Have the bottom dog run up to you and stand on the button. The top will turn into a cabinet. Use it to jump up the ladder.
Scene 7
This is a tricky room. First go to the room with the handle and use it to free the dog on the right. Wait until the dog returns to the right, then go down the stairs and pull the left and right dogs.
Quickly make your way down the stairs, and if you're fast enough, both dogs will stop at the floor switches next to the middle stairs, creating a safe passage through the bottom room.
There are two dogs in the next room. First, lure the top dog to the left by jumping down, and then to the stairs, on the button. While the bottom one is turned into a cabinet, jump up to the stairs.
Scene 8
Upstairs, the first closed painting awaits you. Inside each such picture is a puzzle or a mini-game. In this case, you just need to jump over obstacles.
Moving on, you will come across a three-story room. Use the crank to drop the bridge, then jump down the hole to the bottom floor. Activate the light switch to turn the dog on the left.
There is a second light switch that activates a lamp in the middle of the room. Lure the dog under you and keep the chest of drawers there. Use the crank again to drop the bridge, blocking the light. The dog will then return to the left and step on the switch, transforming the top dog and opening the way forward.
Scene 9
Use the handle on the top level to drop the bridge on the middle level. While the dog is still distracted to the left side, quickly go down the stairs and cross the bridge.
Jump down, then go up to the upper level. Use the left lever to lower the barrier. Use the crank again to raise the bridge, then raise the barrier. Walk around the dog, then lure it into the light and push it under the stairs.
Drop the barrier and cross the bridge again, then raise the barrier. Lure the first dog all the way to the right, also transforming it. With both chests of drawers, you can have one on the light switch and one under the stairs. There is one more picture you can explore before moving on.
Scene 10
Here's a new enemy: shadow jellyfish. These guys are quite cold and not afraid of your presence, you just have to get around them as they just move back and forth along a fixed route.
Walk down, then climb up the right stairs to pull the lever to open the bottom left door.
Scene 11
Regarding jellyfish, it should be noted that they can hover over gaps in the ground. With that in mind, pull the lever to raise the middle barrier. When it's safe, go over and pull the other lever to raise the right barrier. Go to the bottom right exit.
Scene 12
Go to the right side switch and wait by the light. Medusa cannot cross you, so she will go higher. Climb up and pull the lever to open the path ahead and examine the painting if you wish.
On the way back, use the left light switch to be safe.
Scene 13
After the cutscene, you will find yourself in a three-story room. Click on the switch below to release the jellyfish. She will go to the right, then she will go higher, which will lead to an interesting interaction − the jellyfish will push the dog to the left.
Press the middle switch when the dog is fully abandoned to transform it into furniture. Use the lever in the upper right corner of the room to lower the bridge, then let the jellyfish through again using the switch on the bottom floor.
When the bridge falls, the jellyfish will go down instead of going up. She will push the dog all the way to the left, so quickly go down the stairs that the dog was guarding.
Scene 14
You are in a large four-story room. Go down to the second floor and press the light switch to make the jellyfish go up. Once she reaches the top, she moves to the left and pushes the dog onto the light switch.
Before returning to the second floor, jump over the middle gap and use the light switch on the right to turn off the lamp, then head back downstairs. Make the jellyfish go up again and this time step on the floor switch to make the jellyfish turn right to turn the right top dog.
Turn on the lamp on the fourth floor again before heading down and then make the jellyfish go up. Hit the floor switch again and this time the jellyfish will go straight down and to the right, turning the last dog in the room.
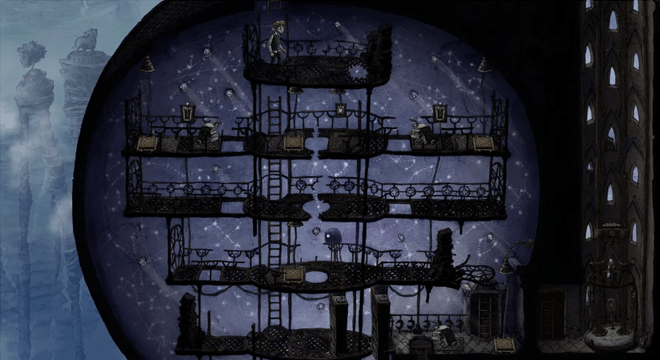
Scene 15
You will enter the planetarium. Go down to the level with the jellyfish. When she is on the right, stand on the button. Medusa will rest, fly up and push the dog to the left. Repeat with the button, but this time quickly climb up behind the jellyfish and stand on another button from above to make the jellyfish fly to the right. Activate both levers on the two pedestals. Press the switch on top so that the jellyfish cannot fly to the right. Lift it up again, follow the same path again and press the button. When the jellyfish rises, there will be burning lamps to the left and right, so it will fly down and push the dog. Use this to go down the stairs.
Interact with the closed picture. You need to select notes on the right and play them by pressing the "Space". If the correct note is chosen, the dog will raise its head and bark happily. The first note is the top note. And then you'll figure it out.
Scene 16
Another four-story room to solve. Use the switch on the first floor to turn off the light. Wait for the jellyfish to move, then go to the left side and use the switch to turn off the left light.
Medusa will be on the first floor, so turn on the light switch. She will be forced to go up and to the left along the second floor. When she passes the light switch, turn it on. Medusa will go down, then to the right. Before she leaves to the right, turn off the switch on the first floor.
After passing the first floor lamp, she will turn around and go back, so turn on the light again. With the lights on on both the first and second floors, the jellyfish will rise to the fourth floor and position itself directly under the lamp, so turn it on to transform and press the floor switch.
Scene 17
Pull the lever in the middle to use the new view of the device. This lamp works like a regular lamp, but you can move it left and right. For now, leave it covered with an umbrella. Free the jellyfish by stepping on the floor switch.
Jump down to avoid the jellyfish and release it to the left side of the room. Quickly head up the stairs and use the lever to move the lamp all the way to the left to transform it to use it as a weight switch on the floor.
Scene 18
Use the lever to move the lamp all the way to the right where it is blocked from reaching the bottom floor. Draw the bottom dog to the stairs, then use the lamp to push the dog to the left, but NOT onto the switch.
Move to the right and lure the top right dog into the middle of the room. When the top dog returns to its original position, quickly run back to the lever and then press the bottom dog against the floor switch to catch the top dog underneath and transform it.
Another picture is waiting for you.
Scene 19
Three story room. Use the lever on the bottom floor to push the top dog to the left onto the floor switch. Seduce the dog on the middle floor to the left to the top of the switch, then jump down and walk around the dog. There is a staircase guarded by a dog, in which there is a small room with paintings.
After you're done looking around it, move to the left - a hidden floor switch will raise the barrier, allowing you to return back to the main room. Slide the top dog onto the left switch using the lower floor lever to free the dog on the middle floor, but move the lamp back to the right so the dog has some room to move away from the floor switch.
This will prevent the middle dog from returning to a neutral spot on the right side. Lure the medium dog onto the left floor switch, then use the lower lever to move the lamp to the left, chasing the dog under the lamp.
Another picture is waiting for you, but this time it is interactive. This time you need to defeat the knight in a duel. The right lever attacks while the left lever repositions your shield. Watch the enemy's stance - if he has a high sword, a high block, and so on.

Scene 20
Another three-story room. Press the switch immediately in front of you to turn off the lamp above the switch in the upper left corner of the room. Go down the stairs and turn off the lamp to let the jellyfish through.
Turn it on and the jellyfish will rise. When he is above you, move to the left and lure the dog to the right so that he is next to the light. When the jellyfish comes back down and reaches the dog, it makes its way to the top floor. When she is above the switch on the floor, press the switch on the top floor to turn the jellyfish.
This will also turn the dog on the middle floor into a chest of drawers, allowing you to get to the aviary.
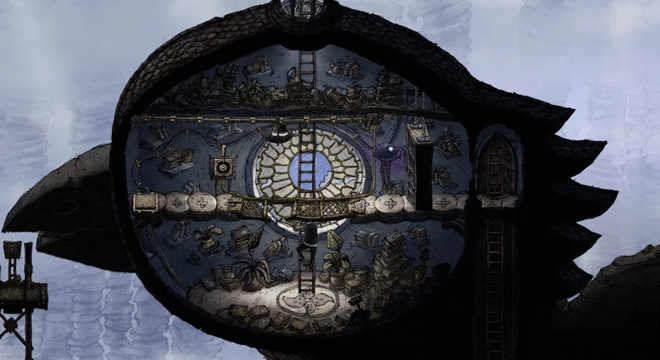
Scene 21
You will meet the bird for the first time. You need to return the book that fell to the dog. Go downstairs and turn off the light. When the jellyfish flies to the left, turn on the light. When the jellyfish flies up from the light, lure the bottom dog and stand by the lamp. Wait. The jellyfish will rest against the dog, which rests against the lamp, and then will fly up. When this happens, go up the stairs to the same place and turn on the light by pressing the switch. You need to do this so that the jellyfish turns into a stand right on the button. Go to the dog that has become a pedestal.
Scene 22
First, let's get to the picture. Go down, activate the lever on the left. Run to the button on the right and stand on it. Medusa will push the dog right on the button. Get off the button, climb up and jump towards the painting. Now go down to the bottom button. Let the jellyfish again push the dog to the button. Block it by stepping off the button. Wait for the jellyfish to push off the cabinet (behind which there is a dog on the button) and fly up. Get off the button quickly. Having done this, run to the lever and close the left cabinet. Medusa will return down, fly to the left and rest against the closet with the dog. Then she will turn around and fly right down and push the dog away from the stairs leading to the exit. Use this moment.
Scene 23
Call the elevator for the dog to arrive. Climb up quickly. The bird will give you the device. Now you can activate it on CTRL. This device turns on/off lamps or raises/lowers bridges or bookcases marked with a green icon. You will use this mechanic in the near future. Lure the dog under the lamp and turn it on CTRL. Ride the elevator.
Scene 24
You will find yourself in a room with a large clock. Go downstairs, turn off the light on CTRL and lure the dog to it. Turn on the light, turning it into a nightstand. But move this cabinet to the left so that it is not on the button! Climb up, jump off to the left and lower the lever inside the clock on the left. Turn off the light to make the dog walk to the right, then quickly turn it on with CTRL. The dog will turn into a cabinet and close you. Medusa will hit the wall and fly up. You turn off the light on CTRL so that the dog moves away from the button. Exit and hit the switch when the jellyfish is above the lamp on top. Go down, go up to the jellyfish and set it on the button. The way out is open. Go downstairs and lure the dog under the lamp by manipulating the light (switch off and on when the dog is under the lamp). Leave this level, but to get there to the secret room, jump off the lift to the left. There will be a normal picture.
Scene 25
Go down to the hall with four dogs. There is a central staircase that can be used to get to each. Jump to the upper right dog first and lure it to the edge. Get down below. When the dog walks back over the lamp, jump on the button on the right. Having done this, lure the lower right dog onto this button. Hurry up, go upstairs and jump on the top left button. Lure the nearest dog to her. Finally, jump on the bottom left button and lure the dog onto it. From a safe location, rotate the device by pressing CTRL to turn on the lamp behind the last dog. All dogs are locked on buttons. Move the cabinet from the button to the left so that the light at the top goes out. Climb up to the fifth dog, lure it to the right and stand under the light of the lamp. Press CTRL to turn off the lamp. A chain reaction will begin, all the dogs will return to their places. The latter will follow the button and highlight the top one, turning it into a cabinet. Move to the right and go upstairs.
Scene 26
At the new level, immediately inspect the painting on the left. Cross the bridge, activate the lever and get into the hall with the organ. You have already been here. You need to go up to the right side. On CTRL, turn on the lamp so that the jellyfish turns into a stand. Place it on a button. Climb up to the dog so that he runs to you. Follow even higher, to the right and get to the button behind the dog. Jump on the button and then back to the right. When the dog stands on the button, press CTRL to release the jellyfish by turning off the light. The dog will be locked on the button. Climb up and to the right and stand on the lowered cabinet next to the painting. When the jellyfish is on the button, turn on the lamp on CTRL. If the stand is on the button, the dog will be released. It will come off the button, and the cabinet you are standing on will lift you up.
Scene 27
Activate the closed painting. You need to hide behind bushes, trees and from a couple in love. Move at the moment when the enemies have their backs turned to you. There will be three parts of the puzzle.
To go further, you need to lower the two parts of the bridge. There are puzzles at the top and bottom, and you can complete them in any order. To get started, go up. There will be one jellyfish here. Go right, down, left and go up the next ladder avoiding the jellyfish. Hit both switches! One will turn off the light on the button below, and the other will turn on the light at the lever on the right. Go down to the lever and lower it. You will lower the bridge. When the jellyfish flies to the right, raise the bridge. Wait for the jellyfish to hit the light near you and fly up. Go to the button on the right to climb back up. Run to the stairs, go up to the switches and turn off the light at the switch next to the lever. Jump down. Go down to the lever after a jellyfish visits near it. Wait for it to hit the raised bridge and fly down. Close the bridge. Medusa will be in the corridor with the button. Follow the switch and turn on the light above the button at the moment when the jellyfish is there. She will press the button, and you can get to the lever and lower the first half of the bridge.
Scene 28
Get down. There will be dogs here. You need to install two dogs in the form of pedestals on two buttons. First, move the lamp to the left. Go down the right stairs and lure the first dog to the left. Climb the left stairs, press CTRL to raise the cabinet. You will ban the dog between the closet and the lamp. Slide the lamp onto the dog, turning it into a nightstand. Remove the bookcase on CTRL, move the lamp and the dog to the right, as close as possible to the right stairs. Lure the left dog there and pinch it again between the light and the pedestal. And then move the pedestals and the light so as to arrange them into two buttons. You can go down the stairs on the right and get to the elevator. Activate the lever to open the second bridge.
secret room. There is a secret room in the room with the dogs that you put on two buttons. On the floor with these dogs, go through the gap in the wall on the right. There will be a simple painting in the secret room.
Scene 29
Next, you will encounter a new type of enemy. They go where the main character is going. Go to the stairs on the left, down, up the stairs on the right, left along the upper corridor, right (so that the enemy goes all the way to the right), and then go back and jump off the ledge to the left. There will be a second enemy. Don't touch the lever. Go down the stairs, take 1 step towards the enemy, go upstairs and go to the lever. The enemy should be behind the closet. Lift this cabinet with the lever. Go down, to the left and all the way to the right. Return to the lever, remove the cabinet. The enemy will be a couple of steps to your right. Climb down to the button, jump to the left. The enemy will stand on the button, and you can leave the level.
Scene 30
There is one enemy. It must be put on the button under the lamp. Turn off the lamp immediately. Go to the wall to the right to be slightly to the right of the enemy. Climb to his floor and call the right elevator with the button on the right. Go left, down and left. Then go right. The enemy will be on the elevator. Follow the left, call the left elevator and go upstairs. Move to the right. The enemy will again fall on the right elevator. Call him upstairs. Move left and down the stairs. Go down to the right to match up with the enemy. Climb to the second floor and call the right elevator with the button on the right. The left elevator should be on top. Get down. You must be to the right of the enemy so that when moving to the left, he ends up on the left elevator. Call him down, go right and lure the enemy to the button. Turn on the light on CTRL.
Scene 31
First, go to the painting on the left. Then turn off the light, go all the way to the left, then all the way to the right. After that, press the switch again. The light on the right will turn on, but the enemy will not fall under it. Move all the way to the right. Be sure to (!!!) go down the stairs a little lower and take one step to the wall on the right. It will be enough for you, having risen, to stand at the switch, and the enemy was on the button. Turn on the light above him, go down to the closed picture and repeat the movement of the leader by pressing WASD.
Scene 32
After going down, immediately go behind the wall to the right, to the secret room with the usual picture. Go down to the pyramid. Turn off the light, go left, down and up the two stairs. Jump over the button and go up the right ladder. Jump over the button again, but don't go down. Instead, jump to the left, to the top stairs. Take one step (!!!) to the left of the stairs leading up. Now the distance between you and the enemy will be 5 cells. Climb the stairs, jump to the right, down to the switch and click on it. By turning on the light, you fix the hanger on the button. Go left.
Scene 33
Next, you will enter a room with 6 hanger enemies! Go right, up the stairs. First go to the right of it, and then to the left to the lever. Click on it to lift one opponent. Walk right and left to the lever. Drop the enemy. Go down the stairs and jump down. You should be between the hangers. Move to the right, go up another ladder (the second one), go all the way to the right, and then go left. Activate the lever to lock all the enemies to the left of the cabinet. Walk a couple of times to the right and left, lower the cabinet, jump down and go to the far stairs.
Below will be a closed picture. To win the mini-game, you need to use W/S on one hunter and A/D on the other. Raise and lower their pistols, shoot the animals at the Spacebar. There will be three phases. At the first stage, one enemy appears from different sides, at the second - two, at the third - three.
Scene 34
In the next room, go upstairs, go right to the hanger and push it out from under the light, being on the right side. When the monster appears, he will not be able to grab you, because the hero will be in the light. Go right and left. First you need to turn off the light on the lamp with a green icon, and then turn it on when the enemy is on the button. Having done this, go down the stairs and jump to the button on the right above the suspended load. Click to turn off the light and create a second monster. At the bottom, call the elevator (if it is on top), go to the top to the right, and then all the way to the left. The enemy will be on the elevator. Call him upstairs. Now you need to make sure that both enemies are under the light (turn it off first). When you have done this, place the hangers two squares apart so that one of them is located on the button. Climb down to the platform by the suspended loads. Stand on the left. Turn off the light and go right. Due to the correct distance, two enemies will activate two buttons in a row. You will drop loads and move to the right. Ride down the lift.
Scene 35
Press the switch and CTRL to turn off the light on the right side of the room. Go downstairs, move the hanger from the light to the right, keeping to the left of it. Take a step to the left to create a one-cell distance, and walk to the right. Turn on the light on CTRL when the hanger is under the lamp. Slide it to the right from the button. Stand on the left by the rising cabinet. Turn off the light and take a step to the left to stand on the closet, and the hanger is on the button. Turn on the light, jump to the left and push out the stand to reveal a jellyfish. Drop down to the hanger to the right of the closet. Do not turn off the light, but first push the hanger to the left! After that, go all the way to the right to create the desired distance. Now you can turn off the light. Stand on the button while the hanger is on the cabinet. Medusa will rest against it and fly up. Climb up the stairs, and when the jellyfish flies by, stand at the switch. Click on it once the jellyfish is over the button. You activate the exit. It remains to lure the hanger into the light and go down. On the way, activate a regular painting.
Scene 36
Upstairs, a closed painting awaits you. This time you will have to control the dog, running under the lamps turning on and off. At each level, memorize the sequence of switching on and off, and only after that move. At later levels, you will have to go back.
First, on CTRL, turn off the light. Then turn the handle to lower the platform. Climb down and go right to the lamp. Turn on the light to create two hangers. Spread them around the edges. There should be 3 cells between them! Turn off the light, standing in the middle between them, go to the nearest stairs, go upstairs and activate the elevator. Go down the lift. You will again be between two hangers. Go right, activate the lever, go left and go down the stairs. Do not rush to use another ladder, but go to the secret room left. There will be a normal picture. Down the stairs you will find another simple painting.
Scene 37
Upstairs, a closed painting awaits you. This time you will have to control the dog, running under the lamps turning on and off. At each level, memorize the sequence of switching on and off, and only after that move. At later levels, you will have to go back.
First, on CTRL, turn off the light. Then turn the handle to lower the platform. Climb down and go right to the lamp. Turn on the light to create two hangers. Spread them around the edges. There should be 3 cells between them! Turn off the light, standing in the middle between them, go to the nearest stairs, go upstairs and activate the elevator. Go down the lift. You will again be between two hangers. Go right, activate the lever, go left and go down the stairs. Do not rush to use another ladder, but go to the secret room left. There will be a normal picture. Down the stairs you will find another simple painting.
Scene 38
Turn on the light to stop the hanger. Go down the stairs and open the closed painting. There are several different rooms here. You are interested in rooms with a statue of an elephant, a man and a pipe. Find the pipe and use it to get the knight out of the way. You may have to use the elephant statue first. If so, then later use the statue again to create a bridge. Then go to the statue of a man and interact with it. You will move the bookcase, but you will have to hurry, go past the statue of the knight, cross the bridge and use the passage until it is covered by the bookcase. After doing this, you will reach the elevator. The cat is already at home.
Scene 39
Follow to the left and find yourself in a room with a lot of gratings. Click on the nearest lever. Press CTRL to turn off the left lamp and turn on the right one. Walk to the right so that the hanger stands on the button and lowers the cabinet. Take another step to the right. Both hangers are now side by side. First you need to raise the cabinet and the upper arm of the male hanger. It's simple. Then put a female hanger to the left of the lamp and turn it on. She will not be able to pass, and you can lure her to the closet and lift her up. Lure the hanger under the right lamp (male) and turn it on CTRL. At the same time, the female hanger had to rest against the light of the left lamp. Both the one and the other hanger have 5 cells to the buttons and six to the cabinets. Turn off the light and go to the right so that both hangers go upstairs. And then put them on two buttons located next to each other.
Scene 40
You will see new creatures - goats. The goats run away from the main character, but if they are at a dead end, they will become aggressive and attack when approached. If there is no threat, the goat goes to the nearest grass. Walk to the right and push the goat against the lever. Climb up the nearest stairs. When the goat leaves, go down and activate the lever. Go to the goat. Let her jump up. Follow her up the stairs. She must rise above. Go there and the goat will jump down to the grass above the lever. Go down the left ladder, go up the ladder at the lever so that the goat jumps under the lamp. When she stands under it, turn on the light on CTRL and climb up to the stairs with the help of a chair.
At the top there will be a closed painting. Use it, then press Space several times to lift people up and through the ring using A and D.
Scene 41
Follow the goat. The book will fall down. Jump down and to the right. Climb up and ride the elevator. Get to a large room with several levels and a goat. Lower the plate with the lever first. Then go to the goat and go down the stairs next to it. When she calms down and approaches the grass, follow her up. She jump up to the left. Go down to the lever and lift the plate in the center. Jump on top to go around the goat and scare on the left. She will fall down and to the right. Use the lever to lower the slab, go up the stairs and lure the enemy onto the slab on the left. She will jump higher. Climb up the same ladder to make the goat jump even higher. Use the lever to lift the slab, go up the stairs, and the goat will jump on the slab to the left. Turn on the light and use the chair to jump up to the stairs.
Scene 42
There is a lever on the right, behind the skeleton. Lift it up to open secret room with the usual picture. Ride down the elevator and use the closed painting. You need to please every viewer. Press "Space" to switch between viewers. Everyone has a light bulb above their head. Number them from left to right from "1" to "4". For the first and fourth viewers, you need to raise the sound (W), for the second and third, lower the S. Everyone should shake their heads and dance.
Scene 43
Soon you will come to a cave with three goats. Climb down and press the lever. Let the goat come to you. Go around it on top and press the lever again to lower the fence. Go around the goat on the right and make it jump onto the fence and be on the second tier. Climb up to it, move up the stairs to the upper left goat. Just wait for the bottom one to return to the pasture on the right. Drive it to the right on the button and climb up so that the top goat jumps down. Drive both goats into the paddock on the left and close by pulling the lever. Climb up to the third goat and drive it down. Free the two goats, raise the fence, and then drive all three goats down. Drive them into the lower left corner and close. Leave the level.
Scene 44
You will find yourself in a hall with two goats and a dog in a wheel. Drive the goat down, follow it up. Drive the goat to the right. She must graze on the lower grass. Drive her closer to the dog in the wheel. The light will turn on. Push the chair towards the wheel to make a goat appear. The dog won't stop moving. Go down the stairs and exit the level. Get to the regular painting. Pull the lever twice to make the bird find the book.
Scene 45
Raise the wall and go left. After descending, activate the lever on the left. Climb back. There is a staircase here. She leads to the secret room with the usual picture. Climb down and chase the goat up, sneaking up on the left. Climb up and drive the goat to the button on the right. Run fast and stand on the button on the left. Goat and dog must apply. Wait. When the goat approaches the cabinet, get off the button. The dog will get angry and drive the goat down. Get down. Have two goats stand on the grass. Press CTRL to turn them into thumbs. Move along the edges of the illuminated area and stand exactly in the middle. Goats must be left and right in the same cell from the hero. Turn off the light, the goats will stand on two buttons at the same time. Climb up the stairs.
Scene 46
Open the closed painting, use A and D, and use Spacebar to speed up to swim, and then fly through the rings. At the end, you will need to hit the ball so that it falls into the ring.
Scene 47
Go down and watch the cut-scene. It cannot be missed. Follow the only route, then follow the bird and you will find yourself in tunnels under water. Walk to the right and go down the stairs. go right behind the barrels, to the secret room with the usual picture. Turn off the light, climb the right ladder and the trunk will bend in your direction. Turn on the light. The water will flow to the right. Jump to the lever and activate it. Do the same, but for the water to flow to the left. Walk left and down.
Scene 48
Let the trunk lean towards you and turn on the light. Climb down, pull the lever to make a pipe appear, and then jump to the island to the right. Walk to the left and you will see that the hanger has risen under the lamp. Turn off the light and turn it on again on CTRL so that the water flows down. The light will turn on, which will trap the hanger. Walk left, push the hanger to the left of the light. Go down, go left, then right, up and right. The hanger will be on the left edge. Turn off the light and you will see that the trunk also reacts to the hanger. Turn on the light so that the water flows to the right. You can leave the level. But before you go down the stairs, jump to the right, to the secret room with the usual picture.
Scene 49
Climb up the nearest ladder and jump to the button on the right. She will start the timer with the lamp. Go down, go left so that the hanger rests on the lamp. Then go right so that the hanger is on the left edge. By doing this, you will see how the trunk deviates towards the hanger. Fix it with a lamp (CTRL). Jump to the island on the right, go all the way to the right and go left. Get up and step on the button again. Until the time runs out, jump down, jump on the two islands to the right and return to the left. When the time runs out (and the light above disappears), jump to the left and go up the stairs. Stand on the left side. The hanger will be on the right. On CTRL turn off and turn on the light. Both trunks now pump water at an angle. Activate the button and select three islands from the location.
Scene 50 (End)
Get to the glowing crystal and watch the video. Get back on the water. Just follow the bird to the surface. Get to the top left point and jump down into the mouth of the beast.
To be continued!
Was the article helpful?
 Thank you very much!


