Continuation of a series of popular wrestling simulators, made under the license of WWE. On the cover was John Cena, whose career is dedicated to the story campaign. Players will be able to fight him in his brightest battles. The main innovation is the WarGames mode, in which players can fight each other in 3v3 or 4v4 formats.
Fix: WWE 2K23 keeps crashing when launching on PC

Developed by Visual Concepts and published by 2K Sports, WWE 2K23 is the latest version of the professional wrestling sports video game. This latest installment marks the twenty-third overall edition in the series of video games centered around WWE and is the successor to WWE 2K22. It is also the tenth game to be released under the banner of WWE 2K. However, several players have reported that they have encountered compatibility issues since its launch when trying to launch the game. Some players have experienced unexpected crashes during launch.
Contents:
- Why is WWE 2K23 crashing?
- Fix: WWE 2K23 keeps crashing on launch on PC
- 1. Check the system requirements
- 2. Run the game as administrator
- 3. Disable Full Screen Optimization
- 4. Update your GPU driver
- 5. Windows update
- 6. Force use of dedicated GPU
- 7. Close unnecessary background tasks
- 8. Restoring game files
- 9. WWE 2K23 update
- 10. Disable third party overlay apps
- 11. Disable Windows Firewall and Antivirus Software
- 12. Adjust power management settings
- 13. Reinstall Microsoft Visual C++ Runtime
- 14. Perform a clean boot
- 15. Restore Overclocked CPU or GPU to Default
Why is WWE 2K23 crashing?
You might be experiencing a crash issue when launching WWE 2K23 due to temporary glitches, problems with game files, or even computer issues. Many PC gamers are facing issues with game files or software/hardware that can cause a crash at any time.
Luckily, there are steps you can take to troubleshoot and fix the problem. Before jumping to conclusions, it's important to check the possible reasons why the game is crashing. Many players have found success by doing the following troubleshooting methods:
- Checking compatibility with PC specifications
- Update to the latest version of the game
- Game launcher update
- Update graphics drivers
- Check for problems with DirectX versions
- Closing unnecessary background running tasks
- Checking if a game is being blocked by an antivirus or firewall
- Check for problems with the application being launched
- Checking for Issues with Microsoft Visual C++ Redistributables
- Checking if an overclocked CPU/GPU is causing the issue
- Check for application overlay issues.
By following these steps, you should be able to resolve the crash at startup issue and return to playing WWE 2K23 without any problems. Don't let this problem stop you from enjoying this addictive game.
Fix: WWE 2K23 keeps crashing on launch on PC
Since you know the possible causes, it's time to move on to the troubleshooting methods below and follow them until the problem is fixed. Sometimes PC gamers don't follow a few methods thinking these workarounds won't help. But the fact is that even a basic method can help you a lot, which may not be useful to others. So don't skip any method until you're done. Now, without further ado, let's dive into this.
1. Check the system requirements
First, you need to make sure that your PC specification is properly compatible with the system requirements of the game, because any incompatibility can lead to launch failures or no problems with the game launching. We have provided you with requirements that may be helpful to you. If in case your PC build is not fully compatible, be sure to update the specific software/hardware to make it fully compatible.
Minimum requirements:
- Requires 64-bit processor and operating system
- OS: Windows 10 64-bit
- Processor: Processor Intel Core i5-3550 / AMD FX 8150
- Memory: 8 GB arrangement
- Graphic arts: Video card GeForce GTX 1060 / Radeon RX 480
- Direct X: Version 12
- Disk space: 80 GB available space
- Sound card: Sound Card compatible with DirectX 9.0c
- Additional Notes: SSD recommended, AVX - Compatible processor
Recommended requirements:
- Requires 64-bit processor and operating system
- OS: Windows 10 64-bit
- Processor: Intel i7-4790 / AMD FX 8350
- Memory: 16 GB arrangement
- Graphic arts: Video card GeForce GTX 1070 / Radeon RX 580
- Direct X: Version 12
- Disk space: 80 GB available space
- Sound card: Sound Card compatible with DirectX 9.0c
- Additional Notes: SSD recommended, AVX - Compatible processor
2. Run the game as administrator
Run the game application file on your computer as an administrator to allow User Account Control (UAC) access. Sometimes your system needs UAC access permission to run a rather important program. By following these steps, you will have to allow administrator access for once and it will not ask you for the same thing again. For this:
- Go to the directory of installed games WWE 2K23.
- Click thefile applications on your PC.
- Click on <font><font>Materials</font></font> > Click on the tab Compatibility.
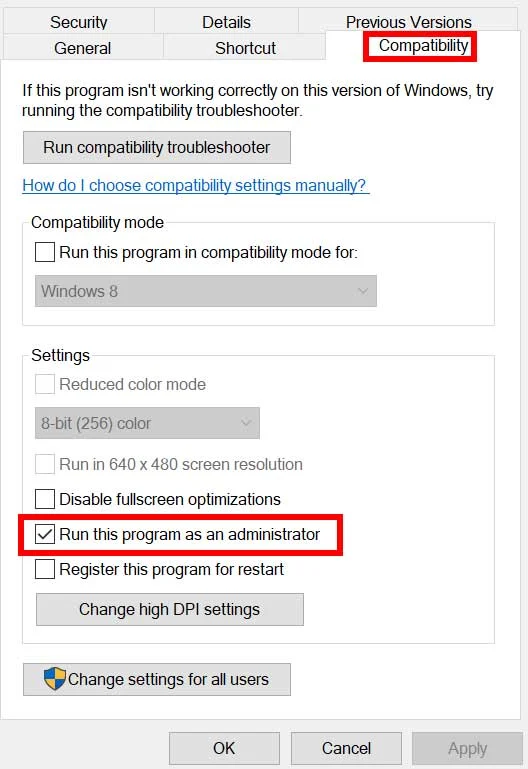
- Select the checkbox Run this program as administratorto turn it on.
- Then press "Apply" and then "OK", to save your changes.
- Finally, double click on the game application file to launch it.
If in case you are running the game through Steam, follow the same steps for the Steam app as well.
3. Disable Full Screen Optimization
Sometimes disabling full-screen optimization by Windows for a specific game application file should fix compatibility issues for some PCs. Although it is disabled by default, you should double-check it to make sure that full-screen optimization is not enabled. For this:
- Open the client Steam > click on The library.
- Right click on WWE 2K23 > select Management.
- Press "Browse Local Files» > navigate to the installed folder WWE 2K23.
- Rclick on WWE 2K23.exe > Click on <font><font>Materials</font></font>.
- Click the tab Compatibility > Make sure check the box Disable full screen optimization.
- Then press "Apply" and then "OK", to save your changes.
4. Update your GPU driver
Another thing you should do is to update the graphics driver version on your PC by following these steps. If an update is available, be sure to install it. An outdated GPU driver can cause problems running the program, for example in games or even during gaming sessions. Not only does your game look pathetic, but your PC won't be able to reach its full potential due to a graphic conflict. For this:
Advertisements
- Press the keys Win + X, to open shortcut menu.
- Press device Manager from the list.
- Double click video adapters to expand it.
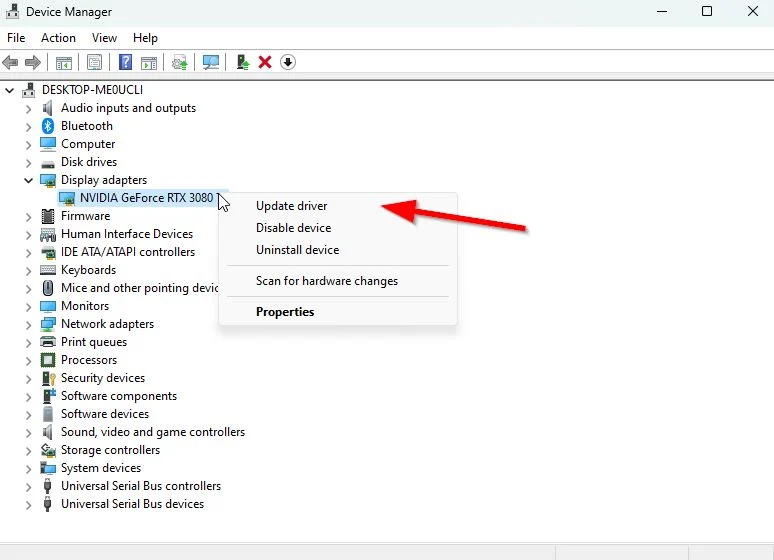
- Right click a dedicated graphics card that is active or in use.
- Now press Update driver > Click on Automatic driver search.
- It will automatically check for an available update and then download and install the latest version.
- Just wait for the same and restart your computer to apply the changes.
If there is no update available for your GPU, you can go to the official graphics card website using the links below and search for your graphics model manually. Be sure to download and install the latest GPU driver for your manufacturer's model number.
5. Windows update
If you have been running an outdated Windows version or build number for a while, follow these steps to check the same. Always try to install the latest system update so you can get the latest security patch, performance improvements, bug fixes, additional features, and more.
- Press the keys Windows + I, to open Parameters.
- Click the Windows Update and press Check for Updates.
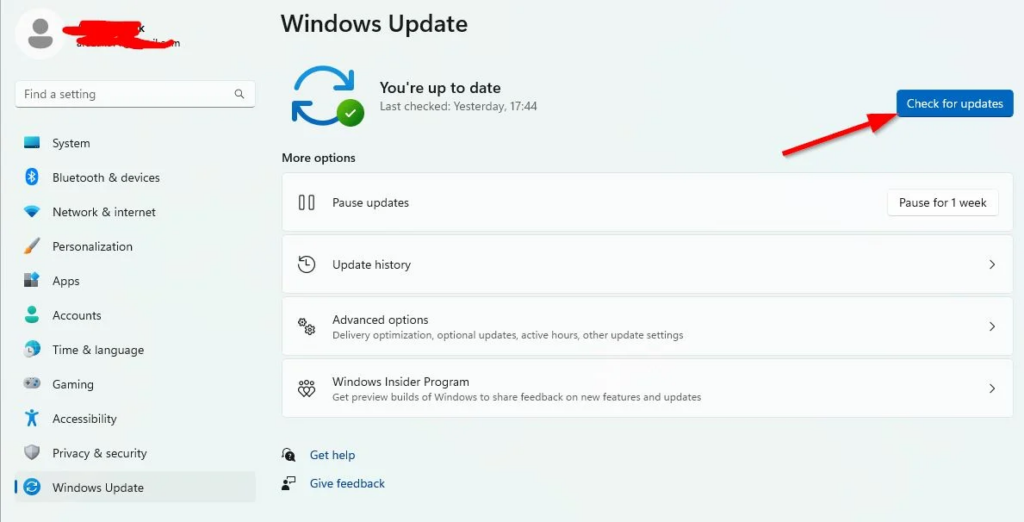
- If an update is available, click Download and install.
- Wait for the update process to complete.
- After that, restart your computer to apply the changes.
In addition, you should also check for optional updates by following these steps, because sometimes a couple of driver updates or security patches can appear here that can help you fix a few bugs or problems.
- Press the keys Windows + I, to open Parameters.
- Click the Windows Update > Click Extra options.
- Scroll down to find More options.
- Click the Optional Updates > If an update is available, you can choose to update.
- Now press "Download and Install" and then wait for some time to complete it.
- Finally, reboot the system manually.
6. Force use of dedicated GPU
Advertising
It is highly recommended to always use a dedicated (external) graphics card on your desktop for heavy games and applications so that you can get better graphics performance all the time. For this:
For Nvidia GPU:
- Right click on a blank desktop screen > Open nvidia control panel.
- Go to 3D settings > click "Managing 3D Settings».
- Open Program settings > select WWE 2K23 from the list.
- Get preferred graphics processor for this program from the list.
- Once it's done you can see it like high performance Nvidia processor.
- Be sure to save your changes and restart your computer.
For AMD GPU:
- Right click blank desktop screen > open Radeon settings.
- Go to section "Advanced settings" > go to "Settings".
- Click the Power > Click Switchable graphics application settings.
- Get WWE 2K23 from the list. [If the game is not displayed, select Add applicationto start the game]
- Then select High performance в graphics settings.
- Finally, restart your computer to apply the changes.
7. Close unnecessary background tasks
It is recommended to close all unnecessary background tasks on your system by following these steps, because the more system resources are used, the more your system performance will decrease. You may not notice this dramatically when you encounter game lags, frame rate drops, stuttering, etc. But this method should be good for you in many ways.
- Press Ctrl + Shift + Esc keys, to open Task Manager.
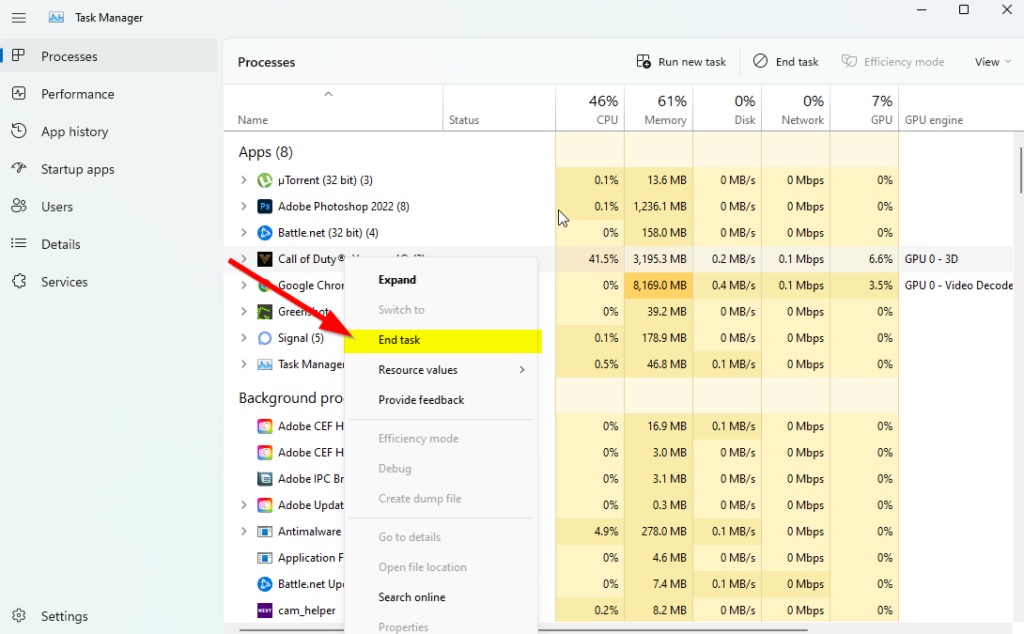
- Press "Processes" and check which task consumes more resources.
- Just click on a specific process and select Complete the taskto force close it.
- Be sure to follow the same steps for every third party app process that consumes more resources.
- After that, close Task Manager and restart your computer.
8. Restoring game files
Needless to say, problems with corrupted or missing game files on PC can experience a lot of crashes when launching the game without any proper error message in some cases. If in this case your game starts loading within a few seconds and then automatically closes or does not start at all, then it is better to check and restore the installed game files on the PC by following these steps:
For Steam:
- Start the client Steam > click on The library.
- Right click on WWE 2K23 from the list.
- Press "Properties" > "Go to local files».
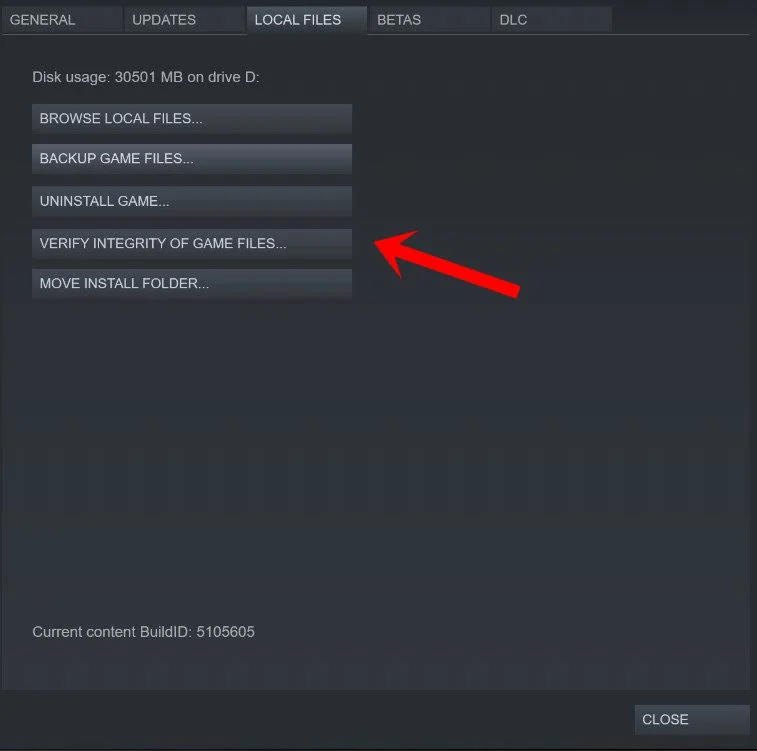
- Press Verify integrity of game files.
- This process may take some time. So, be patient.
- After that, be sure to restart your computer to apply the changes.
9. Update WWE 2K23
We should also recommend that you manually check for a game update at the end through the Steam client to make sure there is not an outdated version of the game that is conflicting with the launch of the game. An outdated version of the game patch can cause several potential issues that can cause crashes. For this:
- Open Steam and go to The library.
- Click on WWE 2K23 from the left panel.
- Steam will automatically search for an available update.
- If an update is available, click "Refresh».
- Be sure to wait a while until the update completes.
- After that, be sure to restart your computer to apply the changes.
10. Disable third party overlay apps
Basically background running conflicts with XNUMXrd party overlay apps can cause a few issues with the game launching because they consume a lot of system resources just like the processes when the game starts. Even though the game won't launch, the overlay app will launch and run until you close it manually. While some overlay applications may also start working when you boot the system at the very beginning. So try disabling overlay apps manually.
Disable Discord Overlay:
- Open application Discord > Click on gear icon (Settings) at the bottom.
- Get Overlay в Application Settings > Turn on overlay Enable in-game overlay.
- Click on Games > Select WWE 2K23.
- Required disconnect switch Enable in-game overlay.
- After that, restart your computer to apply the changes.
Disable the Xbox Game Bar:
- Press the keys Windows + I, to open Parameters.
- Now click "Gaming > "Go to game panel».
- Disconnect Record game clips, screenshots, and broadcast using the Game bar option.
- After that, save the changes and restart your computer to apply the changes.
Disable nvidia GeForce Experience overlay:
- Run the application Nvidia GeForce Experience > go to settings.
- Press "General > disconnect an option in-game overlay.
- After that, restart your computer to apply the changes.
Disable the Steam overlay:
- Open the client Steam > click on The library.
- Right click on WWE 2K23 > click on <font><font>Materials</font></font>.
- Click on General > Turn off option Enable Steam overlay while playing.
- After that, restart your computer to change the effects.
Some PC gamers or advanced users also use some other overlay applications like MSI Afterburner, Rivatuner, RGB software, etc. If you also use any other mouse or keyboard software or any RGB tool that is not so necessary during games, it is best to turn them off.
11. Disable Windows Firewall and Antivirus Software
It's highly likely that you're using the default Windows Firewall protection on your PC, but sometimes turning it off temporarily before launching any game can greatly reduce startup crash issues. For this:
- Click the start menu > Enter Windows Defender Firewall and open it.
- Then click Turn Windows Defender Firewall on or off left panel.
- Select an option Disable Windows Defender Firewall (not recommended) for all domains.
- Then press OKto save changes > Restart your computer to apply the changes.
Also, be sure to disable Windows Defender Antivirus on your computer to make sure the antivirus software isn't blocking game files. For this:
- Press the keys Windows + I, to open Parameters.
- Press "Update and security» > press «Windows security».
- Press "Open Windows Security > go to protection against viruses and threats».
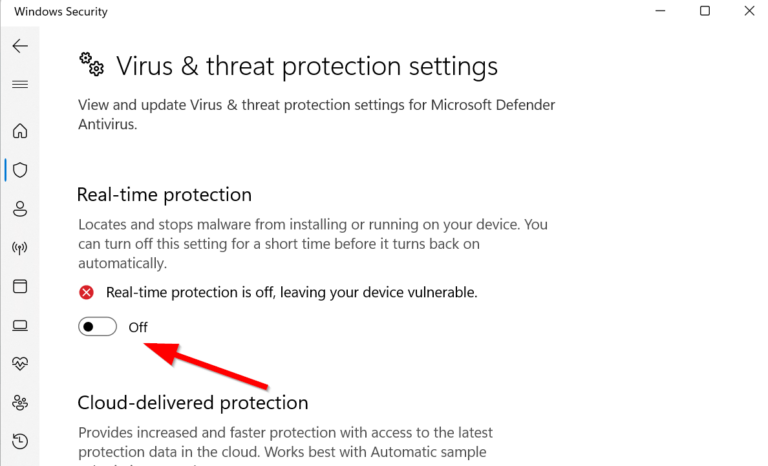
- Now press "Settings Management" > just disconnect switch real time protection.
- When prompted, clickYes ", to continue.
The note: If you are using any other third party antivirus program on your PC, make sure to turn it off from the settings menu.
12. Adjust power management settings
It's better to set the high performance power option on your computer before playing to get the full potential of the system, because Windows prefers to run in balanced power mode by default to save power and offer average performance for your daily task. But heavy games or applications require high performance mode, which will consume extra power but offer amazing performance. For this:
- Click on start menu > control panels "Enter" and open it.
- Press "Equipment and Sound" > select "Power supply».
- Get High performanceand you're done.
- Finally, restart your computer to apply the changes.
13. Reinstall Microsoft Visual C++ Runtime
If the Microsoft Visual C++ Redistributables are not installed or even already installed on your Windows system, be sure to manually reinstall it using the following steps.
- Open start menu > Type applications and features and open it.
- Click programs Microsoft Visual C ++ from the list one by one.
- Press Remove and follow the instructions on the screen.
- After removing all Visual C++ programs, restart your computer.
- Now go to Microsoft official website and download the latest Microsoft Visual C++ Runtime.
- Be sure to install it on your computer and reboot your system to change the effects.
14. Perform a clean boot
Several users have claimed that performing a clean boot on the PC does indeed fix the system boot problem because some applications or tasks start at the very beginning. These tasks run continuously and consume a lot of system resources. To do this, follow these steps:
- Press the keys Windows + Rto open the dialog Run.
- Enter the msconfig and press Enter, to open system configuration.
- Go to Services section > Click Hide all Microsoft servicesto turn it on.
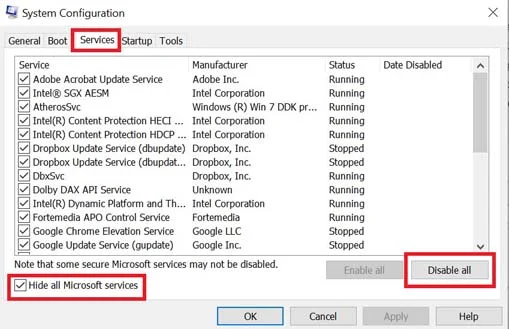
- Now press "Disable all" to disable other services.
- Press apply, and then OKto save your changes.
- Then go to Startups > Click open Task Manager.
- Click the tab "Startup» > make sure a specific task with a higher launch impact is selected.
- Now press "Disable", to turn it off.
The note: Follow the same steps for each program with a higher launch impact, except for the audio or graphics service.
- Finally, be sure to restart your computer to apply the changes.
15. Restore Overclocked CPU or GPU to Default
Sometimes an overclocked CPU or GPU in a PC can cause conflicts with other hardware, which can cause a bottleneck issue. It's better to temporarily disable or restore an overclocked CPU/GPU to factory default so you can check the potential cause of the crash. There are several tools available on the Internet to tune an overclocked CPU or GPU on a PC, such as MSI Afterburner, Riva Tuner, AMD Ryzen Master, EVGA Precision X, etc.
That's it guys. We assume that this guide was helpful to you. For further inquiries, you can comment below.
Was the article helpful?