
The continent of Teyvat, full of life, was created by the confluence of seven elements, and it is ruled by seven Archons… You are standing in clouds of dust under the sky of an alien world. You are brother and sister brought here by the journey. But suddenly your twin is kidnapped by an unknown deity, and you fall into a deep sleep. You wake up in a completely unfamiliar place
Genshin Impact: Feathered Mold - where to find, how to win, drop

Special offer
Now in trend
BONUS +30% OF THE AMOUNT FOR THE POINT USING THE PROMO CODE "PortalVR"
Here you can buy any amount of game currency. Payment is made by any available means. We will send you the selected amount of game currency directly to the game, you only need the UID.
Also, you get daily gifts in free cases in the form of source stones, which you can also sell.
Show more
Here you can buy any amount of game currency. Payment is made by any available means. We will send you the selected amount of game currency directly to the game, you only need the UID.
Also, you get daily gifts in free cases in the form of source stones, which you can also sell.


The Feathered Mold is an elite boss found in the Sumeru region. It drops a number of useful items, including Artifact Sets, Dendro Hero Ascension Materials, etc. In this guide, we will describe the boss's abilities, explain how to kill the Feathered Mold in Genshin Impact, and provide a complete list of loot that can be obtained. obtained after defeating this opponent.
Contents:
- 1. Basic information about the boss
- 2. How to kill the Feathered mold: strategy
- 3. Recommended heroes to fight with feathery mold
- 4. Feathered Mold's Special Attacks
- 5. List of items that can be obtained for killing feather mold

1. Basic information about the Feathered mold
 | feathered mold |
| Class | magical creature |
| Grade | Regular boss |
| Nick | Beloved Mushroom King, Mushroom Lord of the Dark Forest |
| Description | Over the years, these large molds have taken on a unique shape. Their intelligence has reached, and perhaps even surpassed the intelligence of real animals. They actively hunt for food. The tail of the fungus has a beautiful jade plumage, similar to the plumage of an ancient sacred beast, which is revered by Spantamad. According to the logic of anthropomorphic evolution, one should think that they once walked the earth together. |
Location of the Feathered Mold
Before heading to the Feather Mold's lair, Travelers must fulfill a number of specific conditions:
- Reach Adventure Rank 32.
If the location is still closed, then start the story mission of the Archons Chapter 1. Volume 3. «Through smoke and dark woods” (it is not necessary to pass completely).
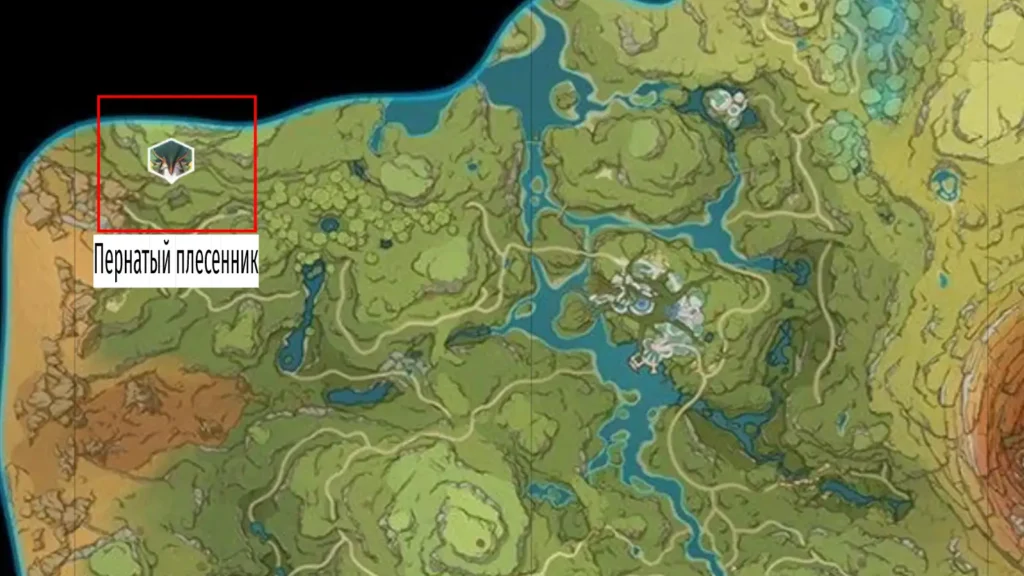
Feathered mold (Jadeplume Terrorshroom) is located in the northwest of Sumeru.
Entrance to the boss


You will find a portal (black hole) in the northwest of Sumeru. To get into it, jump up to it with the mushroom and use the four-leaf symbol. Entering the portal will lead you straight to the boss.
Video of entering the portal and going to the Feathered Mold:
2. How to kill the Jadeplume Terrorshroom: strategy

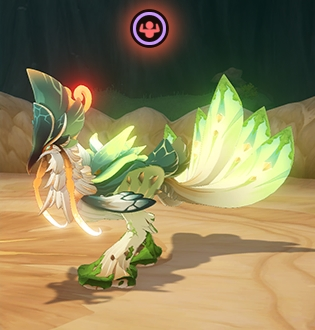
Burning and Resurrecting States
The feathered moulder is a unique opponent of the Dendro element. When damaging him with the abilities of certain elements, you can change his state. In total, the boss has 2 states:
- Revitalization - Feathered Mold starts to deal more damage.
- Combustion – additional opponents (molds) appear on the battlefield.
More about state mechanics:
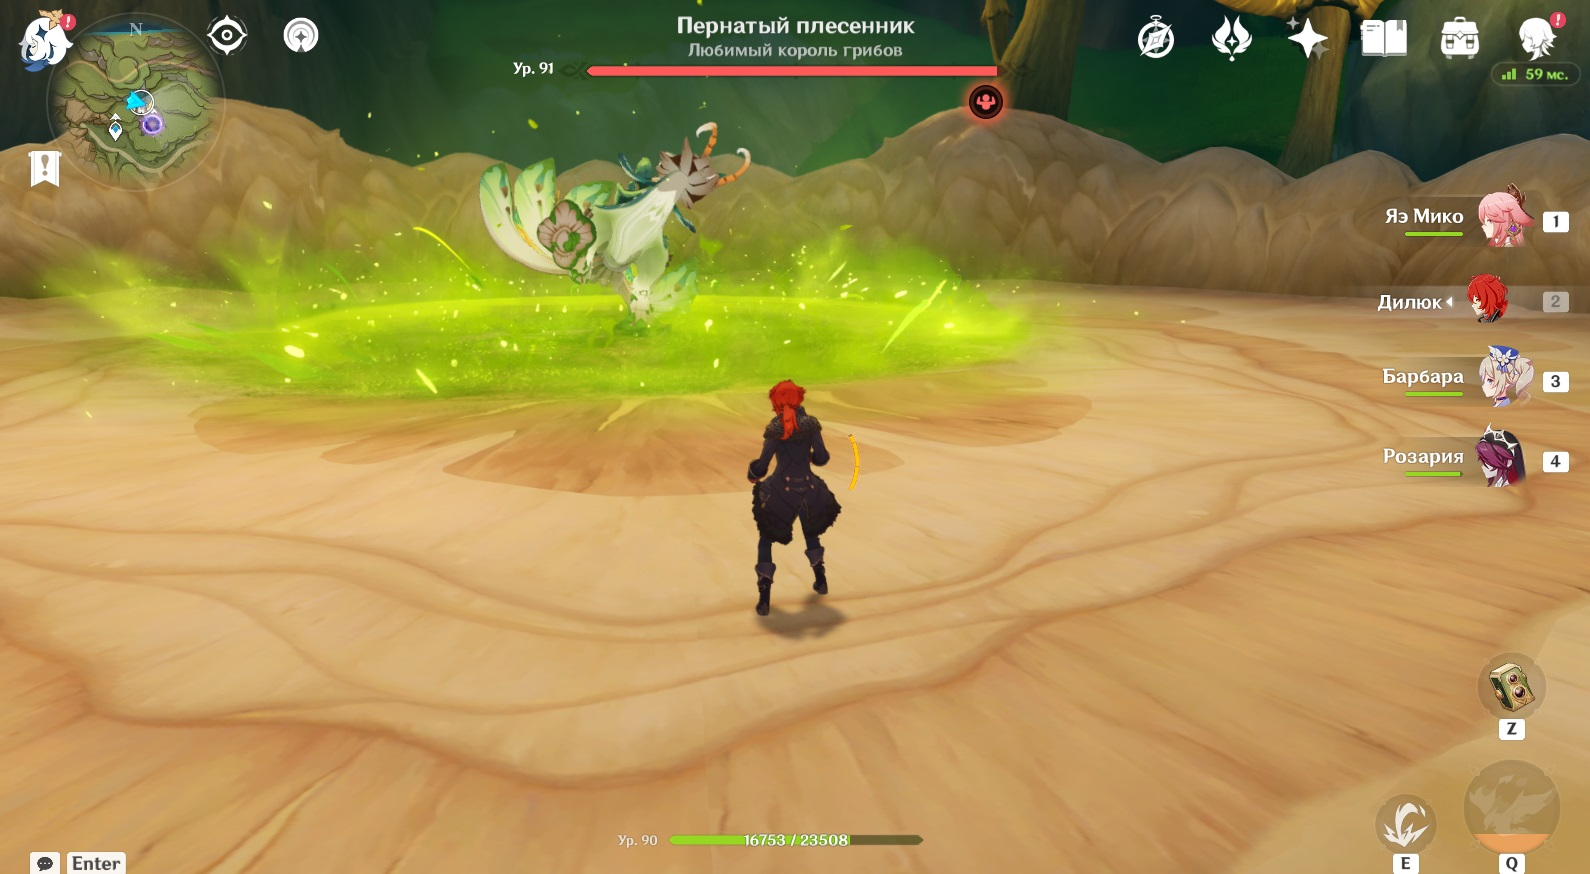
- By attacking the boss with Electro skills, you cause him to accumulate Activation. Also, Activation accumulates if you create a Catalysis reaction (Dendro + Electro). At maximum Activation, he enters a state of Vivify that empowers his attacks and allows him to use new skills. The buff lasts until the monster comes out of Revive. To reduce the amount of Activation energy, hit the boss with the abilities of the elemental hero Pyro. You can track the accumulation of a resource by the red icon under the scale of its HP.
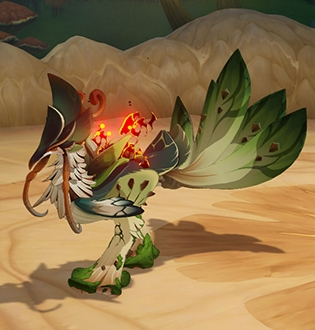
- If you damage the boss with a Pyro elemental ability while he is not in the Revive state, he will enter the Burning state and then enter the Scorch phase. The burnt monster will do its best to recover and will scatter spores everywhere, from which molds will appear after a short time.
You can understand the state of the Feathered mold in its appearance.
Don't stray too far from the boss
If you stand too far from the Feather Mold, it will attack the active hero with a barrage of dendro projectiles. They automatically aim at the target and deal a lot of damage. The boss can use this ability multiple times in a row. Meanwhile, if you need to move to the edge of the platform, then at the moment when the dendro projectiles fly up to the character, dash to the side to dodge them.
Be careful when standing near the Feathered Mold
During close combat, the monster uses a combined attack - it turns around and hits the hero, after which it performs a beak strike on the ground and makes a jump. Try to jump to the side at this moment, or use defensive skills to reduce damage.
Use potions and food
The Feathered Mold is a dangerous enemy added in Update 3.0. Going to fight him, stock up on potions and food that increase the characteristics of the squad. We recommend bringing the following with you:
| Name | Effect |
| Storm Oil (Potion) | Increases Anemo's damage dealt by 25%. The effect lasts 5 minutes. |
| Flame Oil (Potion) | Increases Pyro damage dealt by 25%. The effect lasts 5 minutes. |
| Monolithic Oil (Potion) | Increases Geo-elemental damage dealt by 25%. The effect lasts 5 minutes. |
| Frost Oil (Potion) | Increases Cryo damage dealt by 25%. The effect lasts 5 minutes. |
| Whirlpool Oil (Potion) | Increases Hydro damage dealt by 25%. The effect lasts 5 minutes. |
| Thunder Oil (Potion) | Increases Electro damage dealt by 25%. The effect lasts 5 minutes. |
| Antidendro Potion (Potion) | Increases the elemental resistance of Dendro for all party members by 25% for 5 minutes. |
| Temptation of the Adept (food) | Increases the Attack Rating of all party members by 260~372. Additionally, food increases critical hit chance by 8~12%. The effect lasts 5 minutes. |
| Mooncake (food) | Increases the shield strength of all party members by 25%~35% and increases defense by 165~235. The effect lasts 5 minutes. |
| Tonkotsu ramen (food) | Restores 30~34% of a damaged hero's maximum health + 600~1900 additional HP. |
| Prefabricated Casserole (food) | Brings a deceased party member back to life and restores 900~1500 HP instantly. |
| Crab in oil (food) | Increases Defense by 215~308 and increases healing received by 6~10%. The effect lasts 5 minutes. |
| Pita (food) | Restores 30-34% HP of the hero's maximum health + 600-1900 HP |
The listed potions and food are recommended for the fight with the Feathered Mold. If you do not have recipes for making certain dishes, replace them with similar foods with similar, albeit less properties. For example, instead of "Temptation of the Adept" you can take "Jade bags". This meal increases the Attack Rating of all party members by 224~320 + increases Critical Hit Chance by 8~12%. The effect lasts the same - 5 minutes.
3. Recommended characters for the battle with the Feathered Mold
Below we will present the character sets that are best suited for fighting Dendro Hypostasis. But first, it’s worth saying that when assembling a squad, always choose heroes with the following roles:
- 1 main damage (DPS, dealing basic damage);
- 2 additional fighters (sub DPS);
- 1 support hero (healer).
Alternative variation of the group:
- 1 main damage dealer (dealing basic damage);
- 1 additional strong fighter;
- 2 support heroes (healers).
Basic DPS
You can use any character from the list below as your main source of damage feathered mold:
| Character | Weapon | Effects |
|---|---|---|
 Hu Tao Hu Tao |  | Huge Pyro damage from both elemental skill and ult. Can trigger a Burn reaction that weakens Feather Mold. |
 Eimia Eimia |  | Can attack the boss from a safe distance with fire infusion. |
 Diluc Diluc |  | Deals damage to Pyro with attacks. A powerful explosion of elements in the area. |
 Kli Kli |  | Each hit is pure Pyro elemental damage, allowing for a continuous Burn reaction. |
 Ayaka Ayaka |  | Powerful elemental explosion damage that can take a large amount of health to the enemy in a few seconds. |
 Ganyu Ganyu | | Charged with ice arrows, deals damage from a safe distance, without being exposed to enemy attacks. It is also capable of acting as a sup-dd through an elemental explosion. |
 Eola Eola | | With the help of a strong explosion of the elements, it is able to remove a large amount of health from the enemy. |
Sub DPS
These characters will buff the team's damage and can act as a second damage dealer when hunting the Feathered Mold
| Character | Weapon | Effects |
|---|---|---|
 | | Able to inflict a large amount of Pyro damage from an elemental explosion, even when not on the field. |
 Mona Mona | | Suitable both for a buff from Omen (ults) for causing more damage, and for activating the effect of Budding (Dendro + Hydro) and Blooming (Dendro + Hydro + Pyro). |
 Ye Lan Ye Lan | | Mobility due to fast movement when using an elemental skill and passive Hydro damage from an elemental explosion. |
 Xingqiu Xingqiu | | Very useful Elemental Burst: Increases interrupt resistance, deals Hydro damage, and restores a small amount of health to the active character after the water swords end. |
 Heizo Heizo | | When assembled into crits, it can deal good damage. The mastery build on this boss will be useless due to the lack of Dispel reaction with Dendro. |
 Albedo Albedo | | A good sub-DD, capable of attacking in a wide area. |
Supports (healers, shielders)
| Character | Weapon | Effects |
|---|---|---|
 Zhong Li Zhong Li | | A strong and stable shield that helps to avoid damage from powerful enemy attacks. |
 Yun Jin Yun Jin | | Good buffer for characters using normal attacks. When an elemental skill is activated, it creates a shield for a short time and reflects the enemy's blow with it. |
 | | A fairly versatile hero who can act in any role: healer, shield and main damage dealer. |
 volumes volumes | | The shield is less strong than that of the same Zhong Li, and with conditions, but this is compensated by the Pyro element and periodic damage from the ult. |
 | | Gives the Pyro effect for Burning, buffs the unit and heals. |
 Kokomi Kokomi | | Continuous heal. If you use her elemental burst so that the boss attack occurs during the cutscene, no damage will be taken. |
 Jean Jean | | With the use of an explosion of elements, restores health to all characters in the squad. |
 | | Shield and healer. At the 6th constellation, increases elemental mastery in the ultimate circle by 200 points. |
 | | Imposes Dendro status for Budding and Blooming reactions. |
BUDGET TEAM
| Character 1 | Character 2 | Character 3 | Character 4 | Features |
|---|---|---|---|---|
|  Ember Ember |  Dendro Traveler Dendro Traveler |  Barbara Barbara | Fully F2P team, doing a great job with the Feathered Mold. Two Pyro heroes for the Burn reaction + Pyro resonance for the attack power buff. Dendro Traveler applies Dendro status. Barbara/Noelle - Heal or shield. |
| Yanfei | Collei | | | A low-budget squad with great potential, with Yan Fei as the backbone of the group and Collei being used to conduct reactions. Diona and Bennet are the perfect combination for increased protection and healing. |
Use the abilities of healers
If you're having trouble dodging boss attacks, pick your healer more often and heal the group.
Combine the abilities of Hydro, Dendro and Electro elemental heroes
The elemental reaction "Budding" (Hydro + Dendro) creates dendro cores on the battlefield that explode and deal additional damage to nearby monsters. The combination of Dendro + Hydro + Electro elements will allow the Dendro Cores to turn into creeping projectiles and automatically fly into the Feathered Mold.
4. Feathered Mold's Special Attacks
monster stats
| HP | atk | Def |  |  |  |  |  |  |  | |
| 190.18 | 87.92 | 500 | 25% | 25% | 25% | 25% | 25% | 25% | 25% | 80% |
| HP | atk | Def | HP (2P) | Atk (2P) | Def(2P) | HP (3P) | Atk (3P) | Def(3P) | HP (4P) | Atk (4P) | Def(4P) |
| 1027.88 | 177.64 | 505 | 1541.82 | 195.4 | 505 | 2055.76 | 222.05 | 505 | 2569.7 | 248.7 | 505 |
| 2315.31 | 297.05 | 525 | 3472.97 | 326.76 | 525 | 4630.62 | 371.31 | 525 | 5788.28 | 415.87 | 525 |
| 7297.57 | 749.71 | 575 | 10946.36 | 824.68 | 575 | 14595.14 | 937.14 | 575 | 18243.93 | 1049.59 | 575 |
| 11915.75 | 1170.75 | 600 | 17873.63 | 1287.83 | 600 | 23831.5 | 1463.44 | 600 | 29789.38 | 1639.05 | 600 |
| 16678.94 | 1599.73 | 625 | 25018.41 | 1759.7 | 625 | 33357.88 | 1999.66 | 625 | 41697.35 | 2239.62 | 625 |
| 22189.58 | 1912.24 | 650 | 33284.37 | 2103.46 | 650 | 44379.16 | 2390.3 | 650 | 55473.95 | 2677.14 | 650 |
| 29787.64 | 2303.33 | 675 | 44681.46 | 2533.66 | 675 | 59575.28 | 2879.16 | 675 | 74469.1 | 3224.66 | 675 |
| 39841.86 | 2858.9 | 700 | 59762.79 | 3144.79 | 700 | 79683.72 | 3573.63 | 700 | 99604.65 | 4002.46 | 700 |
| 53524.62 | 3382.63 | 725 | 80286.93 | 3720.89 | 725 | 107049.24 | 4228.29 | 725 | 133811.55 | 4735.68 | 725 |
| 73409.45 | 4021.32 | 750 | 110114.18 | 4423.45 | 750 | 146818.9 | 5026.65 | 750 | 183523.63 | 5629.85 | 750 |
| 95254.39 | 4632.2 | 775 | 142881.59 | 5095.42 | 775 | 190508.78 | 5790.25 | 775 | 238135.98 | 6485.08 | 775 |
| 124025.19 | 5371.08 | 800 | 186037.79 | 5908.19 | 800 | 248050.38 | 6713.85 | 800 | 310062.98 | 7519.51 | 800 |
| 163055.83 | 6213.48 | 825 | 244583.75 | 6834.83 | 825 | 326111.66 | 7766.85 | 825 | 407639.58 | 8698.87 | 825 |
| 205129.35 | 7142.6 | 850 | 307694.03 | 7856.86 | 850 | 410258.7 | 8928.25 | 850 | 512823.38 | 9999.64 | 850 |
| 256675.56 | 8759.19 | 875 | 385013.34 | 9635.11 | 875 | 513351.12 | 10948.99 | 875 | 641688.9 | 12262.87 | 875 |
| 330912.64 | 10375.78 | 900 | 496368.96 | 11413.36 | 900 | 661825.28 | 12969.73 | 900 | 827281.6 | 14526.09 | 900 |
| 422774.14 | 11992.38 | 925 | 634161.21 | 13191.62 | 925 | 845548.28 | 14990.48 | 925 | 1056935.35 | 16789.33 | 925 |
| 519404.02 | 13321.96 | 950 | 779106.03 | 14654.16 | 950 | 1038808.04 | 16652.45 | 950 | 1298510.05 | 18650.74 | 950 |
| 636001.22 | 15281.66 | 975 | 954001.83 | 16809.83 | 975 | 1272002.44 | 19102.08 | 975 | 1590003.05 | 21394.32 | 975 |
| 776440.25 | 17235.46 | 1000 | 1164660.38 | 18959.01 | 1000 | 1552880.5 | 21544.33 | 1000 | 1941100.63 | 24129.64 | 1000 |
Ability #1 - Combination Attack

When the active hero is close to the boss, Feather Mold performs up to three consecutive attacks - a swing, a beak attack, and a jump. A series of strikes can be interrupted if you move away from the monster at a sufficient distance.
Ability #2 - Dendro Projectiles

If you move too far away from the boss, he will start firing dendro projectiles that will automatically target the active hero. You can avoid damage if you make a dash at the time when the projectiles fly close. The feathered moulder will fire projectiles until you get close to it.
Ability #3 - Dendro Burst

Periodically, the boss accumulates energy and creates a cloud of green fog around him. After a short time, the Feathered Mold explodes, dealing AOE damage to nearby Heroes. At the time of the formation of the cloud, it is better to move away.
Ability #4 - Summon Molds

The boss uses this ability while in the Burning state. He scatters spores (green clots) around the site and monsters appear from them that attack the hero until they are killed. We talked about states in more detail in the Strategy section of the article.
Ability #5 - Dash

This ability is used by the boss while in the Revive state. The monster starts running forward, dealing damage to all heroes in its path. When the Feather Mold's rage subsides, it will fall to the ground and you will be able to attack it without any difficulty for a certain time. We talked about states in more detail in the Strategy section of the article.
Ability #6 - Chaotic Strikes

This ability is used by the boss while in the Revive state. The monster begins to swing its head in different directions, causing damage to nearby heroes. When the Feather Mold's rage subsides, it will fall to the ground and you will be able to attack it without any difficulty for a certain time. We talked about states in more detail in the Strategy section of the article.
Ability #7 - Spore Barrage

This ability is used by the boss while in the Revive state. The monster accumulates energy and releases a bunch of spores that fly towards the character and deal damage. When the Feather Mold's rage subsides, it will fall to the ground and you will be able to attack it without any difficulty for a certain time. We talked about states in more detail in the Strategy section of the article.
5. List of items that can be obtained for killing Dendro Hypostasis
| Boss | Drop |
| |
Which characters need Feathered Mold materials?


Artifacts
| Artifact set name | <font><font>Materials</font></font> |
 Berserk | 2 items: Increases critical hit chance by 12%.4 items: If the hero has less than 70% HP, the chance of a critical hit is increased by 24% |
 Instructor Instructor | 2 items: Increases Elemental Mastery by 80.4 items: After using the elemental explosion, the mastery of all party members is increased by 120 points. The bonus lasts 8 seconds. |
 Seeker of adventures | 2 items: Increases the hero's health by 1000.4 items: For 30 seconds after opening any chest, the hero recovers 30% of HP |
 End of the Gladiator | 2 items: Increases attack power by 18%4 items: Increases normal attack damage by 35% when equipped with a polearm, one-handed weapon, or two-handed weapon |
 Itinerant ensemble Itinerant ensemble | 2 items: Increases Elemental Mastery by 80.4 items: Increases damage from charged attacks by 35% if the character is equipped with a bow or a catalyst. |
Was the article helpful?


