Stranded Deep is a first-person action-adventure game with survival elements. In the center of the plot is the main character, who, after a plane crash, is forced to survive on a tropical island. Players will have to explore the underwater world and land, get food on their own, craft tools and in other ways cosplay Tom Hanks (Tom Hanks) from Rogue One. By the way, a volleyball named Wilson is also here. Also in the game there is pumping, boss battles and a cooperative mode.
Using the Compass in Stranded Deep - Orientation and Navigation Guide
This guide will show you how to use the compass in Stranded Deepto find your way. You can even draw your own nautical chart of all the islands you have discovered to the exact scale. See also how a real compass works!
This guide was originally written for version 0.02, so the graphics look a little different than in the current game. Also, you will now find the compass at the very beginning in the raft storage.
Contents:
Orientation in Stranded Deep
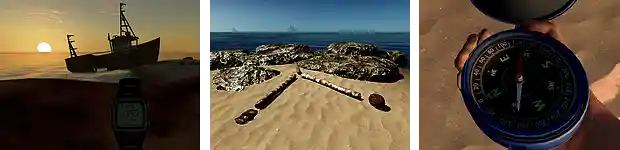
At first, navigating the deep waters is a bit tricky. You can determine cardinal directions using the sun, moon, and time of day (sunrise: Northeast, sunset: West, moonrise: East, moonset: Southwest). You can place sticks on the ground, pointing to the island you came from. Add a coconut or other items to mark special islands. But it's not exactly easy - until you find a compass.
Then everything will be fine. With a compass, you can find your way (and your way back!) in the heaviest rain or the thickest fog. You can even draw your own map of all the islands you've discovered to an exact scale. This guide will show you how.
NoteA: All this will also work in real life.
Basic Navigation in Stranded Deep
How to Use the Compass in Stranded Deep
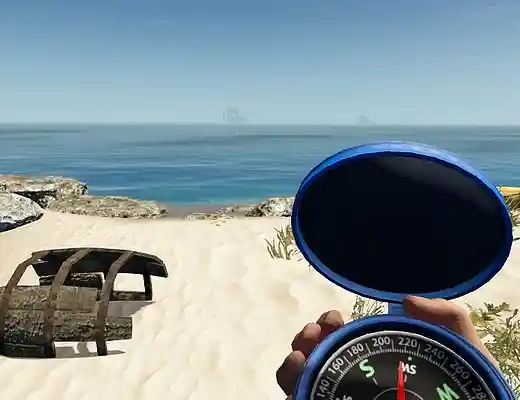
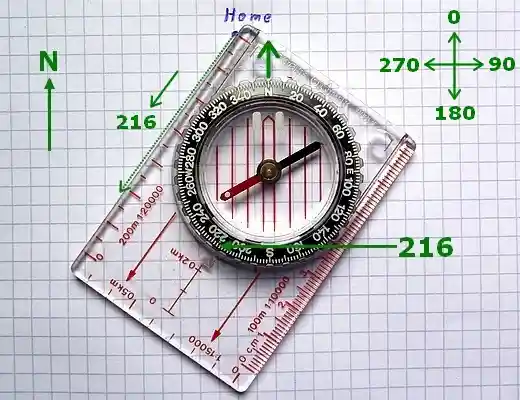
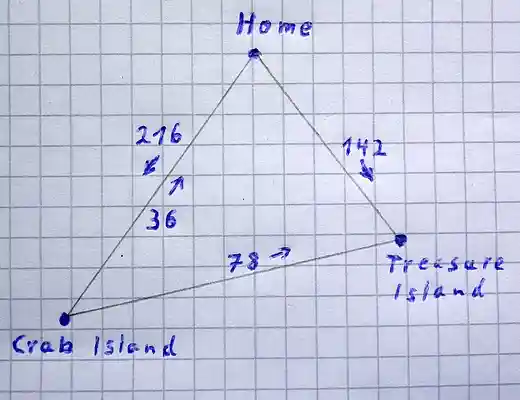
Use the crosshairs (white dot) to point to the island you want to go to. Then read the bearing from the upper (red) end of the compass needle. Here it is 216 degrees or almost southwest.
Keep this direction in mind. Check this with your compass before you start rowing. If you get disoriented while swimming (due to a shark attack or being distracted), just use the compass and keep moving. You can even go on a trip without seeing your destination, for example, in bad weather. If you stay on your current course, you will get there.
Directions are counted clockwise:
North 0° - East 90° - South 180° - West 270°
Determining your way back
The lower (white) end of the compass needle will point you in the direction of your return journey. If you can't read it, define it like this (using your first bearing as the starting value):
- For bearings less than 180, add 180.
- For bearings larger than 180, subtract 180.
- If the result is not between 0 and 360, then you did something wrong.
In the example above, 216 is greater than 180, so the reverse bearing is 216 - 180 = 36.
Take your compass, find the island in the direction of 36 degrees, and you will easily return to where you started.
Stranded Deep Navigation Strategies
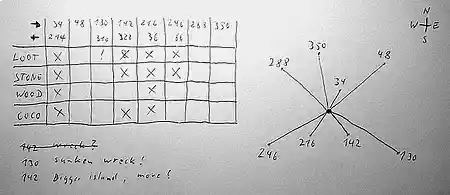
The only thing you could do now is to make one island your main island, from which you radially visit all other islands within sight. You can, for example, create a list or table that includes the coordinates of the islands and additional notes. Or you can draw a rough plan of your surroundings (with suggested distances) to get a general idea.
Alternatively, a map on an accurate scale showing the location and bearings of the islands would open up many more possibilities. In the next chapter, you will learn how to draw such a map. The principle is a bit more complicated than the one above, but it builds on what has been explained so far, and once you get a feel for how it works, it will blow your mind.
Note: Depending on where exactly you are on the island, there may be deviations in the measurements by several degrees. Thus, to get the most accurate reading possible, always try to take a bearing from the center of the island to the center of the other island. It may also be useful to take readings from opposite ends of the island and then determine the average.
Advanced Navigation (Mapping)
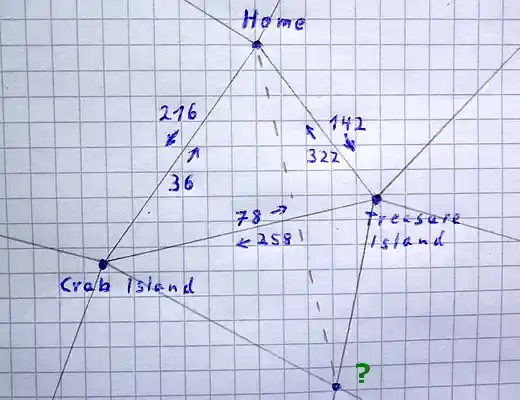
In this chapter, you will learn how to draw your own sea chart of all the islands you have discovered. It will look the same as in the picture below (don't let the numbers 1 and 7 confuse you, they may look different in your country).
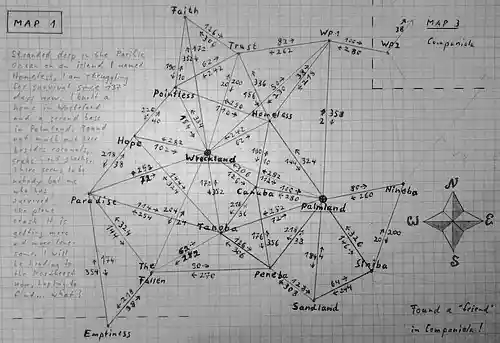
You can determine the direction to other islands at a glance. Your map will also allow you to determine the unknown coordinates of the mapped islands - even over long distances.
What you need
For this project, you will need a pencil, an eraser/eraser, paper (preferably paper to scale or a square/square), and an angle drawing tool – like a triangular ruler, protractor, or square that you know from school. You can also use a real compass, as you would in the wilderness (or graphics software if that's your preference and if your laptop survived a plane crash).
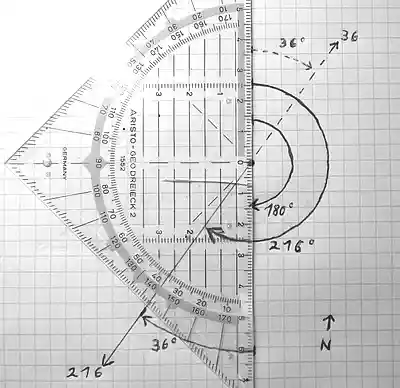
Here we are again. Our target island still has a bearing of 216. Now take a piece of paper, mark your location somewhere (the first island) and draw a line with an angle of 216 degrees, measured clockwise from North, which is zero (see picture below). The baseline is the North-South axis.
| North | (top) | 0° (360°) |
| East | (right) | 90° |
| South | (bottom) | 180° |
| West | (left) | 270° |
If you are using one of the mentioned drawing tools, its scale will most likely end up at 180 degrees. In this case, draw a line at 36 degrees clockwise from South (South is 180 degrees and 180 + 36 = 216). The baseline is always the North-South axis.
Using the Compass for the Stranded Deep Map
Both methods (drawing tool and compass) will produce the same results. Since using the drawing tool is quite simple, I will refer to the more advanced compass procedure here. You don't need a compass. You can do all of this with the drawing tool, and it's easier too. (Since you've read so far, I'm assuming you know how to use it. Just skip the details of the compass and look at the drawings. You can try to find the angles by placing the drawing tool on the monitor. Or, better yet, reproduce a sample drawing with using your own tools so you can quickly understand how it works.)
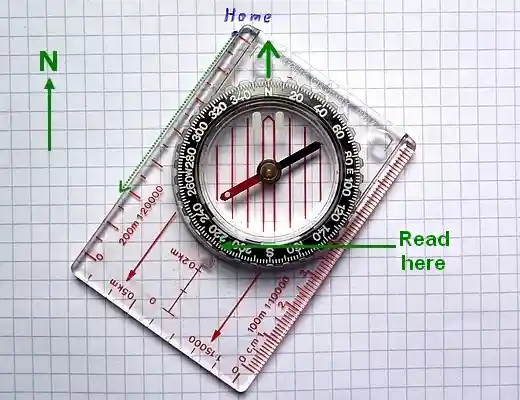
If your compass is a regular swivel-needle model like the one above (as opposed to the game model with a floating dial), you can use it as a protractor/angle measurer. Set the compass to 216 degrees by turning its dial (see image for where to look). Set the base of the compass to its original position, and then rotate the entire compass until its north mark (orienting arrow) points north on your map. That's why checkered/square paper is useful - it's easy to align compass (respectively, your drawing tool) orientation lines parallel to the grid on the paper.
Note: The position of the compass needle does not matter here!
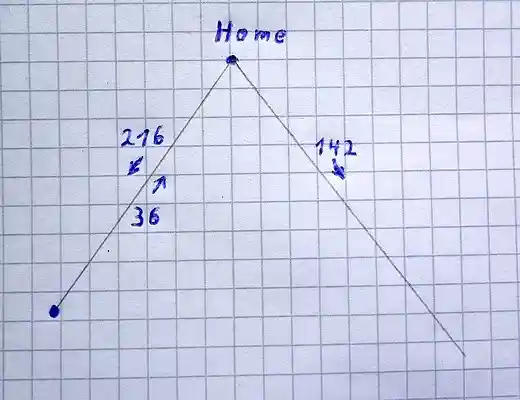
You can also determine the bearing of another island (or several) near you and transfer it to your map. Here, the direction to island number three measured in the game is 142 degrees (southeast).:
After drawing the first lines, you will need to decide where to place the marker for the second island. Leave enough space for names and numbers. Once you've made this decision, you'll set your base distance. It doesn't matter how long it is, as you can only measure angles with the compass, not distances. Your entire map will be scaled based on the first distance defined here.
Now you can go to the second island. You already know how to determine the back bearing, so you can mark it on your map (36).
As soon as you arrive, take another bearing to the third island. In this example, the in-game compass shows 78. Transfer it to your map.
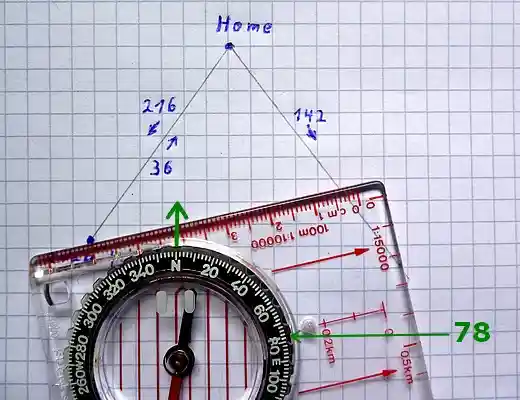
Here you will see again how to install and align the compass. If you are using the drawing tool, you will also need to apply it to the layout of the second island, using the North-South axis as the baseline, and draw the line at a 78 degree angle clockwise from North.
Whichever method you choose, here comes the twist: the intersection of the two lines shows the more or less exact position of island number three. This method is called triangulation.
This way you can go further and further, from island to island. If you later want to find your way to a particular island, you simply check the direction on your map and head there. With the map, you can even determine unknown bearings of charted islands that are out of view - just read the angle off the map with the drawing tool (or compass) and there's your bearing.
Important note: There are several sources of errors and inaccuracies that can accumulate when using this method. The most problematic is the measurement itself in the game. Therefore, don't expect your card to be perfect. You will probably encounter minor deviations of a few degrees from time to time. Don't get annoyed or upset about it. The map is for your orientation, and it will serve that purpose.
If this sparked your curiosity and now you also want to know how to use a real outdoor compass, keep reading.
In-game compass VS real compass
The in-game compass is a floating disk model, meaning its needle is not a real needle. It shows the direction (azimuth) as soon as you point to the target. A real compass like this one (see below) would probably have had an aiming device, such as a vertical slot in the cap with a "hair" and a notch at the other end of the compass. A thin line above the scale would allow accurate readings.
The compass I used to create this guide is a regular model with a turning pointer. For precise measurements, these types of compasses are a little more difficult to handle than disk compasses, but they have the added benefit of being able to also be used as a protractor (angle measure) and directly transfer angles from map to compass - and vice versa .
From reality to map
Aim at the target (see the red arrows on the compass in the picture, this is the direction) and turn the compass disk until the marked north pole of the arrow is between two marks on the glass (which is not in the picture), while the compass itself must be aligned with the target. After that, you can read the direction (azimuth) at the marked position, transfer the angle to your map as shown in the picture, or use it to move outdoors.
From map to reality
From map to reality, it's just the opposite. First you put the compass on the map, as seen in the picture, pointing from your home position to the target. Then you turn the compass dial until its north mark points to the north of your map. Now you remove the compass from the map and turn it (turn it yourself) until the marked north pole of the arrow is between the two marks on the glass. The compass will point in the right direction.
Once again: as long as the compass is on the map, the position of the arrow does not matter. You also don't need to rotate the map. Just make your determination, set the direction, and then take the compass and turn it until North is north. The compass shows you where to go. It may seem complicated at first, but it's actually quite simple.
To make this guide easier to understand, I've used a simple orientation or compass on a map. Similar bearing compasses (see above) with notches and sights, as well as an additional folding mirror in which you can observe the arrow while aiming, allow you to get much more accurate bearings.
Note:
- Outdoors, you will also have to take into account magnetic declination, which varies locally and is shown on maps in most cases.
- In shipping and aviation, the bearing is always given in three digits (078 instead of 78). Since I had limited resources, I decided to do without extra numbers. Who knows how long my pen will last and if I'll ever find another?
Was the article helpful?