Noita - How to Make Wands
A detailed guide to creating the best configurations of wands, castes in Noita.

Basics
Each wand will fire all projectile spells in its slots with the delay specified in the Spell Delay field. If the expended spell has a modifier to this parameter, then it is applied accordingly.
And after all the spells are used, the wand will go away for the recharge time specified in the parameter of the same name.
Spells also cost mana, each with its own value, plus modifiers applied to it.
Wands have their own mana pool and reload speed.
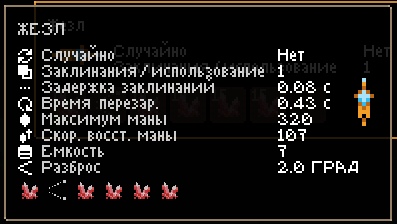
The actual attributes of the wand are, in particular, the following:
Accidentally - if "Yes", then the wand will select a random spell from the list of spells and use it. I'll go into more detail on how the modifiers interact, but random wands are more effective when you just need to fire all the spells on the list in random order.
If "No", the wand will cast each spell in order. Later, I'll go into more detail about how modifiers, timer spells, activator spells, and passive spells interact with each other.
Spells/use - determines how many spells in the list are used per mouse click.
Spell Delay - the amount of time that elapses between successive spells, and each individual spell adds its own time modifier.
For example, a bomb has +1,67s to spell delay, while spark lightning has +0,05s. Accordingly, if you install several bombs and several sparks nearby. lightning bolts, the former will be used much longer.
Recharge time - The amount of time it takes for the wand to update its list of spells. Once you've cast all the spells placed in the wand, you'll see a yellow "Recharge..." pop up above your head when you try to cast.
Max Mana - the maximum amount of mana in the wand.
Mana regeneration rate - The rate at which mana is... Regenerated.
* Quick note about mana: If your wand doesn't have enough mana to cast the next spell on its list, it will simply skip it if there's another spell after it that has enough mana.
Емкость - the number of spell slots in the wand.
scatter - the value indicates how far the projectiles can scatter to the sides when casting. Negative values, on the contrary, bring the projectiles closer together.
Spell Interaction (Basic)
At first, you simply shoot spells at enemies, such as starting spark lightning. The wand will simply fire that projectile after use.
But things get fun when you add projectile modifiers, and even funnier when you add spells with activators or timers to the mix.
Don't worry, I'll try to explain.
First, I'll explain what they all do, and then what to expect when using them together, as well as the most useful interactions.
Also, almost all of this information is pretty much useless with random wands, since you have no control over how the modifiers/activators/timers interact with each other.

Projectile modifiers are spells that modify a projectile. They change speed, damage, trail, direction, etc. These are spells! And spells are "read" with a wand from left to right. This means you can stack as many gear modifiers as you want (if you have the mana and slots) to the left of the projectile, and they will all affect the first spell placed to the right of the last modifier.
Example: you put a damage mod, a speed mod, and a crit mod in a row, and then you have two spark bolts. When you fire for the first time, the wand will read all of these modifiers and add them to the first spark. lightning, and then a second lightning is cast without modifiers, and it comes out as a simple projectile.

Multicast - These spells work like the modifiers mentioned above. But instead of only affecting the next spell on the list, they can change any number of spells.
This means that if you have a double dispel spell, it will tell the wand to fire two spells to the right at the same time. The same goes for other similar spells such as Behind Back, Hexagon, Above and Below, etc. They look for a projectile spell after the modifier to fill each direction.
Example: you put the Behind modifier and place three spark bolts in the following slots. The first shot will read the modifier, find two projectiles, select the next two sparks. lightning, and these two sparks. lightning bolts will be fired in front and behind you. The next shot will be only one spark. lightning, and then the wand will recharge.

With activator or timer
Activator spells are projectiles that automatically cast the next spell to their right when they hit a wall or an enemy. If the spell doesn't hit anything, it doesn't cast anything.
Spells with a timer - they also cast on contact with something. The only difference is that if the spell doesn't hit anything, the cast still happens.
Example: You insert two spark lightning with a timer into the wand, and one regular in order. When the first spell hits something or its range ends, it casts the next spell. The new spell will do the same, casting a third, regular spell, which will be the last one.

Liabilities - spells that constantly do something with your character or with the magic wand itself at the expense of some mana. These effects are active only if you are holding the wand containing them. Also, I don't know if this is a bug or not, but if you have a passive in the last slot, your wand will get a delay at the end of the spell queue. If you reassign the passive to start, there will be no delay. (Always put your passives in the first slots)
Example: You place the torch in the first slot of your 10-slot wand, and the remaining slots contain everything else. Now when you pull out this wand it will burn like a torch and can be used to interact with the environment. (Shine, set fire, etc.)
Spell Interaction (Advanced)
Modifiers and multicast - Let's say you need a shotgun of three fiery spark lightning. The way to achieve this is: Multicast -> Modifiers -> Projectiles 1 - 2 - 3. The multicast will be read first, then all the following modifiers will be collected, and then the next three projectiles will be selected. The shot will be simultaneous for all three projectiles, and the modifiers set before the multicast will be applied to all of them.
Example: Triple Dispel Spell -> Flame Trail -> Spark Lightning-> Jumping Blast -> Magic Lightning. When you left click, the scatter spell is cast, then the fire trail is cast and added to the modifier collection, and then the next three projectiles are cast. Your wand will fire all three projectiles with the fire trail applied to them individually.
UNIQUE - Arc modifiers are unique to multicasting, they cause any element (Fire Trail in the case above) to jump between all projectiles that are cast together. Gives nothing when used on a single projectile.
Modifiers and Activators/Timers (Triggers) - the modifier will affect the next projectile to the right of it, but nothing after it (except in the cases described above, where it is "collected" by the multicast modifier). This means that when using triggers, if you place a fire trail in front of a triggered projectile followed by a regular projectile, the first projectile will have a fire trail and the second will not. You can also do the opposite, so that the first projectile does not change, but the next one it fires is modified.
Now let's combine these two concepts to get some kind of cluster spell.
Modifiers, multicasts and triggers - Since the trigger casts the spell on contact/expires, it also uses modifiers and multicast. This means you can have a triggered projectile with a multicast after it. And the trigger projectile that casts the next spell will read the multicast, and cast as many spells as it specifies.
Example: Timed Spark Bolt -> Triple Scatter Shot -> Spark Bolt -> Spark Bolt -> Spark Bolt. This will fire one projectile, and when that projectile hits something, three spark bolts will be fired from its location.
Now add modifiers - modifiers only affect the rightmost projectile unless they are collected by a multicast modifier. Fire Trail -> Spark Lightning with Timer -> Triple Cast -> Damage + -> Crit + -> Saw Blade -> Saw Blade-> Saw Blade. The first projectile, a spark lightning, will fire with a trail of fire, and then when it hits something or travels a certain distance, the projectile will shoot out three damage and crit boosted saws. This means that if you know the approximate distance the projectile will travel before firing the saws, you simply stand a little further away from the enemy and then shoot. The saws will fire spark lightning directly in front of the enemy, dealing triple damage, boosted by modifiers.
IT IS IMPORTANT
I think based on the above, you understand that you do not need to have too many slots or too much mana in order to kill everyone and everything. All you need to do is manage what you already have.
one more step forward
Now let's say you have a multicast that casts three projectiles, each of which casts a few more projectiles. This is where the rabbit hole starts, where you can go through as many layers as your wands/spells allow. To describe the multicast selection process, let's create a mental flowchart of an example. Consider this set of spells in a wand in this order:
Flame Trail -> Triple Scatter -> Timed Magic Bolt -> Arrow -> Timed Magic Bolt -> Arrow -> Timed Magic Bolt -> Arrow.
On a left click, the first thing that reads is a fire trail applied to whatever was thrown by the triple cast. Triple Scatter is looking for three projectiles, so it first finds the first magic bolt with a timer. But now the magic bolt is looking for its own spell to cast, so the next spell to cast after the timed bolt is an arrow. After the timed bolt finds a projectile behind it, the triple spread continues to look for more projectiles to fire, so the process is repeated for the next two magic bolts.
I've omitted modifiers in the example for simplicity, but will say that after the first timed bolt there was an acid trail that will be applied to the arrow coming out of the magic bolt that was originally fired.
When you use this wand, it fires three magical bolts like a shotgun, and then each one fires its own arrow with whatever modifiers you place between the bolt and the projectile after it.
Madness - I think wands don't have enough slots or mana for that, but theoretically it would be very funny if you had a multicast of several projectiles with a timer, and each projectile had the next multicast and several projectiles following it.
What do you need to look for to be cool
The most important thing to look out for is NOT random sticks. Random is good for casting the same projectiles, but not for creating controlled spells.
Here I will break the text into early and late game.
AT THE BEGINNING OF THE GAME
1. Wands with a minimum of 200 mana, 50 regen, and as close to zero reload speed as possible.
Wands with near-zero cooldowns can also be used with a single spell that will cast at an incredible speed. The obvious downside to this is that it burns mana, so you won't be able to hold the left mouse for long with most spells.
Sometimes you get a wand that shoots pretty fast, reloads faster than the starting stick, but usually it only works with weaker spells.
The stick with the bomb at the start is a good example of this. Put spark lightning in it, and it will cast pretty quickly, and then it will restore mana for a long time.
2. Wands with multicast modifiers, triggered spells, or your favorite explosive/powerful cast. Even if the wand itself is rubbish, hold on to these valuable spells to craft a wand for the later part of the game. With the cluster shot method I talked about earlier, you only need one triggered spell to continue it with a multicast. Don't miss it.
3. Tentacle. Not a record for maximum range or attack speed, but it deals 25 damage, which is very good in the first two stages of the game.
Aside from these three, the wands you find early in the game are often irrelevant in the future, as you will most often find random wands with junk spells. Therefore, most can simply be ignored, except for those that are really useful to you.
NEAR THE END OF THE GAME
You must NOT have random wands.
1. Wands with a capacity of 10-13 slots with a mana of about 1,5k and a cooldown of 50. Not great if the cooldown is high, but almost anything under 1 second will do. These wands are great for pulling a powerful cluster shot, which can easily bring you closer to the passage of the game.
2. Nuclear weapons, a meteorite, a huge magic rocket, and everything that bangs hard.
Just be careful.
EXAMPLE OF A GOOD LATE GAME STICK
10 slots, 1k mana, 52 recovery, no coincidence.
In that order
Energy Shield Sector -> Cooldown Reduction -> Timed Magic Lightning -> Disorder -> Damage Up -> Crit -> Homing -> Magic Lightning x3.
This wand is what I took with me on the run, and it did good damage all the time. The shield on the player minimizes damage from enemy projectiles. The cooldown reduction makes the cooldown so fast that lack of mana was my only problem. The timed version of the spells is objectively better than the activator version, as you can both ricochet shots off the walls and just shoot them from afar. Damage, Critical Strike, and Homing mods make all projectiles deal a lot of damage.
A few more lines
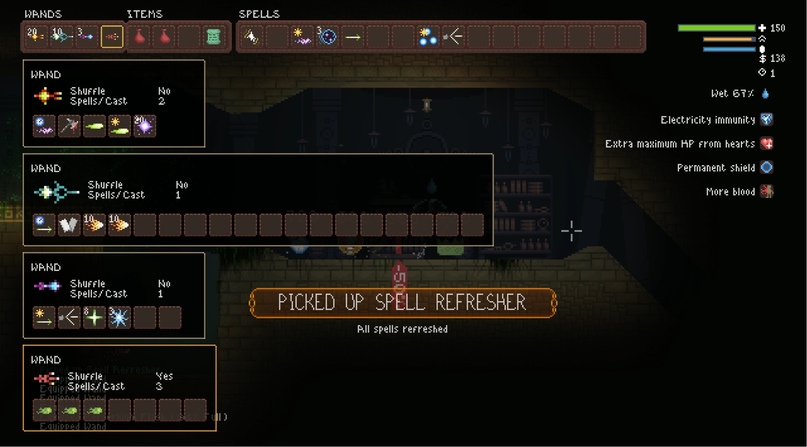
The first stick fires two projectiles.
The first projectile is a spark with a timer, the second is a magical lightning with an activator. The spark will cast magic lightning with a crit bonus, and the second projectile will fire a huge magic missile when it hits something, and it all works together to get really high DPS with a low risk of hurting yourself.
The second stick simply casts two VERY strong magic missiles from the magic arrow, which creates a large explosion about a second after the arrow is cast, which allows you to deal high damage in a precise and controlled way at a distance.
The third wand fires a magical arrow that, on impact, creates a giant death cross.
The second spell, Thunderbolt, has a very high mana cost, as does Death Cross, so the wand doesn't have enough mana to cast it.
But when the death crosses run out, then the mana will be enough, and a thunder charge will be cast, instead of a cross.
This approach makes it possible to optimally use the available spells.
The fourth, random stick, is just a wand that fires goo balls at a good speed. Reserve. Needed in case the remaining wands run out of mana, for example.
End.
That is why you need to be able to make the right wands.
I hope this guide will help you not only complete the game, but also enjoy it.
 Thank you very much!

