
In Lost Ark there is a collection of "Souls of the Islands". Collecting "souls" is not just the extraction of some items, but addictive, sometimes long, sometimes ...
Raid on Belakis in Lost Ark, the second of the Lords of Fetrania
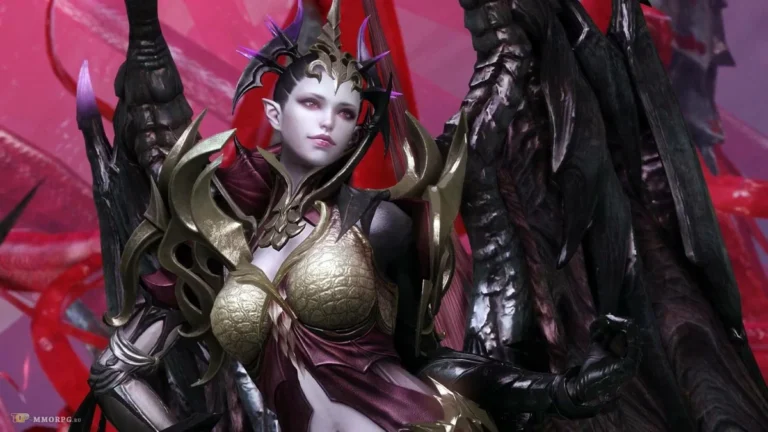
Belakis in Lost Ark, the Lord of Temptation, the embodiment of unrelenting lust, is the second of the Fetranian Lords. A team of 8 people can challenge her, for this, use the “Lord of Fetraniya” stele, which is located in every major city.
The battle with Belakis is available in two modes:
- normal (from equipment level 1430);
- heroic (from equipment level 1460).
A feature of this raid is the summoning of one of the 3 esdos to the battlefield. After the scale is completely filled, you can use one of the skills. Esdo abilities are only available to the raid leader. You can summon Ninav, Master Wei, and Iona to fight Belakis. Each of them has their own skills.
- Ninav - Light of Parkunas. The ancient bow, which contains the power of the Primordial Light, has the ability to remove buffs from the boss and deals significant damage.
- Master Wei - Awakening of the Beast. Summons a Beast that unleashes three powerful attacks that deal debilitating damage to enemies.
- Jonah - The power of Jonah. For 30 seconds, reduces all damage taken by 50% and grants immunity to debuffs (except for special ones), as well as restores health to raid members in the area of effect and reduces the effect of "enchantment" in the 3rd phase.
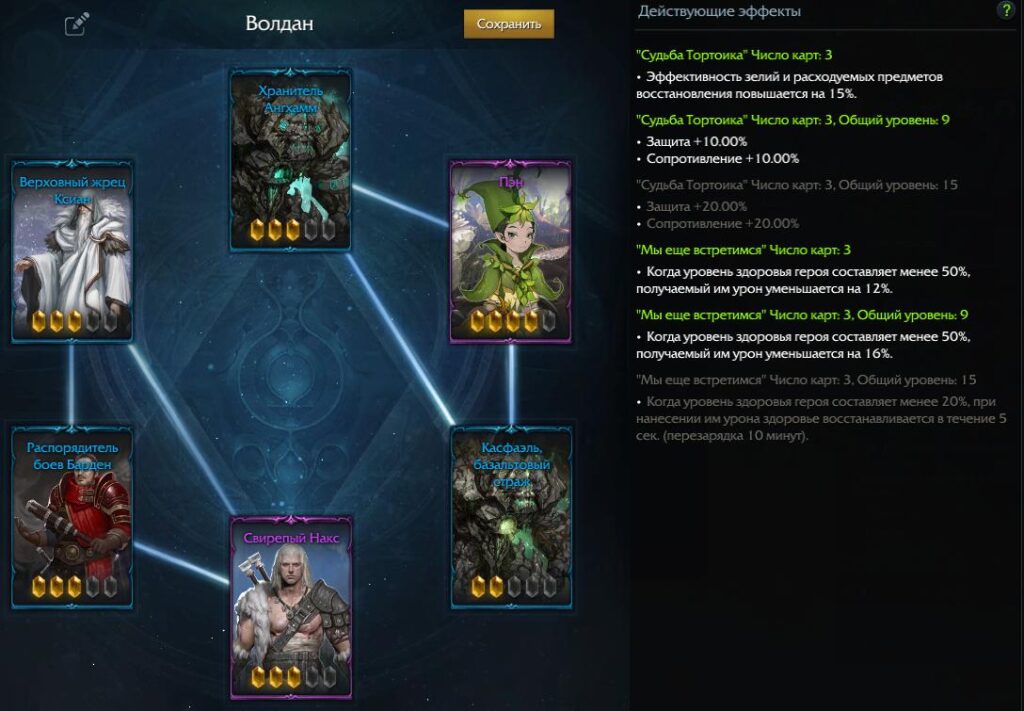
It is also useful to use the appropriate Ark Story deck for the passage if it is upgraded to a general level of 18. If not, then Tortoik's Fate and We'll Meet Again will come in handy to increase the hero's survivability.
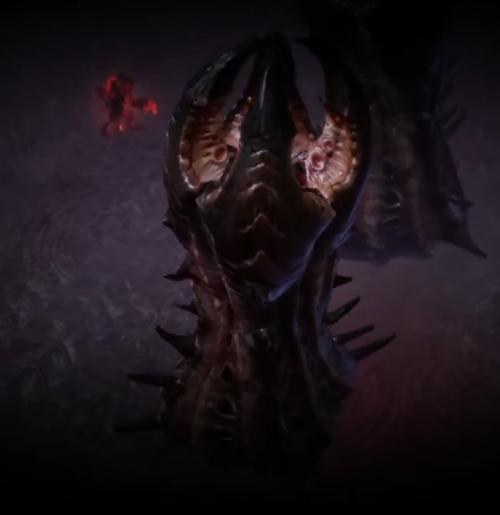
Incubus Morphaz Lost Ark
To successfully complete the minion of Belakis, you will need to coordinate the movements of the entire raid.
Recommended Consumables:


The boss fight is divided into several stages.
When the number of health bars reaches 55, the incubus splits into two incarnations: the incubus itself and its counterpart - an obsession from nightmares. One group starts the battle with the incubus, the second - with the double. When the number of health bars for both bosses reaches 30, the groups will switch places. Each incarnation has its own characteristics.
When the number of health bars reaches 48, the first incubus mechanic will begin. The boss moves to the center of the field and attacks in an area with a safe zone below him. The group stands on the clock at 1/5/7/11, after the attack, each takes 1 ball and must bring it into the goal. Green or red appear at 1 and 7, blue or white at 11 and 5. Color change sequence:
Portals:
When the number of health bars reaches 36, the incubus will move to the center and start charging. The group should exhaust him with skills and grenades. After exhaustion, the boss assigns 2 blue marks and 2 black marks to the group. Your task is to catch the balls before they reach the boss.
Before the balls start flying towards the boss, circles will appear on the floor and a sequence of the appearance of balls of a certain color. According to the color, the player must catch the spheres clockwise or counterclockwise.
After the mechanics, the boss will give a massive attack that will damage the group on the incarnation. The task of the group fighting the incubus is to say where the safe zone is: inside the circle or outside.
When the number of health bars reaches 30, there is a change of bosses. It is necessary to stop the damage before the change.
When the number of health bars reaches 25, the boss in two incarnations will form 4 circles at the 12, 3, 6 and 9 o'clock marks. One of the circles will save the lives of the players on the obsession. But for this, the group interacting with the incubus must tell their comrades which circle is white.
When the number of health bars reaches 10, the incubus will start exhausting and catching balls mechanics, as in 36 bars. And then at 5 bars, both bosses will go berserk, start hitting harder and moving faster.
Sometimes the boss moves to the center and releases 4 balls that chase the players. The task of each player is to take the ball away and eat it. After that, carefully look: in which direction the breeze will go, the "pizza" will move in the same direction. If you successfully deal with it, you will receive a shield for the next massive attack of the boss.
Don't forget that if you move away from the attacks of the boss on the incubus, then on the obsession you should get up under the attacks of the boss.
The main types of attacks of the incubus Lost Ark
- The boss raises his hand - and 8 wedges appear below him, which fly out in 8 directions, creating a cross-shaped safe zone. At this moment, a mass attack is formed under the boss. At the stage of incarnation, it will also be a safe zone.
- The Incubus dashes forward and releases its clones to the sides or back. The clone explodes in an X-shaped area below it after a few seconds. Safely behind the boss.
- The Incubus summons 2 clones, releasing lasers along with them in front of him.
- The incubus jumps up and gives a fan attack in front of him. At the incubus stage it is safe behind, at the obsession - in front of the boss.
- The boss sends out a shockwave in front of him that comes back and forth. Safe on the side.
- Slams forward with its claws 2 times, then jumps up and gives a cross attack on landing.
- Makes 2 sweeping attacks in front of him, and also launches a 270-degree mass attack. Safe in the back.
- Summons orbs that explode on impact. After the incubus gives a mass attack on the inner or outer circle.
- The Incubus flies into the air, creating exploding circles, landing on one of the players a few seconds later.
- The incubus's obsession flies up, forming 2 circles inside and outside. The safe zone is on the purple circles. However, at this point, 5 balls from the sky will fall on each player. For safe movement, move up and down after each ball falls.
Belakis, Lord of Temptation
The first phase
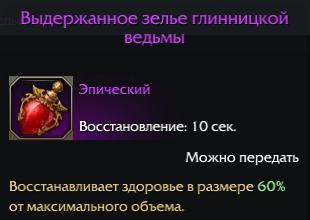
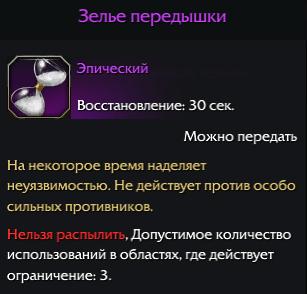
Recommended Consumables: Potion of the Witch of Clay and Respite, to make it easier for the mechanic, you can take a cloak of agility or a marching banner with you.

The boss fight is divided into only 2 stages.
When health bars reach 120, Belakis disappears and summons 3 clones at 2, 7, and 11 on the far side of the battlefield. Clones have several variations: with open wings, with closed ones, and a clone with one wing. After a while, the clones will sequentially start to give a massive attack that deals fatal damage. To escape from it, the entire raid needs to stand near the clones in a certain order. Spheres will help you find out the sequence of attacks.
In parallel, 5 balls appear on the field. Decide in advance who takes 5 balls: 1 in the center and 4 at 12, 3, 6 and 9 o'clock, and who checks the clones at 3, 7 and 11 o'clock. After picking up the orbs, marks will appear above the heads of the players - purple and red. Get together to count the number of reds and purples.
If you have a total of 3 purple signs, then you start hiding from attacks with a clone with folded wings, then with 1 wing, and end with a clone with 2 open. If 3 are red, then vice versa, starting with a clone with 2 open wings, then with 1 wing, and ending with a clone with fully closed.
When the number of health bars reaches 65, Belakis will again summon 3 clones at levels 5, 7 and 12. But now the raid is divided like this: 2 people near each clone and 2 on the pickup. After a while, the clones will start emitting waves (5 times). Your task is to remember what the number of black waves were. After the waves, the clones will start shooting balloons at Belakis. The task is to catch the balls corresponding to the black wave (1 ball - 1 player). If the player catches the right ball, a black halo will appear above it and a negative effect in the line. Therefore, if you had 3 waves on a black clone, 1 player comes up to you on the catch.

The main types of Belakis attacks
After 50 health bars, being hit by Belakis's attacks will inflict a debuff.
- The boss jumps to the center, flying up, and forms a ball in the center of the field. Circles are formed under the players, and after a few seconds, strings are drawn from the ball to the players. As soon as the wave in the field below the player reaches completion, the laser will fire. Therefore, the raid moves back a clock and runs clockwise until the laser attack passes.

- Belakis forms a ring with his palms. Marks appear on 7 players, and a circle appears on one, indicating that Belakis released a larger ring at him. Puddles will explode under the marks, and after a few seconds or on impact with the target, the released ring explodes, forming a safe zone under it. A respite potion can save you from an explosion if you do not have time to enter the zone or go beyond the attack.
- Belakis does somersaults by kicking the ground and releasing about 7 wedges that come back and go in the opposite direction.
- Makes several dashes that can be caught with a counterattack.
- Belakis folds his arms and forms a golden ball, golden rings fly out of it. Each ring stuns the player and explodes the area below them. Once under the ring, you can get out from under it with a jerk.
- Belakis does somersaults on the spot, and then releases 6 purple balls (3 each in front and behind), dealing significant damage. After pulling the players to him.
- The boss releases small purple disks to the sides, then flips and releases 3 more large disks. During this attack, it can be counterattacked.
- Jumps back and performs a spinning jump attack, landing on nearby players.
- Jumps and kicks, releasing three puddles in a row in the direction of his gaze. With some probability, it can cause additional explosions under the players.
- Flies up and gives an extensive attack in front of him. The safe zone is behind the boss.
- The boss gives an inside or outside area attack that stuns and deals damage.
- The attack starts after 120 health bars. The boss teleports to the center and slowly rotates the blood clots clockwise. After a while, gives a "checkered" attack with safe zones. You must dodge the blood clots and stand in an unpainted cage.
- The attack starts after 120 health bars. Belakis collects purple energy in his hand, summoning worms, small worms inflict a movement speed reduction effect. After the small ones, giant worms will appear in front of 3 players and grab the slow target. A player caught by a large worm will be blinded and deal damage over time, and then explode after a certain period of time, dealing large area of effect damage. To avoid loss, the trapped player can be rescued.
- Appears after 65 health bars. A V-shaped laser appears on 2-3 raid members, which should be taken away from the raid to the wall. After the explosion, a sphere appears, releasing small stun balls.
- Belakis chooses a target and attacks it. The attacked character will slowly float in the air, and then receive one of three combo attacks.
The second phase
Recommended Consumables: Witch of Clay Potion, Exhaustion Grenades and Respite Potion, you can also bring a sleep grenade with you in case your friend becomes your enemy.
In the last phase, there is some feature similar to the mechanics with oxygen in the Sea of Oblivion. As soon as the 3rd phase begins, a desire indicator appears above the players. The desire scale is filled immediately by 50%. It changes: falling under the attacks of Belakis, you will begin to fill it, and when you activate the sphere of purification, the value on the scale will decrease to 0%.
When the gauge is 70% full, the player activates 2 positive effects: one allows you to see what was hidden, and the second increases attack power and incoming damage by 13%. The effect can be increased up to 40%.
Once your gauge reaches 100%, your character becomes Belakis' puppet for 20 seconds and no longer obeys you. He starts attacking the rest of the raid members. After 20 seconds, the player dies. If everyone is under control, Belakis destroys the raid.
However, you can save a comrade with stun, freeze, sleep, and fear effects. Then the value on the scale will decrease to 50%.

In addition to using the sphere for purification, you can use Jonah's skill.
If the wish bar shows 0, it will result in the "helplessness" debuff, which will reduce your damage by 99%.
The boss fight is divided into several stages. Between 180 and 170 health bars, Belakis can debuff multiple players. Your task is to take the circles to the edge of the field.
When the number of health bars reaches 170, Belakis moves to the center, where he creates an aura that deals continuous damage and scatters puddles. For 6 players - blue, which increase the speed of movement, and for 2 - brown, which slow down. The task of the raid is to choose the hours in advance, the most convenient are 3 and 9. Players with blue auras divert puddles, and players with brown ones leave them, for example, at the 3 o'clock mark. One is almost at the very edge of the zone, and the second is a meter from Belakis's aura. Caution: blue puddles destroy brown ones. If your character has 140% movement speed, prepare a Respite Potion if you can make it to the boss. Those players who reach the boss and do not use a resting potion will be killed.
When the number of health bars reaches 150, Belakis will disappear and five "clones" will appear on the battlefield, only one of them will perform a deadly attack. To avoid fatal damage from Belakis, the raid must stand near the real boss. She will be where both the clone and the sword are. Those with a wish bar below 70% see clones, and players with a wish bar over 70% see swords. 4 swords appear, the player says at what hour markers, and the others check the location of the clones to find where the clone intersects with the sword.
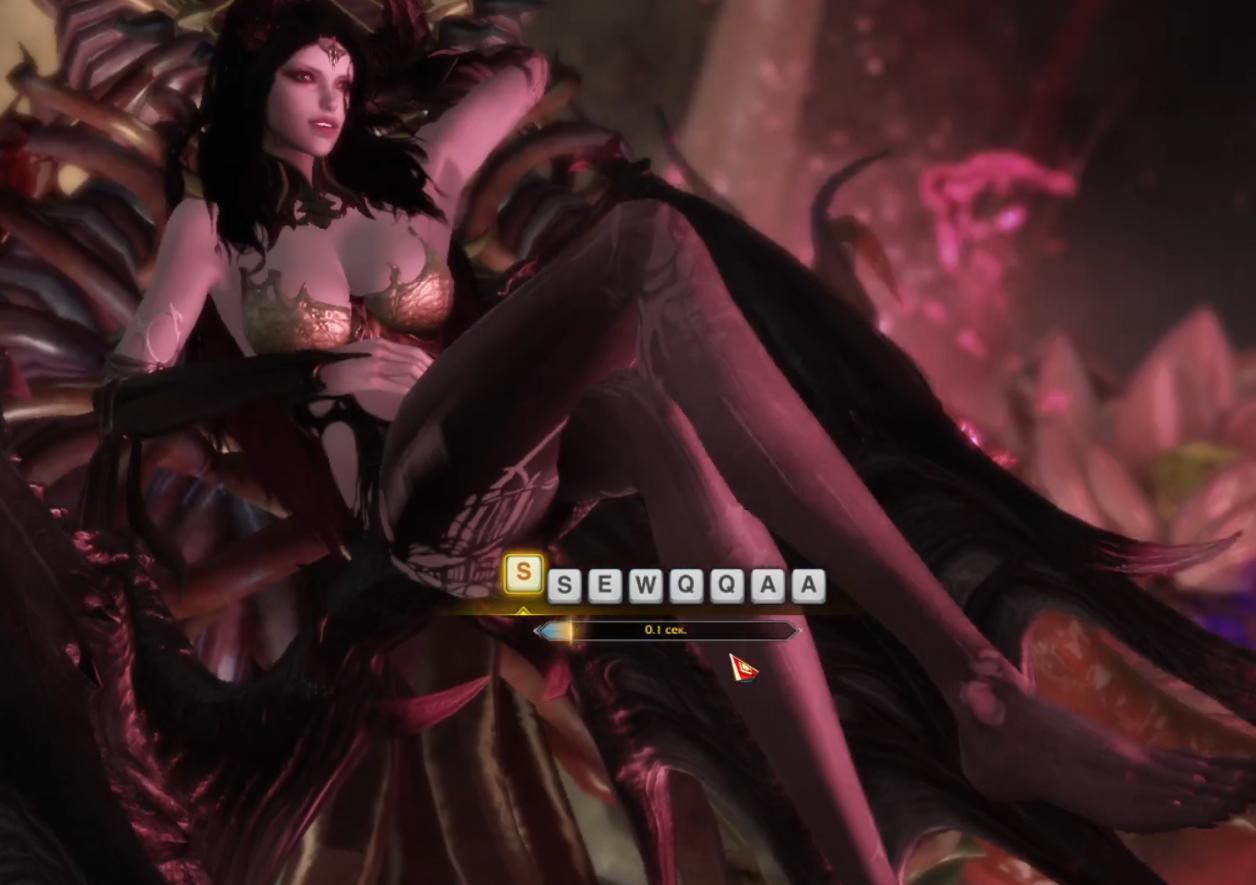
When the number of health bars reaches 135, the boss moves to the center, and the raid moves to any sphere of purification for 12, 3 or 9 and, by activating the sphere, depletes their wish bar to 0%. After that, a small scene begins where you have to press the qweasd buttons 2 times in a certain order in 4 seconds. Depending on the fullness of the desire scale, the time will decrease.
If the characters fail, Belakis will start eating 1 orb for each unsuccessful member and hang a shield on himself, which you can only remove with the Ninav skill.
When the number of health bars reaches 120, the "throne" mechanic begins.
The Lord will give three players a negative effect, they need to move to the center and stand in a triangle. After the disappearance of the effect, a zone of temptation is formed in this place. All players must at this time fill the temptation gauge by 100% and stand so as not to damage each other. After a while, a powerful explosion will occur, everyone whose bar was not filled will be killed. The rest will lose the effect of control.
When the number of health bars reaches 105, the boss will move to the center and spread an aura that increases the desire bar. Belakis needs to be debilitated, and at levels 7 and 1 she summons 2 mini-bosses that explode after about 7-8 seconds. There are 3 options for passing the mechanics.
First: use an orb to reset the scale of the entire raid to 0%, then exhaust the boss with skills and bombs; when mini-bosses explode, the entire raid must apply a Respite Potion.
Second: call for master Wei, who will exhaust Belakis, and let the raid split into 2 groups and deal with mini-bosses. It is advisable to have a couple of people with 70% desire to kill them faster, or summon Ninav, which will obliquely hit both Belakis and the mini-boss.
Third: suitable for those planning to go through the mythic mode - 6 players reset the value on the scale to 0% and exhaust Belakis, and 2 players with 70% of the scale divide mini-bosses among themselves and kill them solo.
When the number of health bars reaches 75, the same mechanic is repeated as at 170 with puddles.
When the number of health bars reaches 55, Belakis moves to the center, 8 tentacles appear on the sides of the arena, which you must destroy in about 24 seconds. To destroy you will need to keep the scale at 70%. However, during this mechanic, Belakis forcibly lowers the gauge, so you should catch spheres to replenish it up to 70%.
The number of remaining tentacles has a positive effect on Belakis, and their location can be seen on the mini-map. Players with extensive attacks can take the 3, 5 and 6 o'clock positions, there will be 2 tentacles each.
When the number of health bars reaches 35-30, in Heroic Difficulty the boss will jump to the center and attack in the outer circle. It then summons 4 orbs at 1, 5, 7, and 11 o'clock. If the sphere reaches the boss, a powerful attack will occur that will kill the entire raid. Therefore, 4 players with a scale below 70% get up on the clock and pick up the orbs. After they catch her, you should press "Space" for 3 seconds to get out of captivity.
The last mechanic is waiting for you at about 2 strips. After the cutscene, Belakis goes berserk and leaves the center, spawning copies at the 3, 6, 9, or 12 o'clock marks, players with 70% temptation will help you determine the direction, who will see the real Lord of Temptation (after a while it will be displayed on the mini- map). The task of the raid is to exhaust her as quickly as possible by standing behind her so as not to take damage from attacks. At this stage, your desire scale gradually fills up by itself. To empty it, players can stand in the black attack zone, at this stage it is better to call on Master Wei. After that, the boss will fly up, attacking from above, and land in the center, where you can kill her.
The main types of Belakis attacks
- Belakis launches a sword whip in front of him, releasing lasers from the links in two directions.
- Flies up and gives a wide area attack.
- The boss strikes in front of him with a whip, making streaks on the ground.
- Bounces back, then flies up and dives at the selected target, takes off again and dives again at the next player.
- Belakis launches a whip sword at a targeted player, when attacked, she locks onto the target and flies with them. The player in the grapple takes constant damage and a decrease in the desire bar. Upon grappling, the boss will perform a 4-way wide attack that refills your meter.
- Belakis unleashes blood drops on the raid and simultaneously attacks in the outer and inner circle. Only 2 options: either the circles are painted over in the direction from it, or towards it. All attacks will increase your wish bar.
- Belakis uses a chess attack as in phase 2, but also chooses 2-3 players and releases spheres at them.
- Belakis summons a portal and releases a sword into it, portals open near the players, from where this sword can deal damage. The player who was hit by the sword falls into the chains.
- Belakis forms a circle under him and paints one part scarlet. If the sword in her hand is in the red zone, then the safe area will be next to her, if the sword is in the black zone, then it will be safe on the outer circle from her.
- Belakis begins to fly over you. Please note: if the sword is hidden, then it is safe exactly under the zone where it flew, if the sword is in hand, then you should move away from the zone - the attack will take place there.
- Every 2-3 minutes, Belakis will form a huge zone below her, which signals that she has summoned large flying worms. Their direction and location can only be seen by players with a bar filled by 70%. Therefore, you need to either move to the edge of the map, where it is safe, and wait for the worms to pass, or trust the players who see them and run. The circle formed by Belakis not only deals damage, but also replenishes the gauge a little.
- Belakis emits waves and summons an eye that will deal significant damage if the mechanic is not met. The mechanic is to determine how many wings the boss has: one, two - or they are closed. If there is one wing, then the whole raid turns away from the boss, and one of the players looks at him. If two, then two players are looking at the boss. And if all the wings are closed, everyone turns away from Belakis.
- Among other things, Belakis can be caught by counterattacking.
Awards
As a reward for successfully completing the raid, you will receive decorations, material for creating equipment, gold and other rewards!
- Resources for crafting new equipment.
- Value Ornaments Rank 3 Relic.
- Gold.
- Fethranites, engraving sketches, maps and more.
The reward for completing the raid can be received once a week.
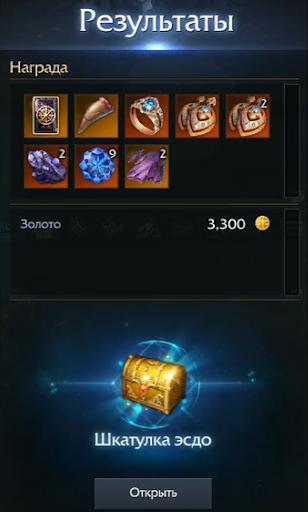
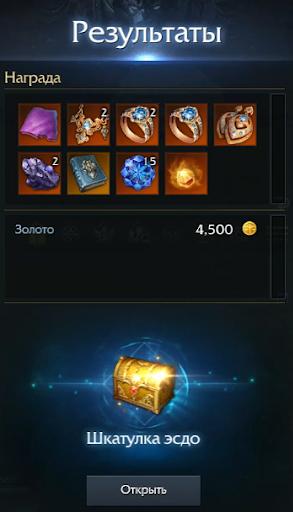
After completing the raid, Seekers will be able to purchase an Esdo Box for 250 crystals with an additional reward that includes Rank 3 Relic Quality Jewelry, crafting materials, and other rewards.
Was the article helpful?