

Passage of the game Lost Lands 9: Tales of the First Brotherhood 100%. All the secrets, puzzles, mini games, collectibles and achievements in one place...
100% Walkthrough The Elder Scrolls III: Morrowind
Detailed text passing game The Elder Scrolls III: Morrowind (Morrowind) 100%.
Main plot
- Report to Caius Cosades
- Informant Antabolis
- Informant Gra-Muzgob
- Informants in Vivec
- Informant Zainsubani
- Encounter with Sul-Matuul
- Base of the Sixth House
- divine sickness
- Mehra Milo and the Lost Prophecies
- The path of incarnation
- Mentor Redoran
- Hlaalu Master
- Telvanni Master
- Nerevarine Urshilaku
- Nerevarine Ahemmusa
- Nerevarine Zainab
- Nerevarine Erabenimsun
- The Mentor and the Nerevarine
- Lucky coin (optional)
- Strongholds of the Sixth House
- Getting the Separator
- Obtaining the Cleaver
- Invasion of the fortress of Dagoth Ur
Report to Caius Cosades
At the very beginning of the game, you will find yourself in the hold of an Imperial prisoner ship. Talk to your cabinmate and tell him your name. Soon after, a guard will come up to you and order you to follow him - do whatever he says. Another guard will meet you at the pier. During the conversation, you will be asked to select your character's race, gender, face, and hairstyle. Choose wisely - harmoniously selected race and specialization will help you get a strong enough character from the very beginning of the game.
After you confirm your choice, walk along the pier into the building and talk to Socutius Ergalla. He will offer you to fill out papers that will indicate your class and the sign under which you were born. After confirming the choice, take the papers from the table and proceed through the door to your left.
Before you leave the building, try to grab as many things as possible, in the future you can sell them, which will greatly facilitate your financial situation. Finally, exit to the courtyard and approach the neighboring house. To the left of the building, you will surely notice a barrel. In it you will find Ring of Healingwhich can then be returned to its rightful owner. After that, go into the house and talk to Sellus Gravius. He will give you a modest allowance and tell you a lot of interesting information about Morrowind and about Seyda Nin - a small village in which you are. The name of Kai Cosades, an agent of the Blades, will come up in the conversation. Talk to Sellus about it and get a package for Kai, which will need to be delivered to the addressee.
Cosades can be found in Balmora. The best way to get there is by silt strider, although you can also walk, however, for a low-level character, such a journey can become too dangerous. However, before you leave Seyda Nin, talk to its inhabitants and complete a few tasks. They are not difficult, but will help you gain gaming experience and level up your character. And with the proceeds, you can buy better equipment.
After all the tasks in Seyda Nin are completed, go to Balmora. Kai Cosades' house is located in the northeastern part of the city. In the tavern "South Wall" they can tell you how to get to it.
During a conversation with Caius Cosades, select the line "Report to Caius Cosades", then give him the documents. After examining the contents of the package, he will ask if you are ready to follow his instructions. If you have already mastered the game - answer in the affirmative and get to work.
Reward:
200 drakes
Notes:
While in the building of the Imperial Chancellery, you can secure a completely comfortable existence for the next couple of levels. The alabaster tray is of particular value, but it is worth noting that, technically, its appropriation is theft. Therefore, we take the tray from the shelf, immediately throw it on the ground, tell the guard that we will no longer be there and pick up the tray back. Cosades' disposition towards you decreases by ten points every time you speak to him without a package, refuse to give him a package or refuse join the Blades. Kai, among other things, will say that all the other members of the Blades are ready to provide you with all possible help and offer their services. There are seven teachers in total: Gildan, Nine-fingered, Ritlin, Syovar Horsemouth, Suran Leorian, Tiermaillin, Elon. But remember: you can use their gratuitous help only if your character has not yet reached the fifth level.
| First name | Place of residence | Benefit | Training |
|---|---|---|---|
| Gildan | Ald'ruhn, home of Gildan | Recommends contacting Wayne of the Balmora Fighters Guild | Change (53) Mysticism (53) Illusion (50) |
| Nine-fingered | Balmora, home of the Nine-Toes | Four pinches of moon sugar | Athletics (54) Illusion (50) Sneak (50) |
| Ritlin | Balmora, Ritlin's house | Steel cuirass and helmet | Long Blades (58) Protection (50) Medium armor (50) |
| Syovar Horsemouth | Cabin in the Western Highlands | Recommends contacting Galbedir of the Balmora Mages Guild | Axes (50) Blunt Weapon (50) Long Blades (50) |
| Suran Leorian | Caldera, home of Suran Leorian | Recommends contacting Llaros Uwain at the Caldera Hall of Government. | Mysticism (54) Recovery (54) Destruction (50) |
| Tjermaillin | Balmora, home of Tjermaillin | Specialist Alembic | Enchantment (50) Mysticism (50) Recovery (50) |
| Elon | Seyda Nin, Arrilla Inn | Guide to Vvardenfell | Long Blades (62) Athletics (52) Medium armor (52) |
Informant Antabolis
As your first task, Kosades will ask you to speak with Hasphat Antabolis of the Balmora Fighters Guild. Kai is interested in information about the secret cults of the Nerevarine and the Sixth House. However, Kai will warn you that Antabolis will most likely require you to complete some task for him.
So, go to the Fighters Guild and talk to Antabolis. He, as Kai warned, will ask for a small favor. You will need to go to Arkntand and find a Dwemer puzzle there. The gates of the Dwemer fortress are opened by a small lever located near the front door. Once you have the puzzle, return to Antabolis. However, you can explore the rest of the ruins, this will help you gain experience and earn some money.
After you return with the Dwemer puzzle to Hasphat, he will tell you some information about the Nerevarine and the Sixth House, but he will add that it is best to talk about local beliefs and superstitions with Sharn gra-Muzgob in the local Mages Guild. With the information received, return to Kai Cosades.
Reward:
Membership in the Blades
Key to Arkntand
Notes:
As a kind of reward, Antabolis will offer you the key to the lower levels of Arkntand. It should be noted that this key has no special practical value. All locked doors can be easily cracked with a master key. So if you have already bypassed the entire Arkntand, then you can safely throw away the key. After the return of the Dwemer puzzle with Hasfat, it is worth talking about the "Dwemer", as a result of which Nchuleftingt and Mzuleft markers will appear on your map. If his disposition towards you is high enough, then when choosing the Nchuleftingth replica, you will receive a letter of recommendation, which should be given to Senilius Cadiusus in Nchuleftingth.
Informant Gra-Muzgob
After studying the notes, Kai will give you the next task - to talk with Sharn gra-Muzgob about the cults of the Nerevarine and the Sixth House. The building of the Balmora Guild of Mages is located next to the building of the Guild of Fighters.
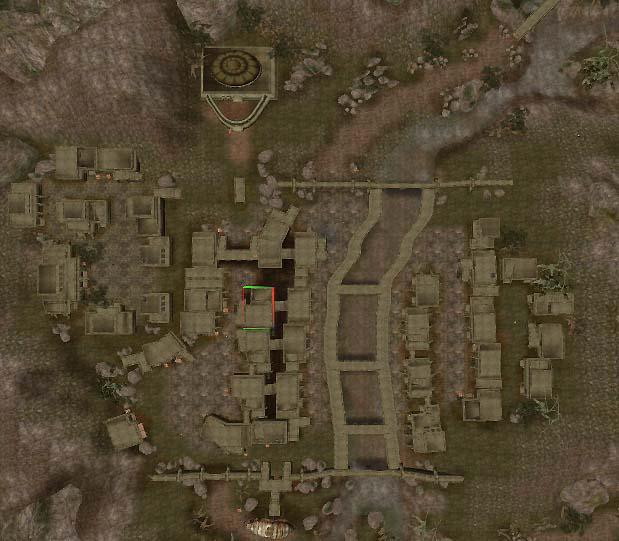
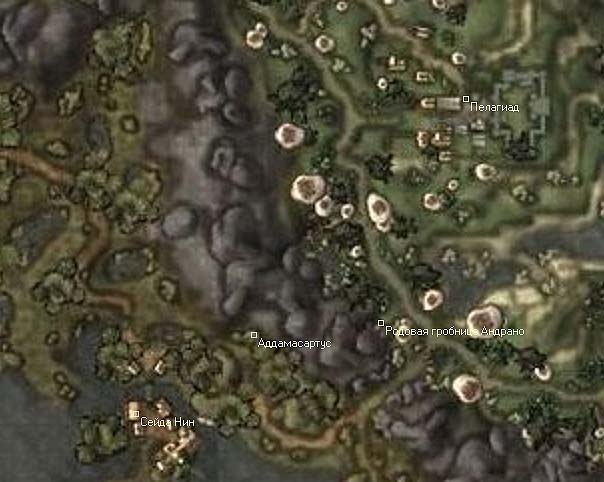
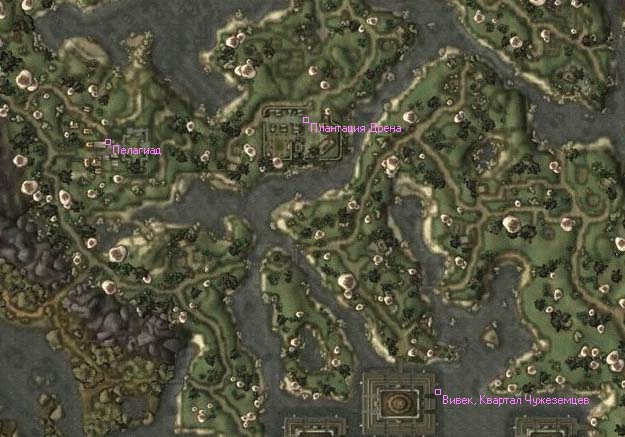
When you talk to Sharn, she will say that she can tell you about the Nerevarine cult, but only after you complete her order - you will find the skull of Llevul Andrano in the Andrano Ancestral Tomb. The tomb is located south of Pelagiad, right next to the road. However, it is worth remembering that all ghosts are resistant to conventional weapons, so you should buy some kind of magic blade. However, Sharn will give you the Blade of Fire, but if you already have enough funds, look for a better weapon. When you have the skull, return to Sharn gra-Muzgob and she will give you her notes on the Nerevarine cult.
Once you have the notes, go to Caius Cosades. He will thank you for the work done and give you the title of "Beginner". If your character has already reached the third level, then Cosades will give you the next task.
Reward:
Blade of fire
Several scrolls
+1 to overall reputation
Notes:
On the shelf next to Sharn, you will find the book "36 Lessons of Vivec: Sermon 15", which will increase your skill in unarmored combat by one. Next to the skull, you will surely find a unique Dagger of Justice, which will serve you well at first.
Dagger of JusticeType: Short blades, One-handed weapons Chopping: 3 - 3 Cutting: 3 - 3 Stab: 3 - 3 Condition: 400/400 Weight: 1.5 Price: 6 Effect on impact |
Informants in Vivec
Now that you have the records of Sharn gra-Muzgob and Hasphat Antabolis in your hands, it is up to you to gather information about the Nerevarine cult and the Sixth House in Vivec. To do this, you will need to interview three informants: Addhiranirr, a Khajiit from the Thieves Guild; Huleyu, an Argonian from the Morag Tong; Mehru Milo, priestess of the Temple. It's best to start with the first two. You can get to Vivec by silt strider from Balmora.
Once in Vivec, go to the District of St. Olmes and go down to the level of the Canals. Talk to the locals, such as Seviza Teran. She will tell you that Addhiranirr is hiding from an agent of the Imperial Chancellery and that you should look for her in the dungeons. Get down even lower, to the level of the dungeons. Addhiranirr is indeed here, but she won't tell you anything until you solve her problem. The pesky agent is named Duvianus Platorius and can be found right there in the St. Olmes' District Belt. Talk to him about Addhiranirr and tell him that the Khajiit has left Vvardenfell and gone to the mainland. Office agents are so naive that they believe the first stranger they meet. After that, you can return to Addhiranirr for information. As soon as she tells you everything she knows about the Nerevarine and the cult of the Sixth House, you can start searching for the second informant - Huleya.
You will find an Argonian in the Black Shulk Inn, but he is not going to share information while his life is in danger. The fact is that Huleya is threatened by several racists who dream of cracking down on him, since the presence of a free Argonian gets on their nerves. He cannot fight them, as this would damage the reputation of the Morag Tong, and he also does not want to set up his friend, the owner of the inn, so you will have to settle his problems. There will be only three opponents - Etis Savil, Urven Davor and Favel Gobor. You can kill them or bribe them. In the latter case, it will be necessary to raise their disposition towards you to 60 or higher. If you have money and a well-spoken tongue, then everything will work out. Well, if not, get ready to fight. Once the problem is resolved one way or another, escort Huleya to Jobasha's bookstore. There he will tell you everything he knows about the cult of the Nerevarine, and will give you his notes, which should be delivered to Caius Cosades.
The third informant, Mehra Milo, can be found in the Vivec Temple District, in the library. This informant will be the most accommodating of all - to get information from Milo, you just need to go with her to the back of the library. There she will tell you everything she knows about the cult of the Nerevarine and advise you to get the book "Advancement of Truth", which outlines the worldview of the apostate priests. This book is very rare, there are only five copies in all of Vvardenfell. The following are the locations of all existing copies: Tel Uvirith, Arelas' homeVivec, Secret Library in the Hall of JusticeVivec, Jobashi's Rare Books Vivec, Temple LibraryVivec, Telvanni Tower
As you understand, the easiest way to get it is to steal it or buy it from Jobasha.
Once you have collected information from all three informants and obtained the Progress of Truth, return to Caius Cosades with a report. If you have collected all the required information, then Kai will assign you the title of "Wanderer". After that, Cosades will offer you to increase your skills and complete several tasks from other guilds. Follow his advice, and when you feel that your character has grown stronger, return.
Reward:
200 drakes
+1 to overall reputation
Notes:
The book "Advancement of Truth" is best stolen or bought from Jobasha while helping Huleya, so as not to return there after talking with Mehra Milo.
Informant Zainsubani
As a result of studying the collected information, it became clear to Kai that most of the information can be found among the Ashlanders. Thus, the next task of Kosades is to search for an informant among the representatives of this nationality. Go to the Dunmer named Hassur Zainsubani for information about the Nerevarine cult. You can find him in Ald'ruhn, in the Ald Scar tavern. However, before he shares his knowledge, you will have to give him a gift. Since Hassur loves poetry most of all, a collection of poems will come in handy. For this purpose, one of three books will do: Ashland's Hymns (available from the bookseller in Ald'ruhn or the Hlaalu Archives in Vivec), Words of the Wind (purchased from the bookseller in Ald'ruhn), or " Five Distant Stars (bookstore in Ald'ruhn). However, instead of books, you can do a favor for Hassur: find his missing son Hannat, who has gone to explore Mameya, an ancient underground complex located west of Red Mountain. By the way, you don’t have to look for the son himself, just promise that you will find him. Once you gain Hassur's trust in one way or another, he will hand over his notes to you. After receiving them, return to Caius Cosades.
Reward:
200 drakes
Various potions and scrolls
Notes:
Interestingly, Khassur is a member of the Thieves Guild, which means that members of this guild will find it much easier to negotiate with him than members of any of the Great Houses or the Fighters Guild. Before starting the next quest, Kai will ask you to visit Krulius Pontanian and Sommuthis Vunnis in Moonmoth Fort . The first one will give you some useful scrolls and the second one will give you some potions.
Encounter with Sul-Matuul
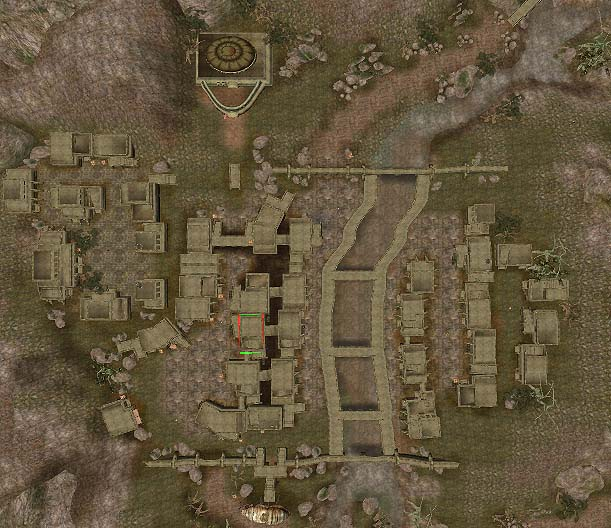
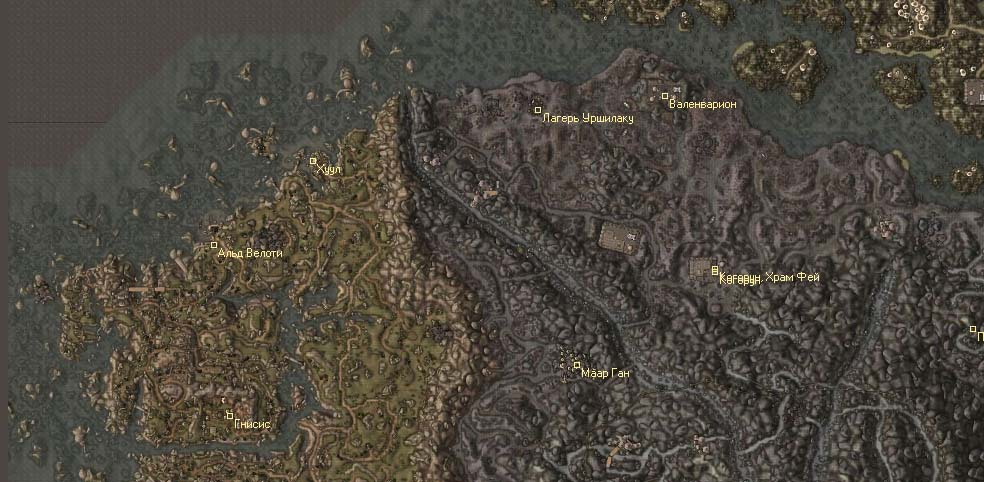
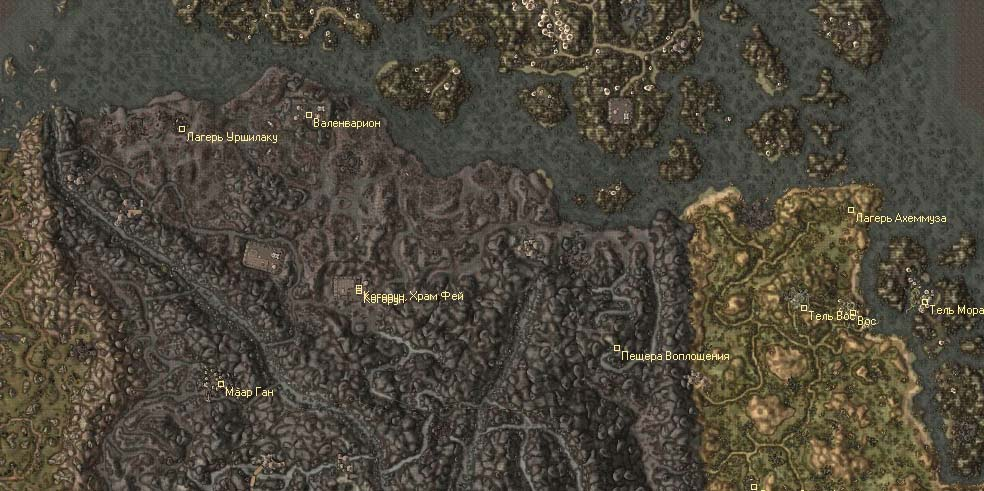
So, having received Zainsubani's notes, Kai will give you the next task - to come to Urshilaku's camp and talk there with Sul-Matuul and Nibani Mesa. Before you leave, Cosades will tell you something interesting. It turns out that it is you who fit the prophecy of the Nerevarine, it is you who may be the embodiment of the ancient hero of the Dunmer - Nerevar. That is why you were released from the Imperial prison, sent on a secret mission to Morrowind. Well, the emperor's desire is quite understandable. Nerevar in ancient times fought for the independence of Morrowind all his life, his name is sacred to all those who want to wrest the province from the rule of the Empire. Therefore, to take the Nerevarine, the incarnation of Nerevar, into your service is a very successful political step. It's definitely risky though. However, let's leave high politics alone and return to the task of Caius Cosades. The Urshilaku clan camp is located far to the north, on the coast of the Sea of Ghosts. You can get to it either from Maar Gan along the Ban-Dad foyade, or from Khuul by water (by swimming or using spells). Remember, you must not kill members of the Urshilaku tribe, otherwise they will refuse to deal with you.
Once in the Urshilaku camp, you will need to talk with Sul-Matuul (tribal ashkhan) and Nibani Mesa (tribe shaman). However, they will refuse to talk to you until you get permission from Zabamund. Go to him and talk about the prophecies of the Nerevarine. During the conversation, you will be offered several answers: Offer a duel for the right to speak with Sul-Matuul. Your level must be at least 6. Show off your exploits. Your reputation must be greater than 20 or your Speech level must be greater than 30. Tell us everything you know about the cults of the Sixth House and the Nerevarine. Speech level must be at least 30. Offer 200 gold for the opportunity to speak with Sul-Matuul and Nibani Mesa. The condition is appropriate - 200 drakes in your pocket.
Having received permission, go to Sul-Matuul.
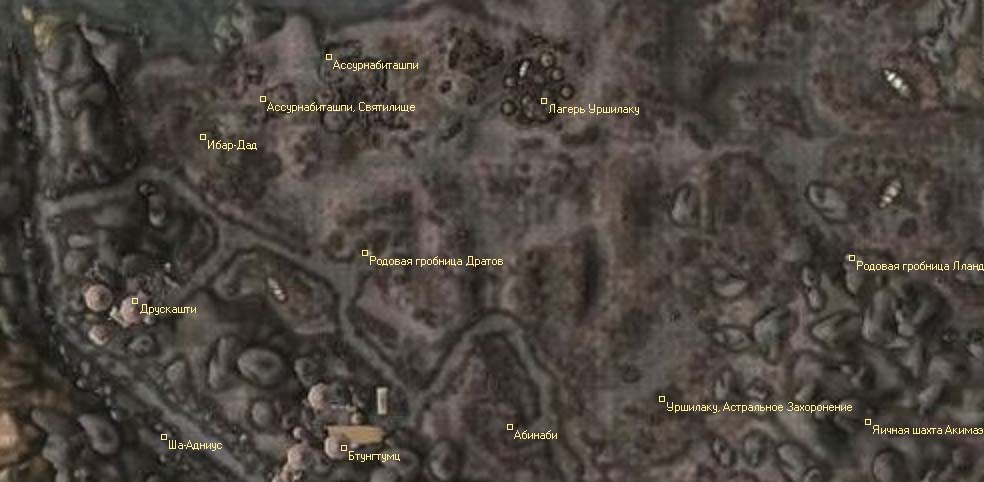
This time he will accept you, but he will notice that in order to be able to talk about the Nerevarine with you, you must become a friend of the clan. To do this, you need to go through the rite of initiation. Sul-Matuul's quest will become such a rite for you: you will have to get Sul-Senipul's Bonebiter Bow, buried in the depths of Urshilaku's burial caves. You will find these caves in the southeast of the camp, halfway to Red Mountain. The desired bow is located at the ghost of Sul-Senipul. Kill him and take the Bone Gnawer. When you have the bow, return to Sul-Matuul, and he will declare you a friend of the clan, completing the initiation rite. After that, go to Nibani Mesa so that she checks you for compliance with the prophecies of the Nerevarine.
Bonebiter Bow of Sul-SenipulType: Accuracy Attack: 1-20 Condition: 600/600 Weight: 2.0 Price: 105 Effect when used |

Now that you have become a Clan Friend, Nibani Mesa will tell you everything he knows about the prophecies of the Nerevarine and whether you really are the embodiment of the ancient hero of Morrowind. The dialogue will be long, try not to miss a single line. When you have discussed all the questions, the shaman will tell you that you are not the Nerevarine yet, but you can become one. She will be happy to help, but first you need to get the lost prophecies, which are owned by the apostate priests of the Temple. When you bring these notes to her, she will help you fulfill what is destined for you by fate. In addition, Nibani Mesa will give you two books about the prophecies of the Nerevarine. After receiving them, you can return to Caius Cosades.
Reward:
Bone Gnawer Sul-Senipula
Mage's Bane
Notes:
In addition to the Mage's Bane, a lot of interesting items are hidden in these caves. For example, in the Laterus Burial, you can already legally get glass leggings at this stage of the game. They are located at the top of a spiral rise near the mummy on one of the stones hanging from the ceiling. Before going to the caves, Urshilak is strongly recommended to learn a spell with the Levitation effect or buy the appropriate potions or scrolls.
Mage's BaneType: Long blades, Two-handed weapons Chopping: 1 - 45 Cutting: 1 - 39 Stab: 1 - 27 Condition: 840/840 Weight: 16.2 Price: 32 000 Effect when used |
Base of the Sixth House
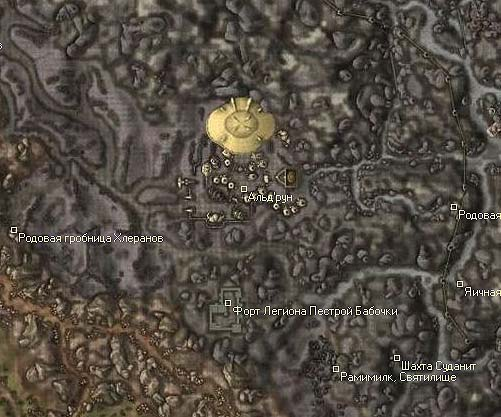
When Kai listens to your report, he will say that he needs to think about what he heard and consult with Mehra Milo. Cosades will offer you to improve your skills and acquire suitable equipment before he issues the next task. When you consider yourself ready to fight, talk to him again: Kosades will say that you need to arrive at the Fort of the Spotted Butterfly and talk to Raesa Pullia. She knows something about the base of the Sixth House and is looking for a person for some kind of task. So, your path again lies to the north, to Ald'ruhn. The task itself is to find the base of the Sixth House and eliminate Dagoth Gares.
When you reach the Motley Butterfly Fort, you will find Raesa Pullia in the interior, just opposite the entrance. Talk to her about the base of the Sixth House and she will tell you that a Legion patrol found her near Gnaar Moka, but almost all the soldiers died. Only one of them returned and all the time repeated in delirium the name of the cave - Ilunibi. You have to go there and deal with what is happening there. You can be told the location of the cave in Gnaar Mok.
When you enter Ilunibi, prepare for the fact that it will be hot here. Various creatures of the corprus will become your opponents, battles with them are a serious test. Also note that simple weapons do no harm to corprus creatures. However, the most serious opponent will be Dagoth Gares himself, the priest of the cult of the Sixth House. Before he fights you, he will give you some interesting information. It turns out that the head of the Sixth House, the powerful Dagoth Ur, is aware of your arrival and is looking forward to meeting you in order to offer you an alliance. After that, Dagoth Gares will attack you. However, the victory over him will not be complete: before his death, he will have time to put a curse on you and infect you with a terrible corprus disease, which he will call the gift of Dagoth Ur. After you kill the priest, you can return to Caius Cosades. It should be said right away that there is no alternative storyline in the game, so you cannot join the Sixth House and become an assistant to Dagoth Ur.
Reward:
Fists of Randagulf
Notes:
Before completing this quest, it is highly recommended to learn the spells with the effect of "Levitation" and "Resp. characteristics” or buy the appropriate potions and scrolls. From this moment on, Sleepers will begin to appear near the roads - barely dressed Dunmer, who were most affected by the rise of House Dagoth. They are similar to those Sleepers that you might see in the caves of the Sixth House and will attack you as soon as they notice. There are many useful items in the room in which you fought Dagoth Gares: undoubtedly among them is a pair of glass boots lying near one from the walls.
Fists of RandagulfType: Gloves Protection level: 90 Condition: 450/450 Weight: 16 Price: 35 000 permanent effect |
divine sickness
So you have returned to Caius Cosades with victory and a corprus devouring your body. In a conversation, Kai will say that one of his agents, Quick Eddie, said that only Divayth Fir knows the most about the corps in Vvardenfell, except for Dagoth Ur. However, if the head of the House of Dagoth is unlikely to share a recipe for miraculous healing with you, then Divayth Fir, which maintains the Corprusarium, may be useful. And to make it easier to persuade him, Kai will give you a Dwemer artifact - as you know, Fir is fond of collecting such gizmos. Now you should go to Tel Fir.
As soon as you meet with Divayth Fir, give him the Dwemer artifact, and then talk about the corprus. Fir will examine you and tell you that you are really sick, but he has a potion that can help you. The problem is that he will only give it back after you bring him the Dwemer boots. Divayth gave them to a resident of the Corprusarium named Yagrum Bagarn, who was supposed to fix them. So, head to the Corprusarium, which serves as the final resting place for those who, like you, were struck by the corprus. Please note that in no case should you kill the inhabitants of the Corprusarium.
The main attraction of this peculiar hospital is Yagrum Bagarn himself, the last living Dwemer. Talk to him and collect the Dwarven Boots of Flight, then take them to Fyr. It's time to heal from corprus.
Reward:
1000 drakes
Notes:
By the way, if a munchkin lives in your soul, then you can follow the following advice. Each day that you are ill with Corprus, you will increase in strength and speed and decrease in intelligence and willpower. In this way, many manage to bring the strength values up to 400. Anyway, when you think that you are ready to get rid of the corprus, return to Fir, give him the boots, and in exchange he will give you an experimental potion that should heal you from the corprus. As soon as you drink it, the old magician will say that the negative symptoms of corprus have disappeared, but some of its manifestations remain. Remember the advice on strength? So, after curing the corprus, all your characteristics that were reduced during the course of the disease will return to their original values. However, all characteristics that have increased in value will remain at the same level. That is, if, as a result of a corprus, your strength increased to 200, for example, and your intelligence decreased from 100 to 40, then after healing, your intelligence will be restored to its original value, i.e. up to 100, and the strength will remain at the level of 200. If you return to Fir after your healing, he will say that this potion does not work on the rest of the inhabitants of the Corprusarium: he has already killed the two most seriously ill and does not want to continue testing. Obviously, it helped you only because the Nerevarine is protected by prophecy from accidental death. It is highly recommended to have at your disposal spells with the effects of Levitate, Jump, Open Lock, Invisibility or Chameleon. It is worth noting that Fir, as a cure for boredom, invented a rather interesting game: Dwemer chests are placed in the Corprusarium and throughout the tower, sometimes with very decent contents. The only problem is that they are locked with very complex locks and only a skilled burglar, a good magician, or a rich warrior who has spared no expense for high-quality scrolls can break them. There is only one condition in the game - do not get caught. All corprus creatures are hostile towards you and cannot be killed.
Mehra Milo and the Lost Prophecies
After recovering from the corprus, return to Caius Cosades. Here you will be in for a surprise. It turns out that there is a crisis in Cyrodiil, and Kai is urgently summoned to the capital of the Empire, so he promotes you to the rank of an agent of the Blades, which should save you from being dependent on anyone. Kosades' last task will be to take a trip to Vivec and talk to Mehra Milo about the lost prophecies.
So, head to Vivec. When you arrive there, you will find that Mehra Milo has been arrested and put in the dungeons of the Ministry of Truth. However, not all is lost. Priestess has already devised a plan for her own escape, but she needs your help. Before you start saving the priestess, get potions or spells with the Chameleon or Invisibility effect. Then take the Levitation and Divine Intervention Potions that Mehra Milo left for you. It's time to visit the Ministry of Truth - a huge rock hanging in the air above the temple district of Vivec. Drink the levitation potion and take off. When you reach the gates of the Ministry of Truth, talk to Guard Alvela Saram. Say that you have come to Mehra Milo and she will give you the key, but immediately warn that, despite the fact that apostate priests are sympathetic among some residents, no one will like it if you kill someone during the escape. So try not to sacrifice at all.
Many of the doors of the Ministry of Truth are locked, you will find the keys to them in the tables, in the guards' rooms. Please note that the corridors of the Ministry are heavily patrolled, so do not get caught by the guards. It is best to use invisibility or chameleon. Luckily, like most Morrowind dungeons, the Ministry's labyrinths aren't large or intricate. Therefore, you will find Mehra Milo fairly quickly. In a conversation, she will say that the lost prophecies can be found in the Holamayan Monastery, the abode of apostate priests. In order to get there, you will need to go to the eastern docks of Ebonheart and talk to Blatta Hateria there, who will take you to Holamayan. Give Mehra Milo one of the Scrolls of Divine Intervention so she can leave the prison. Now that Mehra Milo is safe, go to Ebonheart Docks and find Blatta Hateria there. Tell her that Mehra Milo sent you and that you want to go fishing. After that, Blatta will take you to the Holamayan Docks on her boat.
Once you're at Holamayan Docks, talk to Nun Vevrana Arion. She will show you the way to the entrance to the monastery. But he will immediately warn you that the doors open only at sunset and sunrise, during the hours dedicated to Azura. As soon as you get to the monastery, you will need to talk with Mehra Milo and with the abbot of the monastery, Gilvas Barelo. After talking with them, you will receive the text of the lost prophecies. The time has come to return to Nibani Mesa to try to realize what the prophecies speak of.
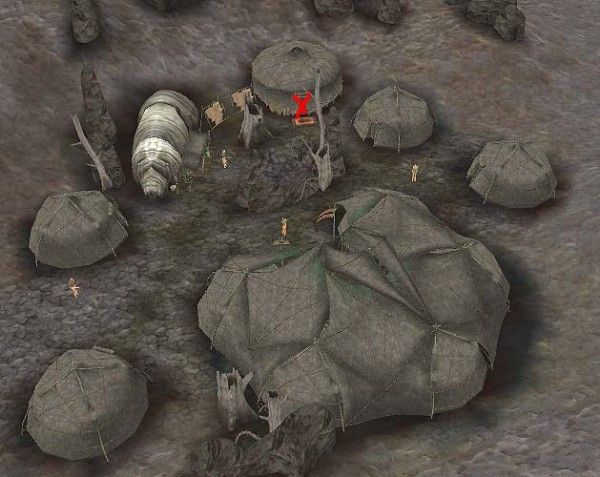
Once in the Ashlander camp, talk to the shaman and give her the prophecies. After that, you can take a walk on the sidelines so that the shaman can carefully study and think over the texts. Return to the yurt after the moon has come and gone.
During the second conversation, Nibani Mesa will say that she has been chosen as your guide on the Path of the Nerevarine. You will need to pass the Seven Trials, the first two of which you have already passed. The first test is the date of birth, the second is the healing of corprus. In order to pass the third trial, you will need to speak with Sul-Matuul.
Reward:
—
Notes:
If you are not a member of the Temple (or your rank is lower than Adept) and are not a representative of beast races, then you can try to put on the Indoril helmet, cuirass and shoulder pads and approach the Grand Ordinator in this form. There is a chance that he will not reveal you and give you his keys, and the guards will not attack you. If your rank in the Temple is higher than the Adept and you are not a representative of the beast races, then the guards will not attack you until you talk to them twice. The first time they talk, they will advise you to leave the Ministry or they will be forced to kill you. Once you leave the Cosades house after receiving this task, Kai will disappear forever. If you want to learn something from him before he leaves, do it before you leave the premises. Killing all the guards in the Ministry of Truth and then selling their equipment to a Crawler or a Mudcrab merchant can save you from any financial embarrassment forever.
Path of Incarnation
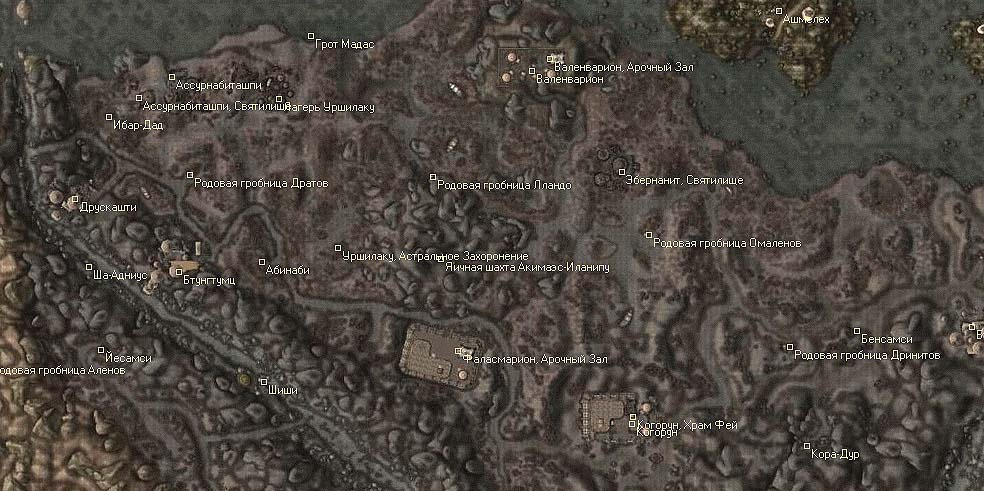
During the conversation, Ashkhan will give you the following task: you need to find the ancient Dunmer stronghold of Kogorun, which belongs to the House of Dagoth. In the fortress, you will need to find three things: the tears of the corprus, the cup of the House of Dagoth and the Shadow Shield, lying in the tomb of Dagoth Morin. After you have all three items, return to Sul-Matuul. Finding items, in principle, is not difficult, most importantly, look carefully around and keep the map of the area turned on. Corprus Tears can be found on the corpse of any corprus creature (stalker or crippled), as well as in one of the Kogorun buildings. The Shadow Shield is located in a cavern called the Bleeding Heart, deep beneath the Kogorun. The bowl is even easier to find - it is located in a small building, the entrance to which is on the surface.
Shadow Shield Type: Shield Protection level: 20 Condition: 2000/2000 Weight: 15 Price: 2400 Effect when used |
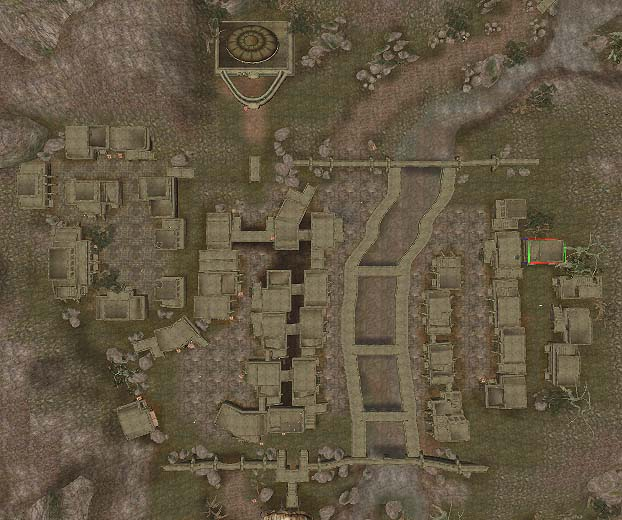
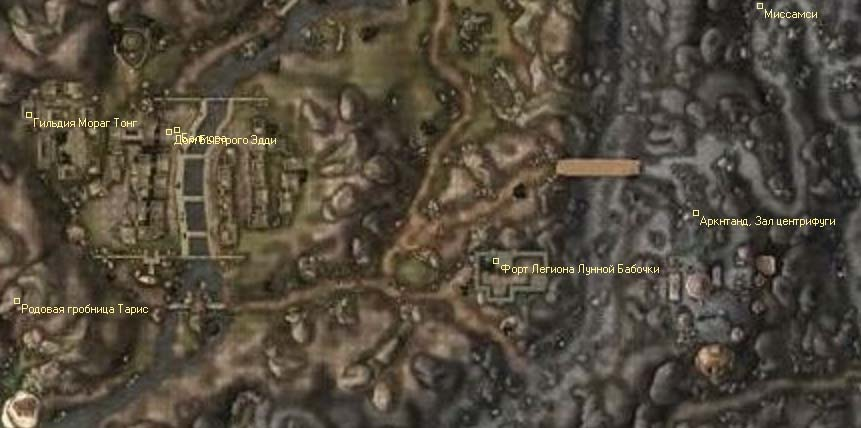
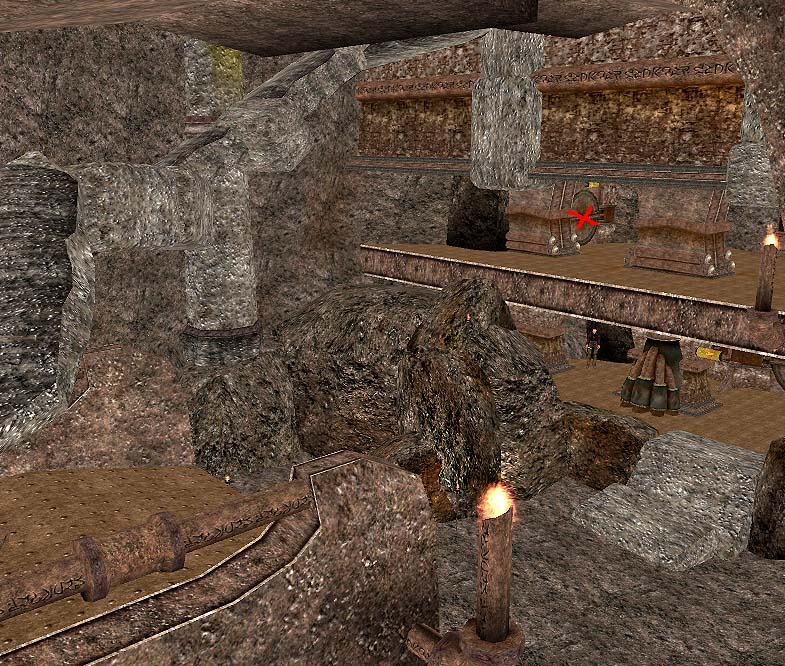
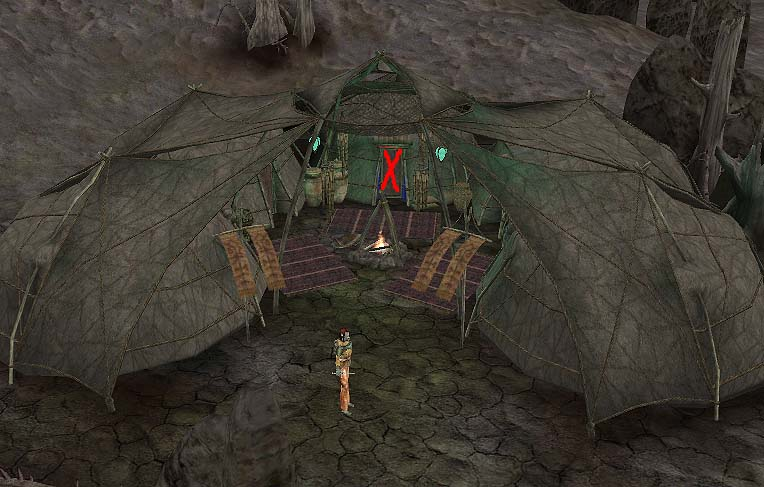
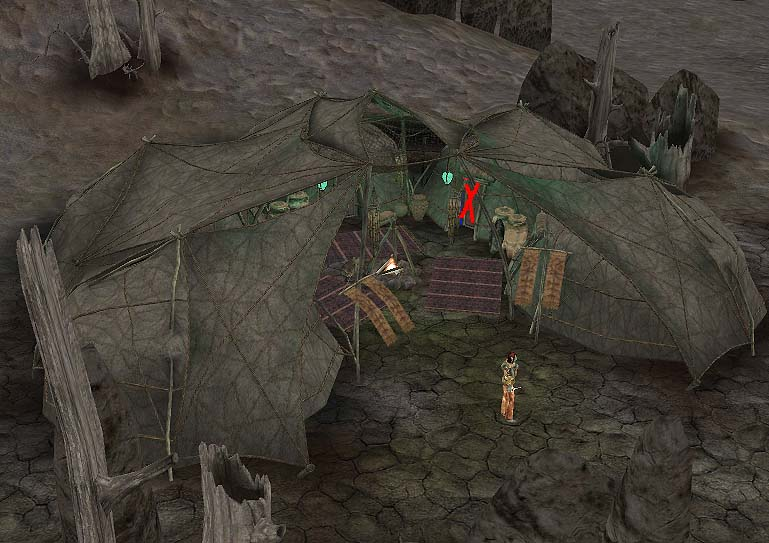
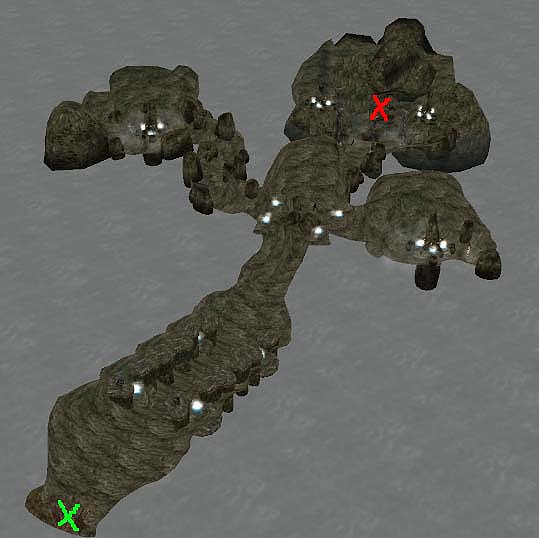
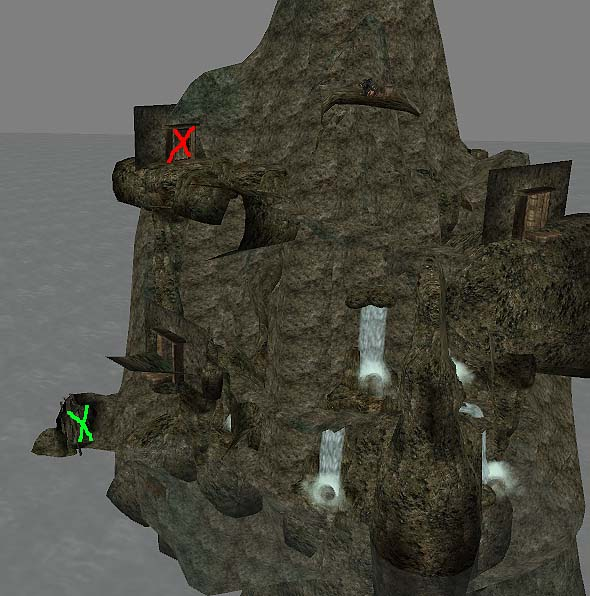
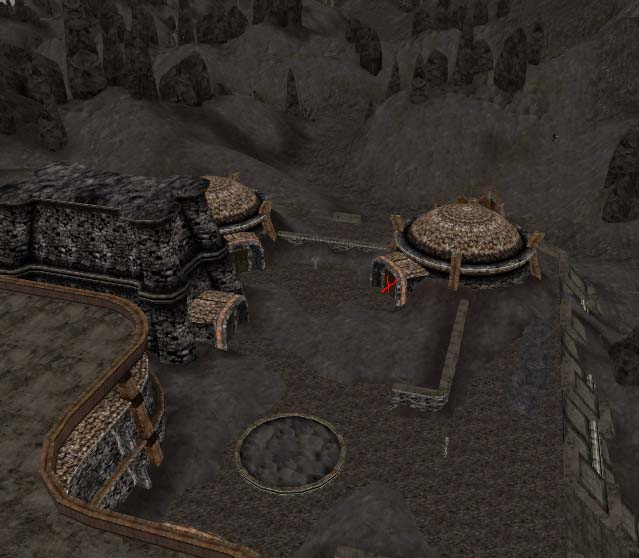
When you pass Sul-Matuul's Warrior Test, he will give you the Belt of Malipu-Ataman. Then return to the shaman. She will ask you a riddle: you need to find a place described in an ancient prophecy. After talking with the Ashlanders, you can easily find out where it is. However, if the riddle turns out to be too tough for you, then see the screenshot. When you arrive, you will see a door that only opens at dawn or dusk, during Azura's hours. Keep in mind, only that, unlike Holamayan, this door must still be opened by yourself. When the door opens, go inside. There, Azura should appear to you and hand you the Moon-and-Star ring, which means that from now on you become the Nerevarine. After talking with all the ghosts in turn, you will receive interesting information from each and gift. After that, return to Nibani Mesa.
Belt of Malipu-Ataman Type: Belt Weight: 1 Price: 95 Effect when used |
After you talk to the shaman, she will reveal to you the essence of the fourth and fifth trials. You must be recognized as a Mentor by the three Great Houses of Vvardenfell (Hlaalu, Redoran and Telvanni) - this is the fourth test. After that, four Ashlander tribes (Urshilaku, Ahemmuza, Zainab and Erabenimsun) should proclaim you Nerevarine.
Moon-and-star ring Type: Ring Weight: 0.1 Price: 2000 permanent effect |
Reward:
Moon-and-star ring
Notes:
In Kogorun, among other things, you can find Daedric leggings, just look in the room in which the Shadow Shield is located. In the Hall of Maquis, a unique blade Fury can be found on the body of a dead adventurer. Interestingly, the fourth and fifth trials are only for inexperienced and unknown to anyone Nerevarine: If your character is already level twenty-one and has at least fifty total reputation points, then Nibani Mesa will immediately direct you to the Archcanon. If your character does not meet these conditions, then you will have to travel a lot.
Rage Type: Long blades, Two-handed weapons Chopping: 1 - 27 Cutting: 1 - 23 Stab: 1 - 16 Condition: 1260/1260 Weight: 21.6 Price: 3200 permanent effect |
| First name | Benefit |
|---|---|
| Idreni Nerotan | Master's Lockpick Master probe |
| Konun Chodala | Ax Konun Chodala Boots of Konun Chodala |
| Pikstar | Belt with embroidery stained pants |
| Hort Ledd | "Sitis" Robe of Hort-Ledd |
| Ein Teria | "The 36 Lessons of Vivec: Sermon 12" Mace of Ein Teria |
| Erur Dan | Spear of Erur-Dan Breastplate of Erur-Dan |
Mentor Redoran
To pass the fourth test, you need to become a mentor of the three Great Houses of Vvardenfell (Redoran, Hlaalu and Telvanni)
Go to Ald'ruhn and speak with Athin Sarethi. If you are not the head of House Redoran, then you will have to complete the task - to rescue his son, Varvur, from Venim Manor. Varvur is kept in the right wing of the estate, in the room behind the tapestry. The key to the door can be found in the same wing, on the bench, next to the note. After completing the quest, Athin Sarethi will say that he uses his influence with other councilors to make them vote for you as a mentor of House Redoran. Just go around all the councilors (Miner Arobar lives in Arobar Manor, under Skar; Garisa Llethri lives in Llethri Manor, under Skar; Brara Morvayn lives in Morvayn's apartment, in the Redoran Council Hall, under Skar; Hlaren Ramoran lives in Ramoran Manor, under Skar) . Then travel to Venim Manor and speak with Bolvin Venim. He will refuse to call you a mentor, but if you have the votes of other advisers, then Bolvin will have no choice but to challenge you to a duel. Travel to Vivec, in Arena District. Go to the Arena Pit, Bolvin will be waiting for you there. After killing Venim, return to Athin Sarethi and he will formally proclaim you mentor of House Redoran, as well as give you an official Temple notice exposing you as an Imperial agent. Atin will not demand an explanation from you, as he is sure of your sincerity, but he will warn that others may not be so understanding. In addition, Athin will give you a Mentor's Ring.
Reward:
Master's Ring
+4 to overall reputation
Notes:
Bolvin has decent enough equipment: he himself is dressed in an ebony cuirass and will try to kill you with a Daedric Daikatana. It may turn out that these items will serve you well. If Varvur is killed, you will never be able to advance further in the main quest.
Hlaalu Master
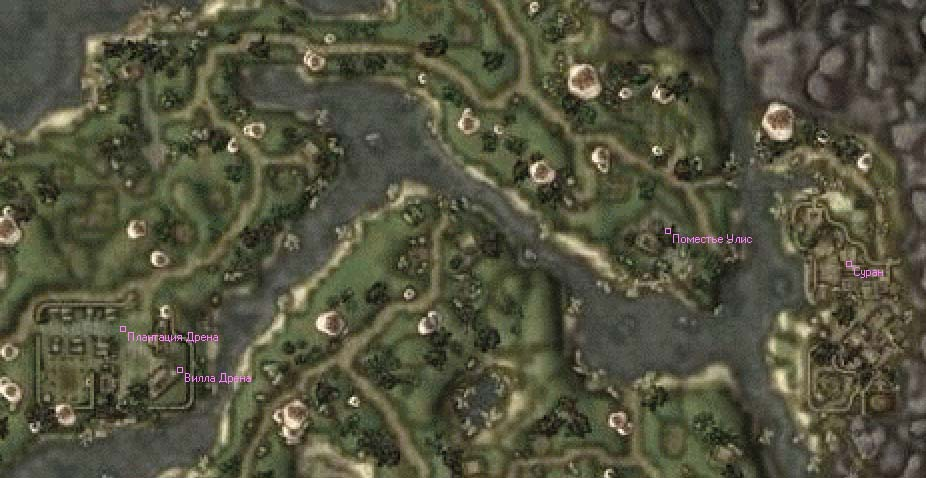
Now your path lies in the city of Vivec, to Crassius Curio. In a conversation, Curio will say that none of the Hlaalu wants to see an outsider as a mentor, but for a modest offering of 1000 drakes, he will try to persuade them. Pay Crassius the required amount and he will tell you where to look for the rest of the advisors. Yngling Half Troll lives at the Plaza in St. Olmes's, on Yngling Manor. For his vote, he will ask for 2000 gold, however, if you feel sorry for the money, you can simply kill him, although such an act does not suit the Nerevarine. Drum Bero lives in the Haunted House in St. Olmes's County Plaza. It won't be a problem to get his vote. Further, your path lies on the Orvas Dren plantation. It will be difficult to persuade him, but it is quite possible. There are several ways to do this. The first way is as follows. Go down to the basement of the main building and kill two assassins. In one of the chests you will find a note in which Dren orders to kill his brother, Duke Vedam Dren. Take the note and in a conversation with Dren, say that you have papers that can compromise him. The second way is to tell Dren that you want to crush Dagoth Ur and free Morrowind from the oppression of the Empire. Please note that in both cases it is desirable to raise its location towards you to 70 and above. After you persuade Dren, go to the remaining two Advisors: Niven Ulis and Veland Omani. They are obedient puppets of Orvas Dren and will do whatever he says. Both can be found on their estates. After you have bypassed all the advisors, return to Crassius Curio, and he will proclaim you the mentor of Hlaalu and hand over the Mentor's Belt.
Reward:
Mentor's Belt
+4 to overall reputation
Notes:
Make sure you have at least 500 drakes at your disposal before embarking on this quest. It's worth noting that Crassius will only want a kiss if he's in high regard with you. If the location is not so high, but you are a member of the House of Hlaalu, then you will have to pay only XNUMX drakes. Everyone else pays the standard rate. With Yngling, the situation is similar: if you are a member of the House of Hlaalu, then he will only ask for a thousand drakes. Kissing him is useless, he is not like that. If you tell Dren that you want to become a mentor in order to crush Dagoth Ur, then he will attack you, thereby eliminating the need to fight his bodyguards.
Mentor's Belt Type: Belt Weight: 1 Price: 1460 permanent effect |

Telvanni Master
Now you should go to Vos and find the tower of Tel Vos, which belongs to Lord Arion. He will tell you where to look for the rest of House Telvanni's advisors, but he will warn you that each of them has a fad. Mister Neloth of the Tel Naga tower in Sadrith Mora has a bad temper, Lady Drata of Tel Mora does not like men, Lady Terana of Tel Branora is insane, and Archmagister Gothren does not like to speak clearly, so everyone will have to find their own approach. So let's start with Neloth. To get his vote, you need to raise his disposition towards you to 70 or higher, and then he will vote for you. The next advisor is Mrs. Drata from the tower of Tel Mora. If you're playing as a female character, you won't have any problems getting her voice. An emancipated person will love the idea of Nerevar returning as a woman so much that she will gladly give you her vote. If your protégé is a man, then before asking for a vote, raise her disposition towards you to 80 or higher. And, after you speak, choose the first answer among the options: roll at your feet and beg to listen to you. After that, tell Drata about your story and she will give you her vote. Next, head to the mad lady Terana from the tower of Tel Branora. You can only get her vote if your eloquence is at least 30. In this case, you will need to make her laugh and quickly ask her to vote for you. If you do otherwise, you will listen to her stupid rants endlessly. Any attempt to interrupt a respected lady will upset her very much. As for Archmagister Gothren, you will have to kill him, since you will not be able to get a clear answer from him. However, you can kill all the other advisors instead of getting their votes and this will not prevent you from becoming a mentor. Having collected all the votes, return to Arion, and he will proclaim you the mentor of the House of Telvanni, handing you the Mantle of Mentor as confirmation of his words.
Mentor's Mantle Weight: 3.0 Price: 300 Effect when used |
Reward
Mentor's Mantle
+4 to overall reputation
Notes
It is highly recommended that you learn the Levitation spell or buy the appropriate scrolls and potions. It's funny that even Arion's death will not be an obstacle to the successful completion of this quest: the Mentor's Robe in this case will be in a box near the entrance to his quarters.If you are a member Houses of Telvanni and convinced Baladas Demnevanni to join this Great House, you will need his voice as well. He will easily vote for you if he has more than 40 disposition towards you. If you plan to join House Telvanni, then killing Gothren will have to be postponed, as he appears in one of the quest chains. In Tel Vos, you can find a very rare Daedric shield Servant of Azura . To do this, head to the northeast tower of Tel Vos and go down the stairs to the penultimate flight. There you will most likely notice that one of the walls is a secret door, activate it and go inside. In the room you will notice a hole in the basement, and in it you will probably see a Dremora. Kill him and take the desired shield along with two other enchanted items. There are only two such shields in the original Morrowind, however if you have the addon Court, it can be purchased from Elbert Nermark in Godsreach.
Servant of Azura Type: Shield Protection level: 80 Condition: 1600/1600 Weight: 45 Price: 30 000 Effect when used |
Nerevarine Urshilaku
So, the fourth test of the Nerevarine is passed, the time has come for the fifth. Now you must be proclaimed Nerevarine by four Ashlander tribes - Ahemmuza, Urshilaku, Zainab and Erabenimsun.
Return to the Urshilaku camp to Nibani Mesa, and she will inform you that the fourth test has been passed. After that, go to Sul-Matuul. After a long conversation, the ashkhan will proclaim you the Nerevarine of Urshilaku and give you the amulet "Urshilaku's Teeth".
Reward
Amulet "Teeth of Urshilaku"
+2 to overall reputation
Notes
Ashkhan will also advise you to talk to Nibani Mesa so that she can tell you more about the customs of the other Ashlander tribes.
Urshilac's teeth Type: Amulet Weight: 1 Price: 2 400 permanent effect |
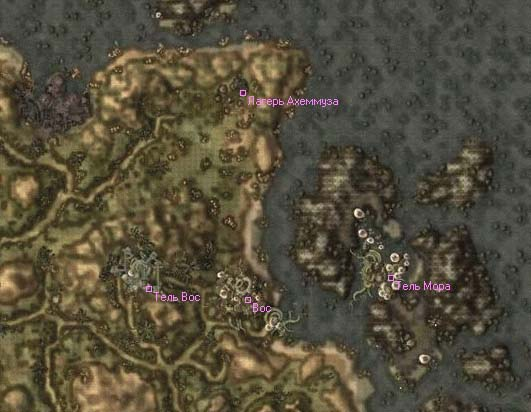
Nerevarine Ahemmusa
The tribe of Ahemmusa is an unfortunate tribe that does not have an ashkhan. Therefore, you will have to talk with the shaman Sinnammu Mirpal. She will report that she can proclaim you the Nerevarine of Ahemmus, but only if you can secure the sanctuary of Ald Daedroth so that the tribe of Ahemmus can exist there in peace. So, head to Ald Daedroth and find the priestess of Sheogorath Hlireni Indavel in the front room of the sanctuary. In order to convince her not to touch the Ashlanders, you can either threaten her (your level or reputation in this case must be more than 20), or describe to her the terrible fate of the unfortunate tribe (in this case, the Speech skill must be at least 50, or you must raise her disposition towards you up to 90). However, you can try to challenge the witch to a duel. One way or another, when you get her consent, return to the camp of Ahemmusa. Tell the shaman about everything and take her to Ald Daedroth, to the statue of Sheogorath, in the sanctuary. There, she recognizes you as the Nerevarine and will hand over the amulet "Ahemmus' Stone of Madness".
Reward
Amulet "Stone of Madness Ahemmus"
+2 to overall reputation
Notes
You can take Sinnammu with you even before talking with the cultist and simply ask her to wait in some secluded place. This can save you a lot of time as you won't have to return to the camp and run back to the shrine, but be aware that sometimes there is a bug where the shaman disappears forever. After you help the Ashlanders with their future habitat, the shaman will move back to the camp. Thus, the tribe will never move to Ald Daedroth.
Stone of Madness Ahemmusa Type: Amulet Weight: 1.1 Price: 2 000 Effect when used |
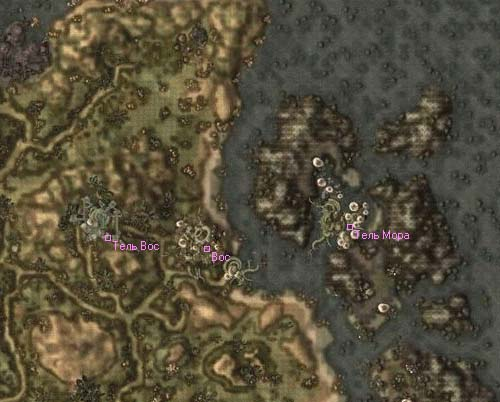
Nerevarine Zainab
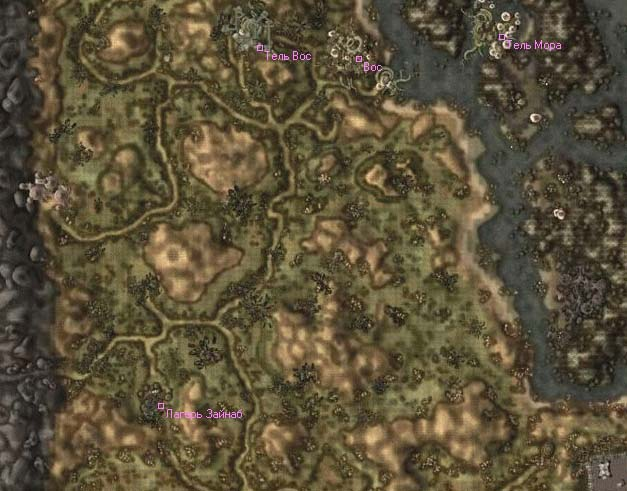
This time you will have to visit the Zainab camp, which lies south of Vos. There you should talk to Ashkhan Kaushad. Before you start talking about the Nerevarine, you will need to raise Kaushad's disposition towards you to 70 or higher. After that, talk to him about the Nerevarine and ask him to test you. He will give you a task - to kill the vampire Calvario, whose lair is located in the Nerano Ancestral Tomb. When the vampire is finished, return to Kaushad. He will agree to proclaim you the Nerevarine, but only after you present him with a gift, according to the customs of the tribe. The ashkhan considers a well-born bride from the House of Telvanni to be such a gift. The gift, to be sure, is not available. But it's not all that difficult. Go to the shaman and consult with her. She will say that no girl from the noble families of Telvanni will marry an Ashlander, but the Ashkhan can be deceived. You should go to the slave trader Savil Imain in Tel Arun and buy a slave from her, originally from the dark elves. After that, you can dress her in expensive clothes and pass her off as a well-born Telvan woman. So, go to Tel Arun and talk to Savil Imain. She will say that she has a beautiful Dunmer slave, but in order to pass her off as a noble person, you will need to buy an elegant shirt, skirt and shoes. Buy everything you need and come back. By the way, you need to buy in a store that the slave trade itself recommends. After that, she will give you the next task - to buy Telvanni Beetle Musk. Having bought the remedy, go back, pay 1000 drakes, and your slave is yours. Open the cage and give the slave the things you bought. After that, return to the Zainab camp. The easiest way to do this is to use a Water Walking spell and run across the water towards the camp. The slave will cheerfully mince after you along the bottom of the sea. Don't worry, she won't drown. When you find yourself in the ashkhan's yurt, give the beetle musk to the slave and introduce her to Kaushad. After that, the Ashkhan will proclaim you the Nerevarine of Zainab and give you the Scourge of Zainab in confirmation of this title.
Reward
Scourge of Zainab
Ashkhan wedding gift
Notes
If you give Ashkhan a pair of expensive shoes, then his disposition towards you will increase by 40 points. Like any other companion, the slave will be able to travel with you on a silt strider or on a boat if she was close enough to you at the time of the conversation with the caravaneer. After that as you were recognized as the Nerevarine by Zainab, you can talk with the bride, and then turn to the ashkhan again. It turns out that he is well aware that you tricked him, but he is not angry at all, on the contrary, he loves this woman even more than he would love any girl from a noble family.
Scourge of Zainab Type: Amulet Weight: 1 Price: 2 400 Effect when used |
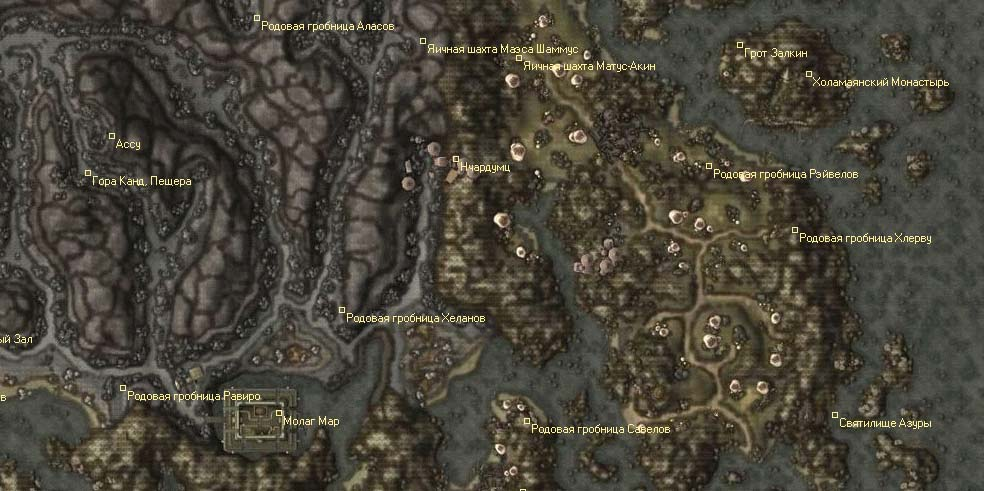
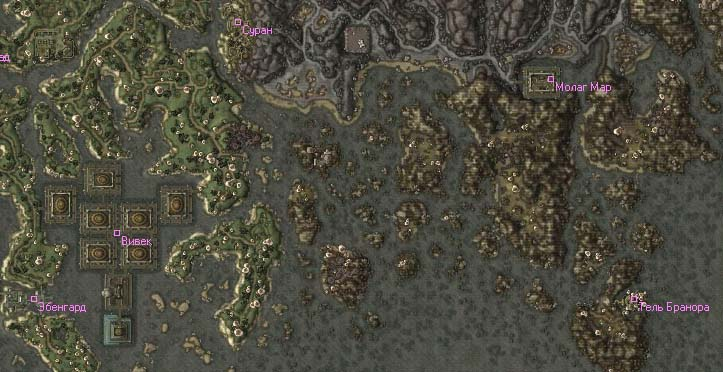
Nerevarine Erabenimsun
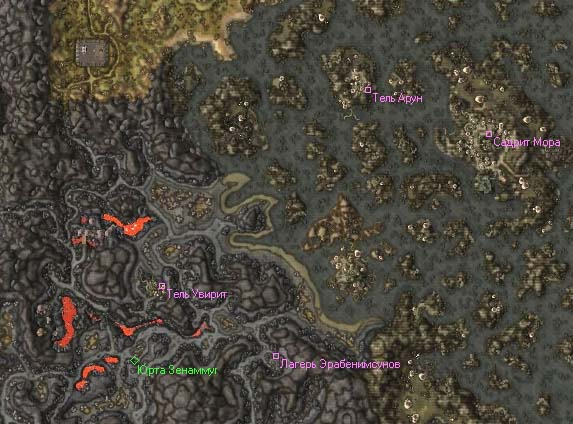
The Erabenimsun camp is located near Tel Uvirith, north of Molag Mar. However, the ashkhan of the Ulat-Pal tribe will categorically refuse to recognize you as the Nerevarine. Like last time, the shaman of the tribe, Manirai, will give you wise advice. She will say that in order to become the Nerevarine of the tribe, you need to kill Ulan-Pal and all of his gulaghans, except for Khan-Ammu. After that, return to the shaman, and she will tell you that now you need to convince Khan-Ammu that he is worthy of being the ashkhan of the tribe. To do this, you need to present him with items that you can remove from your victims, namely: Ayran-Ammu's Battle Axe, Sanith-Kil's Fireheart Amulet, and Erur-Dan the Wise's Robe. By the way, if you manage to raise his attitude towards you to 90 or higher, then Khan-Ammu will return one of the artifacts, saying that he understood the lesson and will be an ashkhan. After Khan-Ammu proclaims you a Nerevarine, go to the shaman for the enchanted belt "Capture of Erabenimsun", in recognition of you as the Nerevarine of this tribe.
Reward
Erabenimsun Capture Belt
+1 to overall reputation
Notes
Ashkhan and his gulahans wear very good armor and are armed with decent weapons. The battle with them is unlikely to be very simple, but the reward will please any hoarder.
Capture of Erabenimsun Type: Belt Weight: 1 Price: 1 000 Effect when used |
The Mentor and the Nerevarine
So, it's time for the sixth test. Return to Nibani Mesa, she will say that you need to meet with Archcanon Sarioni in order for him to arrange a meeting with Vivek for you.
Now you should go to the Temple area of Vivec, find the High Cathedral there and find the healer Danso Indules to get the key to the Archcanon's private quarters from her. The Archcanon will give you two keys, one to Vivec's palace and one to the back entrance to his quarters. So, go to meet with Vivek. In conversation, he will tell you a lot of information about Dagoth Ur, Nerevar and a little about the Dwemer. After that, he will say that your main task will be to destroy the heart of Lorkhan. However, this can only be done with the help of Kagrenac's tools: the Divider hammer and the Cleaver sword. Only those who wear the Wraithguard Gauntlet, kept by Vivec, can take them in their hands. Take an oath to Vivek and he will give you this artifact.
Reward:
Ghost Guardian
Notes:
After you swear an oath of allegiance to Vivek, the attacks of the Temple and the Ordinators will stop on you and you can again complete tasks related to the Temple. After obtaining the Phantom Guard, you can kill Vivek, take the Dwemer Unique Artifact from his body and force Yagrum Bagarn to activate it . Thus, you will have two artifacts.
Ghost Guardian Type: Glove Protection level: 80 Condition: 400/400 Weight: 15 Price: 500 000 permanent effect |
Lucky Coin
As soon as you receive the Wraithguard from Vivek, Imperial Legion Veteran Wulf will appear in the Tower of Dusk in the Wraithgate. During the conversation, he will give you an Old Man's Lucky Coin, which, according to him, will grant its owner great luck in all endeavors. By itself, the coin is nothing, but it grants its owner the Emperor's Luck spell, which increases luck by 20 units. within 120 seconds.
After talking to the veteran, you can talk to Lalatia Varian in the Imperial Chapels of Ebonheart about this strange man and she will tell you that that old veteran is actually one of the aspects of Tiber Septim. Which means the gods are actually on your side.
Citadel of the Sixth House
It's time for the seventh test. There are seven main strongholds of House Dagoth, and it would be great if your character destroyed all of Dagoth Ur's minions before fulfilling his destiny. The benefit here is obvious: they all carry powerful artifacts that will greatly help the Nerevarine in the last battle.
Invasion of Kogorun
You have already visited Kogorun on the assignment "The Path of Incarnation" and even then it was possible to kill the first ashen vampire on your way. His name is Dagoth Utol, he is considered the weakest commander of Dagoth Ur. You can meet him in the section of the Kogorun called Charma's Breath. After he dies, take the Heartfire Belt from his body.
Heartfire Belt Type: Belt Weight: 4 Price: 20 000 Effect when used |
Invasion of Endusal
Endusal is located northwest of the Ghost Gate and there you will find a second Ash Vampire named Dagoth Endus. He is practically no different from his fellows, so it will not be difficult to kill him. Remove the Frostheart Amulet from his corpse and let it serve you well.
Frostheart Amulet Type: Amulet Weight: 5 Price: 20 000 Effect when used |
Turinulal Invasion
Tureynulal - The stronghold of Dagoth Tureynul, one of the most loyal followers of Dagoth Ur, is located northeast of the Ghost Gate, not far from Red Mountain. The citadel is quite large, but it is not necessary to explore it completely: the ashen vampire will be waiting for you in the main hall and should not cause much inconvenience. On his body you will find Purring Heart Amulet.
Purring Heart Amulet Type: Amulet Weight: 5 Price: 20 000 Effect when used |
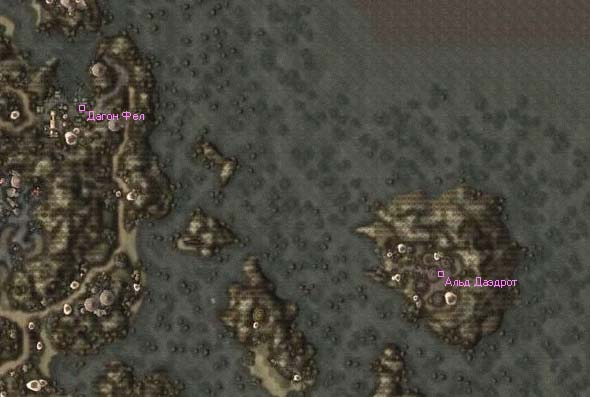
Invasion of Mameia
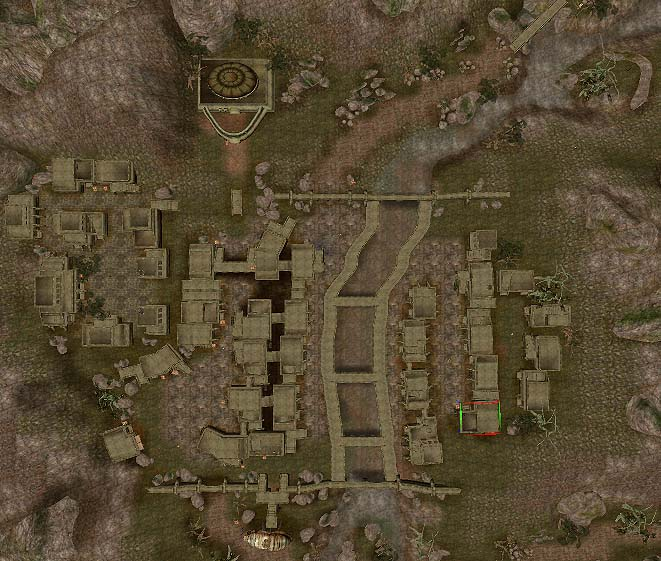
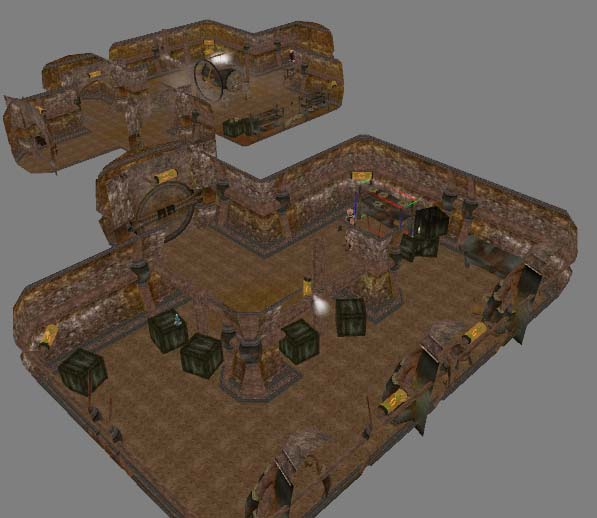
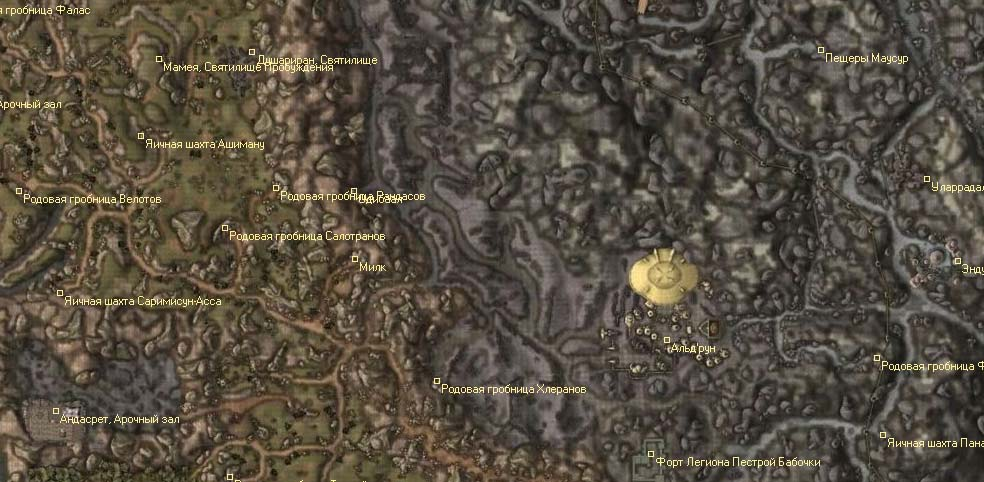
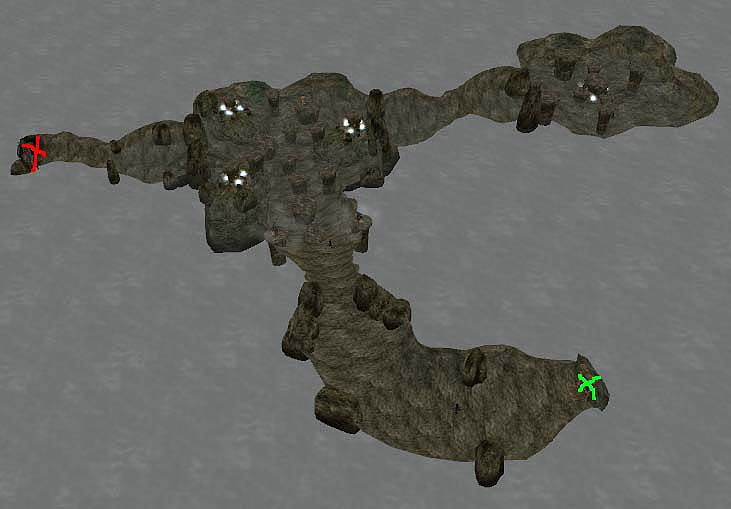
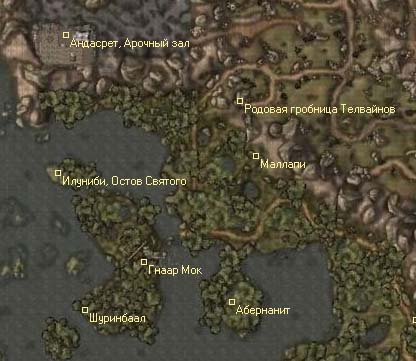
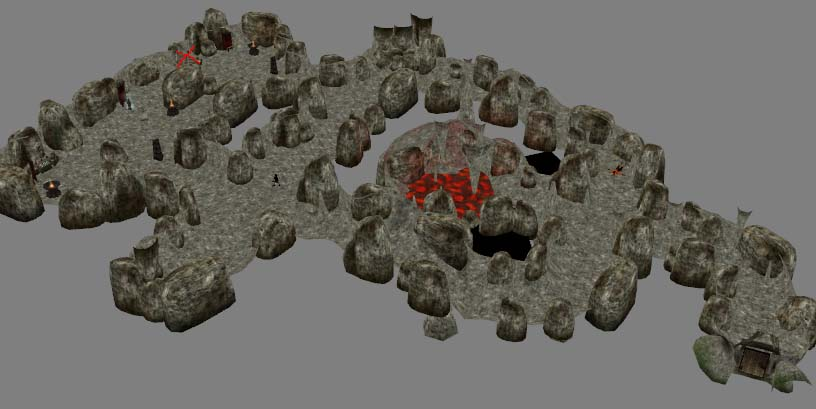
One of the most powerful ash vampires lives in Mamey - Dagoth Arainis. Finding the fortress is not as easy as everyone else, but its location can be viewed on map. The Ash Vampire will be waiting for you at the Sanctuary of Black Hope. The battle will be quite difficult, but as a reward for your efforts, you will get the Soul Ring.
Soul Ring Type: Ring Weight: 0.2 Price: 30 000 Effect when used |
Do not rush to leave after you deal with Arainis. Continue exploring Mamea until you find the Sanctuary of Crazy Dreams. There, in the room with the ashen statue, you will find many interesting items, including the Daedric Face of Inspiration and the Fang of Heinectnamet.
Fang of Heinecktnamet Type: Short blades, One-handed weapons Chopping: 11 - 20 Cutting: 11 - 20 Stab: 13 - 30 Condition: 5500/5500 Weight: 5 Price: 32 000 Effect on impact |
Getting the Separator
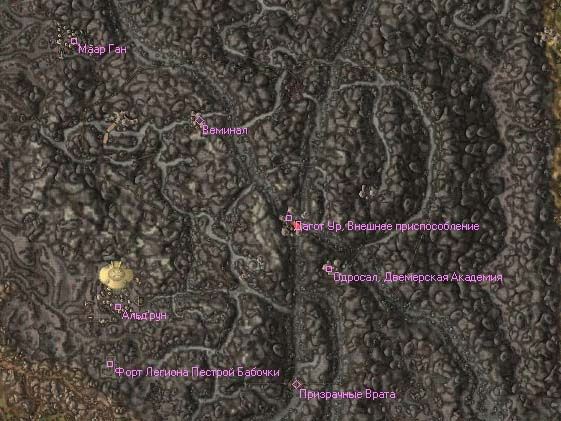
Vivec, among other things, will tell you about the Divider - an artifact without which you will never be able to destroy the Heart. He will also mark on your map the ancient Dwemer fortress of Odrosal, home to one of the strongest ash vampires in the game, Dagoth Odros. The battle with him is not particularly dangerous for an experienced hero, but on his body you will find only the Heartfire Amulet along with the key to the Tower.
Heart Fire Amulet Type: Amulet Weight: 5 Price: 20 000 Effect when used |
The divider can be found in this very Tower: the citadel is quite small and you can easily find the artifact.
Cleaver Type: Short blades, One-handed weapons Chopping: 9 - 15 Cutting: 9 - 18 Stab: 9 - 18 Condition: 1300/1300 Weight: 9 Price: 400 000 permanent effect |
Obtaining the Cleaver
After you talk with Vivek about plans to overthrow Dagoth Ur, a mark of the Veminal fortress will appear on your map, which is dominated by one of the most serious opponents - Dagoth Vemin. There is practically nothing interesting in Veminal's Outer Fortress, the most important thing awaits you in the Hall of the Bracelet. There, in fact, Dagoth Vemin himself lives, and with him the Cleaver.
Cleaver Type: Blunt, One-Handed Chopping: 10 - 70 Cutting: 10 - 60 Stab: 1 - 4 Condition: 6000/6000 Weight: 40 Price: 400 000 permanent effect |
The battle will most likely be quite difficult, but at this stage of the game there should not be any special problems. After you kill the ashen vampire, take the Cleaver and the Amulet of Healing the Heart from his body.
Amulet of Healing the Heart Type: Amulet Weight: 5 Price: 20 000 Effect when used |
Invasion of the fortress of Dagoth Ur
So, the time has come for the most important battle in the life of your hero, which means it's time to hit the road. The destination is the Dwemer citadel of Dagoth Ur, located right in the mouth of the Red Mountain. For a successful outcome of the battle, you must have the Wraithguard, the Divider and the Cleaver. Below is a list of items that can greatly help you in this battle:
- Soul Ring
- Frostheart Amulet
- Ring of Blood
- Heart Fire Amulet
- Purring Heart Amulet
- Heartfire Belt
- Amulet of Healing the Heart
The way to obtain all these items was described above, with the exception of one - the Ring of Blood. The fact is that it is in the possession of Dagoth Gilvot, who lives on the lower levels of the fortress of Dagoth Ur. The path to it will be blocked by crowds of less dangerous creatures, including ashen zombies, slaves, risen sleepers and other followers of the Sixth House. After killing Dagoth Gilvoth, you will receive the seventh artifact.
Ring of Blood Type: Ring Weight: 0.2 Price: 30 000 Effect when used |
Dagoth Ur himself will meet you at the lower levels of the fortress, near the door to the Heart Chamber. Before the battle, he will offer you to talk. Ask him anything you want to know and put on the best gear you have. This fight, in fact, is only a training session, since after defeating the first incarnation of Dagoth Ur, he will only disappear and move to the Chamber. Upon death, he will leave the Ring of the Heart, the last of the artifacts of the House of Dagoth.
heart ring Type: Ring Weight: 0.2 Price: 30 000 Effect when used |
Before entering the next room, put on the Wraithguard and pick up the Cleaver. Dagoth Ur will attack you as soon as you enter the Heart Chamber. It is useless to fight him now, as he is protected by the power of the Heart of Lorkhan. Your goal is to quickly run up to the Heart and hit it once with the Cleaver and five times with the Divider. Dagoth Ur will teleport behind you every time Divider hits, so you have to run back and take him away, and then run up and hit him again. Once you destroy the Heart, Akulakhan will be defeated and Dagoth Ur's powers will be capped at 200. health and lack of magic, so killing him will be easier than ever.
Azura will be waiting for you at the exit of the Chamber, who will grant you Azura's Ring: as soon as you pick it up, you will be cast a spell to restore all characteristics except intelligence and attractiveness. Step out of the Dwemer stronghold and enjoy the clear blue skies above, as well as the knowledge that you have saved Morrowind from enslavement. However, the path of the Nerevarine does not end there, on the contrary, it is only the beginning of a long journey.
Was the article helpful?


