100% Passage of season 1 of the story Seven Brothers Club of Romance. All plot branches, decisions and their consequences, relationships with characters and others...
The Unseen Fears: Ominous Talent Complete Walkthrough Guide

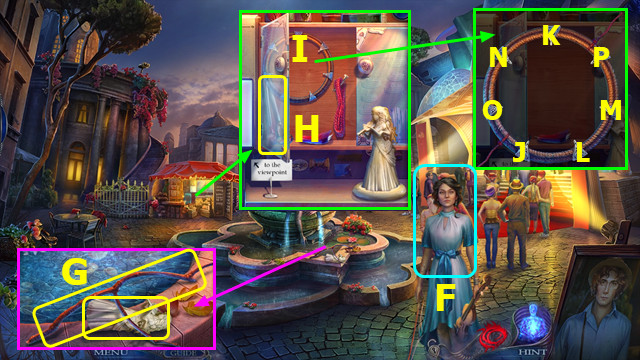
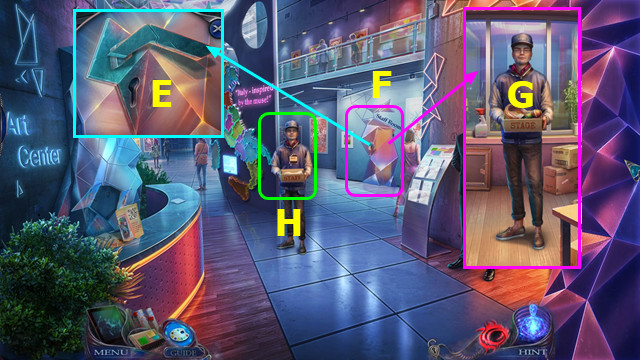
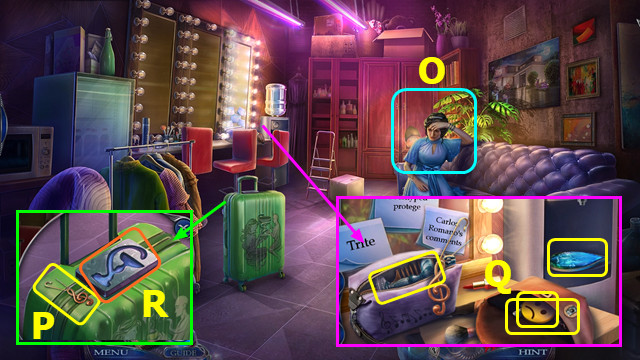
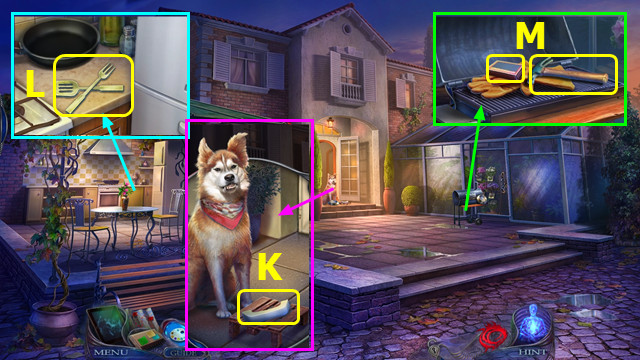
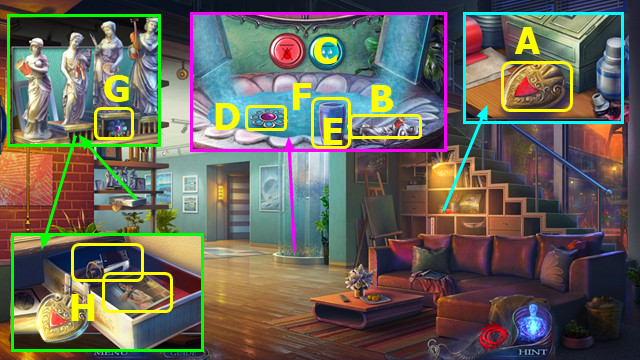
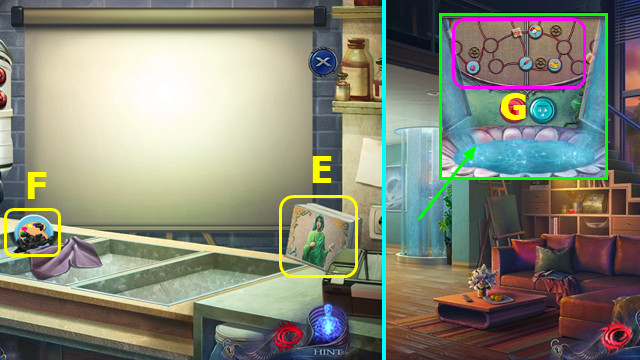
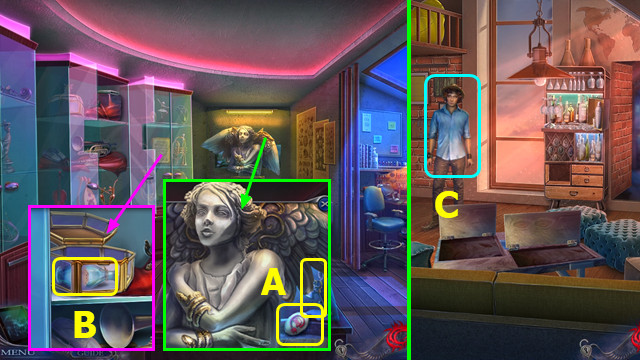
- ➤Talk; take the STATUETTE (F).
- Take STICK and STATUETTE (G).
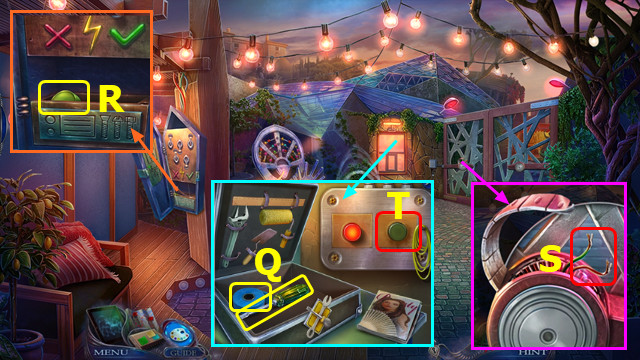
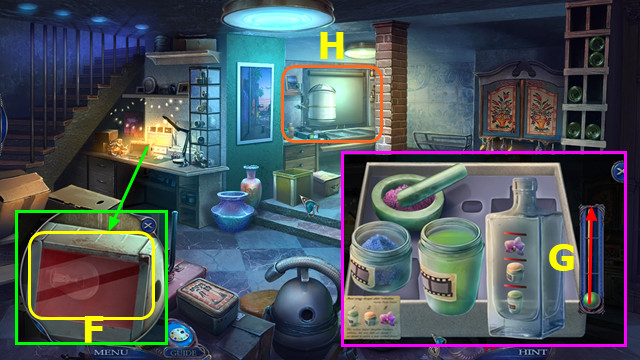
- ➤Read notes; place PLAYER STATUE; take the tongs (H).
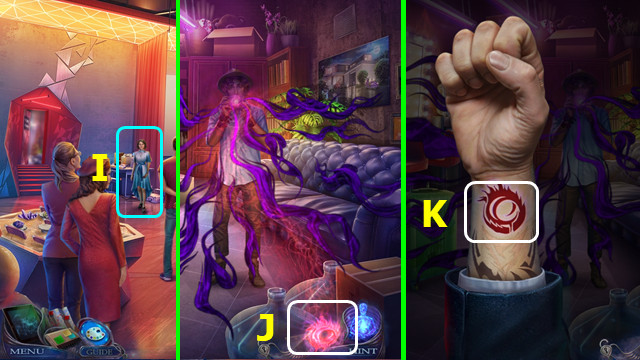
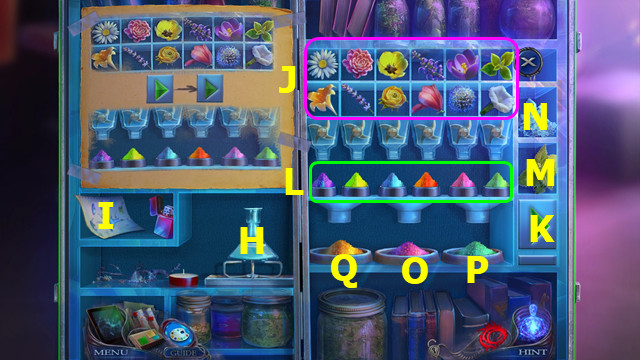
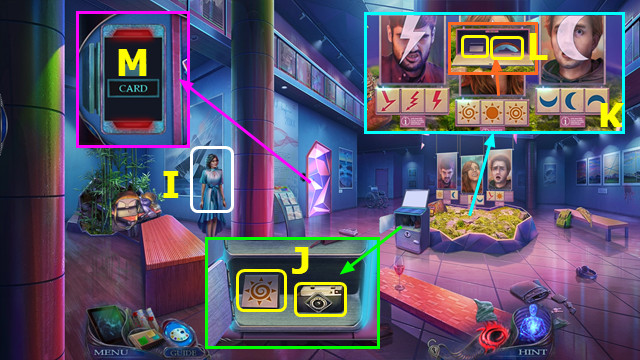
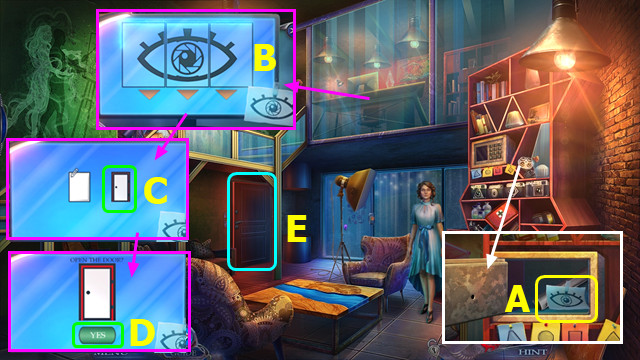
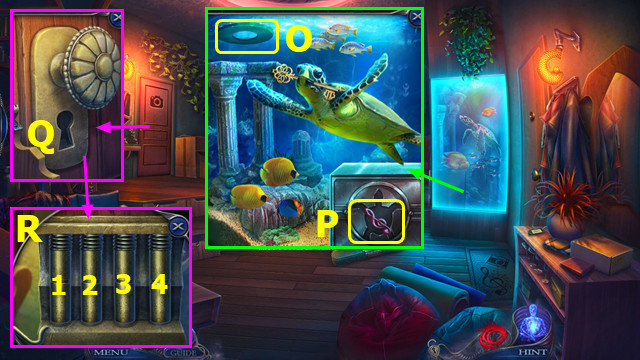
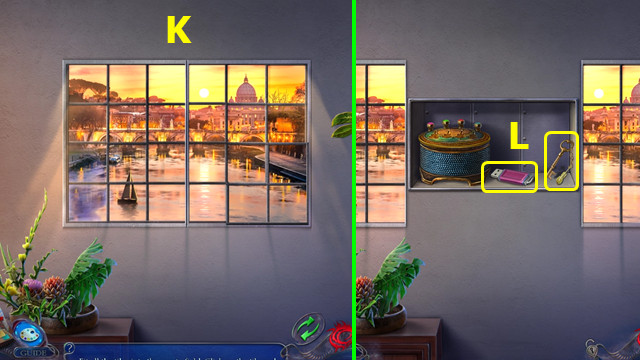
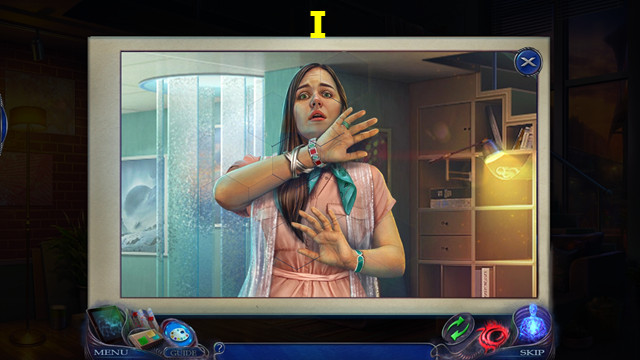
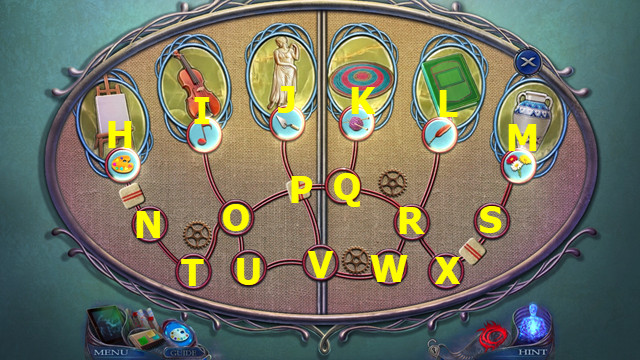
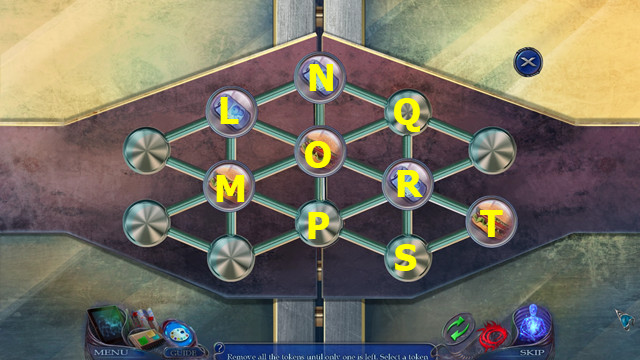
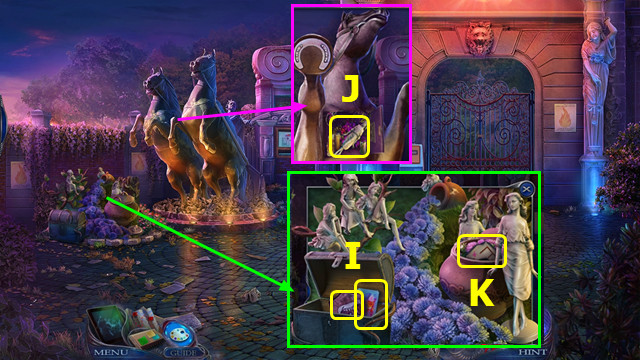
- ➤Select (I).
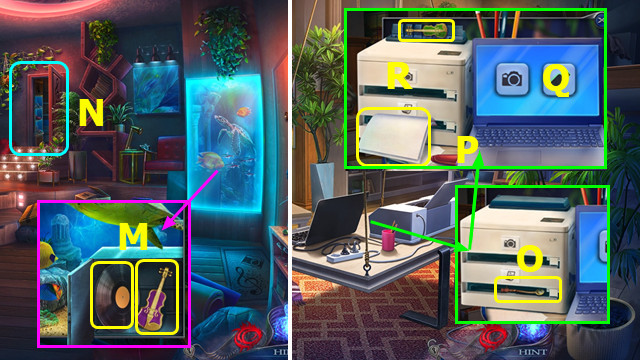
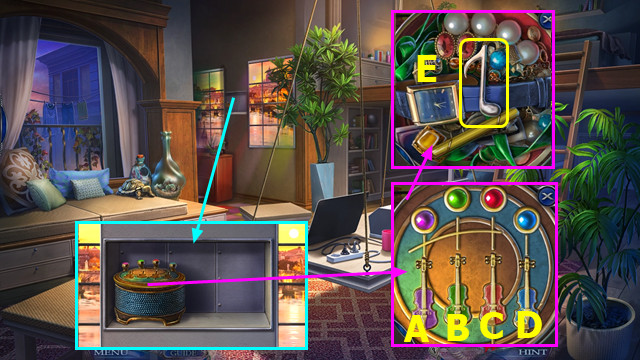
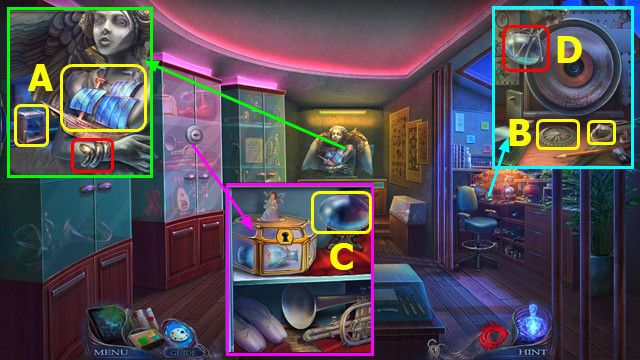
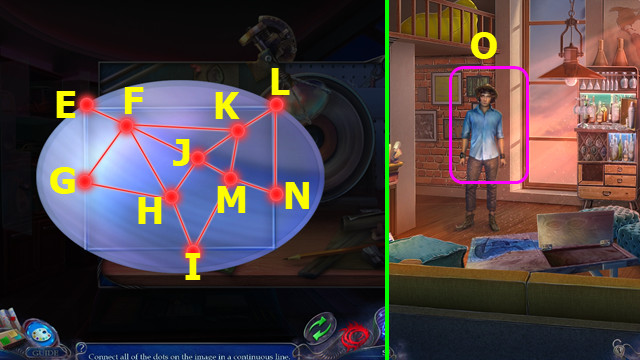
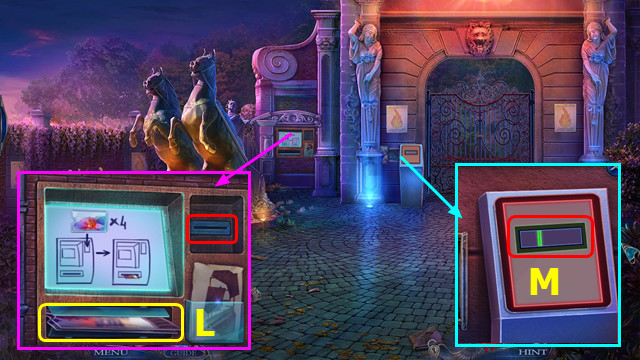
- ➤Select (JKL) - (MNOP); add stick; earn SCOOP NET.

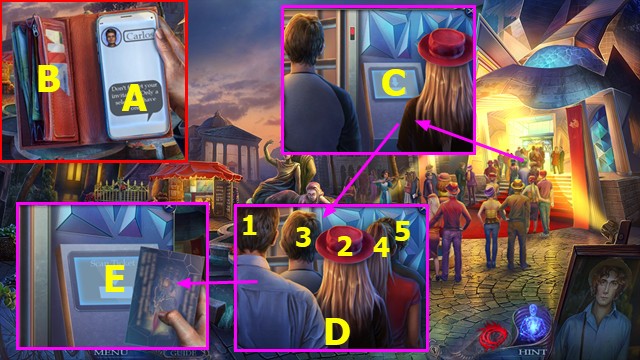
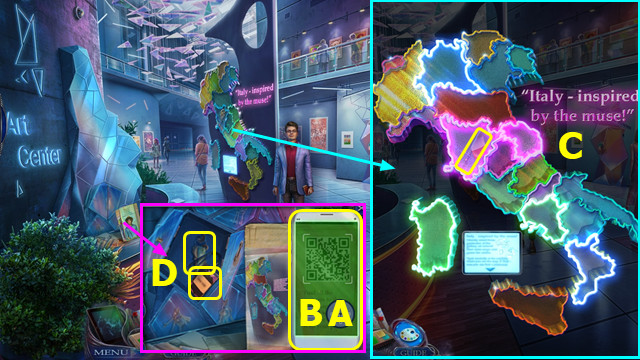
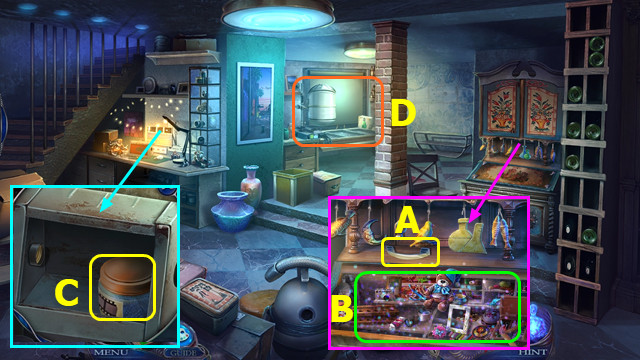
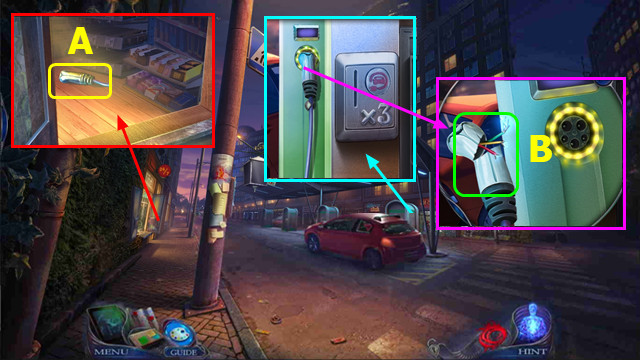
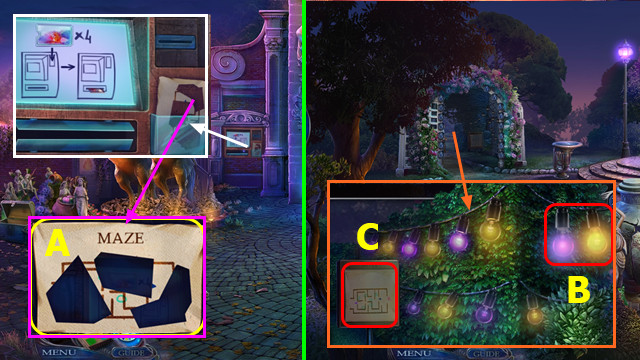
- ➤Use SCOOP NET; play hop; earn SPECIAL COIN (A).
- Place STATUETTE; button (B).
- Use the SPECIAL COIN (C).
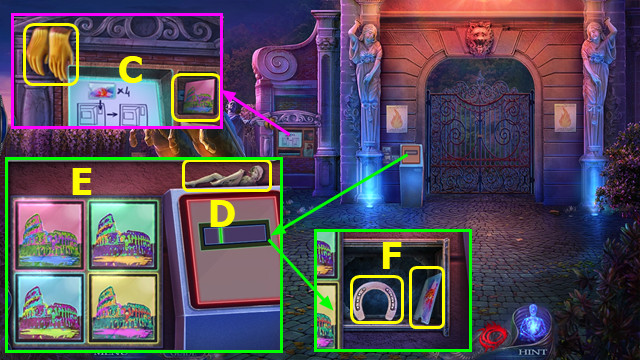
- ➤Play HOP (D).
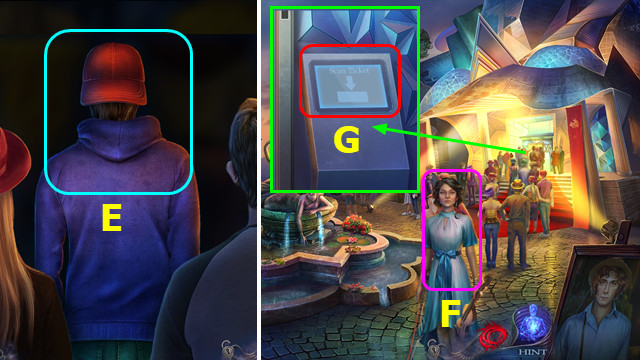
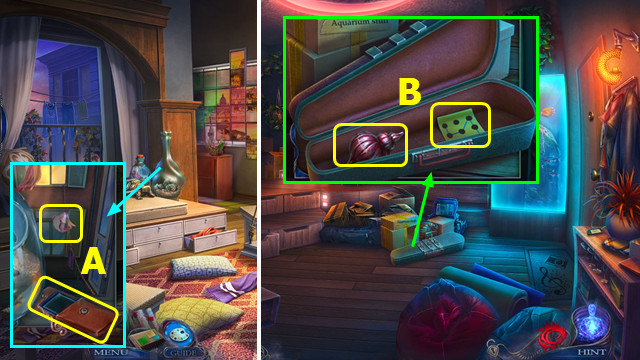
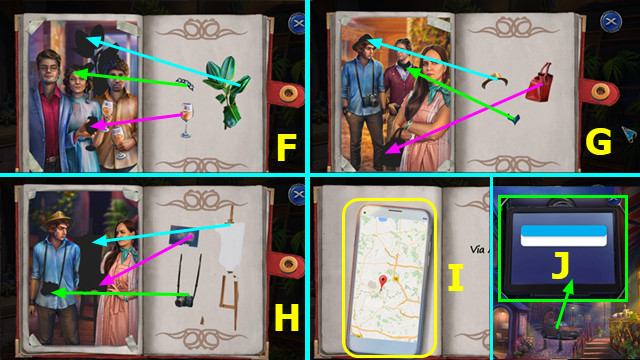
- ➤Select 2x; read the newspaper; take the CELL PHONE CASE and press (E).
- ➤Give a wallet; take the NEW INVITATION (F).
- Use the NEW INVITATION (G).
- ➤Go right.
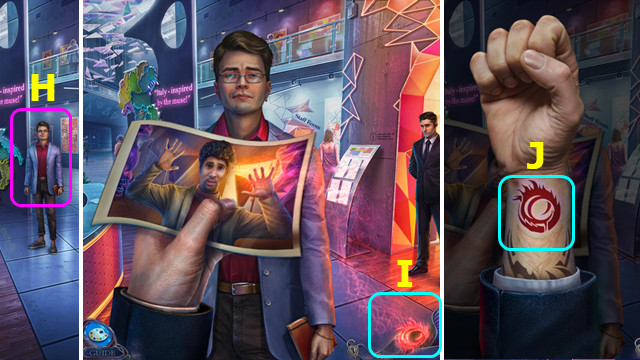
- ➤Talk (H).
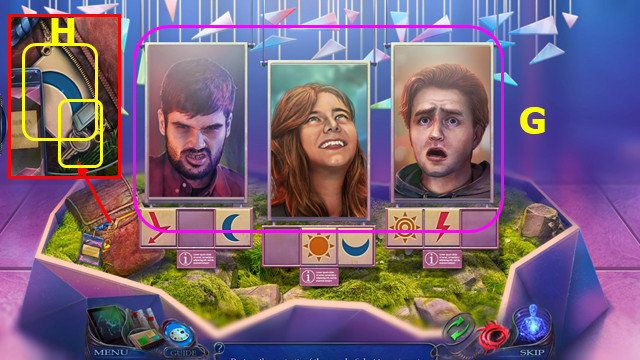
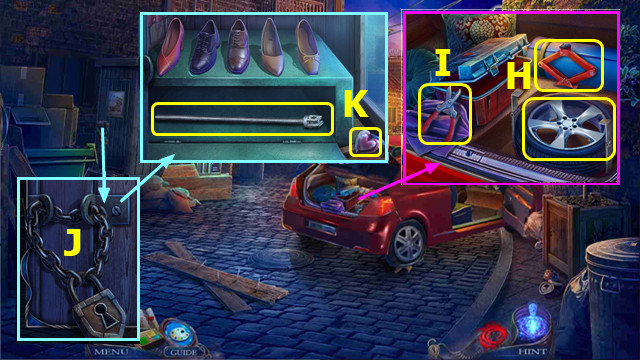
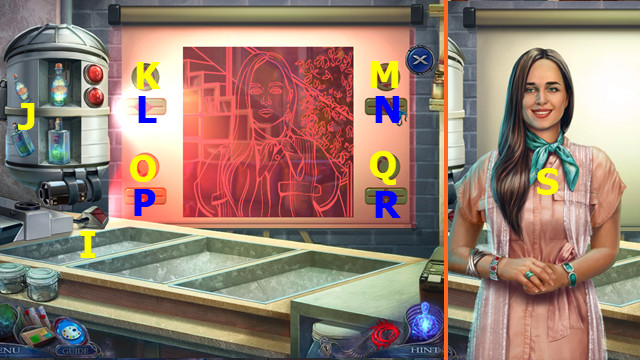
- ➤Select power (I) and tattoo (J).
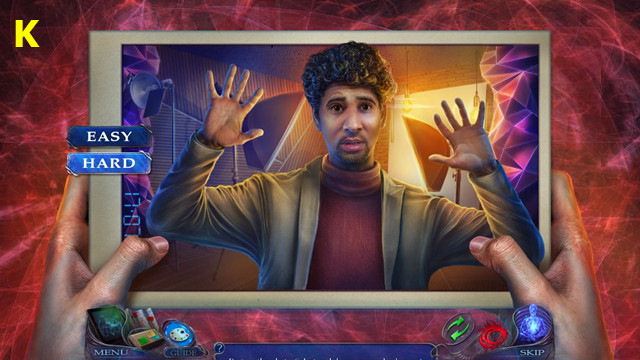
- ➤Solution (K); select a photo. Earn 1/3 MAP PIECE.
- ➤Go right.
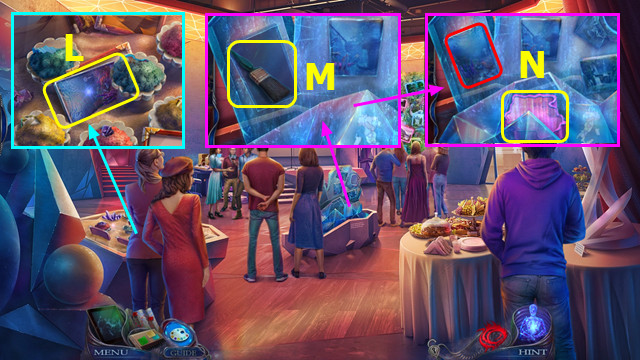
- Take the LOST PHOTO (L).
- Take the BRUSH (M).
- ➤ Post a lost photo; take 2/3 MAP PIECE (N).
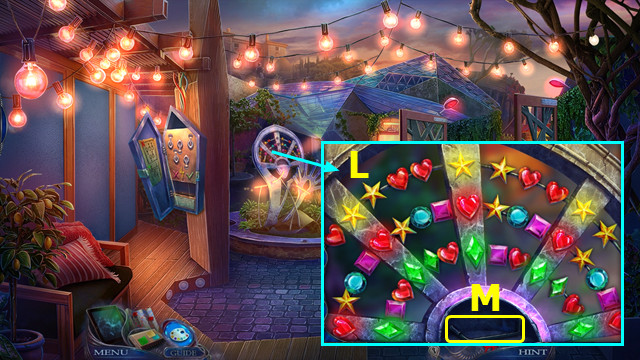
- ➤Use BRUSH; select pairs (O).
- ➤Select (PQ); earn 3/3 MAP PIECE.
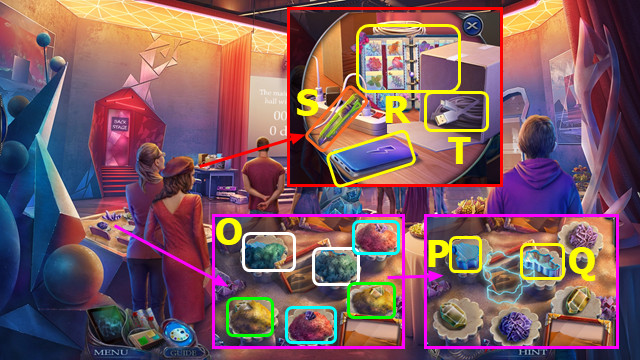
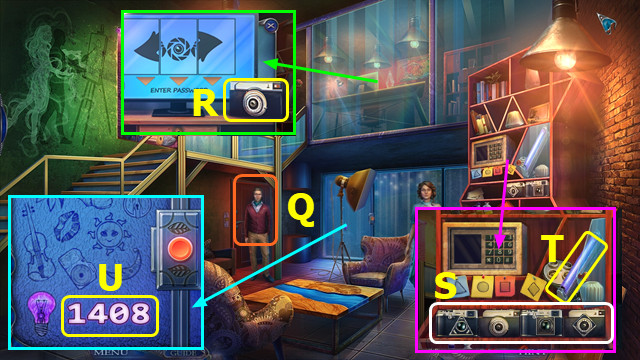
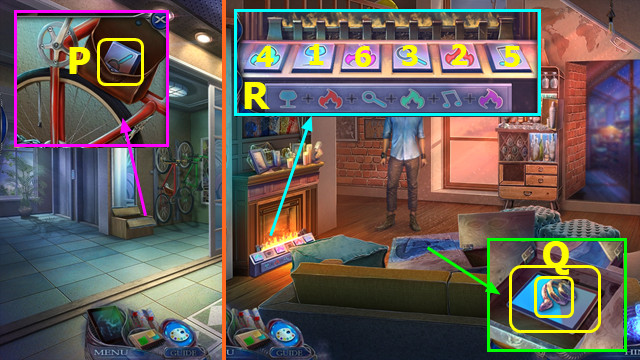
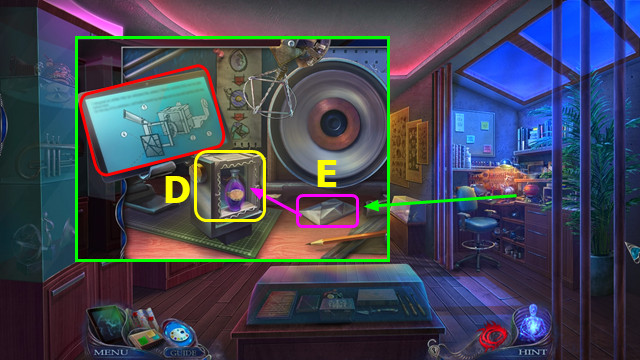
- ➤Read note; take the POWER CABLE and PAPER KNIFE (R).
- ➤Use (ST); take CORD.
- ➤POWER BANK and CORD on cell phone case; take cell phone.
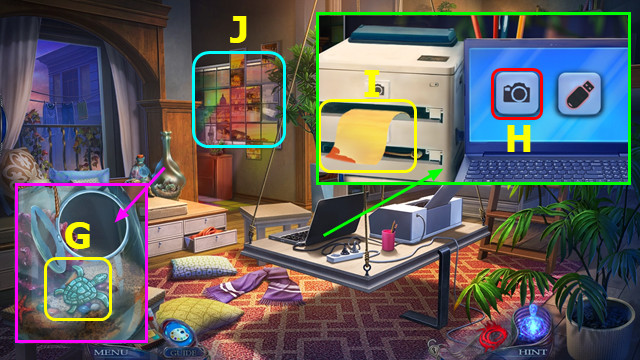
- ➤Read SCRAPBOOK; take CAMERA SIGN and PHOTOS.
- ➤Get down.
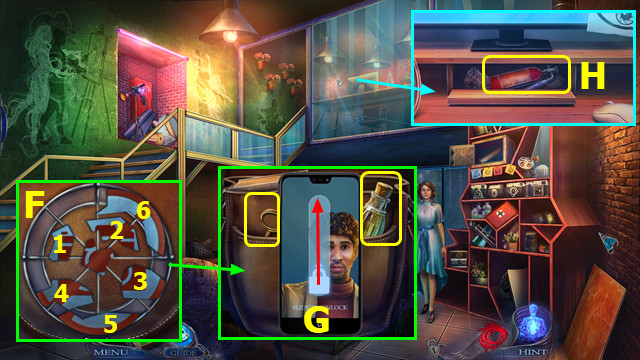
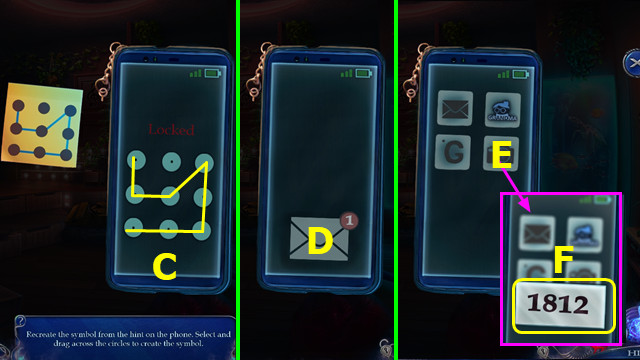
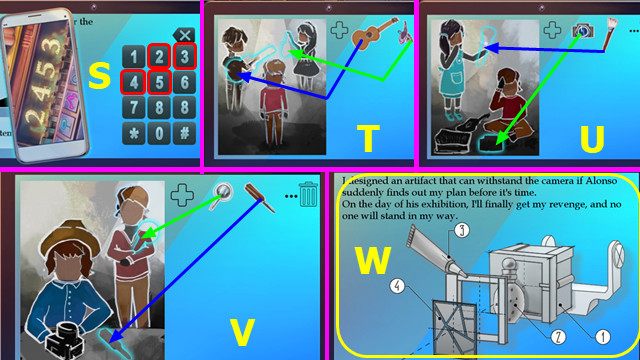
- ➤Read items; use a cell phone; select Ax3-B; take a hint card.
- ➤Use MAP HINT and MAP PART; solution (C); earn a cell phone; take FLAG.
- ➤Use FLAG; take PASS MAP and STAFF KEY (D).
- ➤Read note; use STAFF KEY (E).
- ➤Play HOP (F).
- Give PASSWORD CARD (G).
- ➤Select (H).
- ➤Go right.
- ➤Talk; take the SMILE (I).
- ➤To the left.
- ➤Select power (J) and tattoo (K).
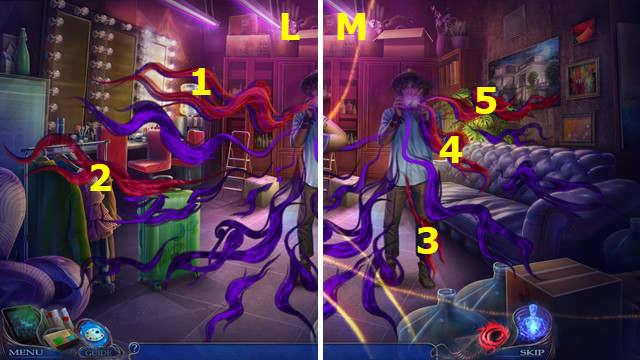
- ➤Select 1-2 (L).
- ➤Select 3-5 (M).
- ➤Talk; take 1/2 KEY PIECE (O).
- Take the PIN (P).
- ➤Use PIN and CAMERA SIGN; read notes and photos; take 2/2 KEY PIECE, SAD FACE, SCREW VIEW, and WATER SYMBOL (Q).
- Use the KEY (R).
- ➤Get down.

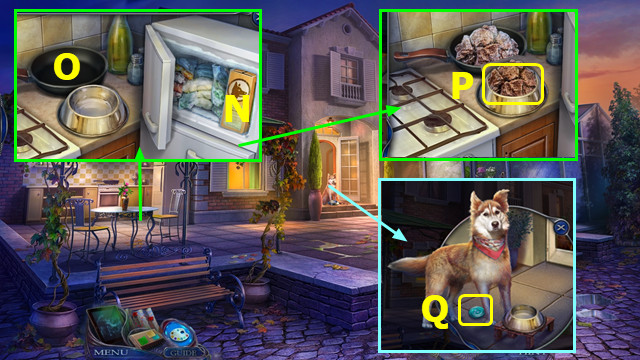
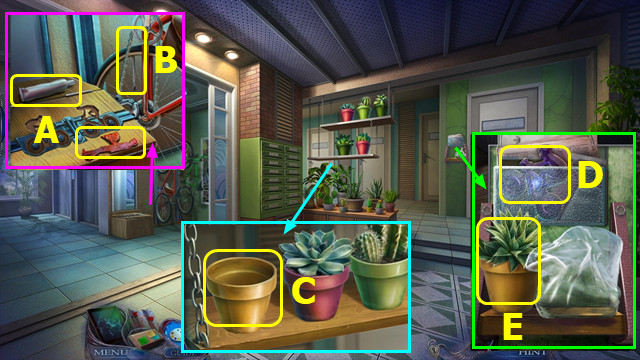
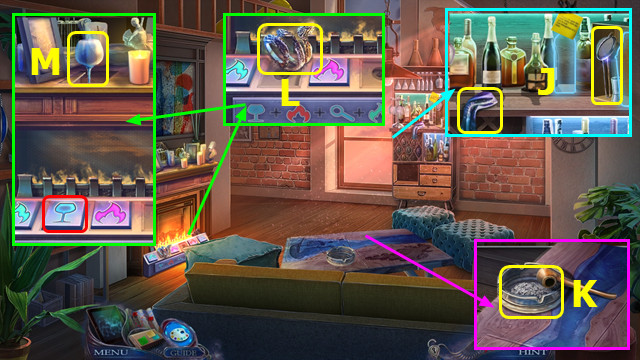
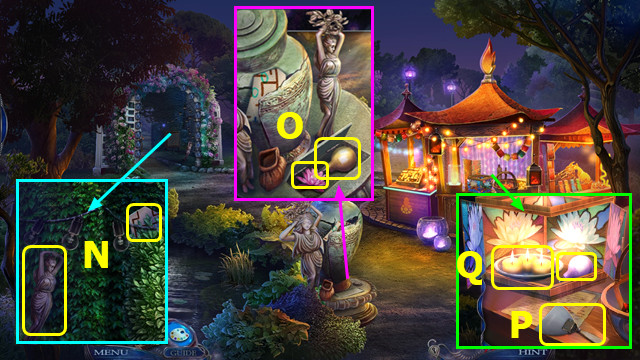
- ➤Use PLANT PHOTOS; play hop; earn SPECIAL FLOWERS (A).
- Place WATER SYMBOL; take 1/2 SALT and MINT (B).
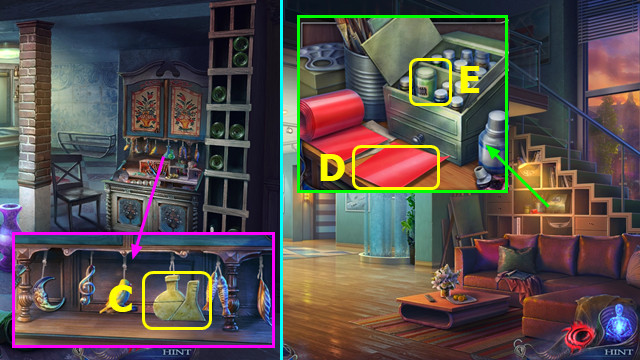
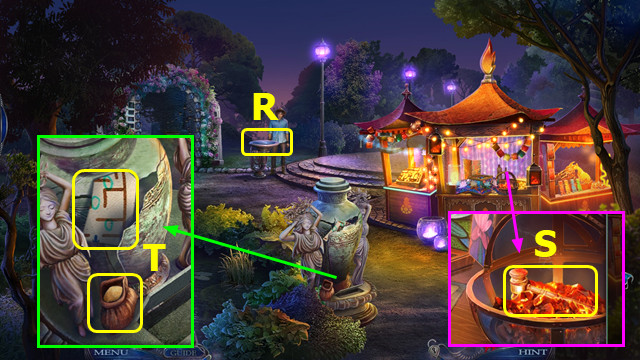
- ➤Read the magazine; use CORKSCREW; earn KNEE (C).
- Use the TONGS; earn 2/2 SALT AND META (D).
- ➤SPECIAL FLOWERS and SALT AND PEPPERMINT on CRAFTS; take INGREDIENTS.
- ➤To the left.
- ➤Use the flask; earn WATER (E).
- ➤Select (F).
- Place the WATER (H).
- ➤Read the instructions (I).
- Place the INGREDIENTS and arrange them as shown (J); select (K).
- Arrange as shown (L); select (K).
- ➤Move (MH) - (NH) - (OH) - (PH) - (QH).
- Take the ELIXIR (H).
- Give the ELIXIR (R).
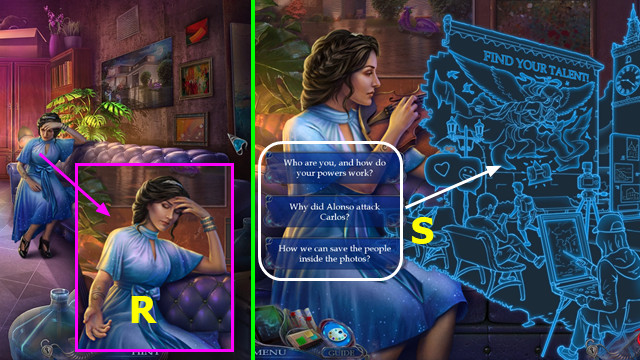
- ➤Select each question; play HOP(S).
- ➤Go down, go right.
Chapter 2: Photo Gallery
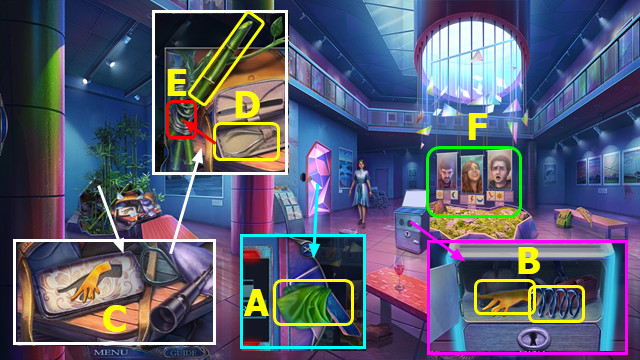
- Take the NAPKIN (A).
- ➤Place SAD FACE and SMILEY FACE; take SPRING and BUTTON (B).
- ➤Read note; use NAPKIN and BUTTON (C).
- ➤Use (DE); earn CLIPPERS; take BAMBOO STICK.
- ➤Select (F).
- ➤Choose strength and tattoo.
- ➤Restore photos (G).
- ➤Use CLIPPERS; read text; take SMALL KEY and 1/3 SYMBOL TILE (H).
- ➤Talk; give STICK BAMBOO; earn 2/3 SYMBOL TILES (I).
- ➤Use SMALL KEY; take 3/3 SYMBOL TILE and 1st CAMERA (J).
- Place SYMBOL TILE; arrange as shown (K).
- Take ACCESS CARD and LOCK PIECE (L).
- Use the ACCESS CARD (M).
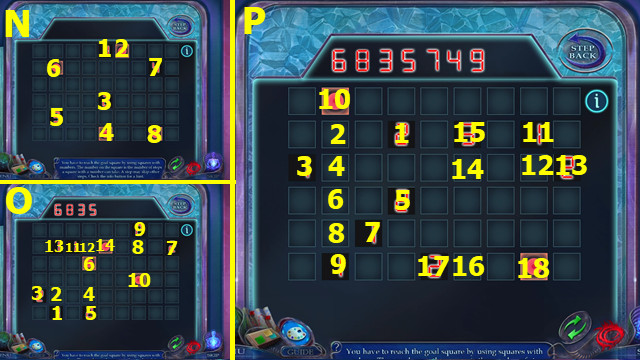
- ➤Select 1-8 (N).
- ➤Select 1-14 (O).
- ➤Select 1-18 (P).
- ➤ Go ahead.
- ➤Talk (Q).
- Take 2nd CAMERA (R).
- ➤Read note; place 2 CAMERA; solution (S).
- Take the UV LAMP (T).
- ➤Use an ultraviolet lamp; play hop. Use CELLPHONE; take DATA (U).
- ➤Use DATA; read note; take the PASSWORD (A).
- ➤Enter PASSWORD; solution (B).
- ➤Select (C); select (D).
- ➤Play HOP; earn BAG (E).
- ➤Select BAG; select 1-6; place LOCK PIECE (F).
- ➤Open bag; select mobile phone; sliding lock (G). Take the KEY ON THE DESK and OIL
- ➤Use DESK KEY; take the FIRE SYMBOL (H).
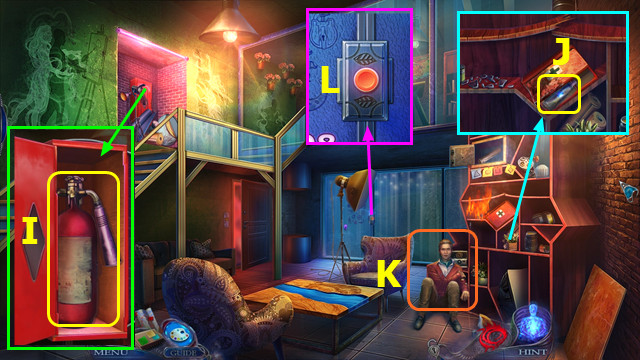
- ➤Delete items; place FIRE SYMBOL; take the fire extinguisher (I).
- ➤Use EXTINGUISHER; open kit; take OINTMENT (J).
- ➤Select; use ointment (K); take ADDRESS and PATIO KEY.
- Use the PATIO KEY (L).
- ➤ Go ahead.
- Take the HANDLE (M).
- Use HANDLE; take BUILDING BUILDING and 1/3 JEWELS (N).
- ➤Install the switches (O).
- Take STONE (P).
- Use STONE; place BUILDING BUILDINGS. Restore items; take the SCREWDRIVER and TAPE (Q).
- Use the SCREWDRIVER; take the BUTTON (R).
- ➤Select; use RIBBON (S).
- Change and select BUTTON (T).
- ➤Go right.

- Take the CAR SIGN (A).
- ➤Select (B).
- ➤Read phone; place a car sign; take the IRON TIRE and SHOE (C).
- ➤Move (DE).
- Place the ADDRESS (F).
- Use the SCREWDRIVER; take 2/3 JEWELS (G).
- ➤Remove the cover; use oil; take the NEW WHEEL and BROKEN JACK (H).
- ➤Place SPRING; take the METAL CLAMPS (I).
- ➤Use metal clips (J).
- Place SHOE; arrange as shown; take HOOK and 3/3 JEWEL (K).
- ➤Get down.
- Place PEARL; solution (L).
- Take the HANDLE (M).
- ➤HOOK and HANDLE on BROKEN JACK; take JACK.
- ➤Go right.
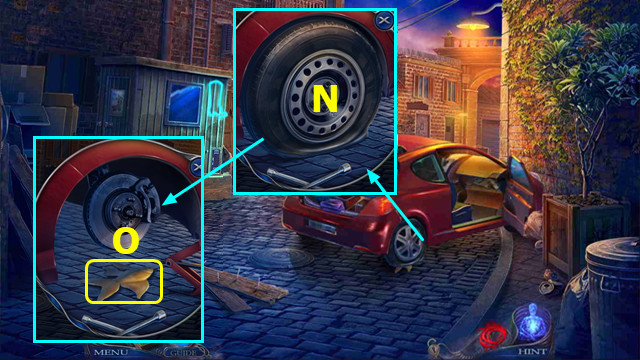
- ➤Remove the cap; use IRON TIRE and JACK (N).
- ➤Take fish; place the NEW WHEEL (O).
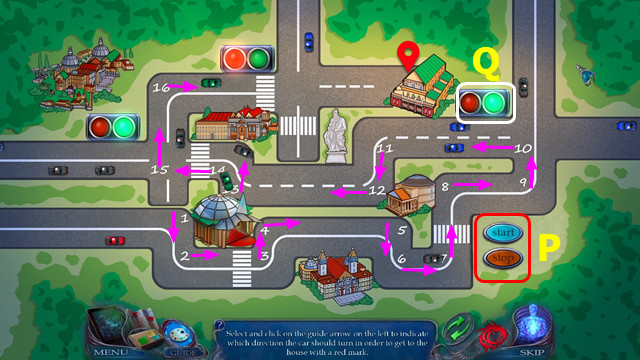
- ➤Set the arrows as shown (pink); use stop and start moving on course (P).
- ➤Watch the lights at the intersections to determine when to stop and start (Q).
Chapter 3: Sibling Street

- Take the STICKER (A).
- ➤Read note (B).
- ➤Play HOP; earn KEY (C).
- Use the KEY (D).
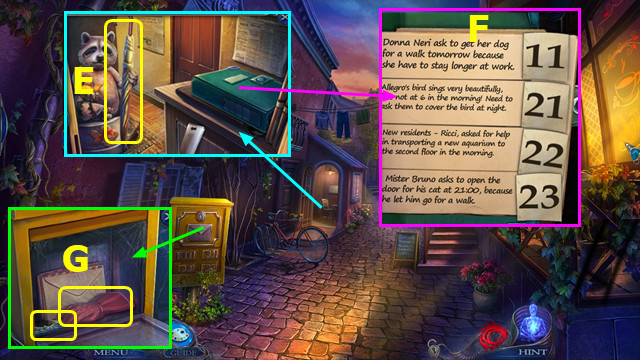
- ➤Place FISH; take the UMBRELLA (E).
- ➤Place STICKER; solution (F). Read notes; take the MAILBOX KEY.
- ➤Use MAILBOX KEY; take the GLOVES and KNIFE SYMBOL (G).
- Take 1st TREBLE CLEF; use UMBRELLA and GLOVES (H).
- Take HACKSAW HANDLE (I).
- ➤Use HACKSAW HANDLE; take HACKSAW (J).
- ➤Use hacksaw (K).
- ➤To the left.
- Place KNIFE SYMBOL; take the SOUVENIR KNIFE (L).
- Take the ROD (M).
- Use the SOUVENIR KNIFE; play hop; earn SEAGULL FOOD (N).
- ➤Use TURTLE FOOD; earn LOCKPICK (O).
- Take 2nd WEDGE KEY (P).
- ➤Use LOCKPICK (Q).
- ➤Select 2-1-4-3 (R).
- ➤To the left.
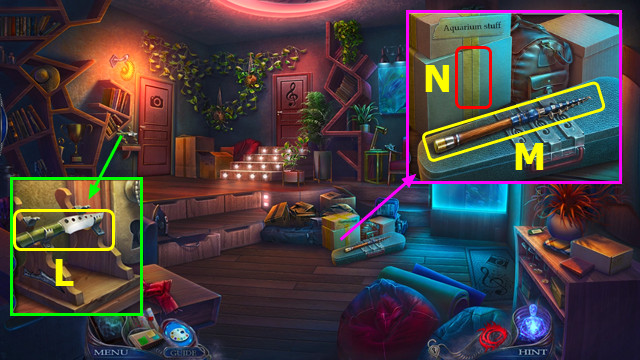
- ➤Take Alonso's phone; use ROD; earn 1/2 WALL PHOTO (A).
- Take the 3rd TREBLE CLEF from ALONSO'S PHONE.
- ➤Get down.
- Place 3 WOODEN CLEFS; take SHELL and PASSWORD (B).
- ➤PASSWORD on Alonso's phone; decision (s).
- ➤Select (D); read text messages.
- ➤Select (E); take CODE (F).
- ➤To the left.
- Place SHELL; take TURTLE (G).
- ➤Place CODE; select (Hx2); take 2/2 PHOTO ON THE WALL (I).
- ➤Select (J).
- ➤Place the PHOTO ON THE WALL; solution (K).
- Take the flash drive and key from Beatrice (L).
- ➤Get down.
- Place Turtle; take 1/2 violin and vinyl (M).
- ➤Use Beatrice's key; play hop; earn BEATRICE'S DIARY (N).
- ➤Take the tweezers from Beatrice's diary.
- ➤To the left.
- ➤Use tweezers; earn RECORD STYLE (O).
- Place FLASH (P).
- ➤Select; read note; select 2x (Q).
- Take the release instructions and 2/2 violin (R).
- ➤Place Violin; select (BC) - (CD) - (AC).
- ➤Take NOTE (E).
- ➤VINYL, RECORD STYLE and RECORD on BEATRICE'S DIARY.
- ➤Restore FGH items.
- Take VANESSA'S ADDRESS (I).
- ➤Get down. 2x.
- Use VANESSA'S ADDRESS (J).
- Take the FREEZER HANDLE (K).
- Take the GRILL KEY (L).
- Take DOG BOWL; place GRILL KEY; take the HAMMER and MATCHES (M).
- ➤Place the dog bowl and freezer handle; move (NO).
- ➤Use matches; take DOG FOOD (P).
- ➤Place dog food; choose a dog take the FOUNTAIN BUTTON (Q).
- ➤ Go ahead.
- Take the HEART (A).
- Take FIGURINE (B); place FOUNTAIN BUTTON (C). Take 1/3 FLOWER KEY (D).
- ➤Use (EF); take WATER.
- Place FIGURINE; take 2/3 FLOWER KEY (G).
- Place HEART; look at the photo; take FILM and PHOTO OF VANESSA (H).
- ➤Choose strength and tattoo.
- ➤Solution (I).
- ➤ Go ahead.
Chapter 4: Dark Room
- Take the HANDLE (A).
- ➤Use HAMMER; play hop; earn LIGHT BULB (B).
- ➤Remove the glass; take 1/3 DEVELOPER COMPONENT (C).
- ➤Select (D).
- Take DEVELOPER (E).
- ➤Open DEVELOPER; read instructions; take ACID.
- ➤Use WATER; take the ART (F).
- ➤Go to Vanessa's house.
- ➤Place ART TOKEN; select (G).
- ➤Solution (RL) - (VU) - (WV) - (XRW) - (QRXSM) - (WRQPJ) - (TOPQK).
- ➤(UOPQRX) - (LRQPOI) - (RL) - (VUOTN) - (IOP) - (NH) - (TOI).
- ➤Read note; take SPECIAL BOTTLE.
- ➤SPECIAL BOTTLE ON VANESSA'S PHOTO; take MUSE ENERGY.
- ➤Get down.

- Use HANDLE; take SCISSORS and KEY 3/3 (A).
- Place FLOWER KEY; arrange the tags as shown; take 2/3 DEVELOPER COMPONENTS (B).
- ➤Go forward 2 times.
- Use SCISSORS; earn CHEMICAL SYMBOL (C).
- ➤Get down.
- ➤Select roll; use SCISSORS; take the RED PLASTIC (D).
- Place CHEMICAL SYMBOL; take 3/3 DEVELOPER COMPONENT (E).
- ➤ Go ahead.
- ➤Place the bulb and red plastic; take the RED LAMP (F).
- ➤Add DEVELOPER COMPONENT to DEVELOPER; move the ball up; take SPECIAL DEVELOPER (G).
- ➤Read the release instructions; add FILM, MUSE ENERGY and SPECIAL DEVELOPER; EARN A RELEASE OF INGREDIENTS.
- ➤Select (H).
- Place RED LAMBUCA (I) and RELEASE INGREDIENTS (J).
- ➤Select Kx3-M-Qx2.
- Move L right to red, move N right to red, and move P left to red.
- ➤Talk; take PAOLO KEY and WINE BUTTON (S).
- ➤Play HOP.
- Take GLUE and BOY (A).
- Use the ACID; take the CHAIN (B).
- Take the POT (C).
- ➤Read note; take the PURPLE CYCLIST (D).
- ➤Select the bag and place the pot; select bag and take 1st PLANT (E).

- Place CHAIN; take RED CYCLIST and SHAKER (F).
- Place PURPLE CYCLIST and RED CYCLIST; take 2nd PLANT (G).
- ➤Place 2 FACTORY; choose pairs; take the KEY (H).
- ➤Use PAOLO'S KEY and KEY (I).
- ➤Go right.
- ➤Read note; take NAPKIN and sift (J).
- ➤Select; take ASH (K).
- Take the RIGHT BRACELET (L).
- Place the WINE BUTTON; use NAPKIN; earn WINE GLASS (M).

- Place the WINE GLASS; take the GRAPE SIGN (N).
- Place GRAPE SIGN; use NAPKIN; earn WINE BOTTLE (O).
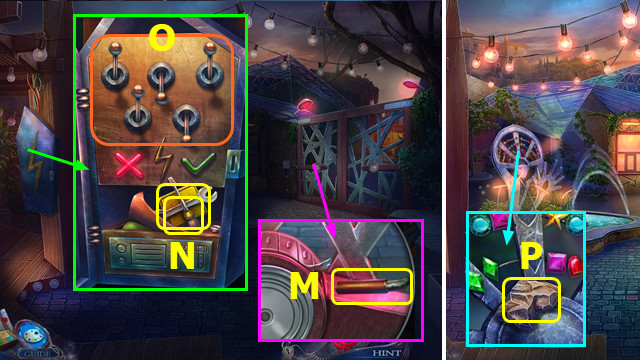
- Place WINE BOTTLE and SHAKER; use ASH (P). Play HOP.
- ➤ Go ahead.
- ➤Take SHIP SIGN; place RIGHT BRACELET; read the items and take the ART PIECE (A).
- Take DIAMOND and WHEEL (B).
- ➤Use DIAMOND; take the LENS (C).
- Place the LENS (D).
- ➤Solution EFKLNMJKMIHJFHGF.
- ➤Get down.
- ➤Speak (O).
- ➤To the left.
- Place the WHEEL; take the MAGNIFER BUTTON (P).
- ➤Go right.
- Place SHIP SIGN; take the LEFT BRACELET and Paolo's tablet (Q).
- Place MAGNIFER BUTTON; select 1-6; receive PILL CODE (R).
- ➤ TABLET CODE on PAOLO TABLET; enter 2-4-5-3 (S).
- ➤Restore Items (TUV).
- Take ART CHART (W).
- ➤Go right.
- Place LEFT BRACELET; take 1/3 ELECTRIC COIN and MUSE KEY (A).
- ➤Use MUSE KEY; take the BOTTLE OF MUSE (B).
- ➤Get down.
- Give the MUSIC BOTTLE; take the ENERGY MUSIC (C).
- ➤Go right.
- Place ARTIFICIAL SCHEME, ARTIFICIAL PIECE, MUSE ENERGY and GLUE (D).
- ➤Move (ED); take the OPPOSITIONING ART (D).
Chapter 5: Road
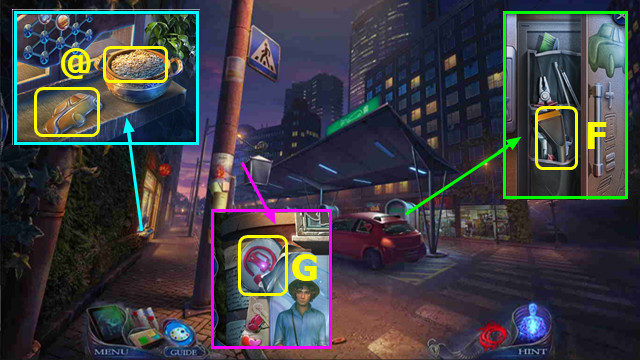
- ➤Take the car sign; use sieve; take 2/3 ELECTRIC COINS (@).
- Take 1st GLASS LILY; place a car sign; take the SCRAPER (F).
- Use the SCRAPER; take 3/3 ELECTRIC COIN (G).
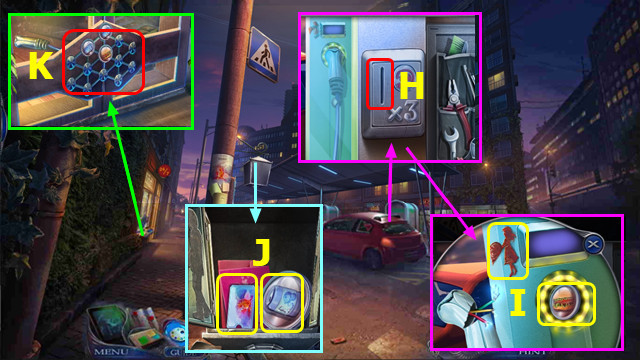
- ➤Use ELECTRIC COIN (H).
- ➤Select a hose; take GIRL and BURGER TOKEN (I).
- ➤Place boy and girl; take 1/4 FLYER and SODA TOKEN (J).
- ➤Select (K).
- Place the RAILWAY TOKEN and SODA TOKEN on the grid; solution (NP) - (TO) - (MS) - (LR) - (SQ).
- Take the NEW ELECTRICAL WIRING (A).
- ➤Replace the NEW ELECTRIC FOLDER (B).
- Take GLOVES and COLOSSEUM (C).
- Read the note and take the 1st MUSE (D).
- ➤Place the Colosseum; solution (E).
- Take 1st HORSE and 2/4 FLYER (F).
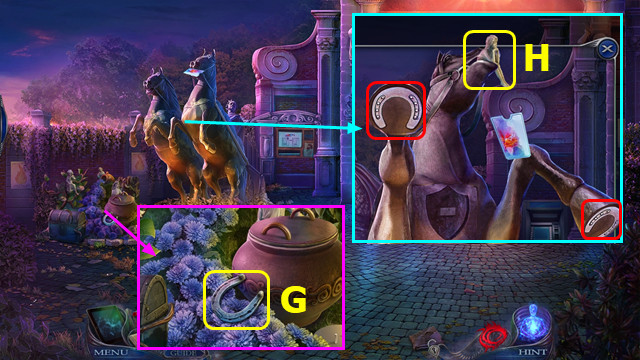
- Take 2nd HORSE (G).
- ➤Place 2 horseshoes; earn 3/4 FLYER; take the 2nd MUSE (H).
- Place 2 MUSE; take ROME EMBLEM and 4/4 FLYER (I).
- Place ROME EMBLEM; take the MUSE (J).
- Place the MUSEUM; take 1/3 MAP PIECE (K).
- ➤Use FLYER; take TICKETS (L).
- ➤Use TICKETS (M).
- ➤ Go ahead.
- Take HEAVY FIGURINE and MAP PART 2/3 (N).
- Place HEAVY FIGURINE; take 2nd GLASS LILY and 1st LAMP (O).
- ➤Take SPATULA; read note (P).
- Place 2 GLASS LILYS; take 2nd BULB and BOWL (Q).
- ➤Select; use the BOWL to earn the WATER (R).
- ➤Use WATER; take the HAMMER (S).
- ➤Use a spatula and a hammer; take 3/3 MAP PIECE and SAND (T).
- ➤Get down.
- ➤Location MAP PARTS; take the MAP OF THE MAZE (A).
- ➤ Go ahead.
- ➤Use gloves and 2 light bulbs (B).
- Place the MAZE MAP (C).
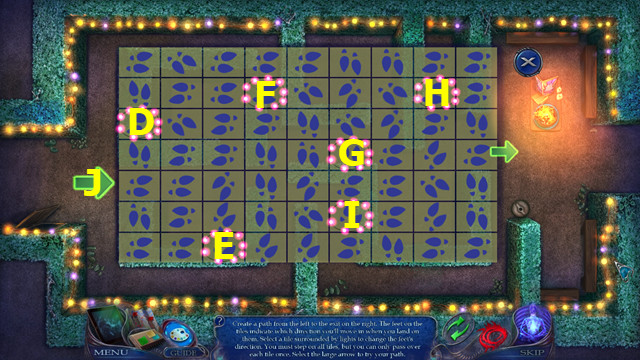
- ➤Решение Dx3-Ex7-Fx5-Gx6-Hx7-Ix7-J.
- ➤Speak (K).
- Use the SAND (L).
- ➤Use resisting artifact (M).
- ➤Speak (N).
- ➤Choose strength and tattoo.
- ➤Play HOP.
Congratulations! You have completed Invisible Fears: Sinister Talent!
Was the article helpful?