Passage of the game Lost Lands 9: Tales of the First Brotherhood 100%. All the secrets, puzzles, mini games, collectibles and achievements in one place...
Lost Lands 2: Four Horsemen - Walkthrough 100%
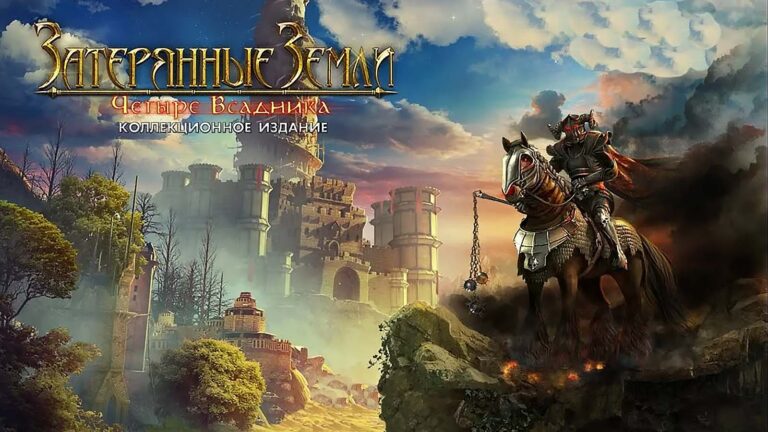
Passage of game Lost Lands 2: Four Horsemen 100%. All secrets, puzzles, mini-games, collectibles and achievements in one place.
Games series: Lost Lands
Content
General information. Walkthrough:
- Glade.
- The corridor.
- Temple of the Dwarves.
- Village.
- Werewolf house.
- Dead lake.
- Fork.
- Death Castle.
- Bonus chapter. Bonus.
- Achievements.
- Questions - answers.
Lost Lands. Four Horsemen (lost lands 2) - An adventure game with hidden objects and puzzles you are waiting for hours of passage of a fantasy story. After centuries of peace, a terrible evil threatens the Lost Lands! There are rumors of four mysterious black riders. They burn villages, freeze reservoirs, sow death and cover the world with darkness. Their goal is to find the key that will allow them to control the parallel worlds, and they will stop at no one to get it. And only the chosen defender of the Lost Lands is able to stop them. The Lost Lands of the 2nd century have passed since the last crisis. Witnesses say that from across the Lost Lands 2, four black horsemen are burning villages to the ground, freezing waterways, spreading death, and shrouding the lands in darkness. They seek the key to the Portal of the Universe and destroy anyone who crosses their path. But there is also talk of a brave girl from another world who once saved their world from the forces of Evil. For this girl, you will go through this complicated story. If you are stuck at any moment and cannot move forward, on our website you will find a walkthrough for the game Lost Lands 2. Four Horsemen.
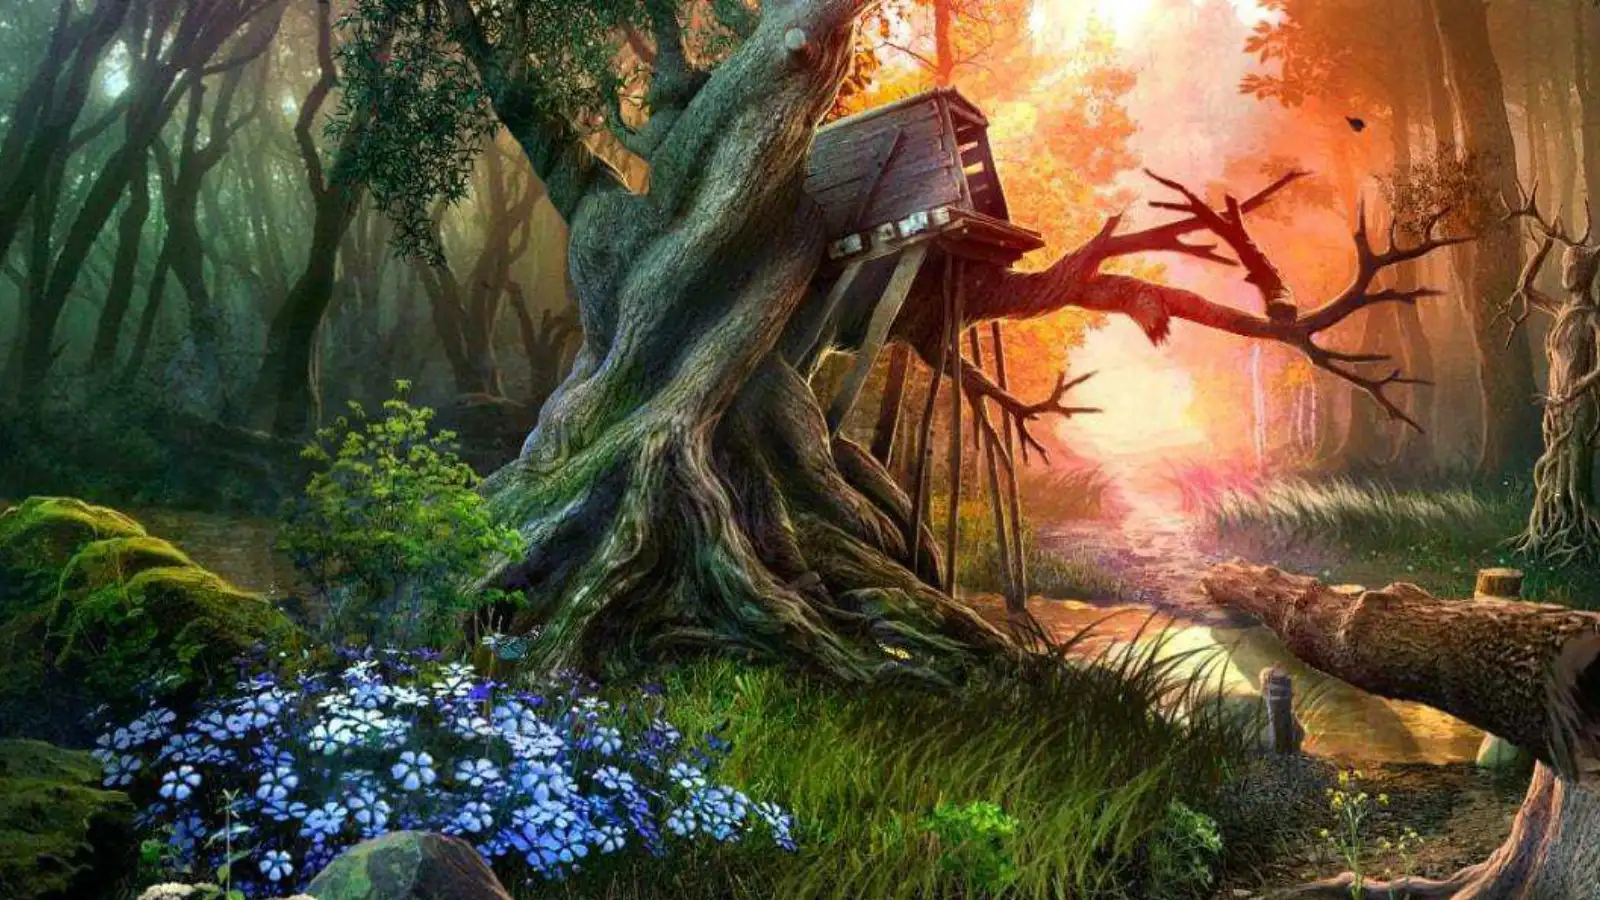
Chapter 1
A strange thing happened to me! The last thing I remember is the underground parking of the shopping center, then some black smoke, nothing is visible, and then I am at the edge of the forest. How I got here I don't know. There is a house here. Perhaps someone who lives in it can explain something. I met an old druid. His name is Maaron the Hermit. It seems that it was at his beckon that I again ended up in the Lost Lands. The Druid says that an unknown Evil has befallen the Earth. True, what kind of Evil, he still does not know and asks me for help. He made an appointment for me at some Life-giving Lake, located behind the tower.
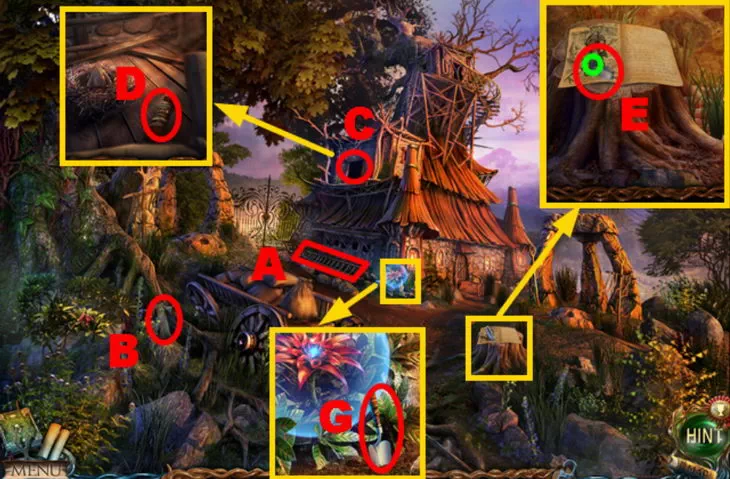
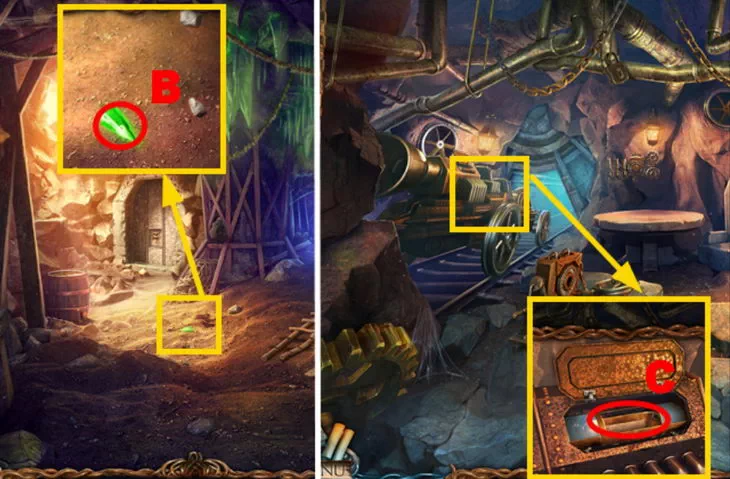
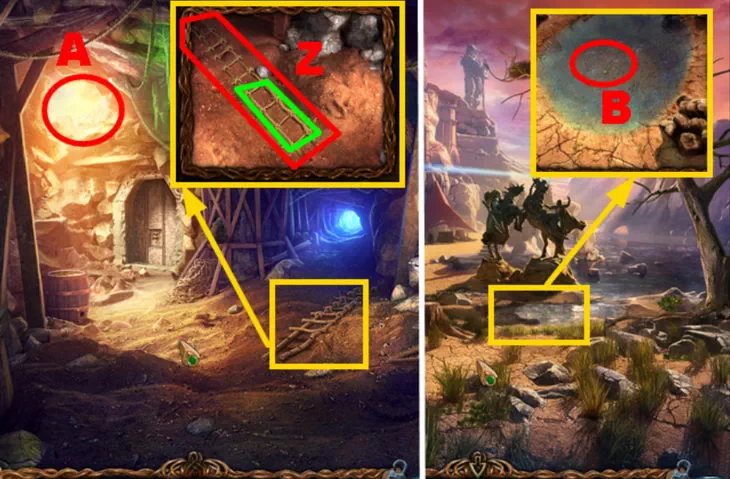
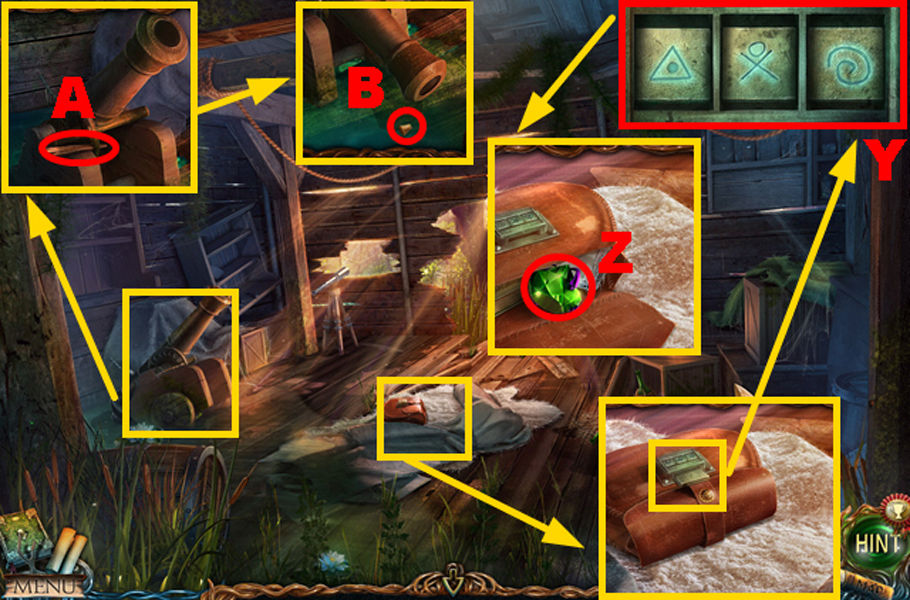
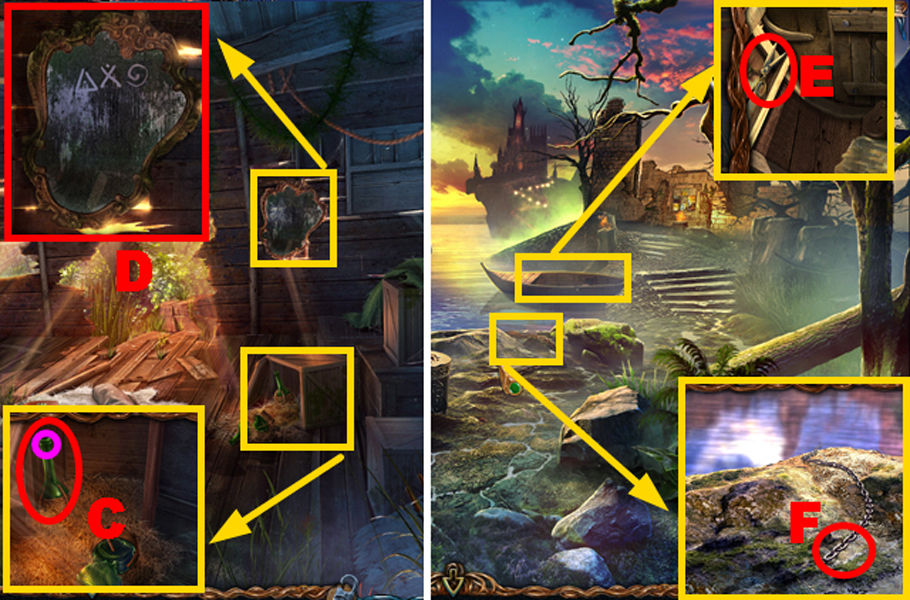
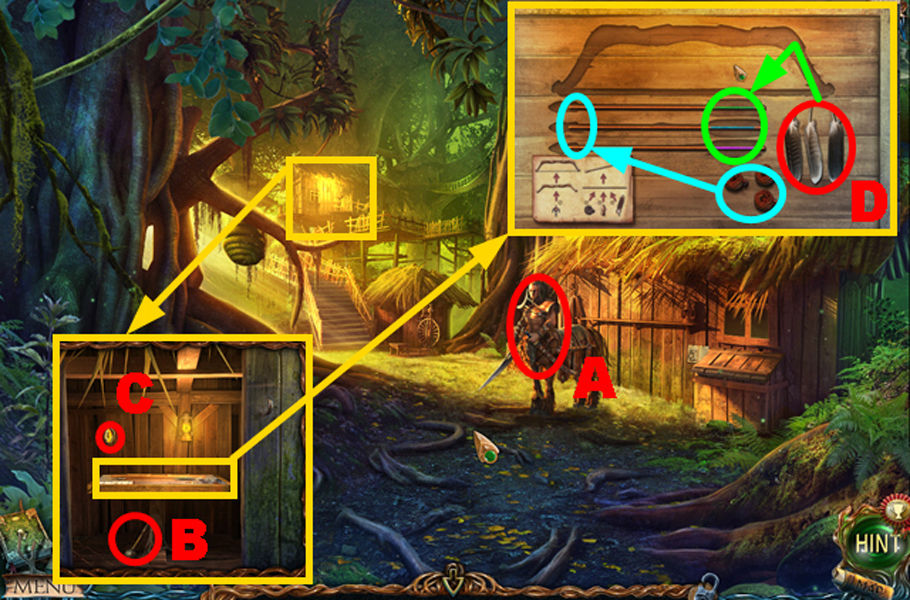
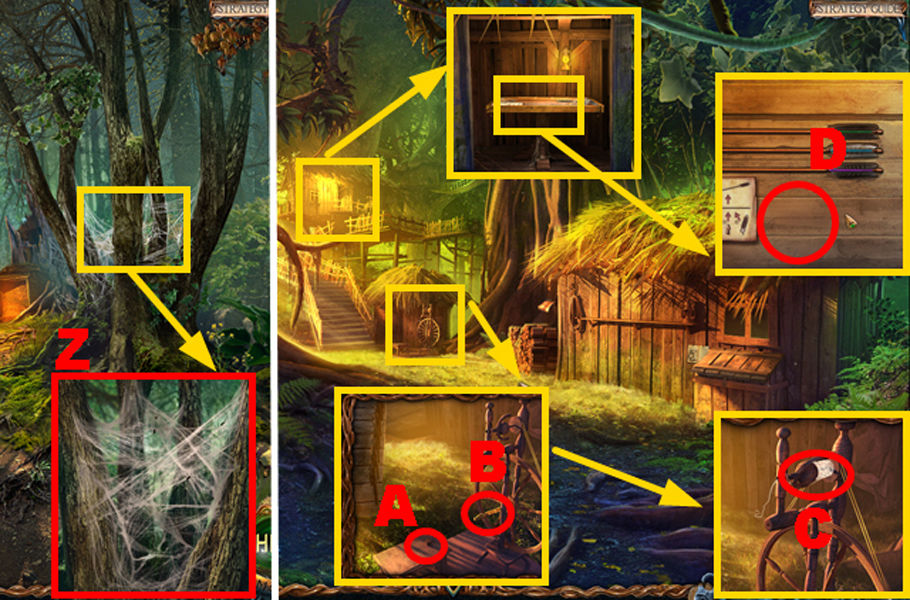
- Take the LADDER (A) and MONK FIGURINE 1/8 (B).
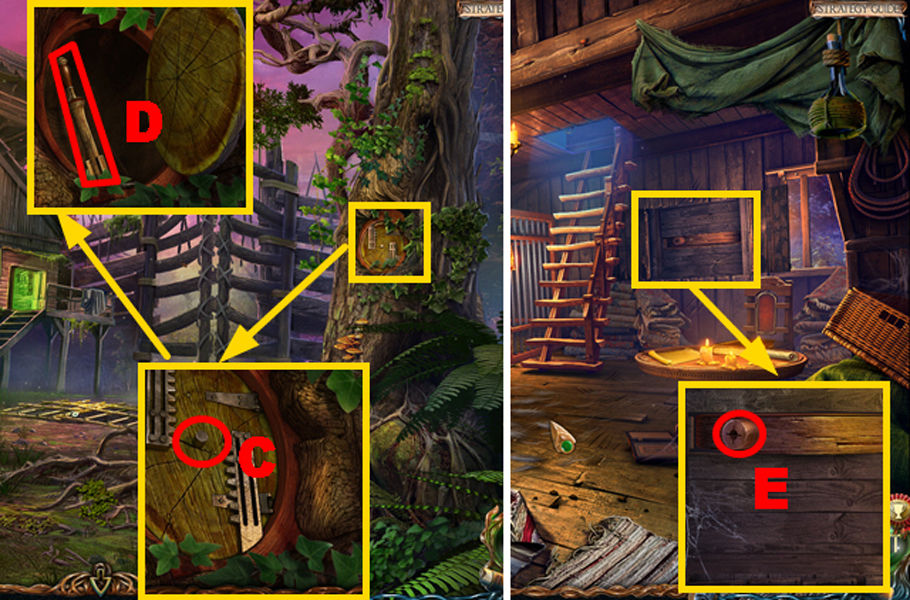
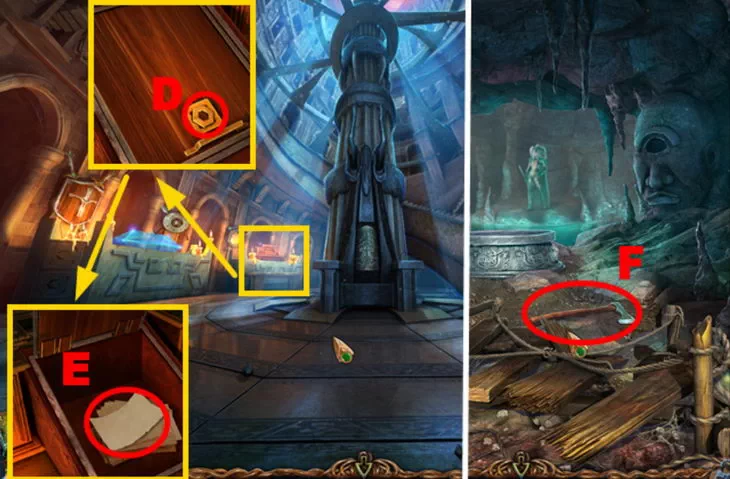
- Place the LADDER (C) and take the KNIFE HANDLE (D).
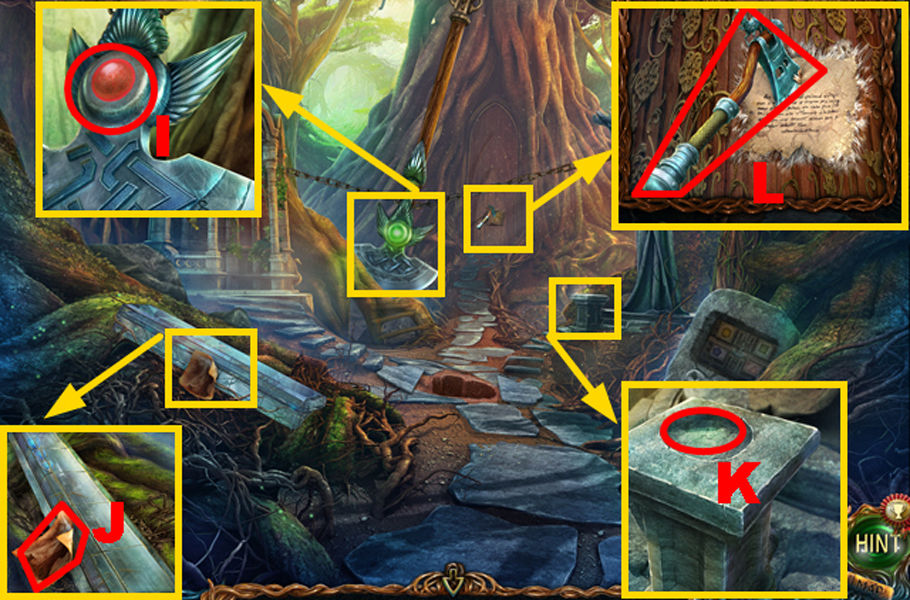
- Put the KNIFE HANDLE on the blade (green area); take the KNIFE (E).
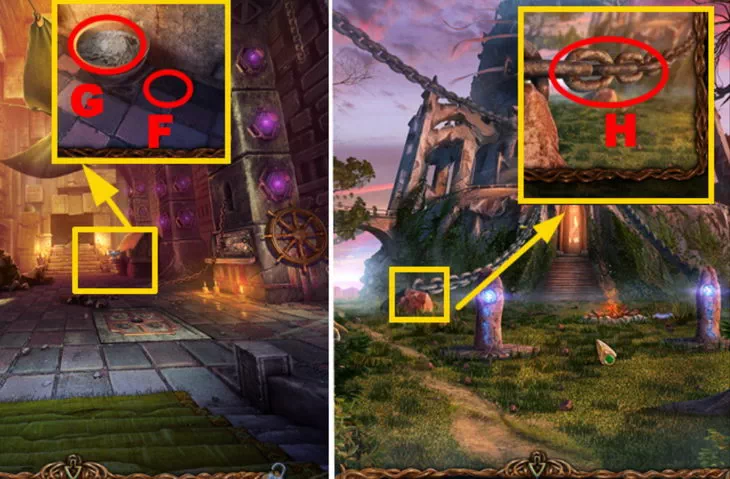
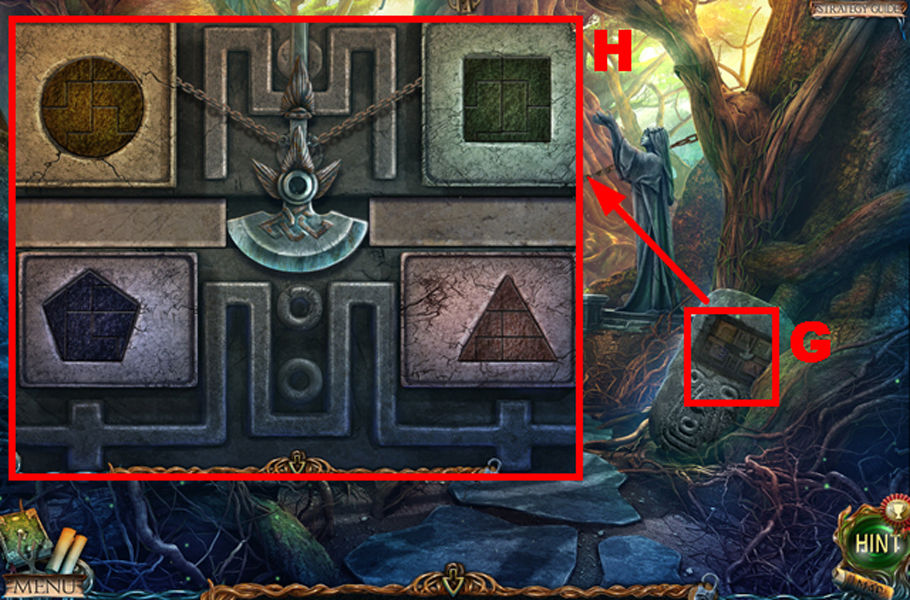
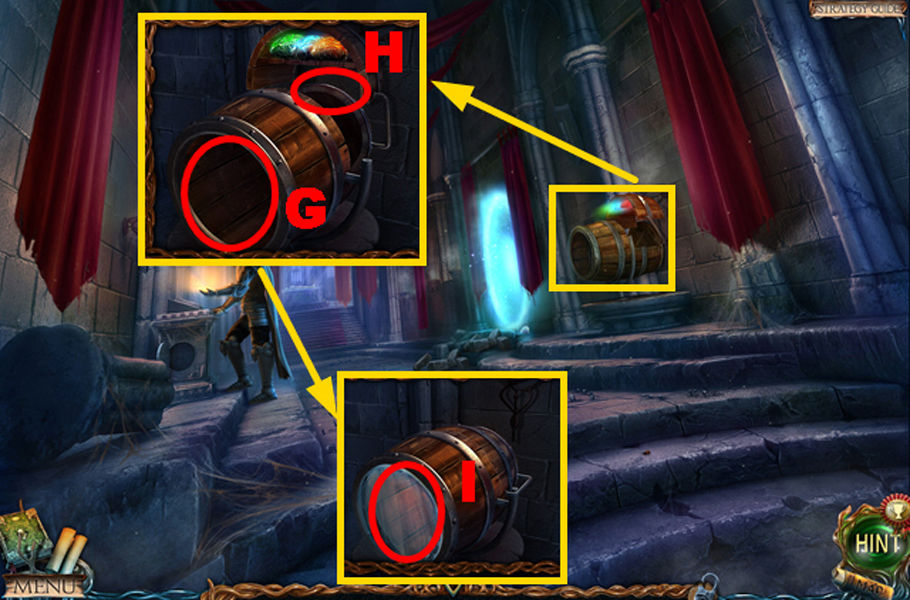
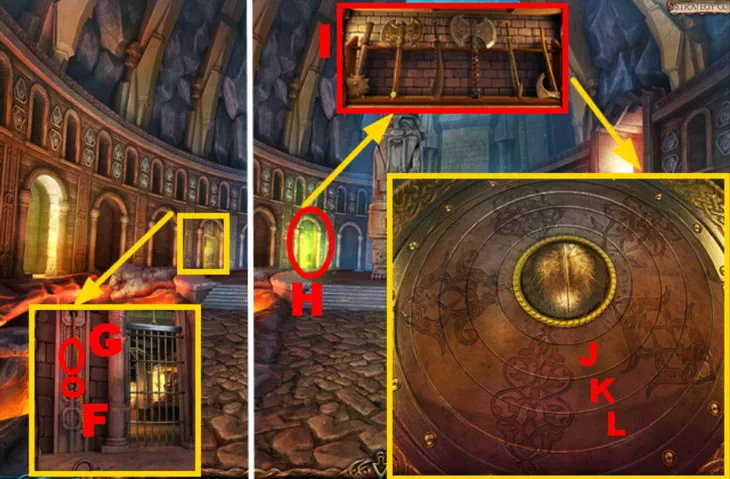
- Take the SPATULA (G).
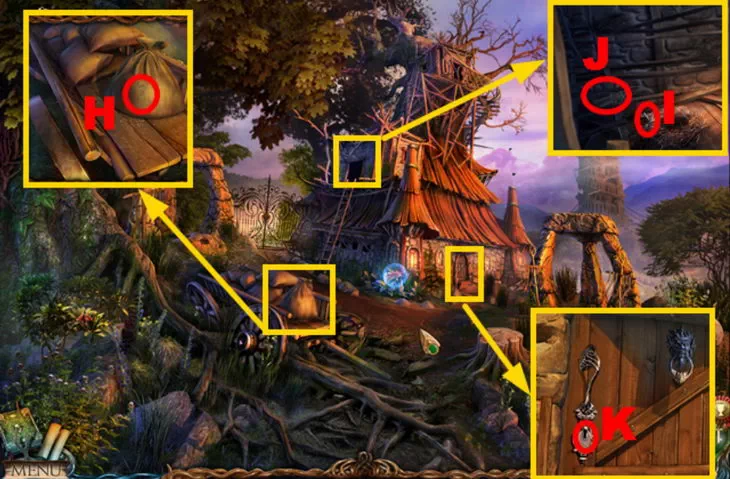
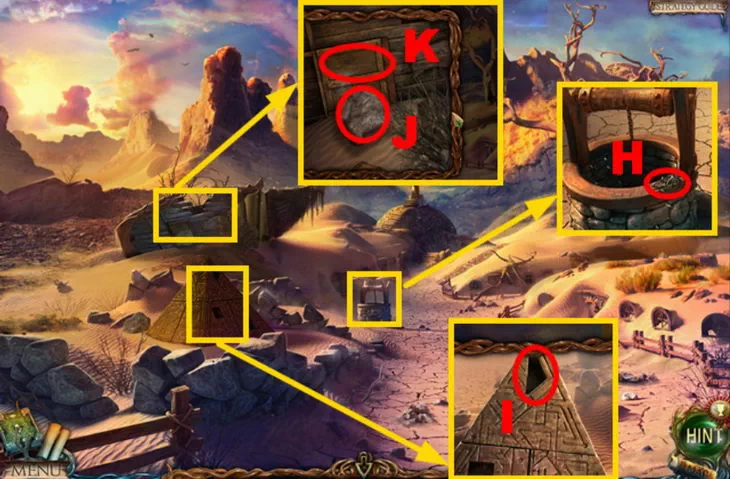
- Use the KNIFE to cut open the bag (H).
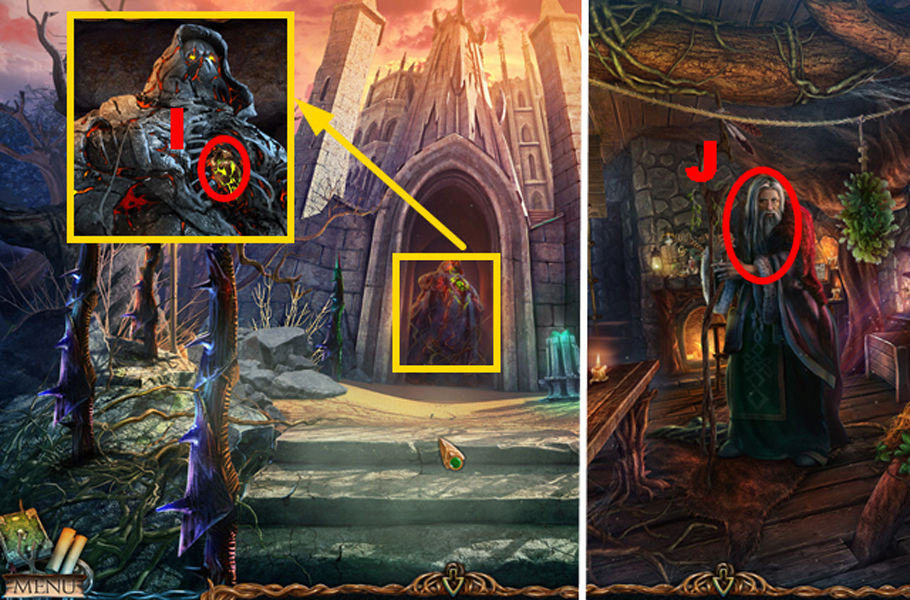
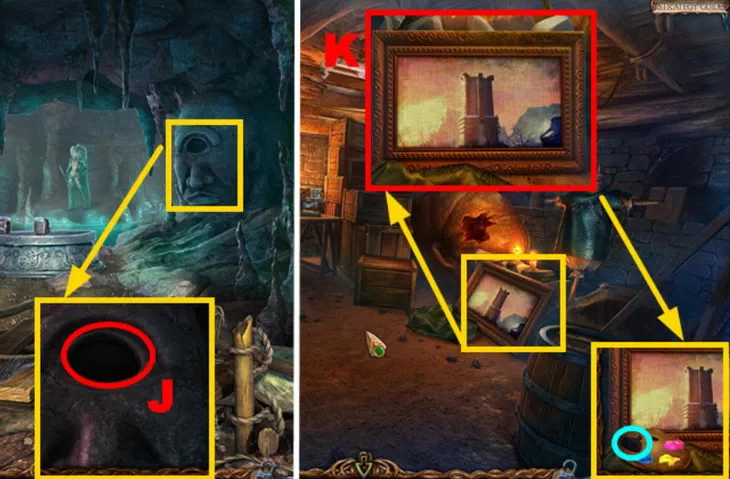
- Take the KEY (I) and MONK FIGURINE 2/8 (J).
- Insert the KEY (K) and turn it.
- Go to Maaron's House.
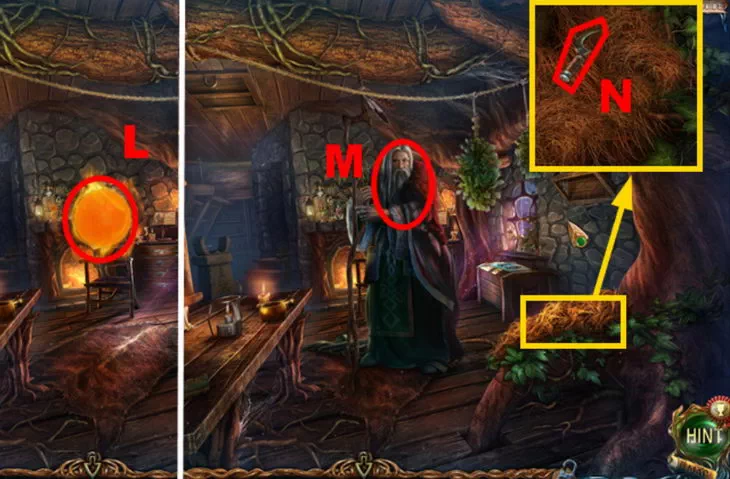
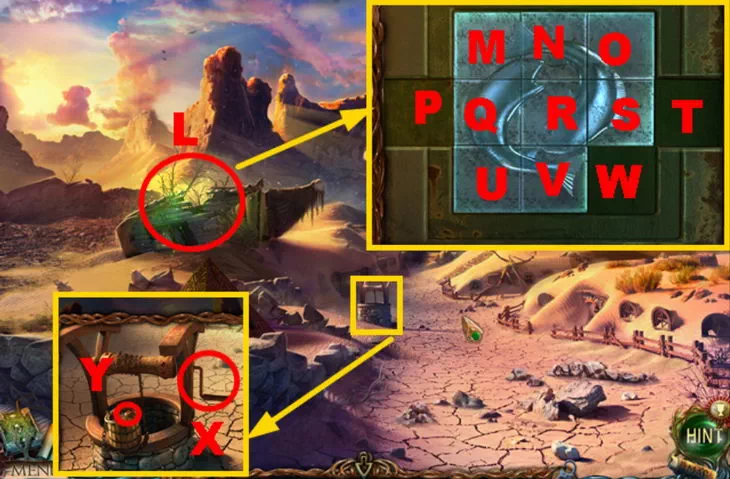
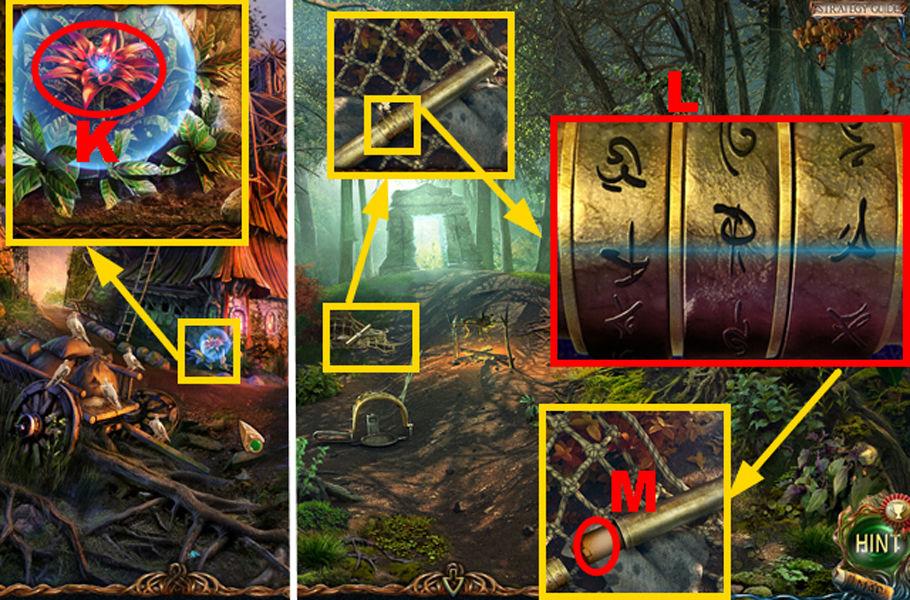
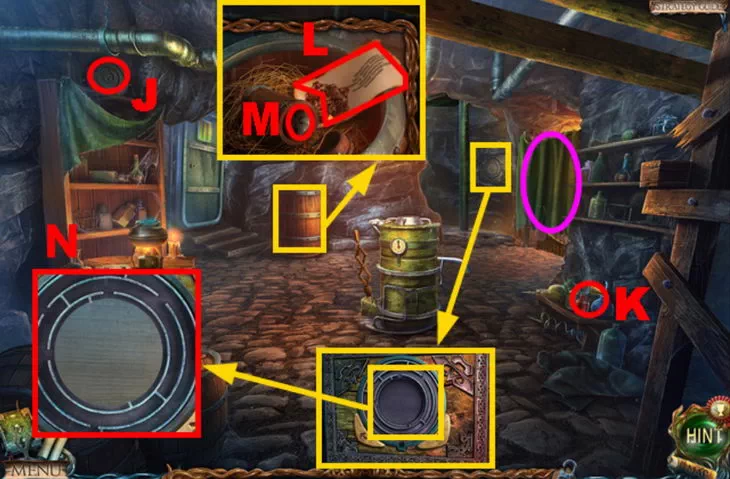
- Touch the sphere (L).
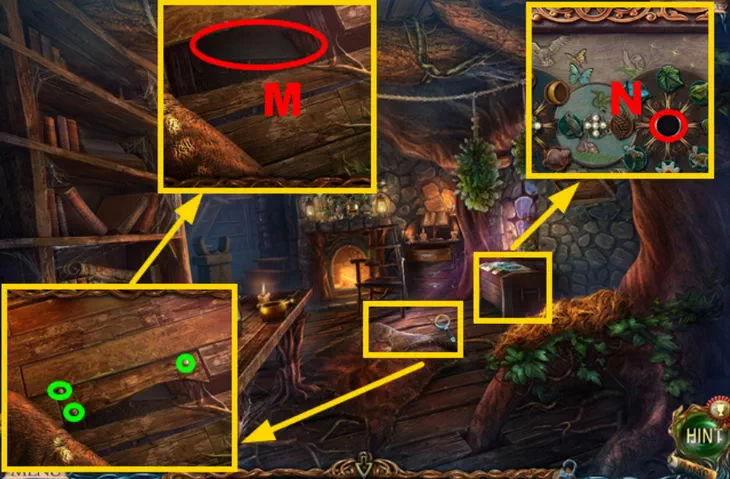
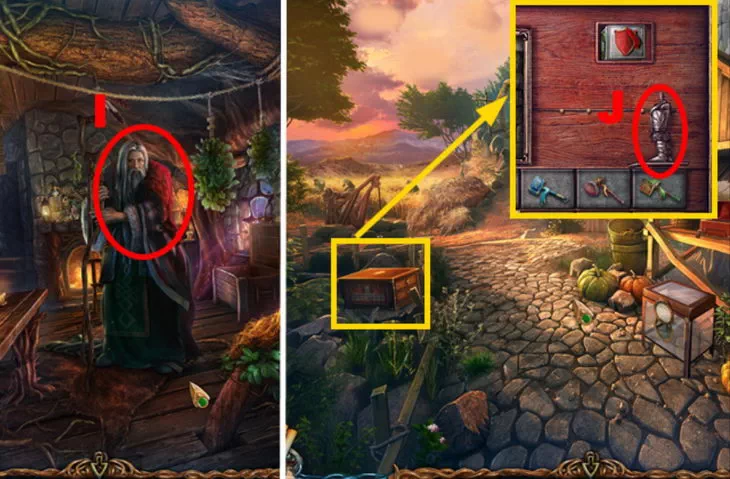
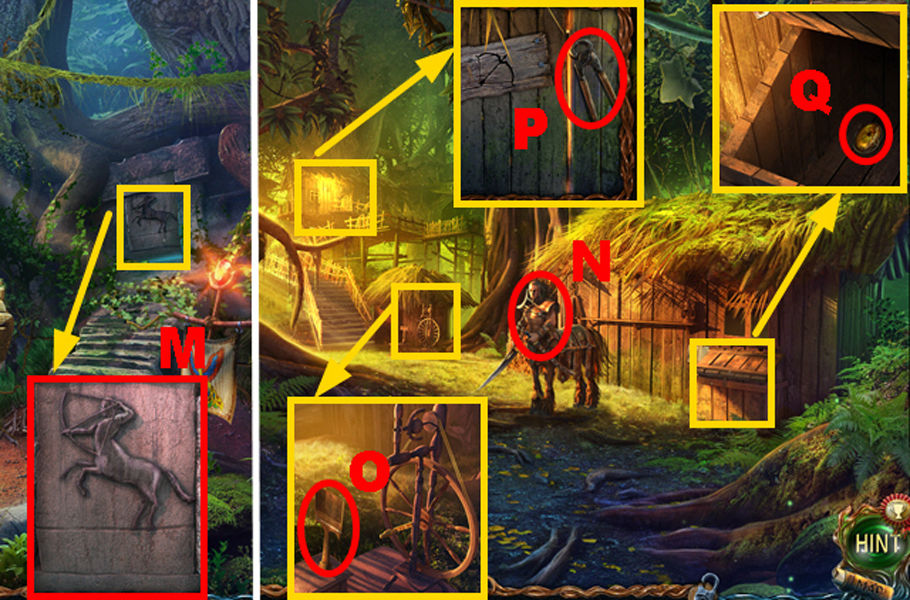
- Talk to the man (M); receive the RUNE.
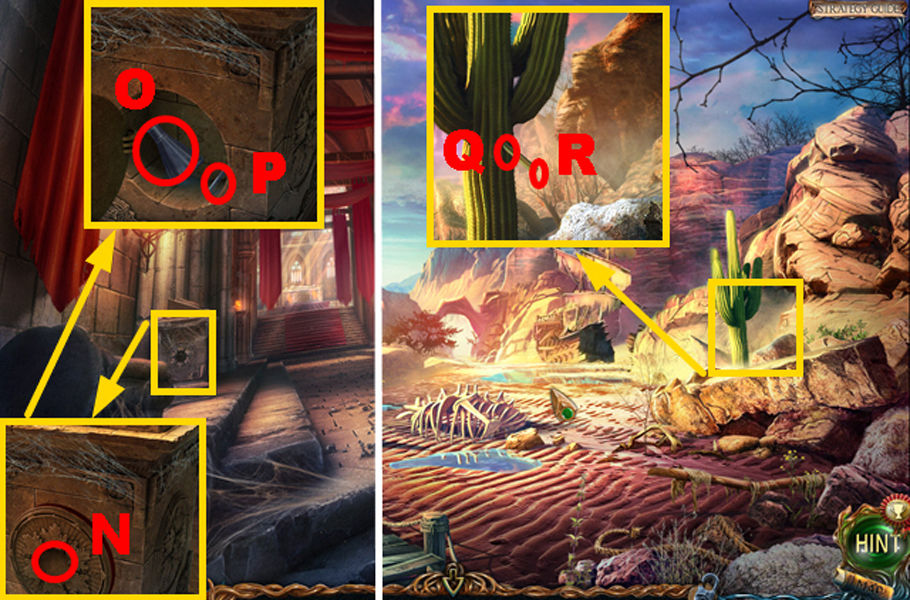
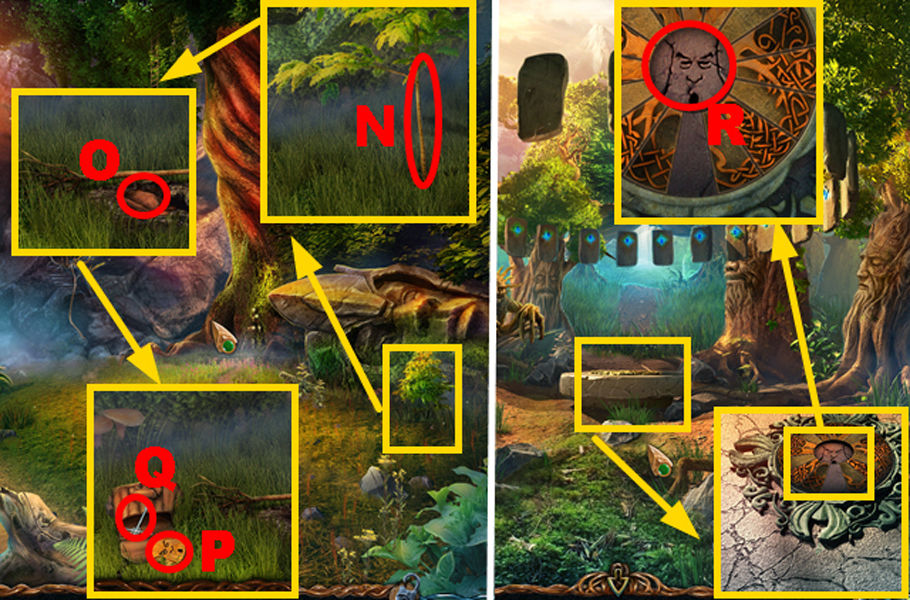
- Move the hay twice; take the SICKLE (N).
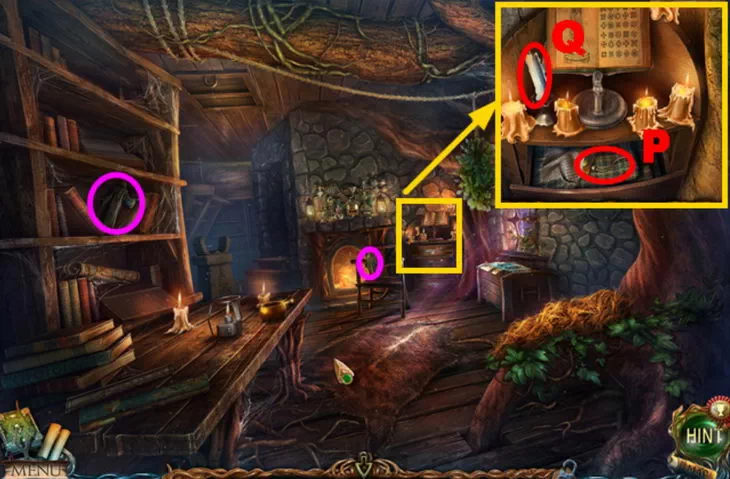
- Collect 2 MONK FIGURES (purple zones).
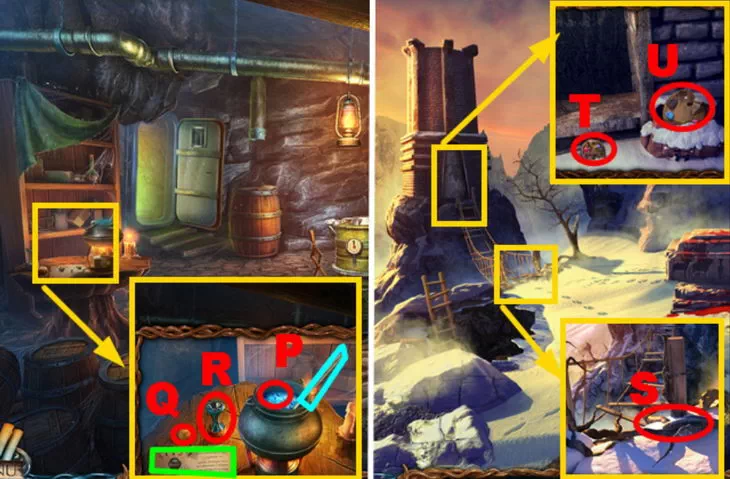
- Open the dresser drawer and move the rag; take the OIL CAN WITH OIL (P) and CANDLE (Q).
- Go back.

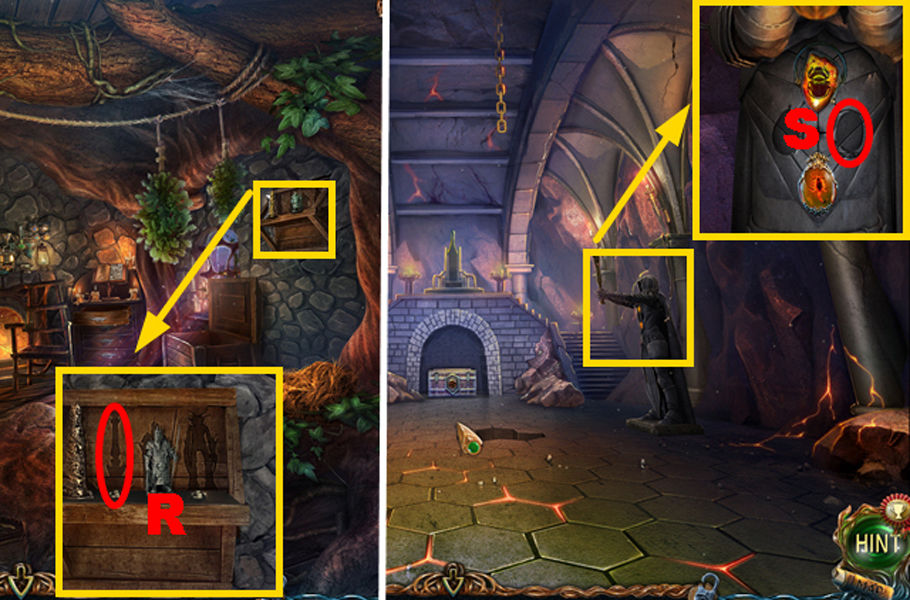
- Place the RUNE (R) in the slot.
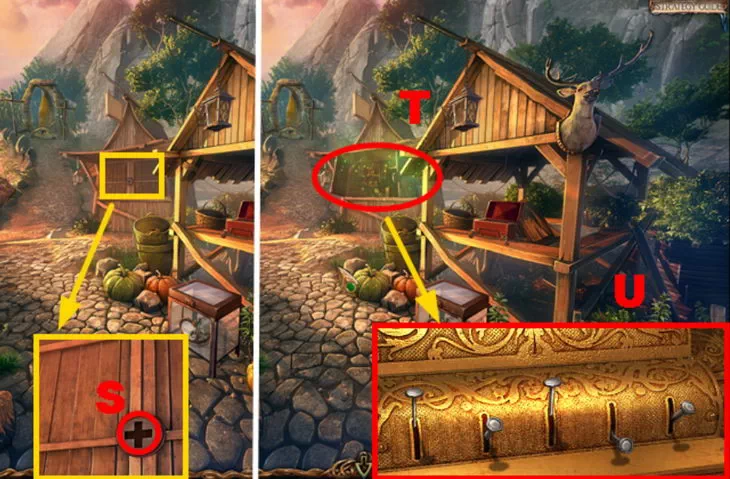
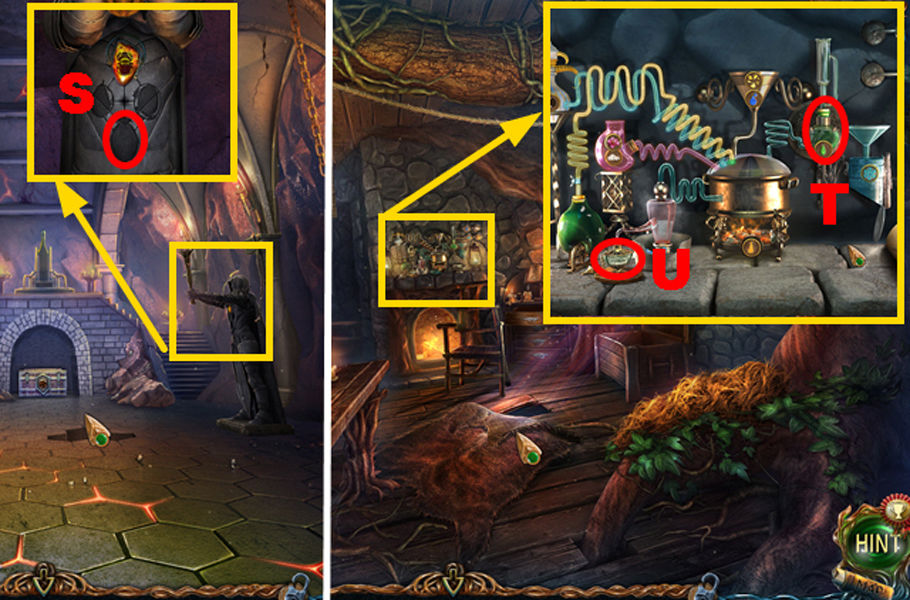
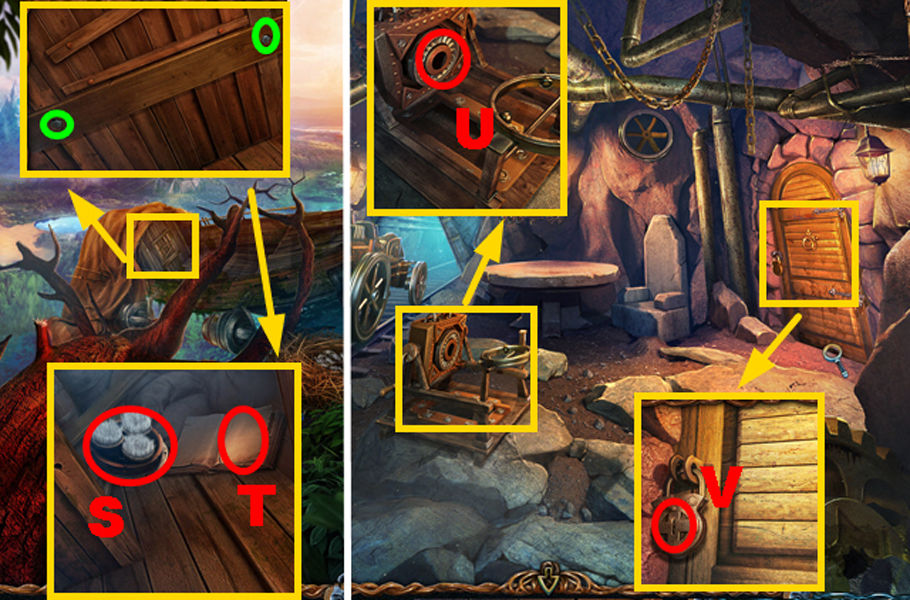
- Take the HAMMER (S).
- Walk left.
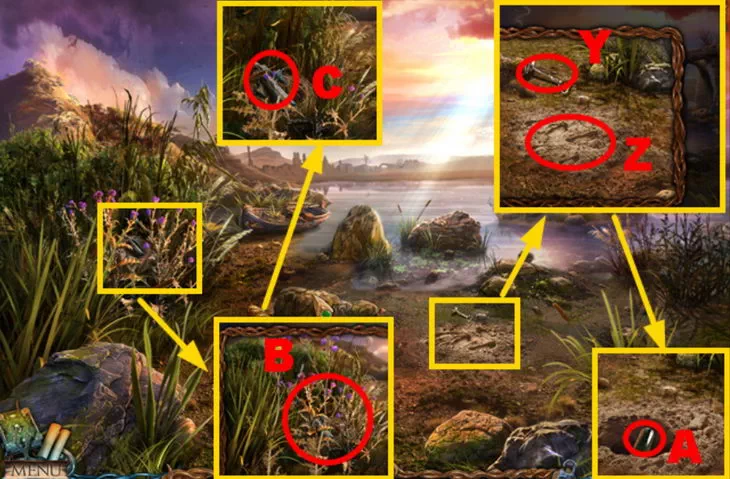
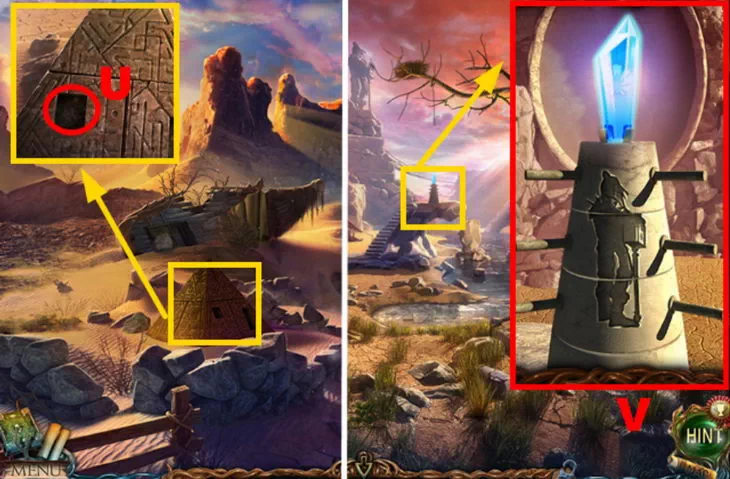
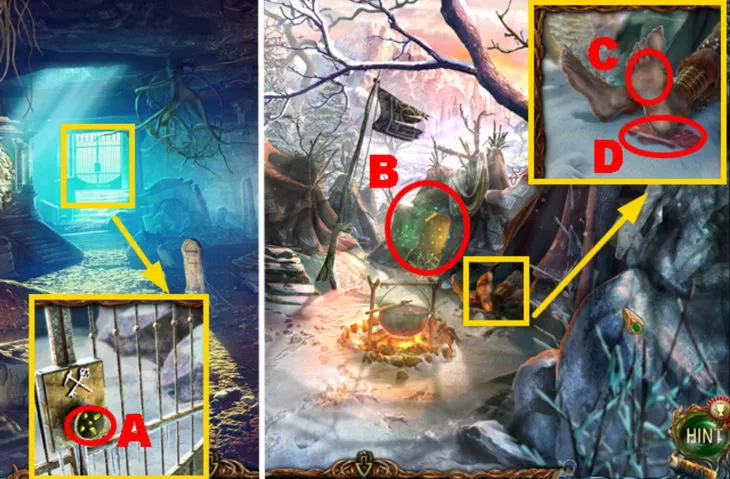
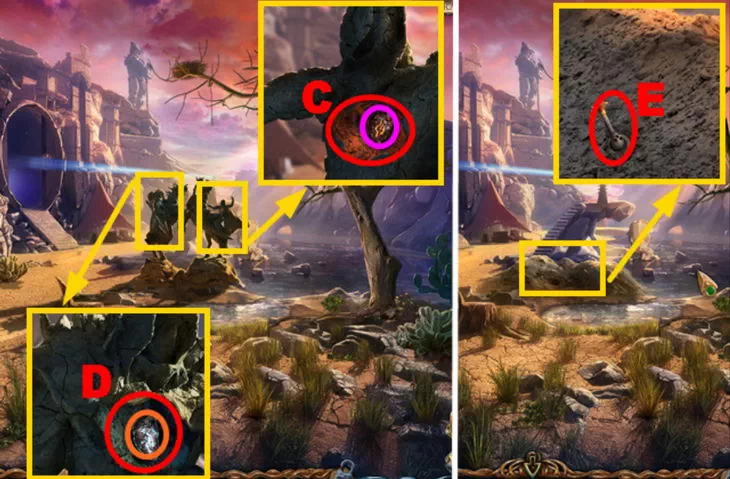
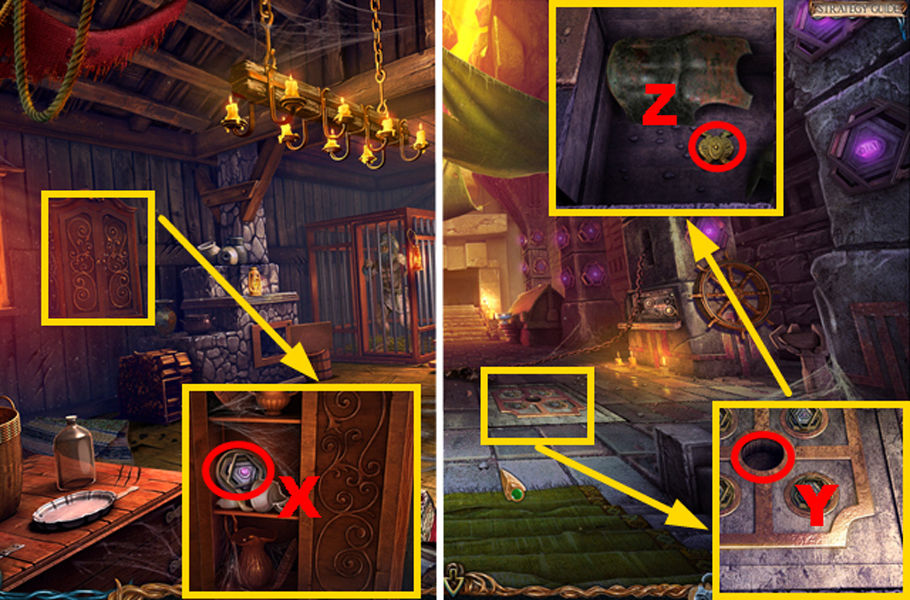
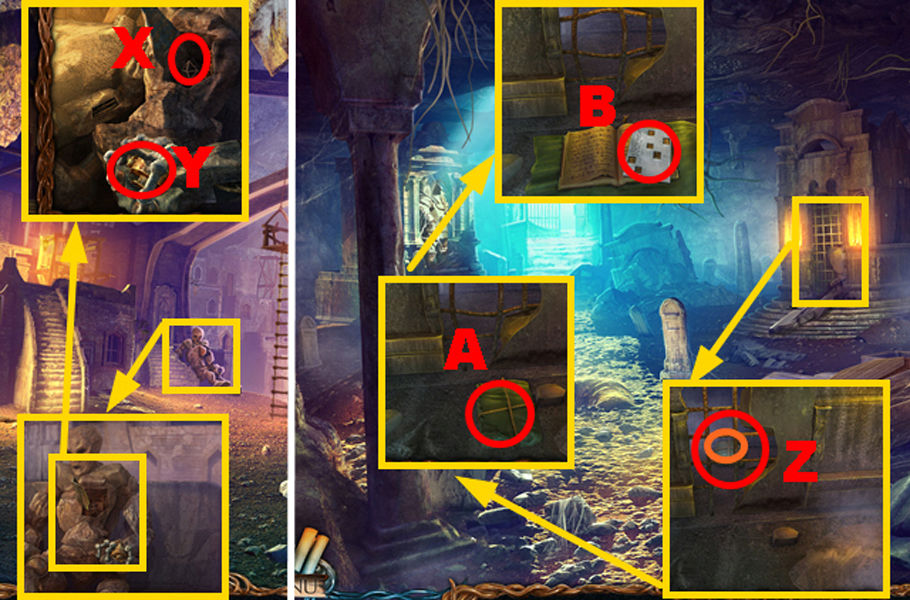
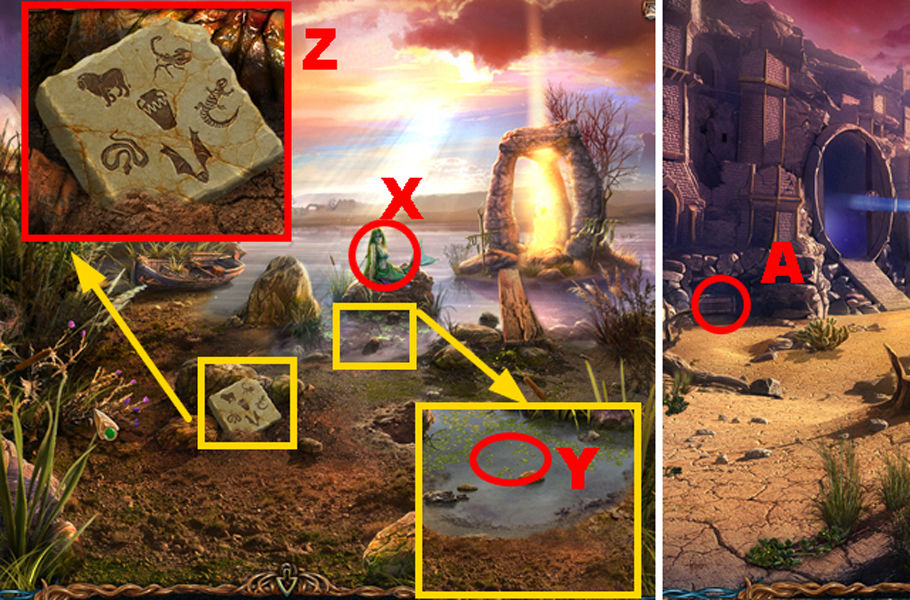
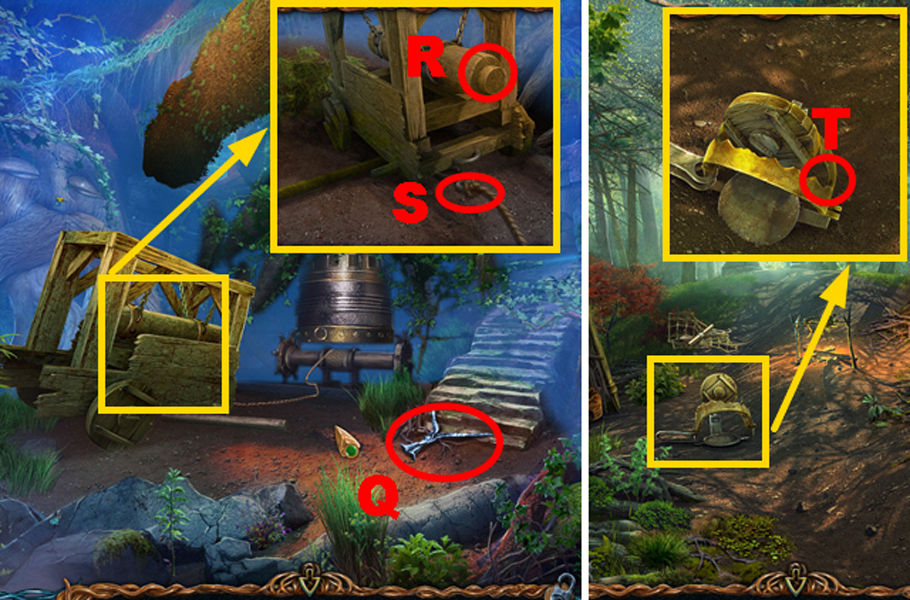
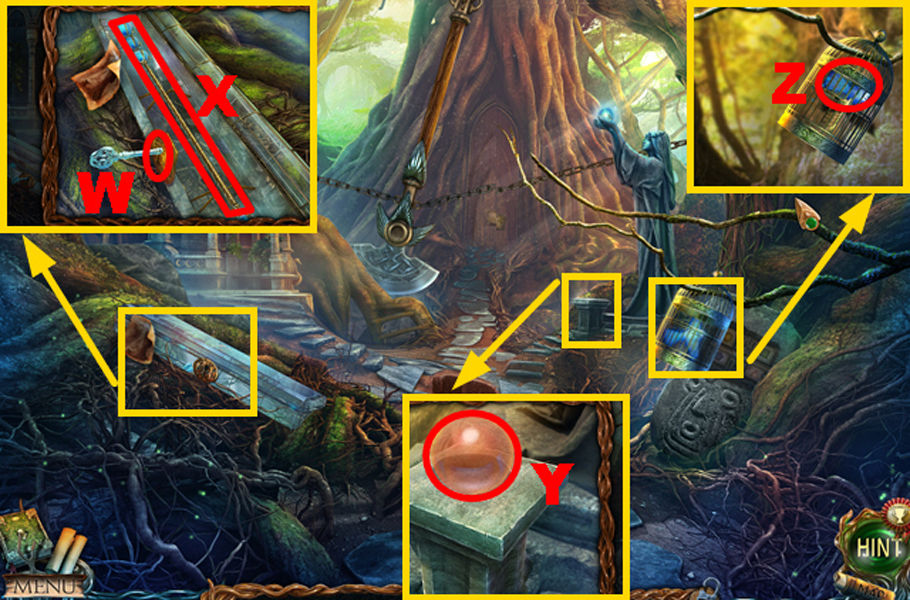
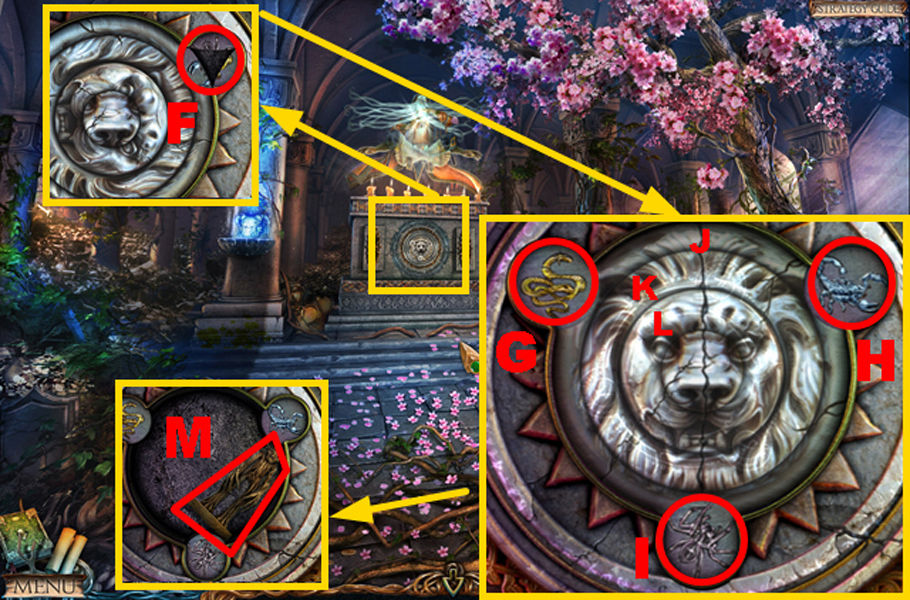
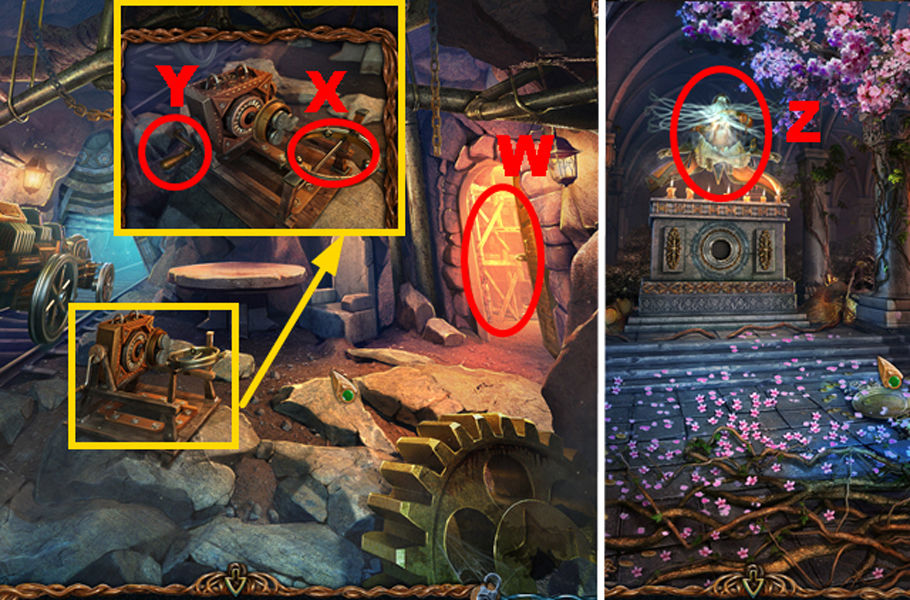
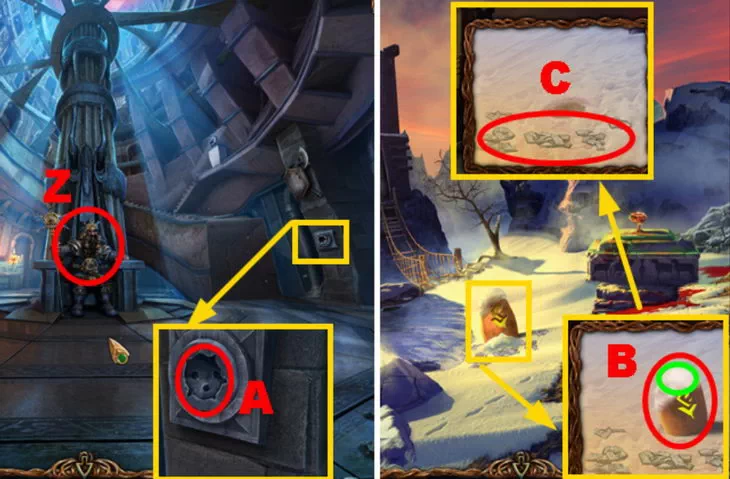
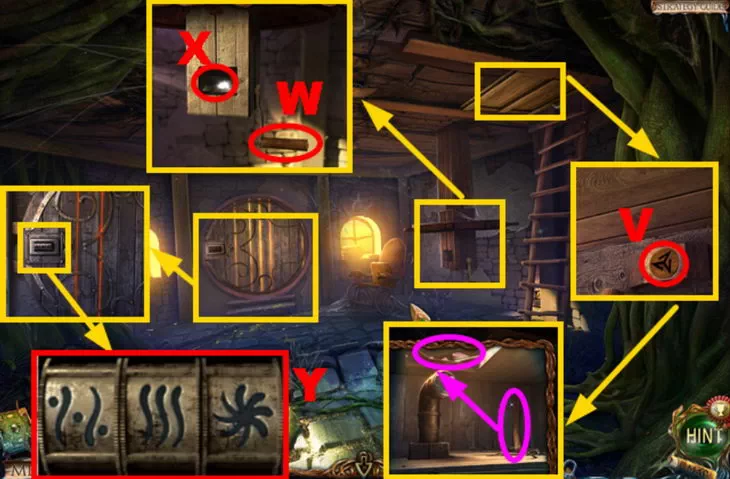
WXY. At the bottom we examine the footprints in the sand, next we take the key.
Z.A. We dig up the sand with a spatula, we find the drum of the music box.
BC. On the left there are thickets of thorns, we cut them off with a sickle, we will find a figure (5/8).
Halfling Village
Lost Lands 2: The Four Horsemen. What to do
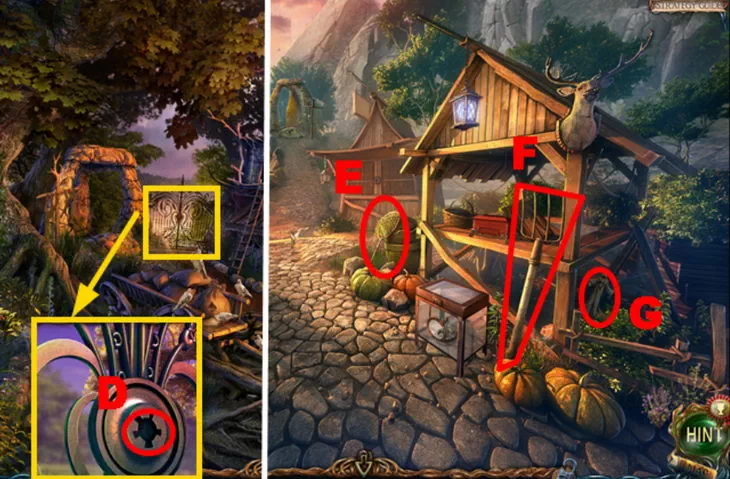
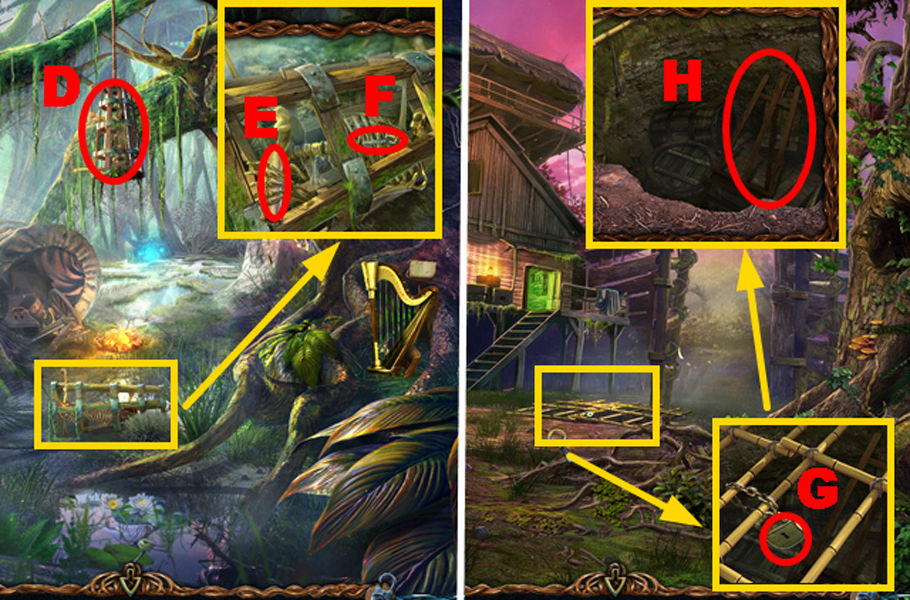
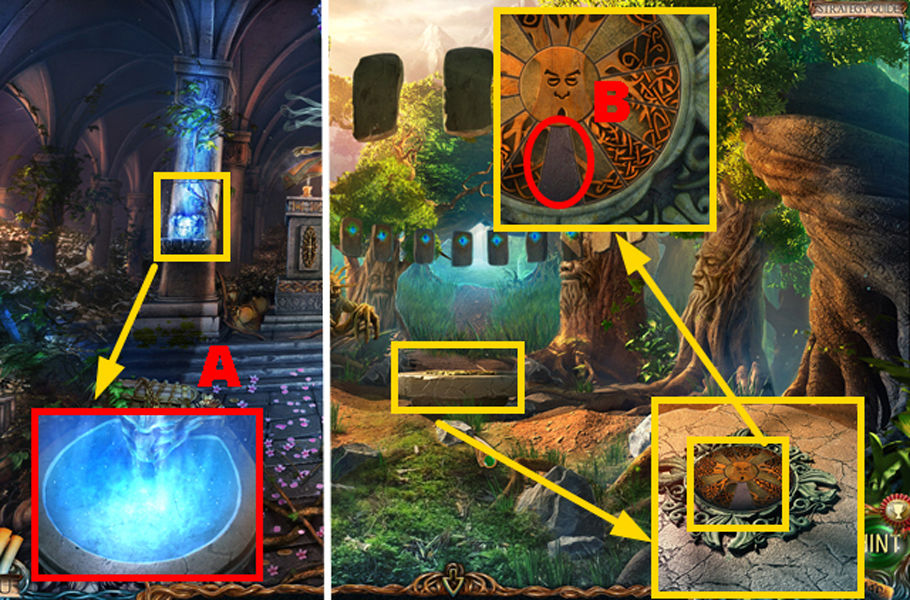
D. We return to the wizard's house, on the left we unlock the gate with the key.
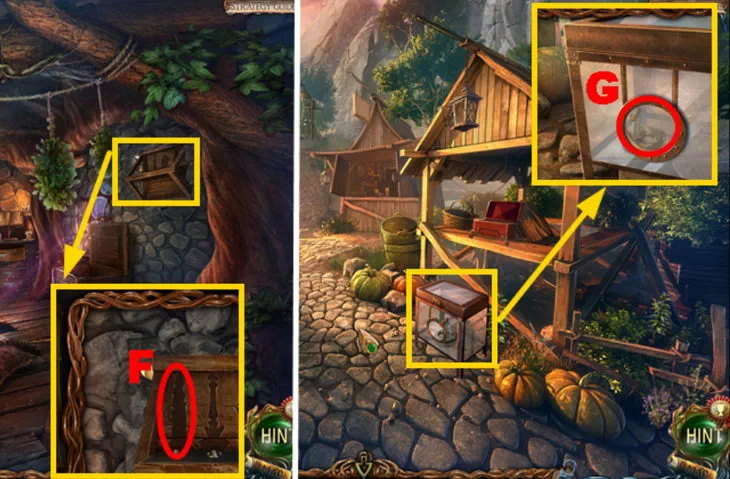
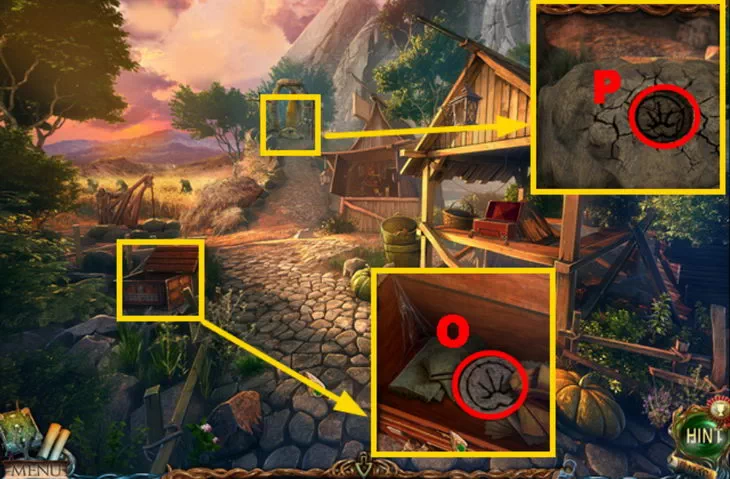
Secret. On the right, on a shelf under a canopy is a ghostly bag (5/35).
Secret. In the center, behind the pumpkins, there is a purple ball - detail (5/35).
Secret. Below, under the glass terrarium, we take the manuscript (4/20).
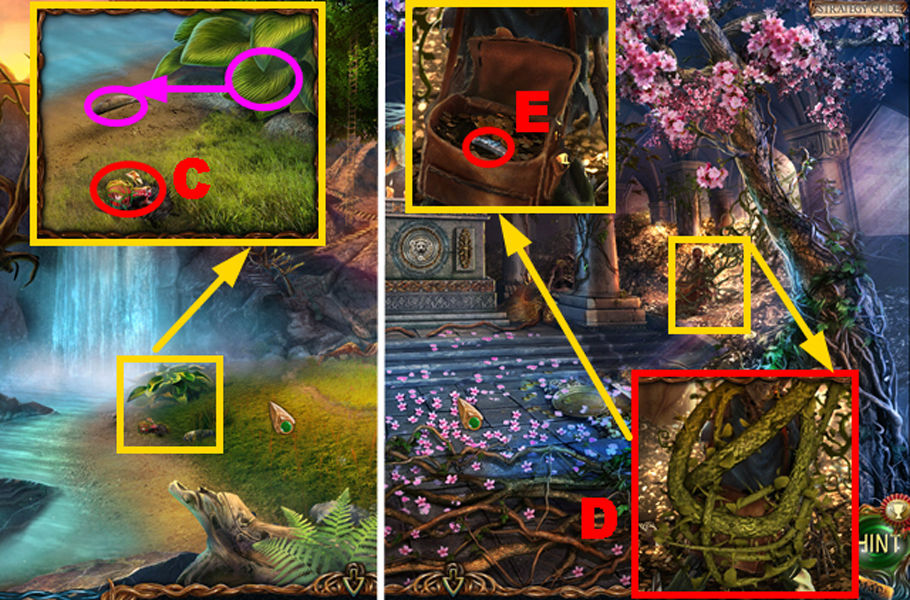
E. On the farm in the center near the pumpkins, take the net.
F. A pitchfork is leaning against the house to the right.
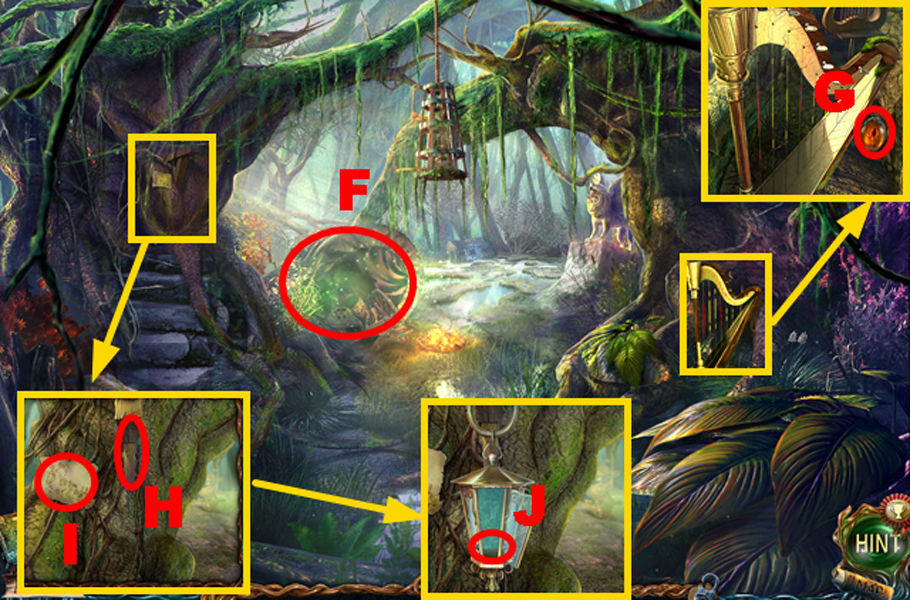
G. To the right under the house in the bushes lies a figurine (6/8).
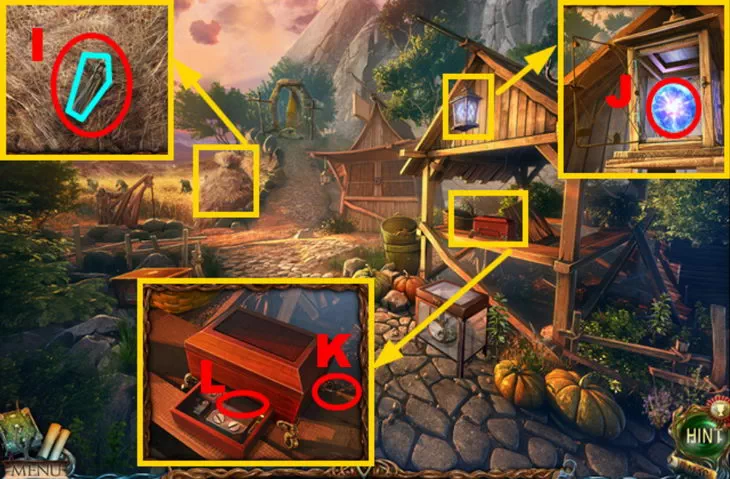
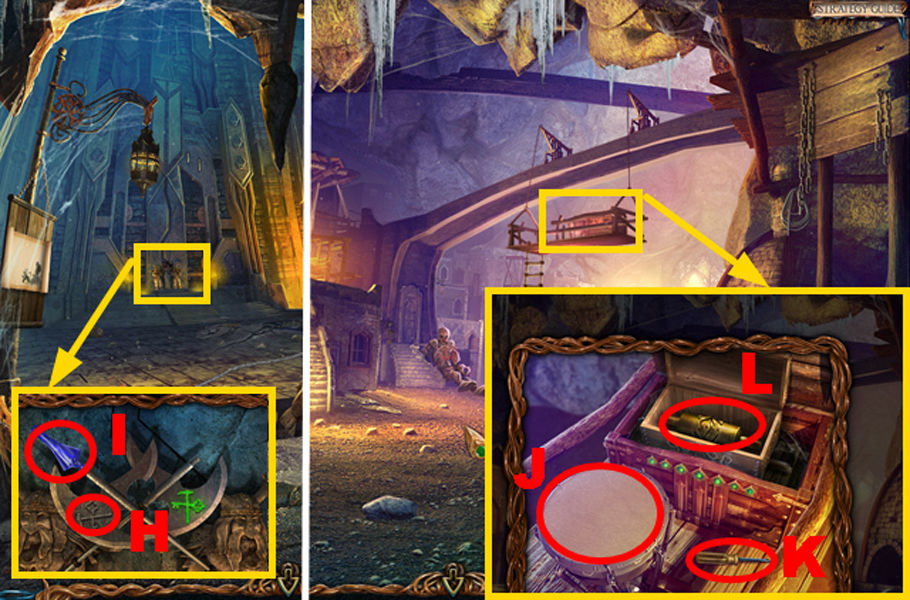
HI. On the left, use the pitchfork on the haystack, inside the figure (7/8).
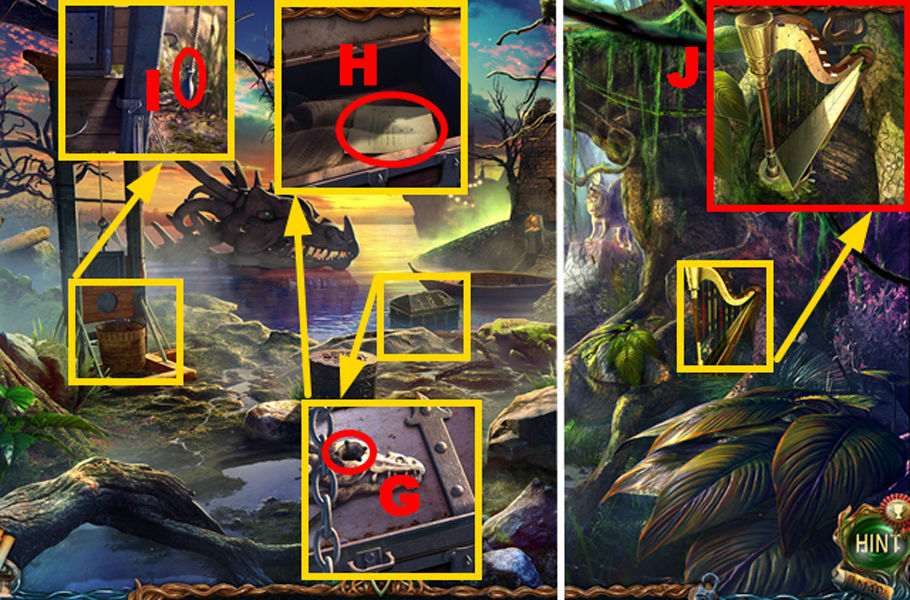
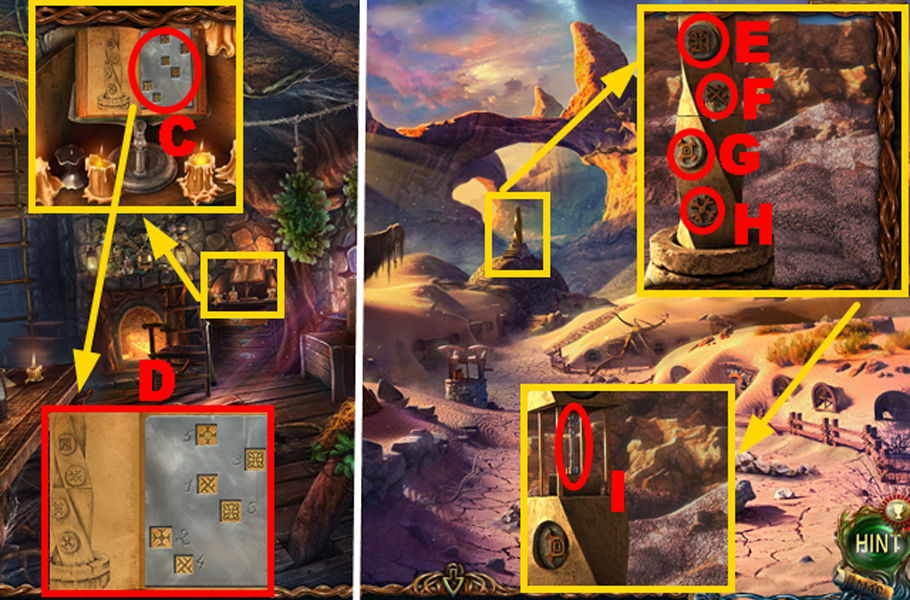
J. At the top, on the roof of the canopy in the lantern, we take the energy sphere.
K. On the right on the shelf we inspect the music box, turn its handle.
L. Add a drum inside the music box.
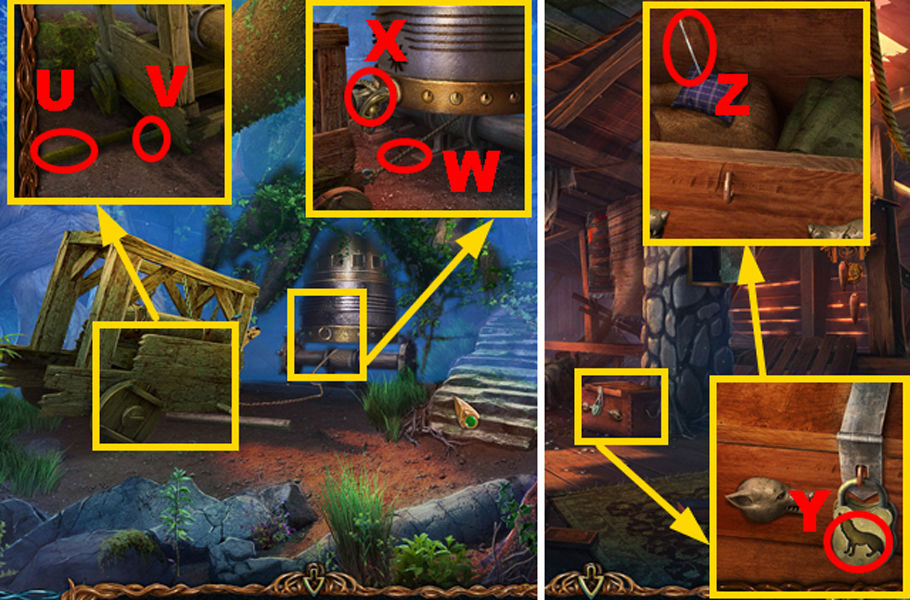
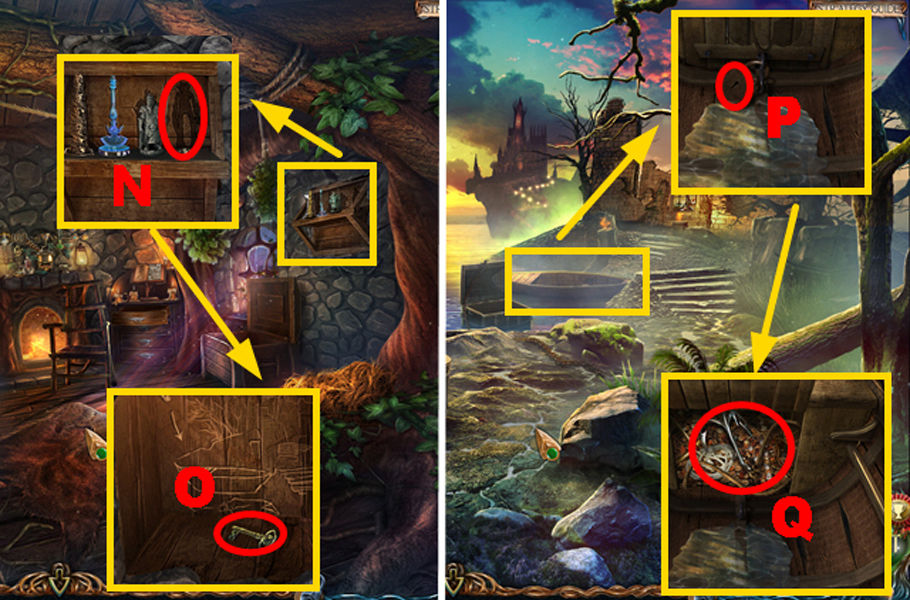
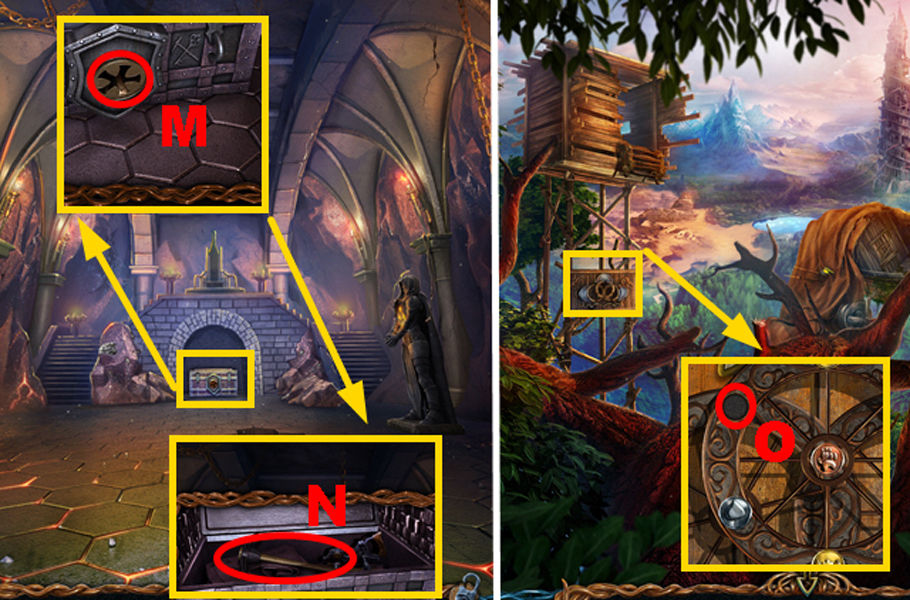
M. We return to Maaron's hut, inside we examine the floor in the center, under the skin there is a cache. We take out the nails with a hammer, remove the board, saw under it.
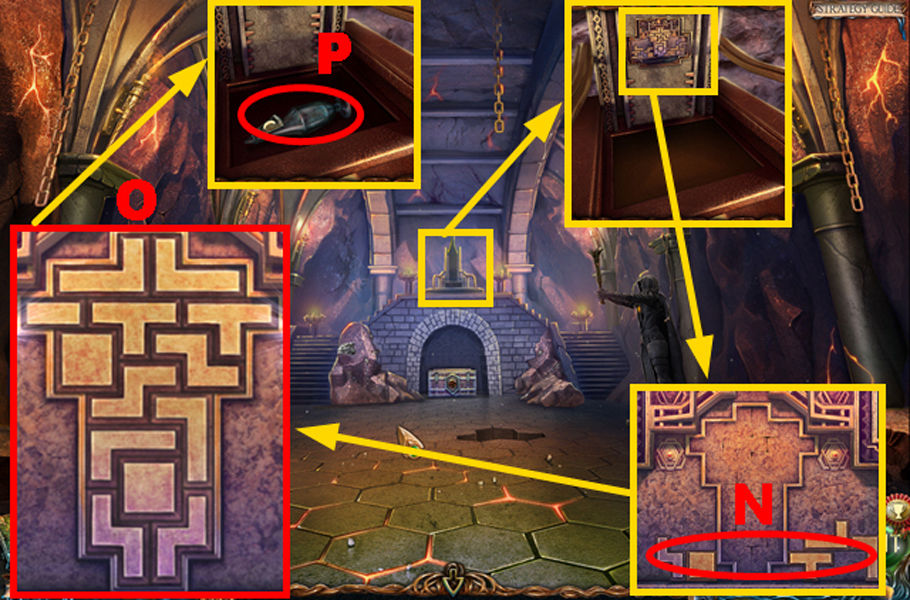
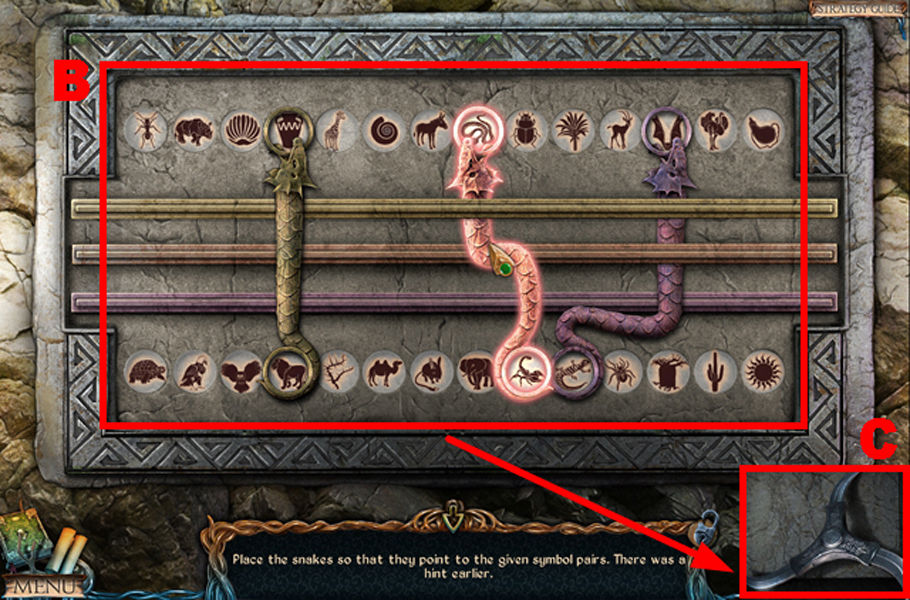
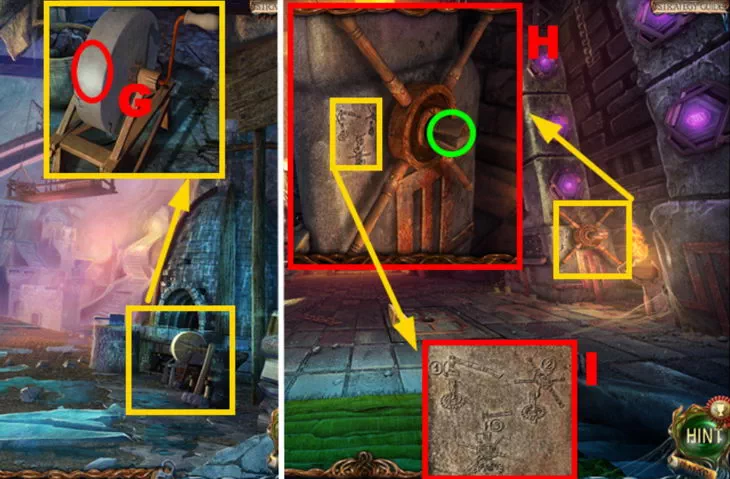
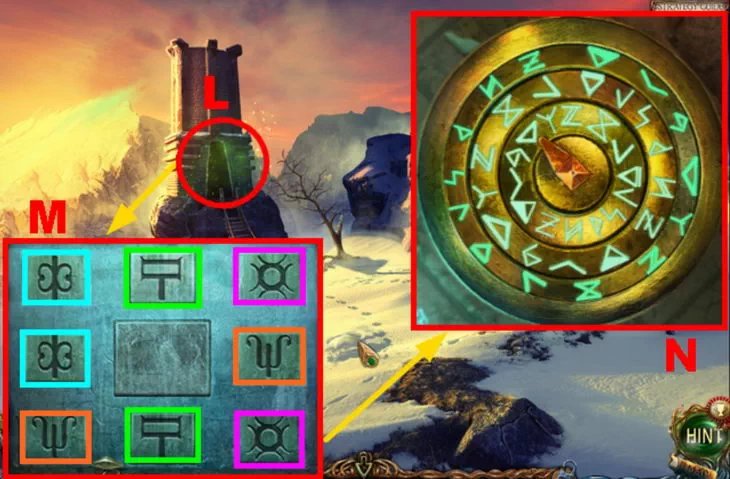
N. To the right of the chest, add the 2nd faucet, solve the puzzle.
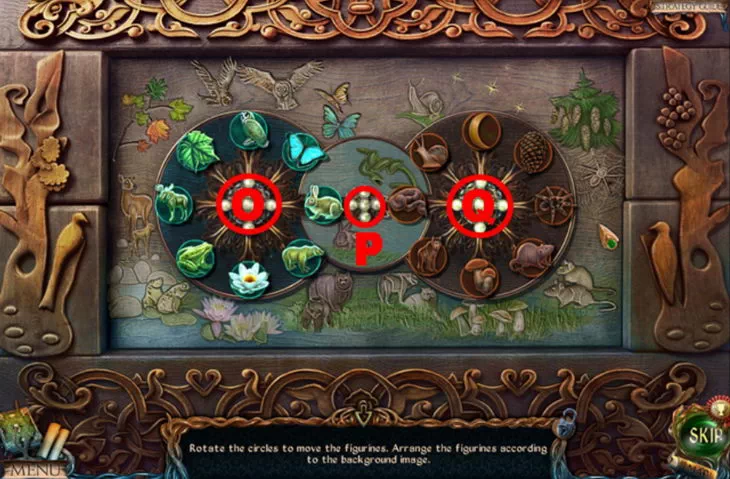
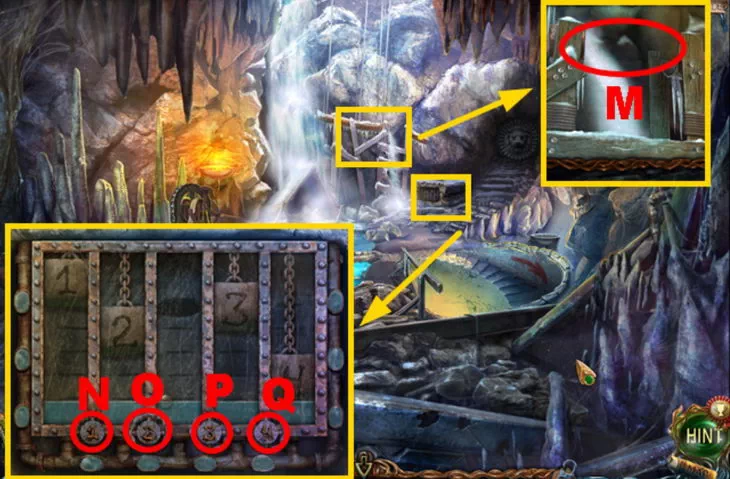
Mini-game on Maaron's chest. You need to arrange all the symbols on 2 circles in places suitable for the pictures around. To get the achievement, you need to complete it in less than 70 moves. Solution (58 moves):
Q (cone), OPQ (moon), 2xO PQ (snail), OQPQ (wolf),
6xO PQ (mushroom), 5xO PQ (mouse), 7xO PQ (spider), 3xQ,
OP (hare), OP (sheet), 7xO P (owl), 6xO P (snake).
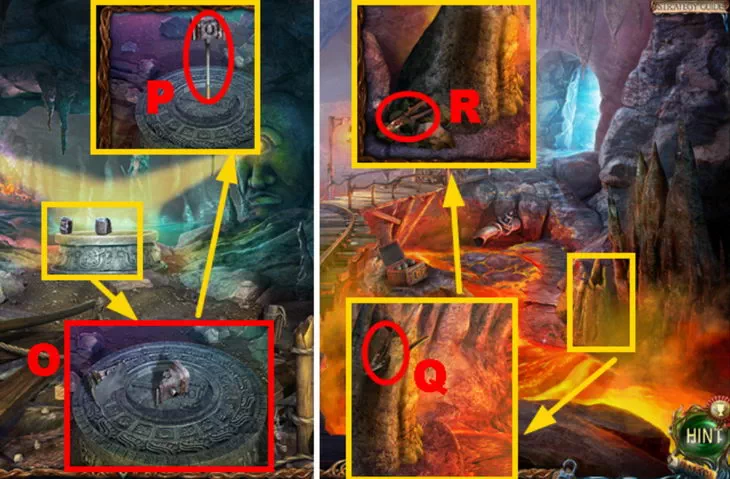
R. Inside the chest is the 2nd energy sphere. We return to the tower, insert both balls into stone dolmens. A staircase to the tower will appear, but the doors are still closed.
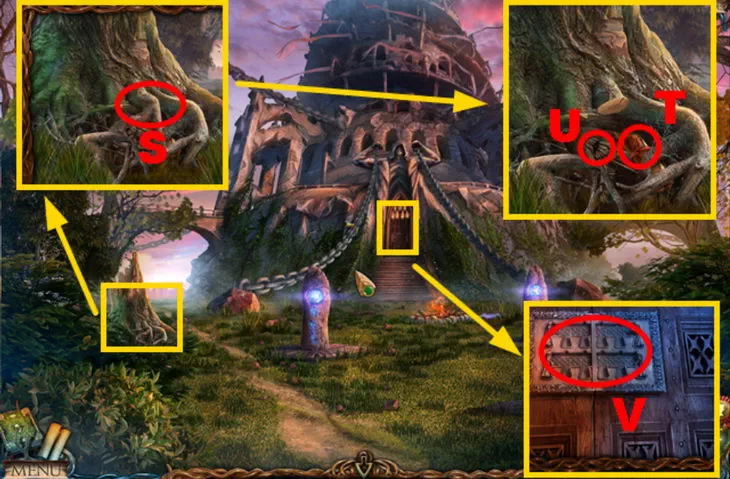
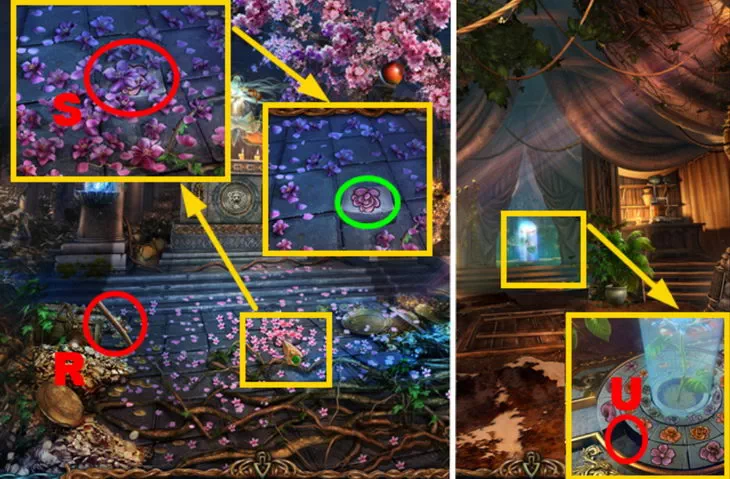
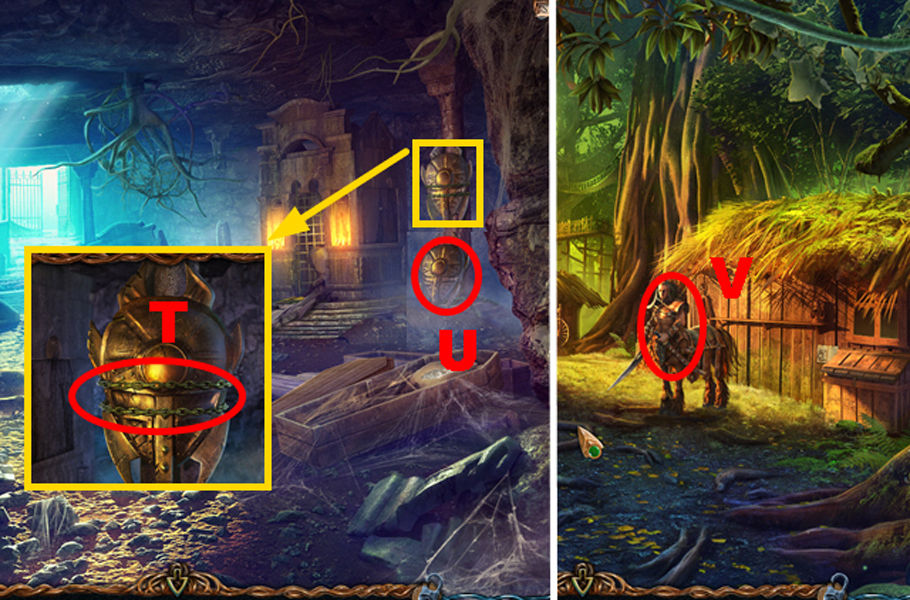
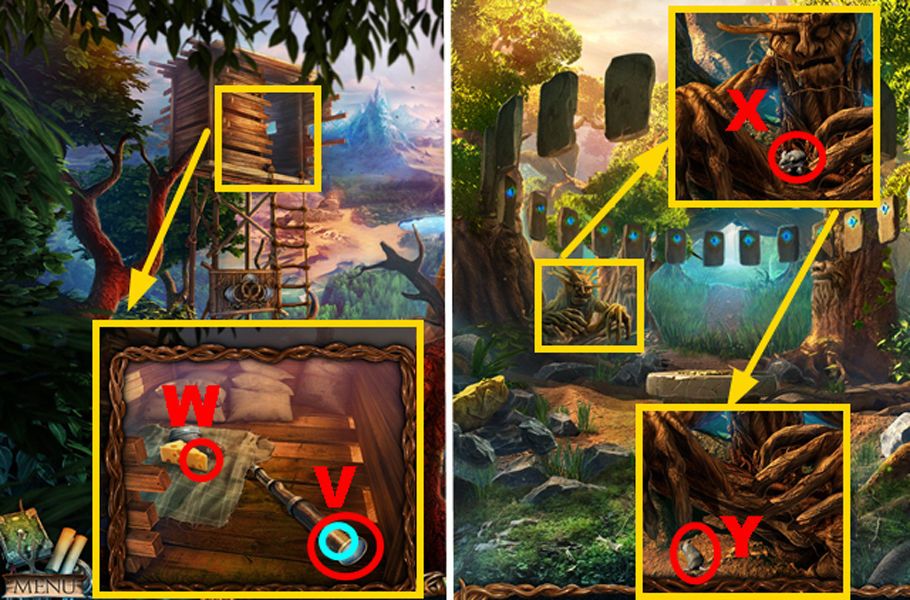
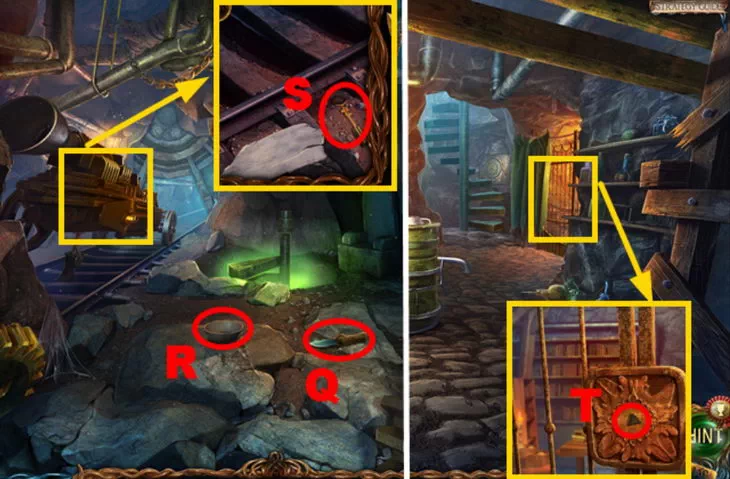
S. In front of the tower, on the left, we saw off the roots of the stump with a saw.
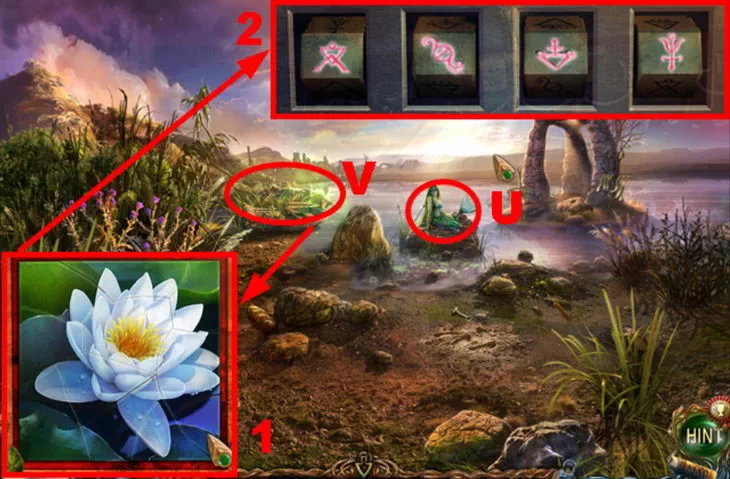
T.U. Under the roots of them is the recipe for a water portal, a figurine (8/8).
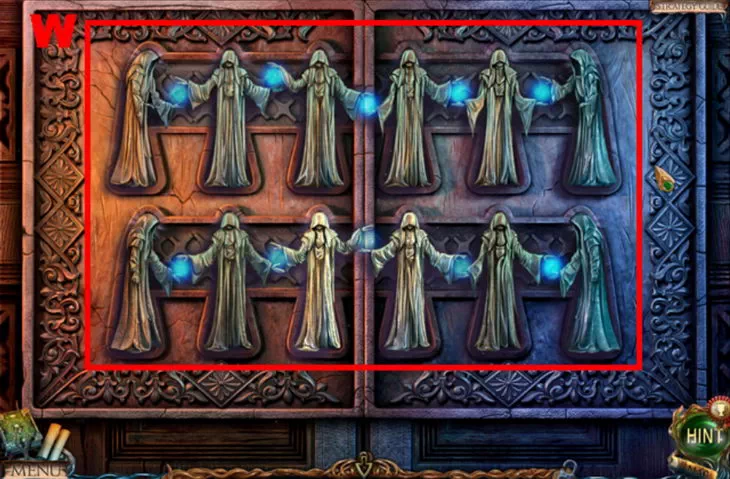
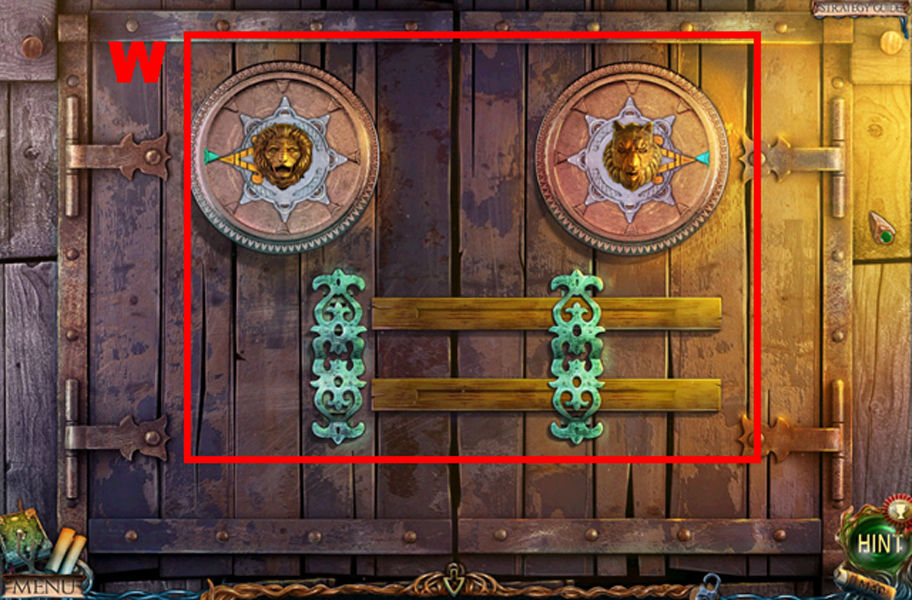
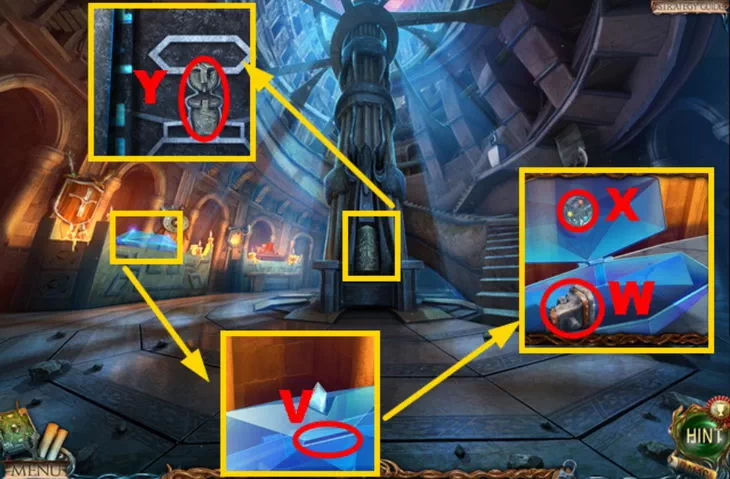
V. All 8 figurines of monks are inserted into the doors of the tower. We solve the puzzle.
W. You need to change the figures of the monks so that there is a small distance between their hands. The correct position is marked by a blue glow between the hands.
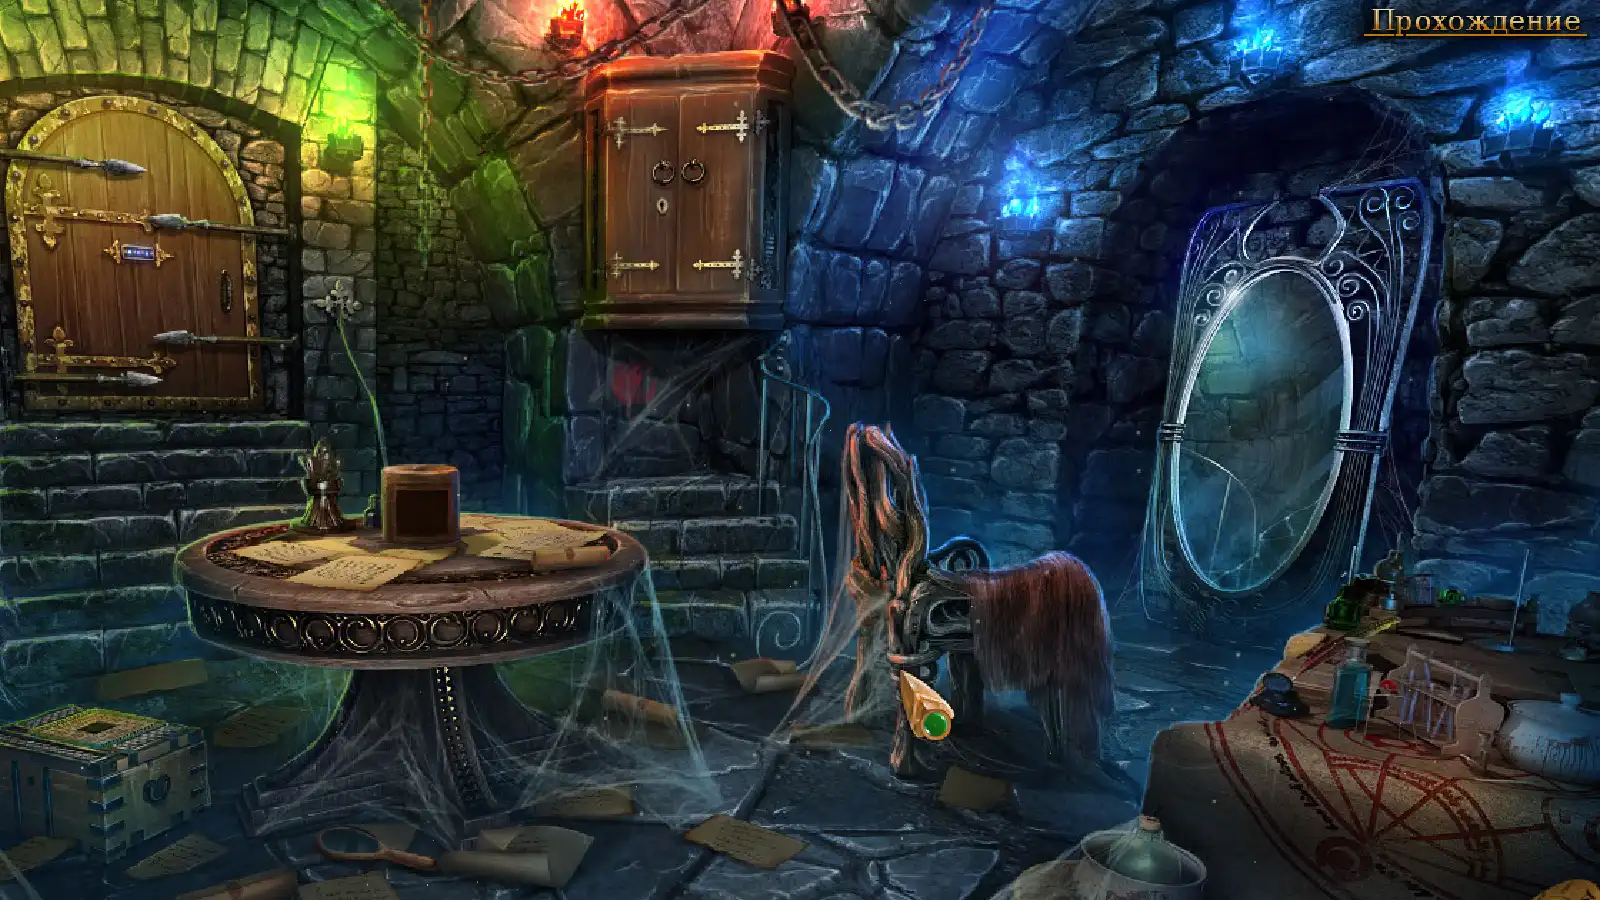
tower hall
Lost Lands 2. Where to get a mirror
Secret. On the left above the statue, on the arch, there is a hose - detail (6/35).
Secret. Near the right statue, on the left is a ghostly hammer (6/35).
Secret. Inside the tower, on the right under the cloth lies a manuscript (5/20).
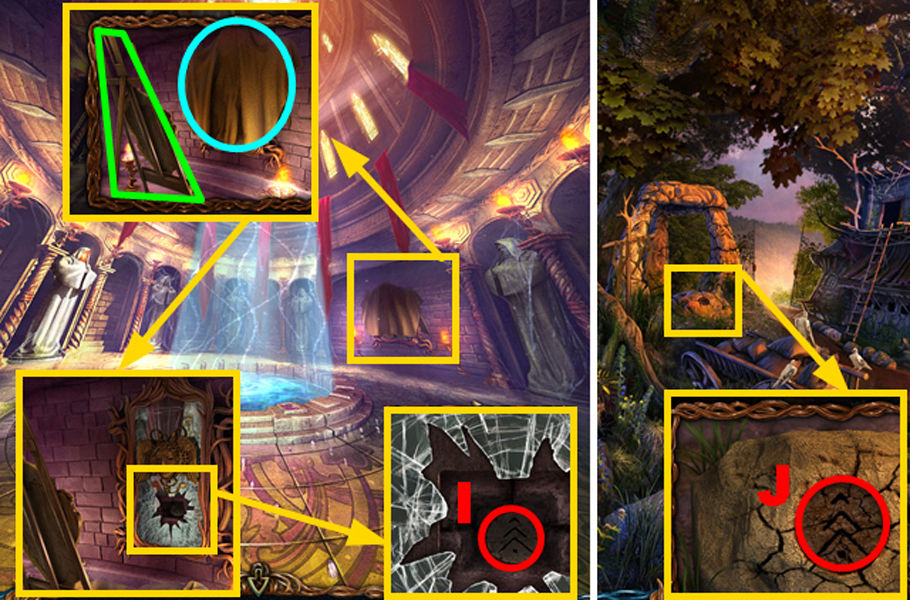
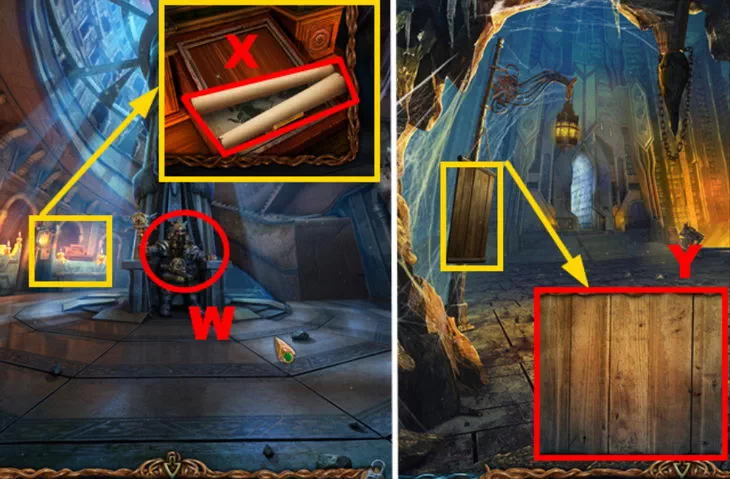
X. Inside the tower, in the center by the pool, take a box of matches.
Y. On the right side of the curtain, cut off the decorative tassel with a knife.
Z. We insert a candle into the head of the statue on the left, set it on fire with matches.
A. When we illuminate the head of the statue, we will see a purple essence inside.
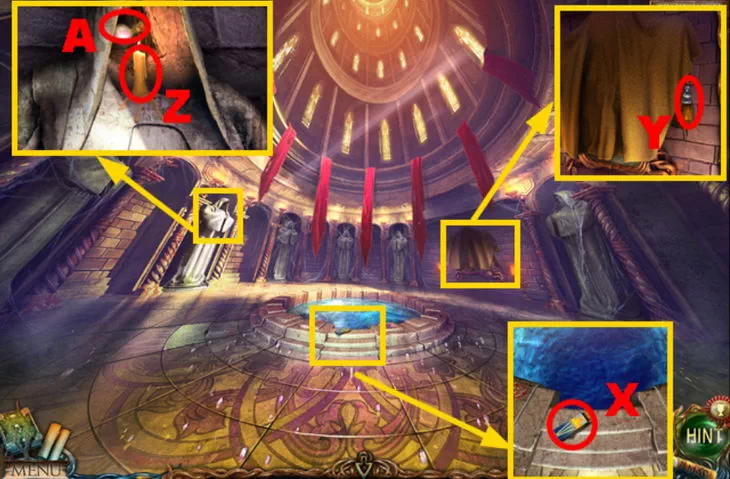
BCD. On the left on the floor there is a recess, we use a knife on it, under it is a part of the mosaic.
E. We return to the lake, in the center we take duckweed with a net.

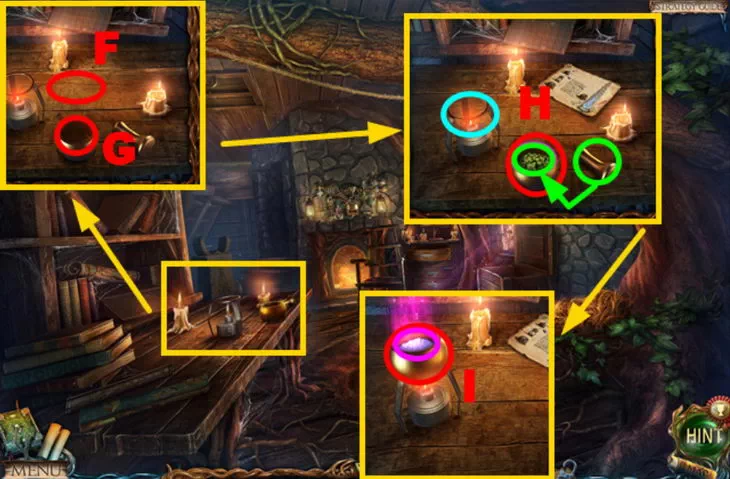
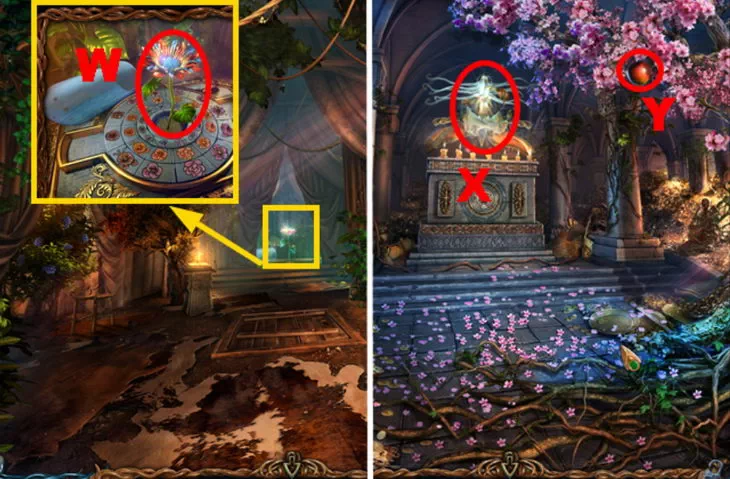
F. In Maaron's house, put the instruction on the left table, make a potion:
G. We put the duckweed in a mortar, rub it with a pestle.
HI. We put the mortar on the fire, add the essence, we get a volatile powder.
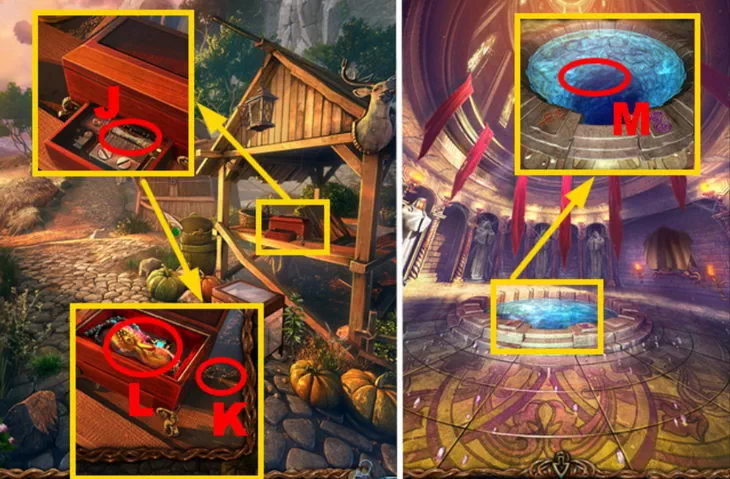
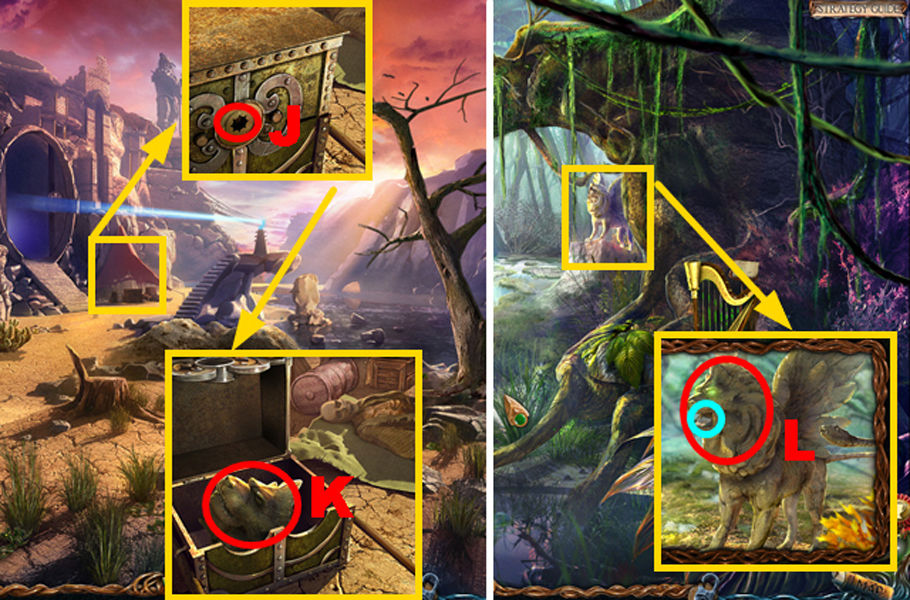
J. We go to the field, we clean the drum of the box with the found brush.
KL. We launch the box, take out the phoenix feather from it.
M. In the tower hall, throw 2 ingredients into the water: a feather and a flying powder. The water portal will begin to operate, we can climb to the upper floors.
Chapter 2
Lost Lands 2. Walkthrough of the game step by step
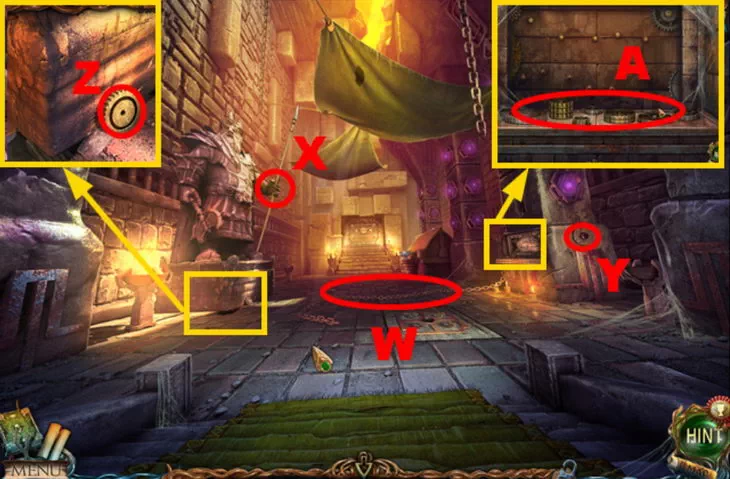
N. On the right, under the column, take the wooden gear.
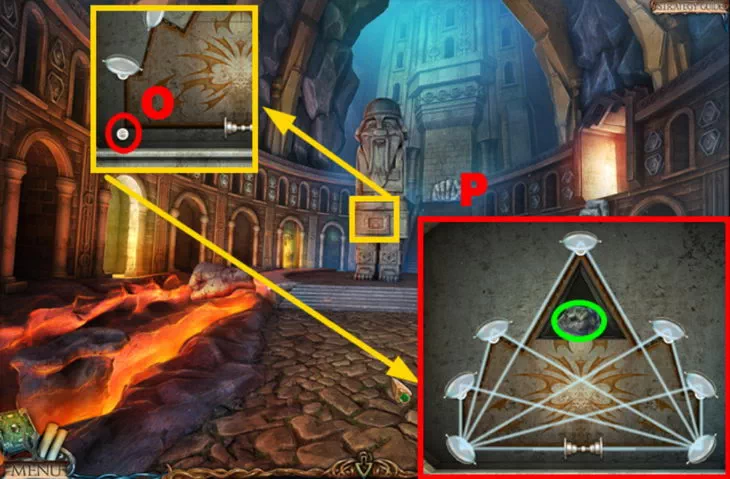
O. Under the portal we examine the stones, we will find a cross key under them.
Secret. On the top left of the column is a ghostly hourglass (7/35).
Secret. To the right of the portal is a slanted ghostly spear (7/35).
PQR. We go into the fields, on the left we put the gear on the mechanism, we will raise the board.
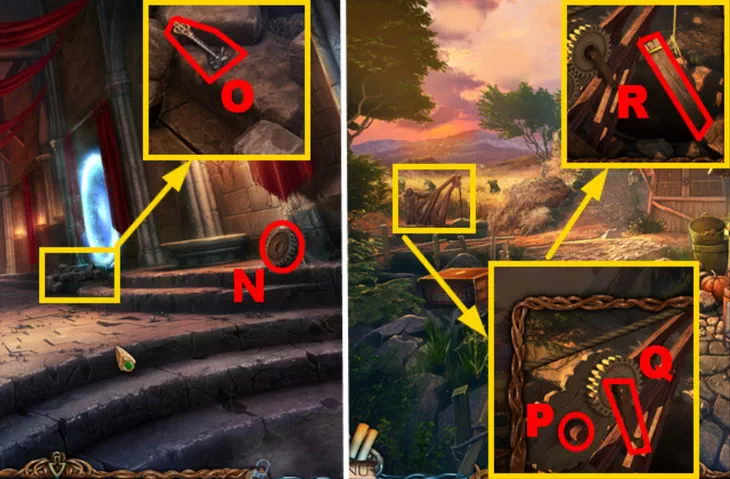
S. In the fields on the right, use the cross key, open the shop.
T. Inside the trading shop you need to find 10 items:
1. Disc 1 - inside the cash register, you need a pen, keys.
2. Disk 2 - bottom left, move the apples in the basket.
3. Stone - on the shelf on the right, by the basket. Apply to door latch.
4. The key is on the right in the slot, we get it with an awl. Apply to the box.
5. Key 1 - bottom center, cut the bag with a sickle. To the checkout.
6. Key 2 - bottom left, on the counter. To the cash register.
7. Handle - inside the box on the left, open with a key. To the checkout.
8. Sickle - behind the door, you need to open the door with a stone.
9. Awl - in the upper right corner. Apply on the right to the gap in the board.
10. Leaf - hanging over the door, put it to the cash register.
U. We use both disks on the box on the left, inside there is a stone chip.
V. On the shore of the lake we put a board to go to the portal.
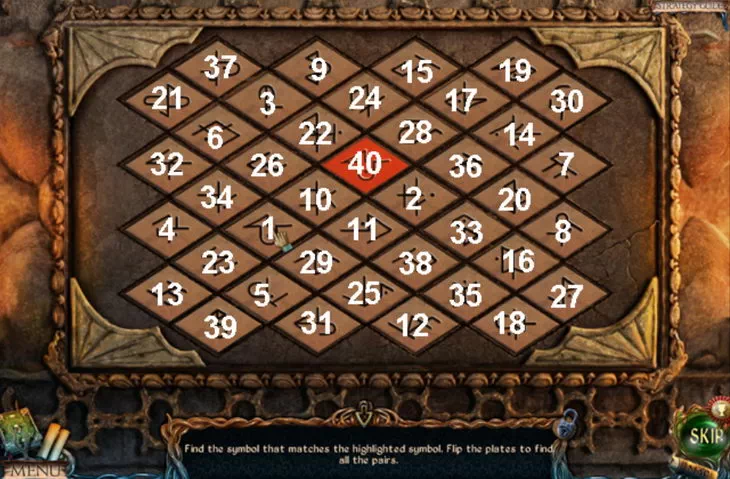
W. We return to the tower, at the top we insert the chip into the sarcophagus.
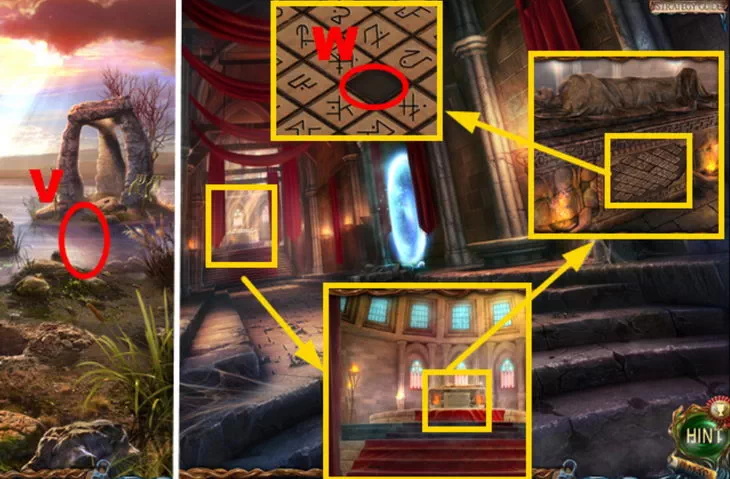
On the sarcophagus, you need to look for a pair to the selected image. After the correct answer 1 chip will turn over, we are looking for the next one. Turn over all 40 chips one by one. To get the achievement, you need to pass without making extra touches. Time is not limited.
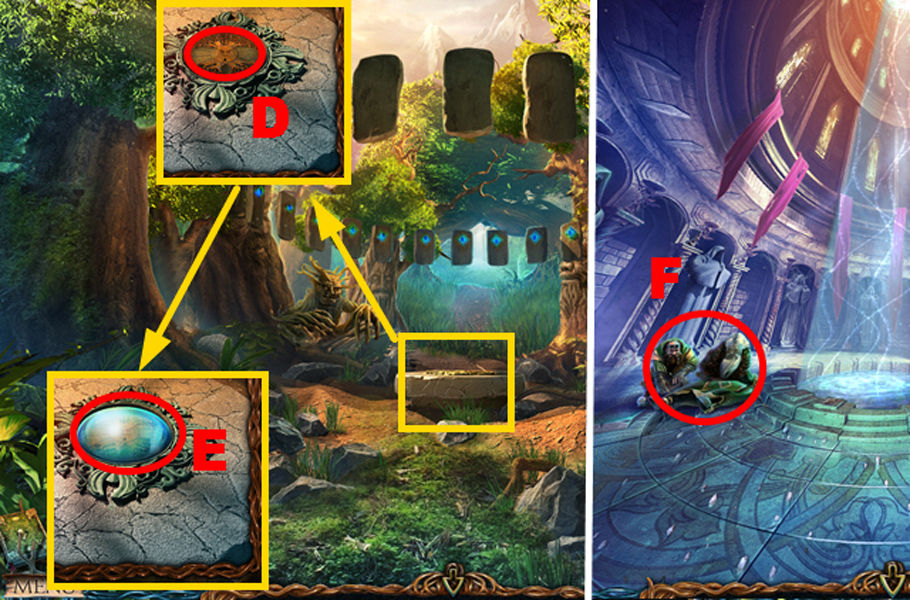
X. From the sarcophagus we get the manuscript (6/20), a round rune.
Y. To the left of the tower, on the lake we will meet Maaron. He will tell about the fiery horseman, instruct us to look for the Compass of the Worlds. We get part of the mosaic.
Z. We insert the rune under the stone arch, the fiery portal will turn on.

Fallen Sea
Lost Lands 2. Where to find cactus juice
Secret. On the left, under a tree, between rocks, a semicircular detail (8/35).
Secret. In the lower right corner, under the rock is a ghost pipe (8/35).
Secret. On the right side of the cactus, between the branches, there is a manuscript (7/20) hidden.
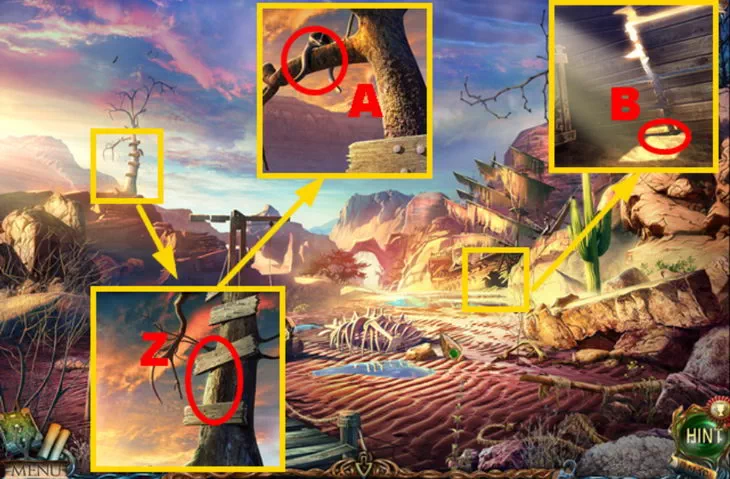
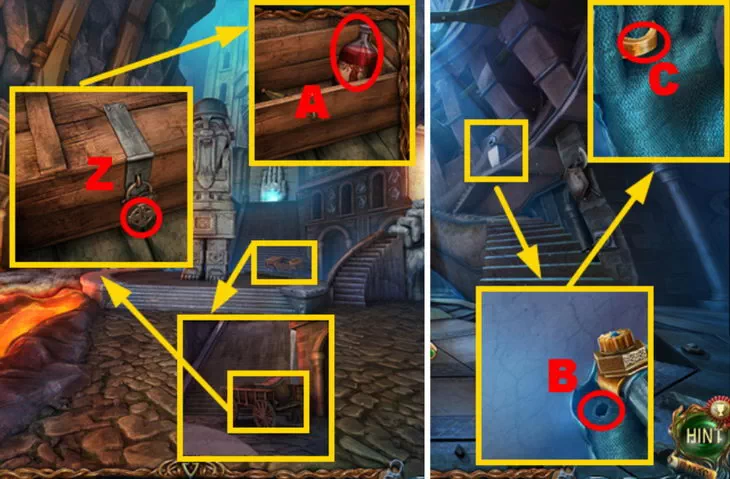
AB. In the center of the bone, we take out of them the rib of the whale, the stone rune.
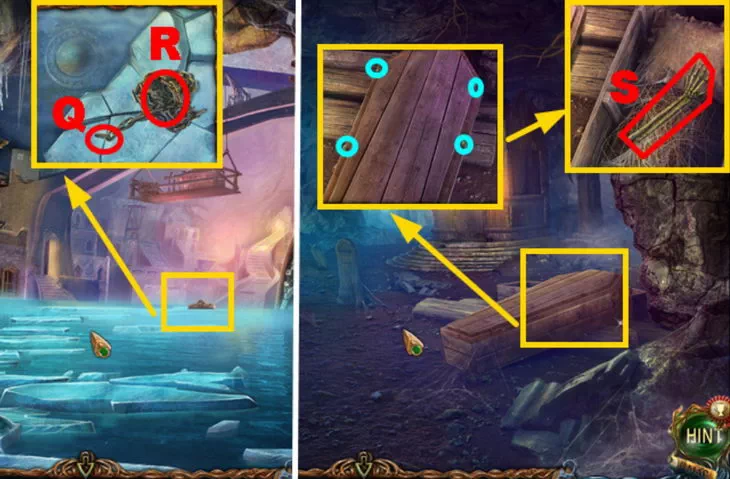
CG. We select the planks from the tree on the left, put them on the tree.
D. We look into the wreckage of the ship, inside under the box of the bank with bugs.
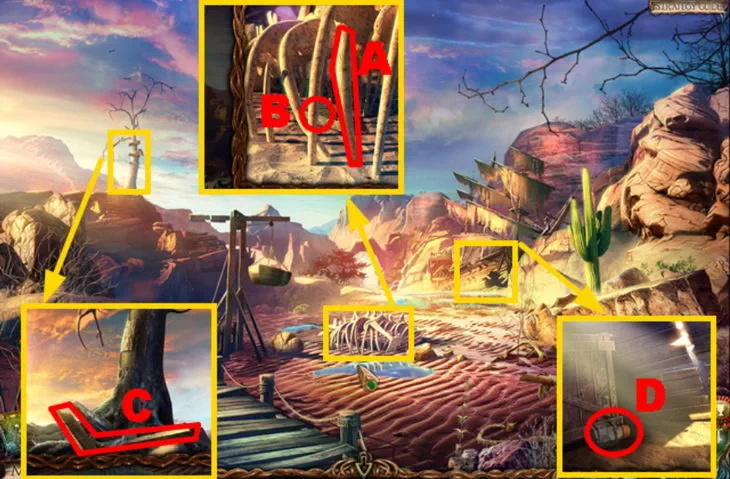
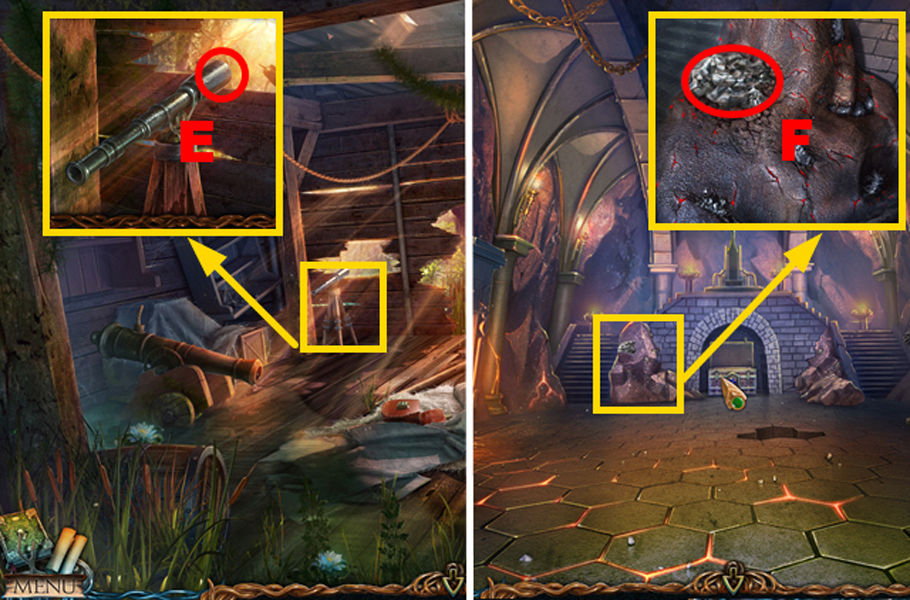
E. Lubricate the round mechanism on the left with an oil can.
F. Next to the boat we take the hook.

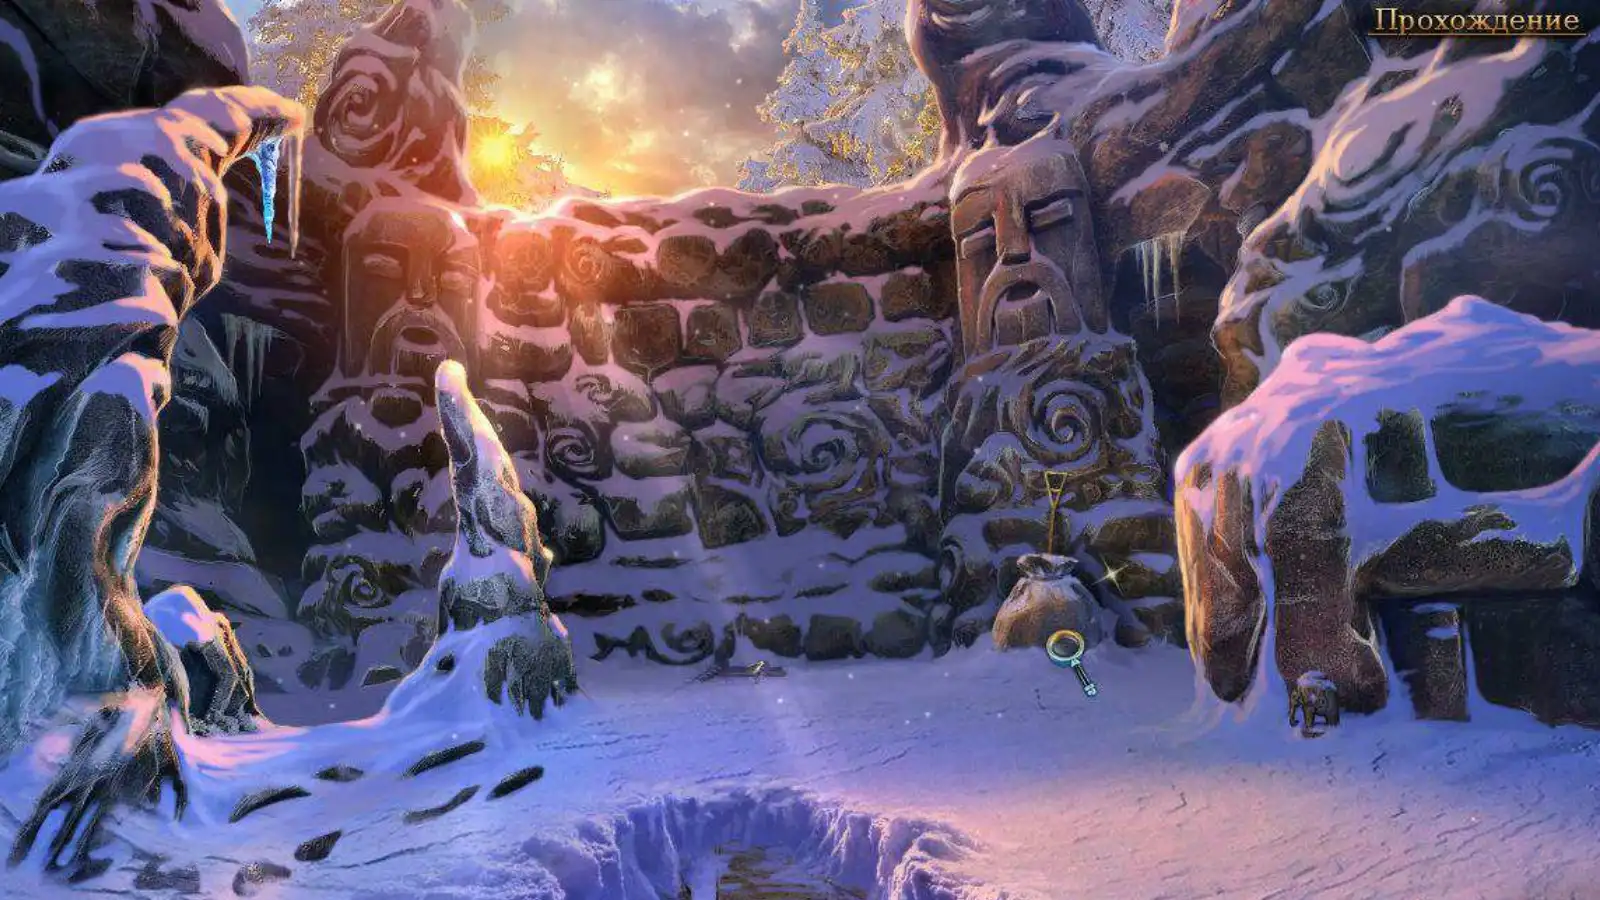
Abandoned Halfling Village
Lost Lands 2: Four Horsemen. How to do
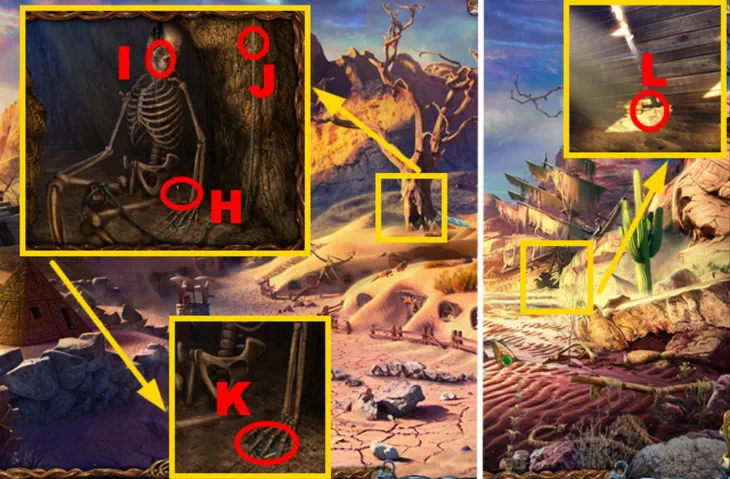
H. We pass under the arch, in the 2nd part of the desert we take nails from the well.
Secret. In the center right, near the windows, there is a round piece (9/35).
Secret. To the right, above the windows, near the grass is a ghostly snail (9/35).
I. On the left is a pyramid, there are 3 recesses in it, we insert a triangle into one.
JK. To the left of the ship we move the stone with a curved edge. We open the hatch.
L. There are 10 items to find inside the ship:
1. Key - on the right near the box. On the chest in the center.
2. Hook - on the left, in the breach of the hull. We weigh in the center on a rope.
3. Crowbar - inside the chest in the center, you need to dig it up, pick it up, open it.
4. Part of the mosaic 1 - in the center, lies on the sand. On the chest in the center.
5. Part of the mosaic 2 - on the left, in the breach of the hull. On the chest in the center.
6. Fragment of a bottle - on the right near the box, we break the bottle on the stone.
7. Box of matches - on the left, lies on the board. Apply to a hanging lamp.
8. Block - in the center, on box number 4. Weigh in the center, + rope, + hook.
9. Rope - hangs on the right, cut off with a sharp fragment of the bottle.
10. Shovel - top left, on the board, under the cloth. Dig up the chest below.
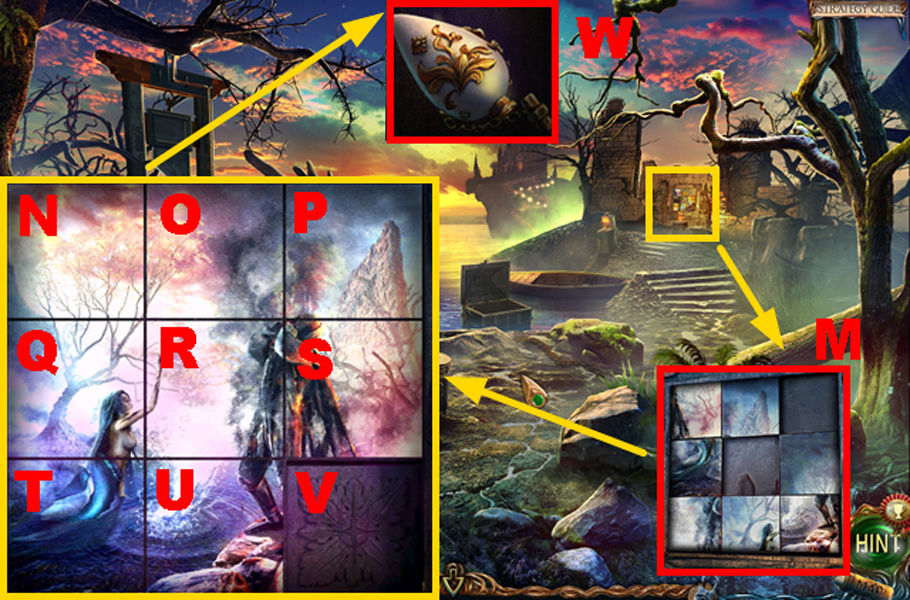
MW. On the chest we solve a puzzle, such as "tag".
Q-right-U-up-V-left-R-down-Q-right-U-up-Q-left-R-left,
Q-down-S-left-R-left-O-down-N-right-M-right-Q-up-S-left,
R-left-O-down-S-right-N-right-Q-right-R-up-U-up-Q-right,
V-right-W-left-R-right-O-down-S-down-T-left-S-up-W-up.
We use the crowbar on the box 4. We take out the handle from it.
XY. We insert the handle into the well, raise the bucket, inside the dynamite.
Z. At the beginning of the desert, on the left, insert nails into the tree, hammer it with a hammer.
A. Climb up the boards on the tree, take the tongs.
B. On the right we go into the ship, we lay dynamite under the breach.
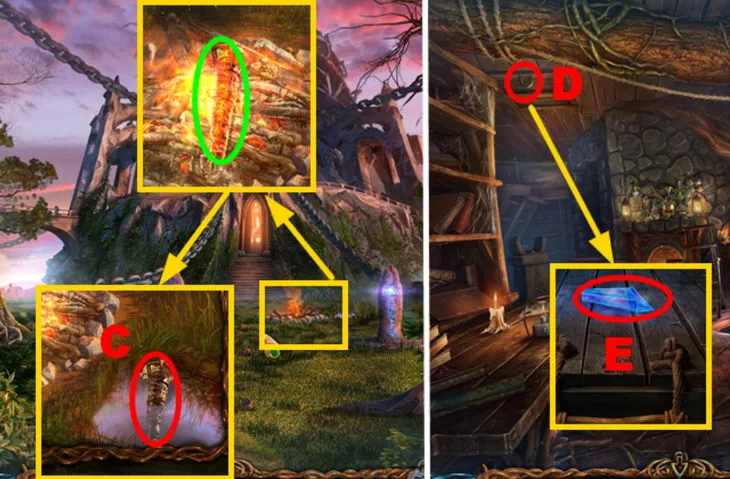
C. In front of the tower, use tongs to get the tower figurine from the fire.
D. We go to Maaron's house, use the hook on the hatch on the top left.
E. Find a blue crystal in Marron's attic.
F. Inside the house, on the right we put the figurine on the shelf.
G. In the fields, on the terrarium, use the jar, lure the snake into it.
H. In the wasteland, in the tree on the right, use the snake to scare away the scorpion.
I. Under the hand of the skeleton we take a part of the mosaic.
J. On the right, cut the rope with a knife, you get a stone on a rope.
K. Remove the monocle from the eye of the skeleton.
L. Inside the ship, use the monocle lens to set fire to the fuse of explosives.
Canyon
Lost Lands 2. How to assemble the mosaic
M. After the explosion of the ship, we select the fallen steering wheel.
N. There is a round gate behind the ship. Throw a rope over the tree on the right.
Secret. To the left of the round gate, under the arch is a ghostly column (10/35).
Secret. On the left, between two columns, lies a flat piece (10/35).
O. In the center under the red canopy we will find a stone rune.
P. We examine the round gate, under them is a brush.
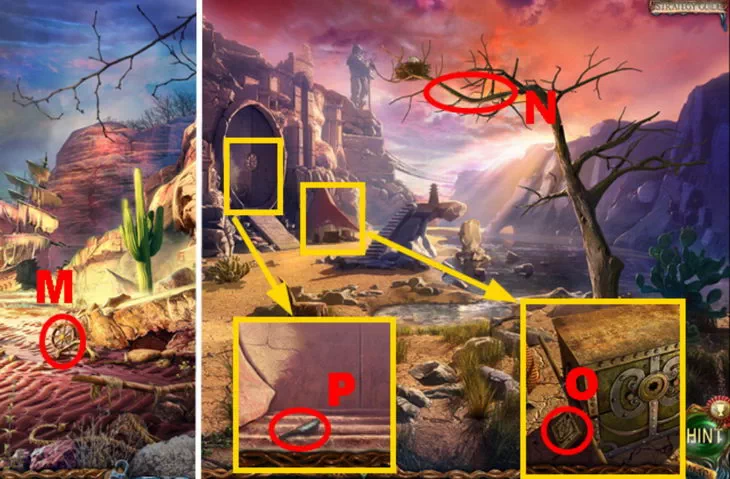
Q. On a hill near the river you need to put a crystal, from the attic of Maaron.
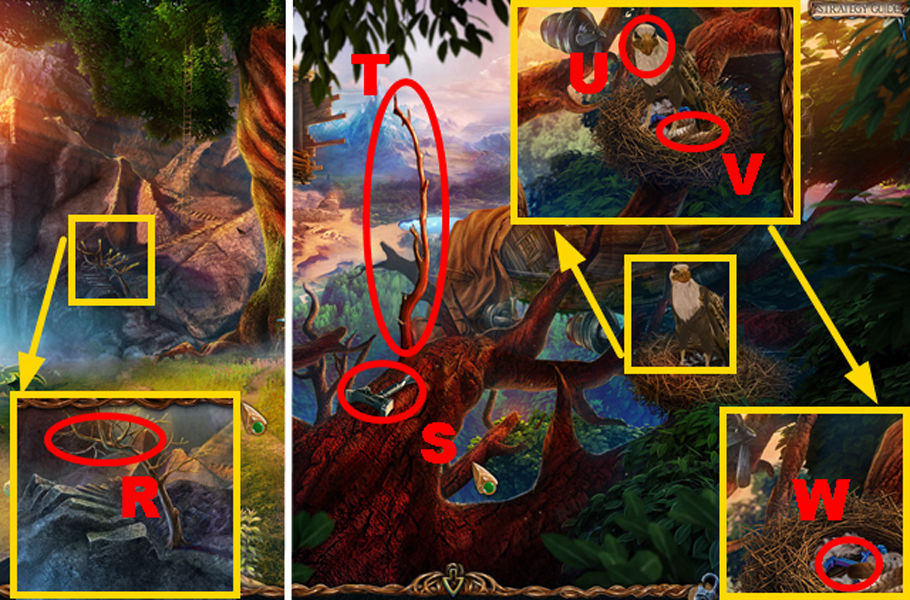
R. We tie the rope from the tree to the stump, lower the branch.
S. Take part of the mosaic from the nest on the tree.
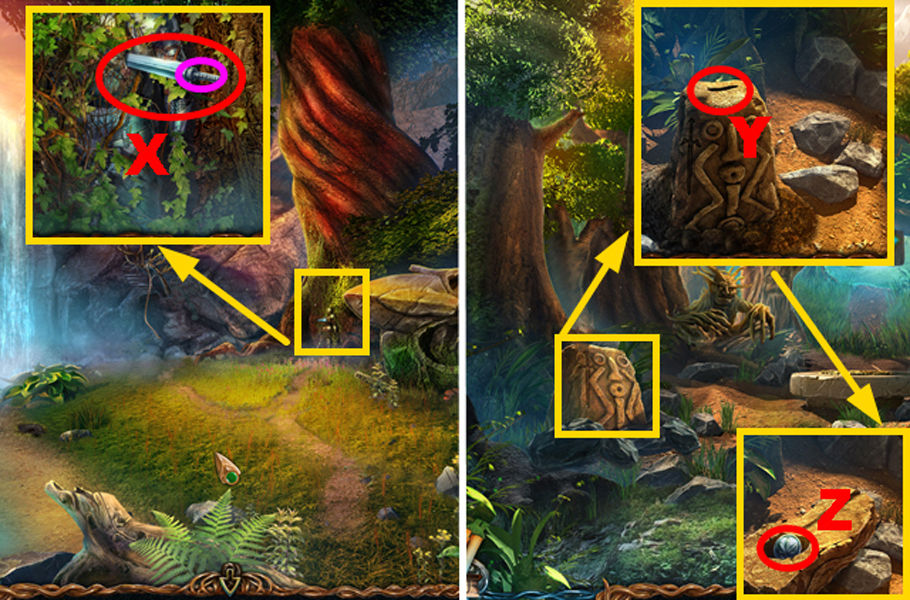
T. In the wasteland, near the cactus, use the brush on the stone, we will see a silhouette.
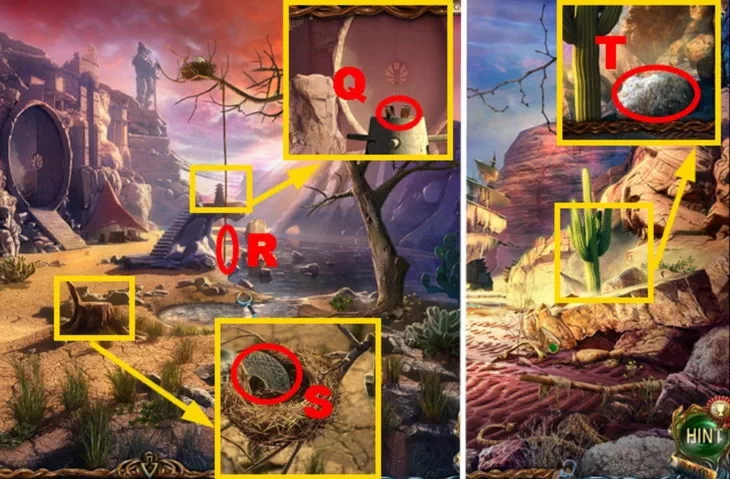
U. On the way to the pyramid, we can insert a square rune.
V. We return to the hill, under the crystal we twist 3 cones to make a silhouette of a warrior on them, as in the picture.
Chapter 3
Lost Lands 2: The Four Horsemen. Walkthrough
Secret. In the upper left corner, a ghostly amulet (11/35) hangs on the wall.
Secret. To the top left of the gate is a round piece (11/35).
wx. We enter the city, raise the chain in the center, tie the statue on the left.
Y. On the right, we put the steering wheel on the winch axis.
Z. Take the gear on the left under the statue.
A. There is a mechanism in the column on the right, add a gear, solve the puzzle:
B. Put the gears in their places.
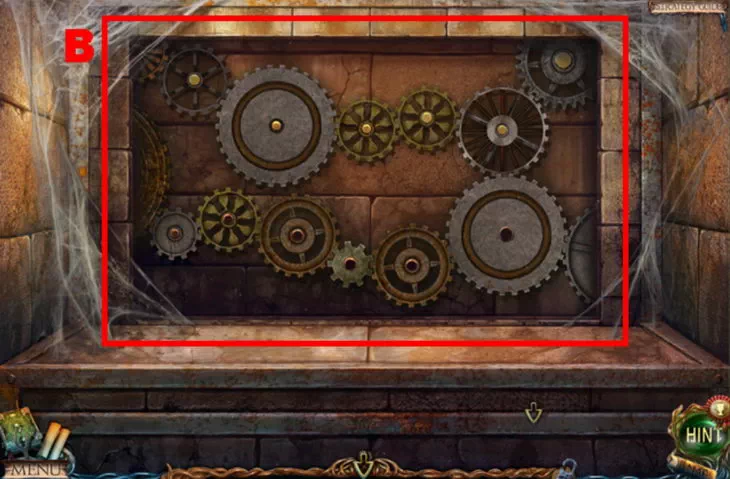
C. Turn the winch on the right, the mechanism will work and drop the statue.
D. Raise the spear among the debris.
E. Use the spear to cut the fabric at the top, a piece of the mosaic will fall.
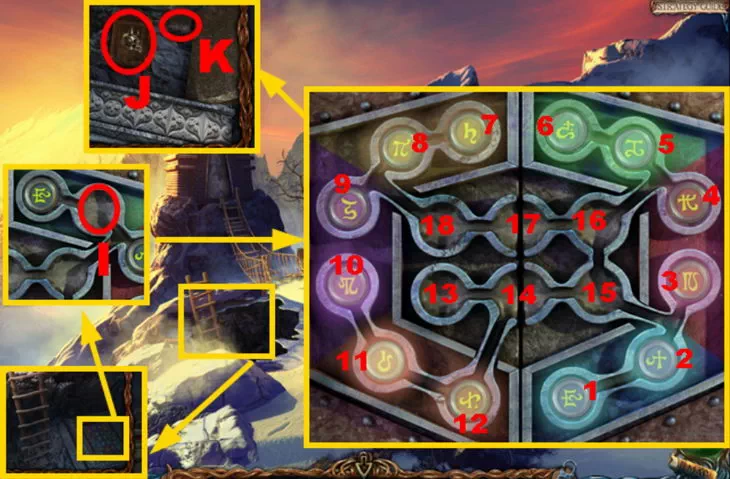
F. Inspect the locked gate ahead, there is a puzzle on them:
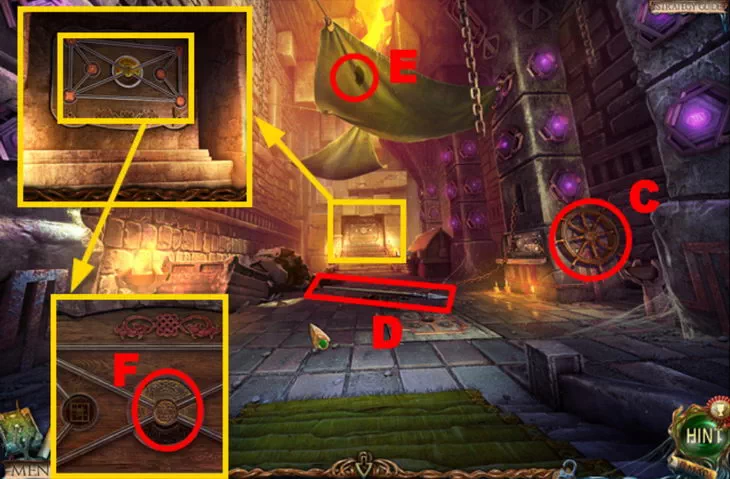
G.M. Spots with circles. In the central circle of the puzzle we insert all 5 pieces of the mosaic. After that, move 6 circles to their places. The desired drawings can be seen at the bottom under the chips, if you move them. Solution (23 moves):
GKJM, IHGJ, KLMI, HGKL, MKJI, HGJ
N. On the left, in the gap under the statue, we take a stone rune, a manuscript (8/20).
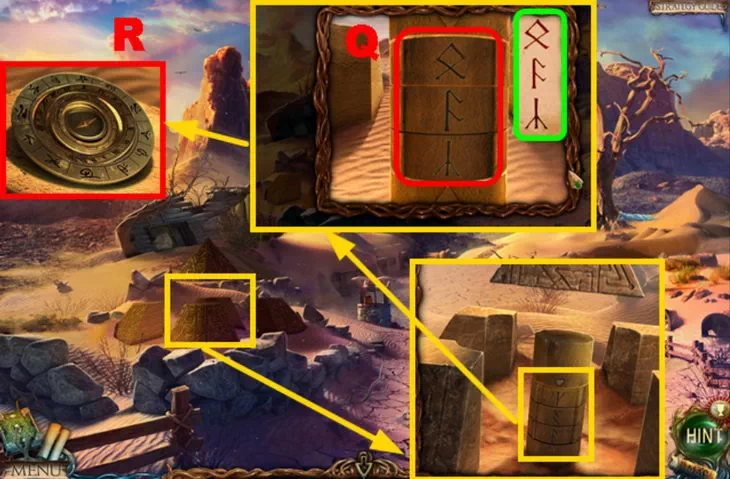
O. After solving the puzzle on the gate, we get a note with symbols.
P. We return to the wasteland, add the 3rd rune to the pyramid.
Q. Inside the pyramid, use a note, arrange the symbols in the same way.
R. Get the Compass of the Worlds from the pyramid. Immediately after that, a fiery horseman will see us and try to attack. The dwarf will save us, he will create a hole and throw us underground. We will survive, but the Compass will be with the enemy.
3.2. Mines
Lost Lands 2: The Four Horsemen. Walkthrough
The name of the dwarf is Folnur, he is a friend of Maaron. We need to get to the top together.
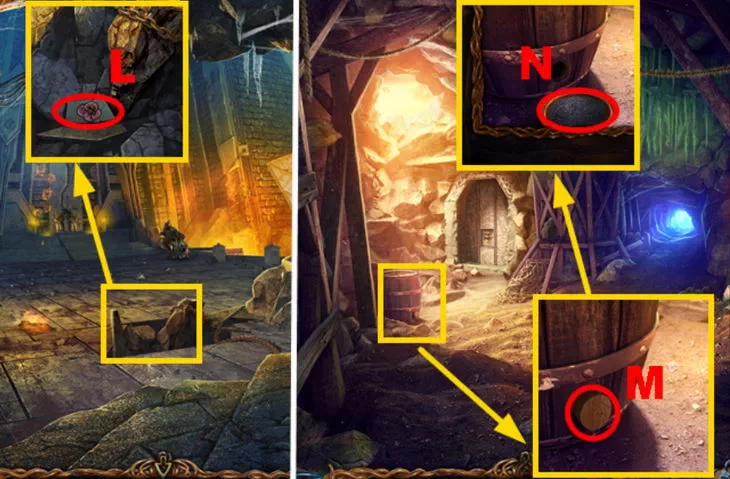
Secret. To the left of the bottom of the barrel is a round piece (12/35).
Secret. Bottom right, near the wooden beam is a ghostly pickaxe (12/35).
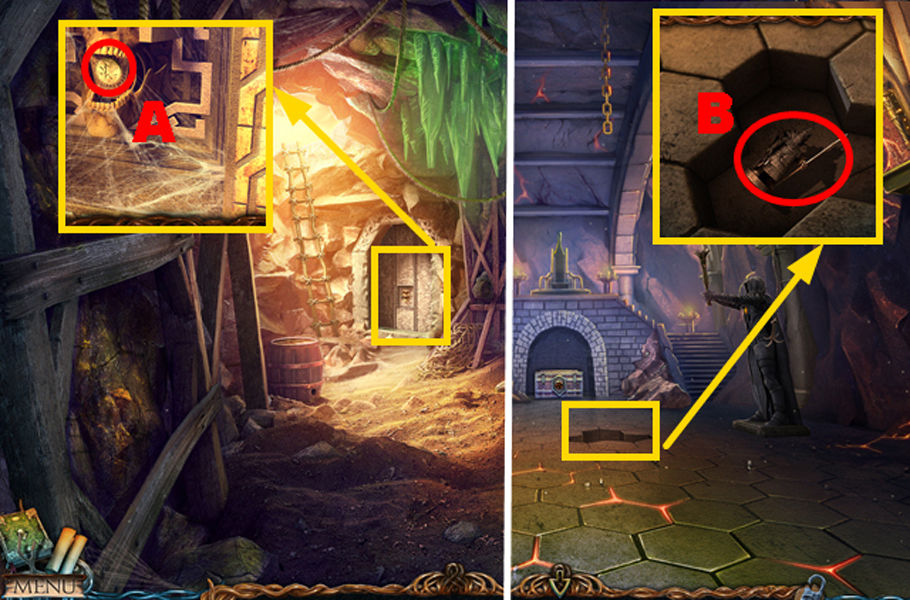
S. On the right is the dismantled ladder, near it we select the lever.
T. In the center of the wall lies a coil, take pieces of rope from it.
In front of the barrel, the 1st step. We examine the barrel, behind it is the 2nd step.
Chapter 3
Lost Lands 2. Guide
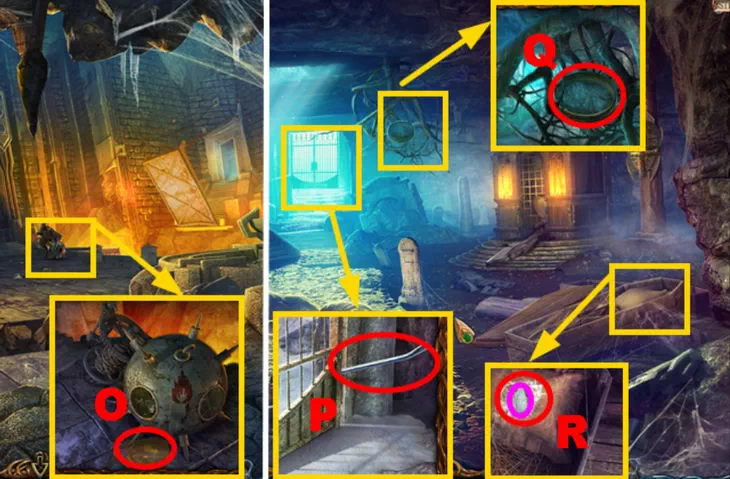
Secret. Top center, on the pipe in the lock is a ghostly key (13/35).
Secret. A hose hangs from the top right - detail (13/35).
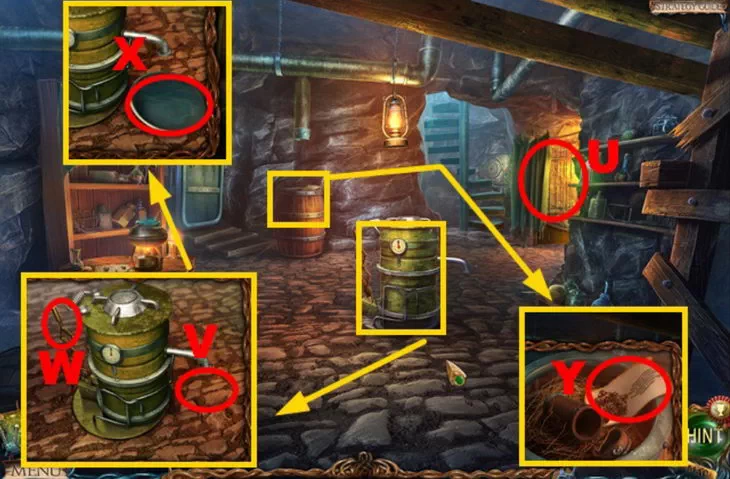
U. Let's go through the tunnel, ahead on the table is a gauntlet, a manuscript (9/20).
V. To the right of the center, under the chair we take the flywheel.
W. In the center on the wall is a mechanism, add a lever to it.
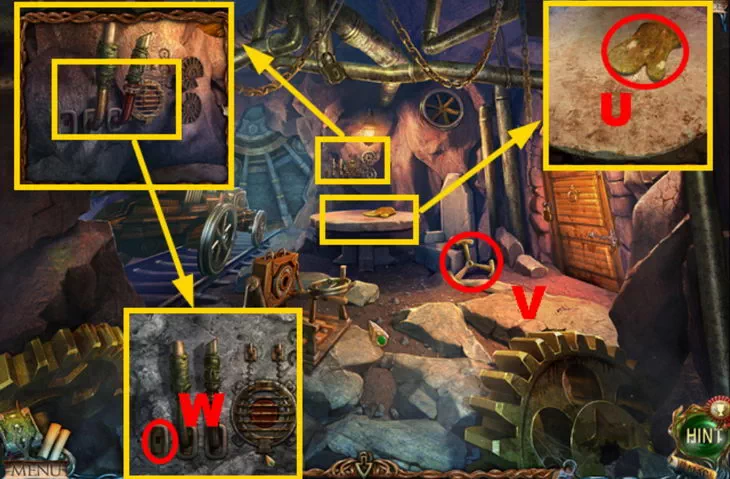
XYZ. We press 3 levers so that 2 circles on the right turn their notches down, as in the figure. Solution (6 moves): 1,33333.
A. A button will open, press it, opening the gate on the railroad.
We return, we can raise a green crystal from the floor with a mitten.
C. Ahead on the trolley, open the lid, insert the crystal, close it. Together with the gnome we will ride on the railroad.
3.4. caves
Lost Lands 2. Where to get
The dwarf will tell us about the Temple of the God of the Mountains, let's go look.
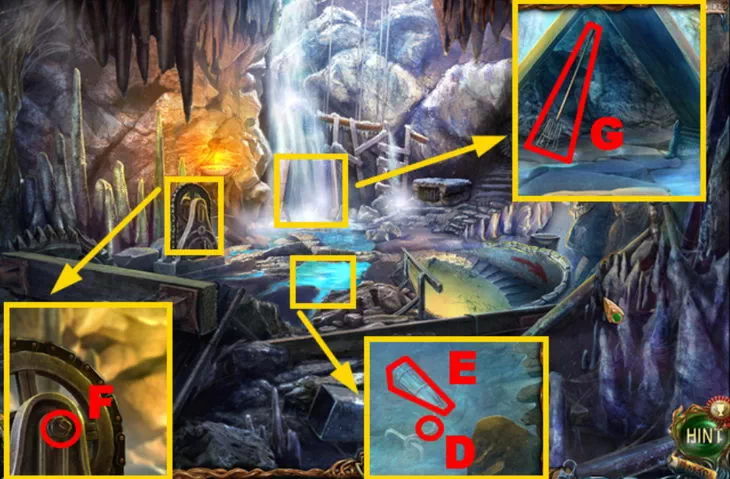
Secret. To the left of the mechanism is a tube - detail (14/35).
Secret. To the right, a ghostly item is hidden under the stairs (14/35).
D.E. We examine the water, cut off the rope with a knife, take a bottle of water.
F. On the left we put the flywheel on the mechanism.
G. Ahead near the waterfall we will find a fruit picker, a manuscript (10/20).
3.5. Area
Lost Lands 2 Hidden Object
Secret. Bottom right, under the fountain is a hose - detail (15/35).
Secret. On the top right, on the column is a ghostly pattern (15/35).
H. We go down into the pit, we find ourselves on the square. On the left under the poster is a corkscrew.
I. Ahead between the statues we take a bowl.
J. To the right, near the broken fountain, you need to find 10 items:
1. Rhombus stone - in the central bowl of the fountain. We insert into the column of the bowl.
2. Pentagon - top right, in the gutter. We insert into the column of the bowl.
3. Trapeze - bottom right, inside the pot. We insert into the column of the bowl.
4. Hammer - inside the chest, opens with a key. We put it down to the left.
5. Pickaxe - to the left of the center of the fountain, hanging on a rock. On the green stone
6. Statue's hand - in the center on the floor. Apply to the recess on the top left.
7. Key - top left, in the sink, you need to put your hand. To the chest.
8. Gem - on the top right, in the rock, we get it with a pickaxe. Into the hammer.
9. Stick - on the left, in front of the chest. On a stone near the fountain bowl.
10. Handle - in the central pillar, you need 3 stones, remove with a stick.
From the bottom left, put 3 parts into the mold and get a whole hammer.
K. In the center, pull the chain 2 times, the rock on the ceiling will collapse.
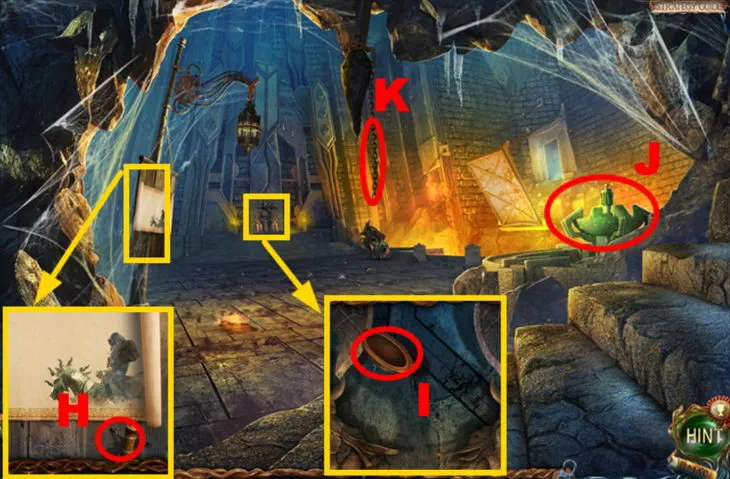
L. Find a circle sector under the fallen rock.
M. We return to the beginning of the cave, put a bowl under the barrel.
N. We insert a corkscrew into the cork of the barrel, we get a bowl of gunpowder.
3.6. Dwarven graveyard
Lost Lands part 2. Walkthrough
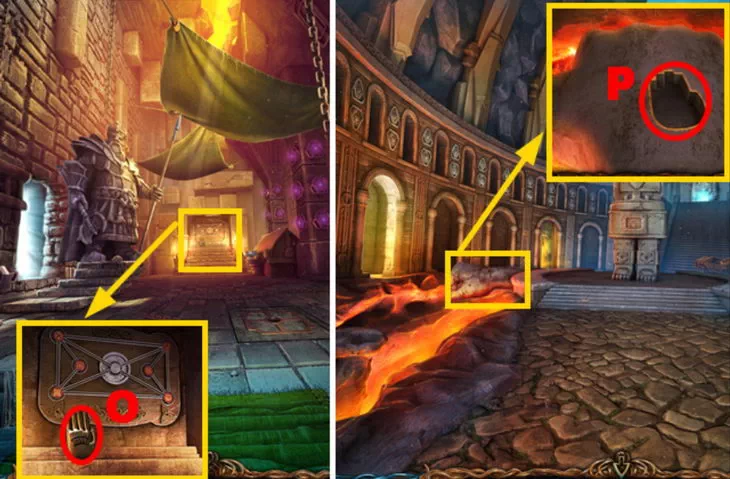
O. On the square, use gunpowder on a round bomb, open the bridge. In the city we pass to the cemetery on the right.
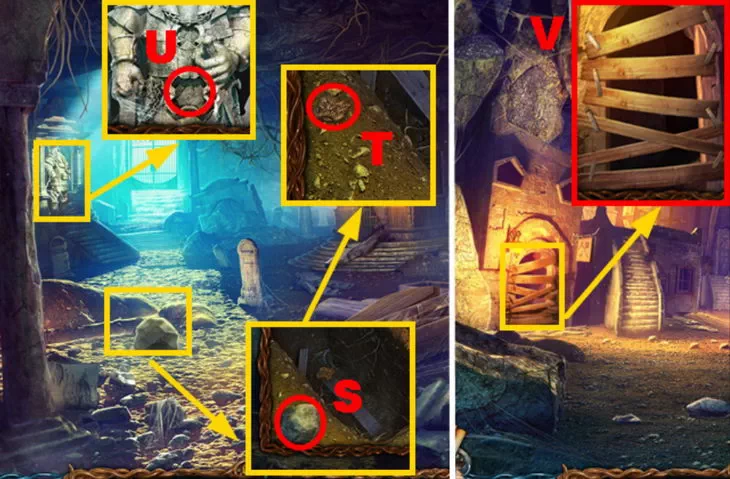
Secret. Top right, on top of the crypt is a ghostly tablet (16/35).
Secret. On the right, between the crypt and the pillar, there is a hose - detail (16/35).
Secret. There is a manuscript (11/20) on the central tombstone.
P. On the left on the lattice gate we will find a crowbar.
Q. Above, in the branches of the tree lies a sieve.
R. There is a pillow on the bottom right in the coffin, cut it with a knife, take a feather.
ST. We examine the pit on the left, we throw off the stone there, we take the medallion.
U. Immediately insert the medallion to the left, into the belt of the gnome statue.
V. We return to the city, on the left we remove the boards from the door with a crowbar.
3.7. Slums of the Dwarves
Lost Lands 2. How to open a chest with a drum
Secret. On the top left, on the upper beams, there is a part (17/35).
Secret. On the top right, near the boards, a ghostly object hangs (17/35).
wx. To the left behind the boards we will enter the workshop, we are looking for 10 items:
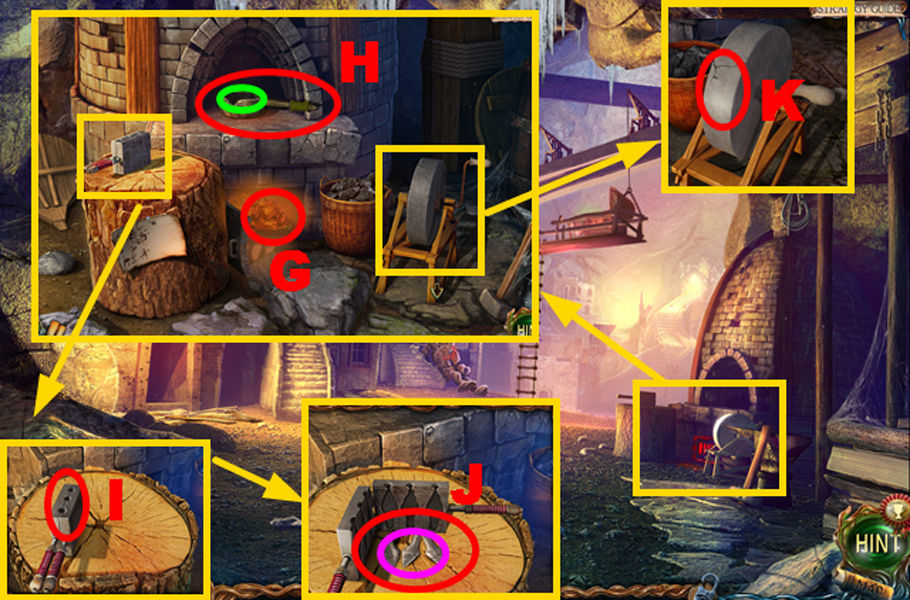
1. Dull blade - down in the bucket. We grind on an emery wheel.
2. Sharpened blade - apply to the fabric on the right, the statue will open.
3. Hammer - top center, on a shelf.
4. Chisel - in the center at the bottom, on the emery wheel.
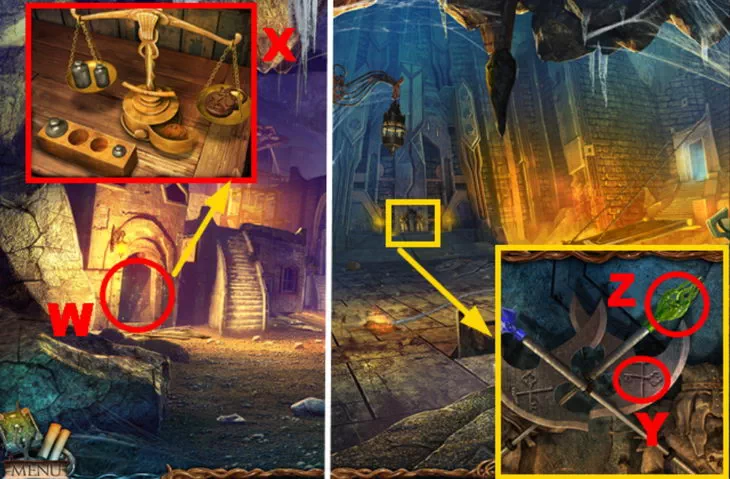
5. Bowl of scales - top left, on a rope. To the scales.
6. The weights of the scales are on the bottom left, on the table. To the scales, put the 1st and 4th load.
7. Disc 1 - inside the scales, you need to balance the bowl and weights.
8. Disc 2 - on the left, clamped in a vise. We insert into the recess above the cabinet.
9. Disc 3 - on the statue on the right, use the chisel and hammer.
10. The key is in the locker, we insert 3 disks above it.
Use the key to open the chest, inside the emerald symbol.
YZ. We go to 2 statues, the symbol is on the halberd, we take the emerald key.
Chapter 4
Lost Lands 2. Passage of the game Four Horsemen
A. In the cemetery, use the key, open the grate, go to the surface.
Secret. On the top right, on the branches of a tree, a ghostly clock (18/35).
Secret. To the left of the left tent, on the shelf is a round piece (18/35).
B. There are 10 items to find in the far right tent:
1. Club - lies on the right side of the bench. Apply to the box in the center.
2. Key - top right, on a stuffed boar. At the door behind the fire.
3. Bowl - bottom left, under the table. We scoop snow on the bench with a bowl.
4. A bowl of snow - use on the fireplace, put out the fire.
5. Part of disk 1 - inside the box, you need to break it with a club.
6. Part of disk 2 - upstairs, you need to build a ladder.
7. Part of disk 3 - in the stone behind the door, put out the fire, open it with the key.
8. Stick 1 - bottom right, clear the bones. To the stairs.
9. Stick 2 - in the center, lies to the left of the box. To the stairs.
10. Rope - in the center, hanging on a pole. To the stairs.
We use all 3 parts of the disk on the box, we get a symbol from it.
CD. On the right leg of the giant we use a feather, under it we take the meat.
marquee
Lost Lands 2: The Four Horsemen. Hyde
E. On the left tent, cut the fabric with a knife, go inside.
F. A dog is guarding the tent, we throw a piece of meat to it, and it will run away to eat.
Secret. On the top right, on a tree trunk are ghostly tongs (19/35).
Secret. A detail (19/35) is hidden in the center near the plant pot.
G. On the floor on the right is the 3rd step.
H. On the right side of the tree we take away a piece of bark, use it as a gutter.

I. On the left we read a book about Muntgor, the god of mountains.
J. Ahead under the flask is a flower, under it we insert the 1st sector of the circle.
KL. Outside, cut off the leather bag from the flagpole with a knife.

M. We go to the waterfall, insert the chute, water will pour into the mechanism on the right.
NQ. On the stone mechanism, you need to turn the valves to raise the water level in the center. Solution (32 moves):
2, 132, 132, 134, 134, 134, 134, 14, 14, 14, 14, 14, 444.
Mountgor Temple
Lost Lands 2. How to beat the game
A round door will open to the right, behind it the god will ask to bring a flower.
Secret. To the left under the distant columns is a ghostly jug (20/35).
Secret. On the left, between the altar and the pillar, there is a round piece (20/35).
R. Left on the floor 4th step.
S. On the right from the floor we select the flowers of the tree, the 2nd sector of the circle.
T.U. We return to the tent, insert the 2nd sector, solve the puzzle.
V. You need to rearrange the images of flowers on 2 circles in the same way as on the 3rd inner circle. To do this, a pair of images can be placed in the side recesses. We focus on the chamomile, turn to it, remember which flowers need to be changed, change, rearrange again to the chamomile, rearrange the next ones.

W. After solving the puzzle, we can cut the flower with a knife.
X. We take the flower to the god Mountgor, he will allow him to take his apple.
Y. On the right on the branches we use the fruit picker, we get the apple of Manutgor.
Z. We return to the beginning of the mine, insert 4 ladders and a rope into the ladder.
A. We put the resulting ladder on the left, get out to the surface into the wasteland.
We will see a video that Mountgor created a false compass, he ended up with 2 horsemen, they had a duel for him, and both died. At the entrance to the city there are now 2 statues of riders.
B. Under the riders, use a sieve into the water, wash the golden pebbles.
Two horsemen
Lost Lands 2 Walkthrough
CD. We break the statues with a hammer, from each we take a stone heart.
E. The statues will crumble, we get the key from the ashes.
FG. On the left we enter the city, put a bag near the bowl, rake up the ashes.
H. At the entrance to the tower, hit the left chain with a hammer, the horn will fall.
I. We go to the house of Maaron, we will give him stone hearts. We learn that the rider Death has appeared in the swamps. We get a dwarf figurine.
J. From the house we go to the fields on the left, insert the figure into the box.
KLM. Colored shields are shown on the top of the box. At the bottom, in 3 rows, you need to choose 3 items of the same color. Shields will change. We select 8 sets of things until both figures come to the center. We look at the color, mentally number the things in each row, from left to right, enter:
Dove: 1,6, 3. Orange: 7, 1, 4. Purple: 2, 5. Striped: 6, 4, 7.
Red: 3, 8, 1. Blue: 6, 3, 8. White: 5, 4, 5. Green: 8, 2, 7.
N. Insert the previously found symbol into the center.
O. There is a rune inside the box.
P. We insert the rune here, into the portal above. A path to the swamp will open.
Chapter 5
Beginning of swamps. Walkthrough
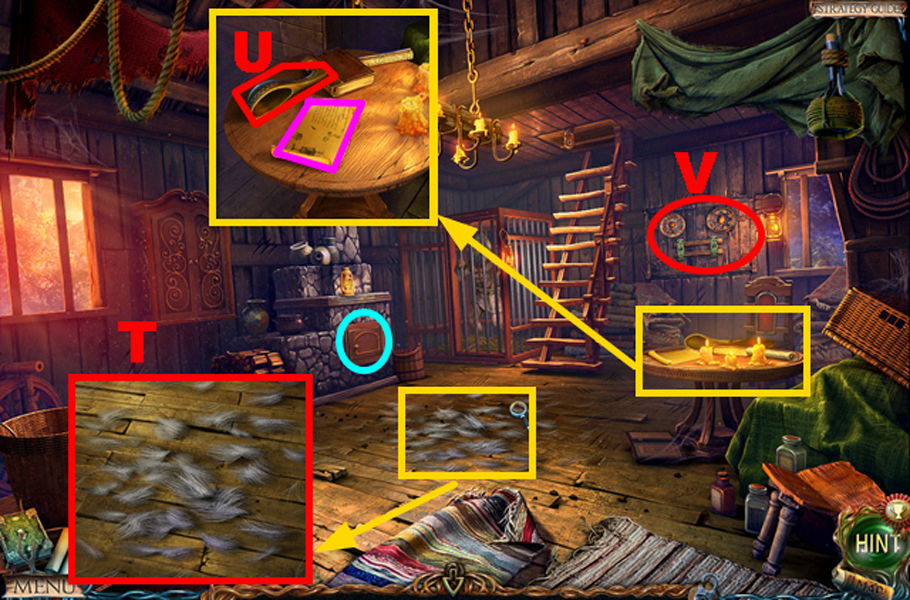
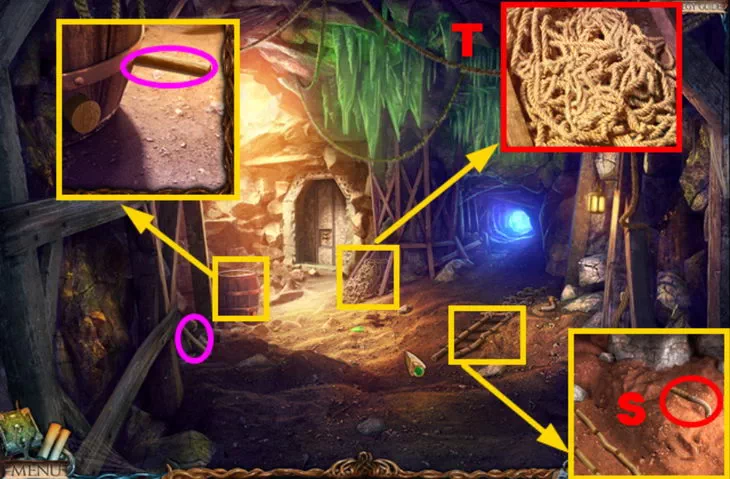
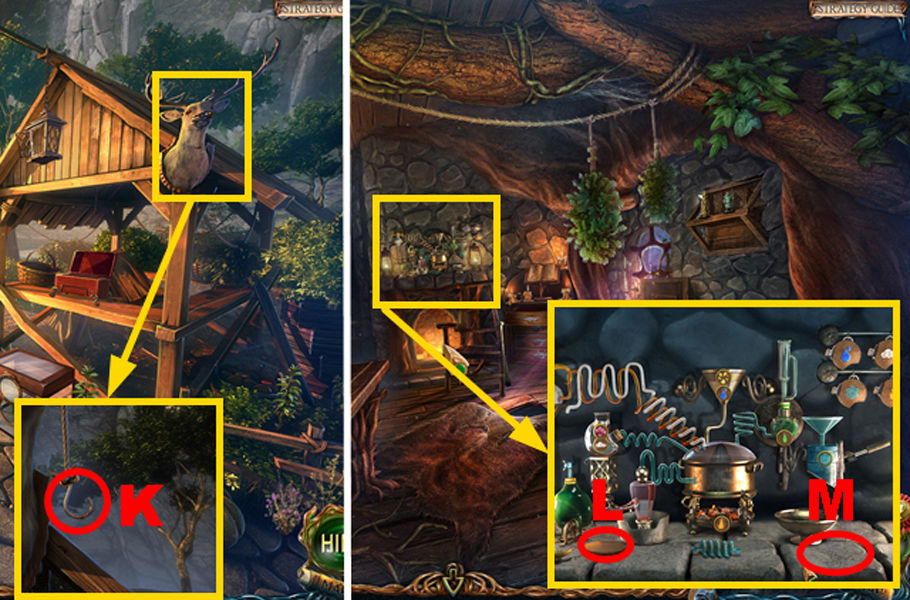
This stage of the passage begins with a conversation. The heroine must take the ladle and wool, and read the recipe to create the potion. Then open and examine the furnace.
Solve the mini-game using the method given above.
Now you need to open the closet and find a medallion in it. Go to the dwarven temple to place the medallion and click on it. To take the medallion, you need to move the armor. Then you should go to the mine.
The heroine must open the door with the key and go to the Abode of Heat. There is a figurine on the floor that you need to pick up. Next, you need to go to the dwarven graveyard.
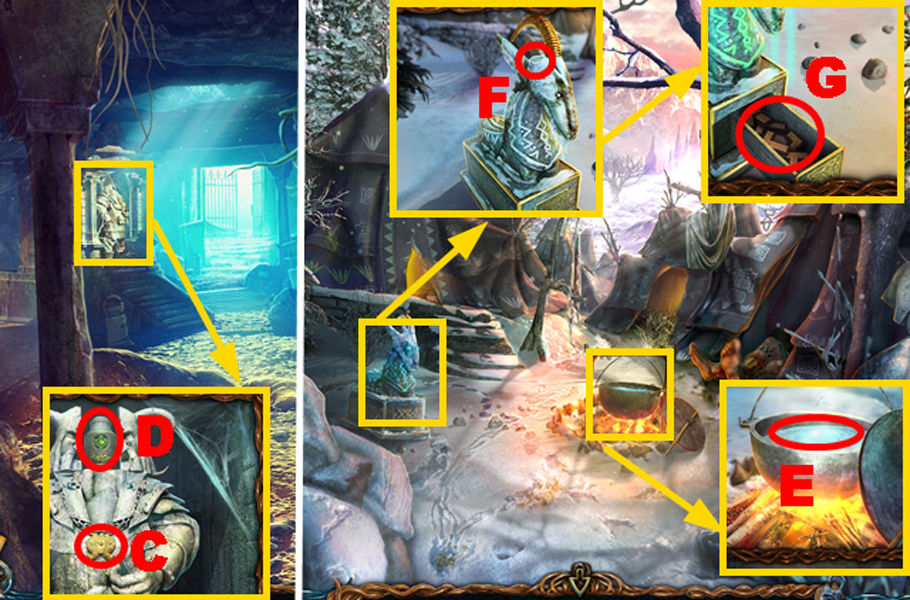
After installing the medallion, you need to pick up the urn with the ashes. Going forward, you need to remove the lid and use a ladle to draw water. Put the resulting ladle with boiling water on ice on the statue. Then a hole will open where you can install the horn. You need to pick up a piece of the mosaic and turn left.
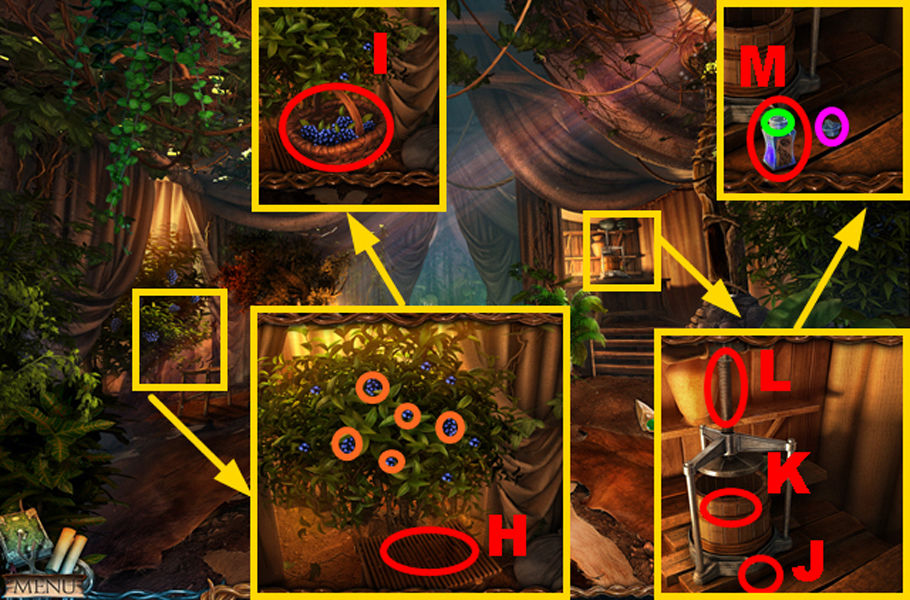
To collect berries, you should put the basket on a stand. Then take it and put a vial on the table. Put the collected berries into the juicer to get juice from them. Pour the ashes and ashes into a container, close the vial. Take the resulting potion and go to the Abode of Heat.
You need to lay out the mosaic and start the game. Collect moon dust and go to Maaron's house.
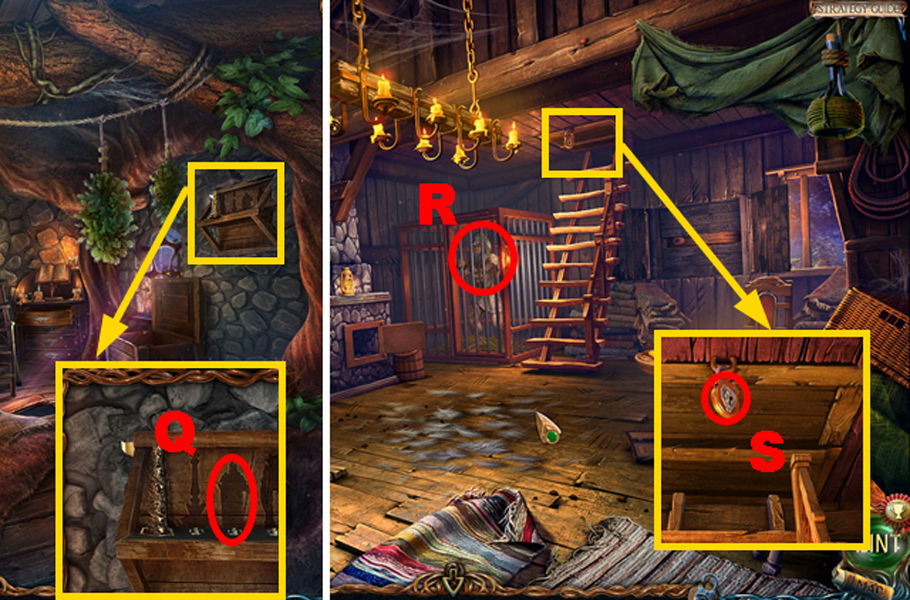
After putting the dwarf figurine on the shelf, you need to go to the Werewolf's house to give him the Polyjuice Potion, for which you can get the key. With it, you need to open the lock, open the hatch and go down.
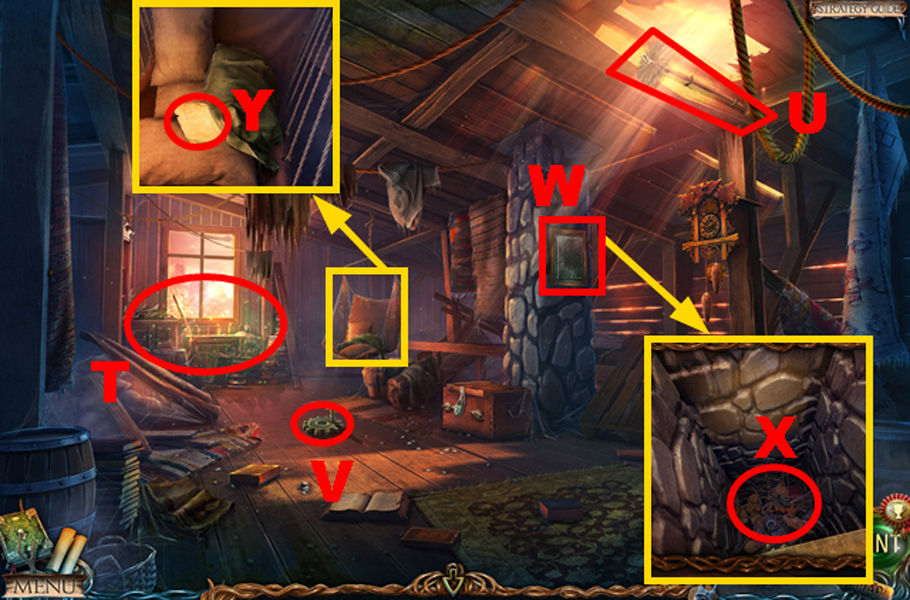
Next, you should go through the HOP to get a lantern. Take a gear and a ruff with which you need to clean the chimney hidden behind the door. Throw back the blanket, where the recipe for the potion will lie.
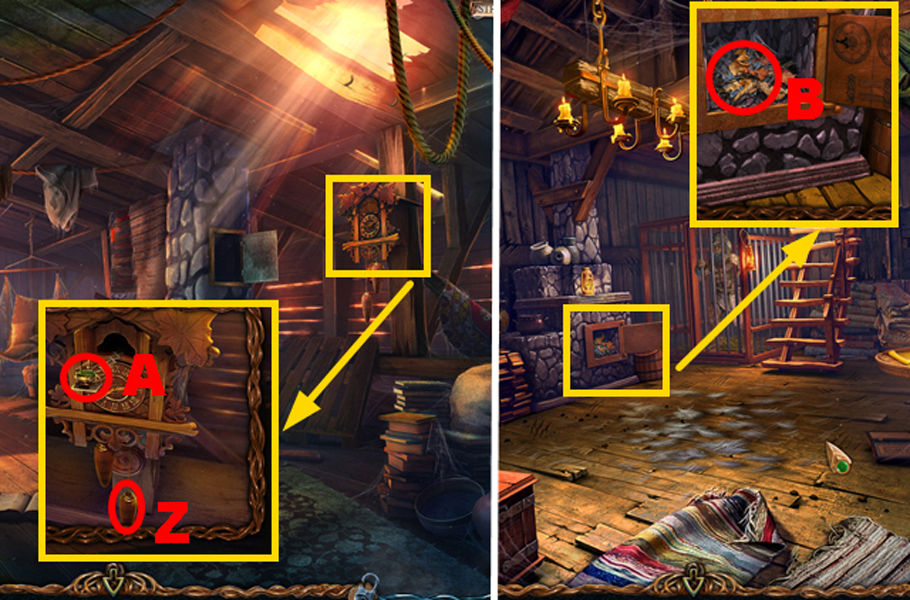
There is a weight on the watch that needs to be pulled. The clock will open and you can pick up the vial. Then you need to go back to remove the garbage from the furnace and pick up the stone flower. Go back.
It is necessary to install the resulting gear and activate the mechanism. Take the lever and go ahead to install it and turn it. Go back and go right.
Important! During the passage of the entire game, you will often have to return to already known places.
Now you need to go through the HOP to get the weights. Take a stone of fire, read the note, hang a lantern, put wool and go to the Halfing Village.
If you hang the weight on the hook, you can turn the handle. Then you need to go to Maaron's house, put the recipe for the potion and put the vial.
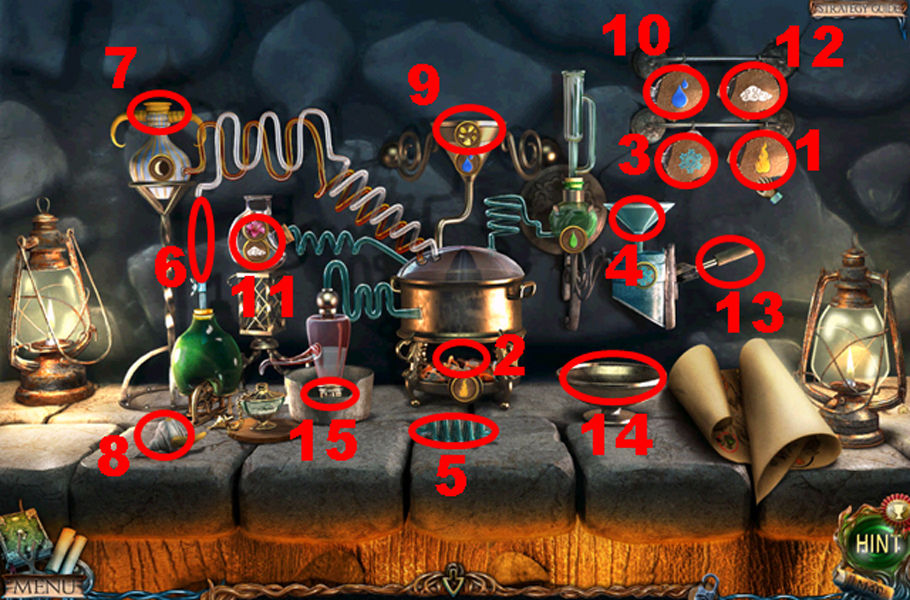
Pay attention! The potion is prepared according to the following recipe: 1 2 3 4 5 6 moon dust 7 8 7 golden stones 9 10 9 divine tree flowers 11 12 11 13 14 15. After that, you need to go to the Upper Corridor.
Next, you should install the flower in the recess, take a flask and a glass tube. Go to the Fallen Lake, where you need to find a cactus and pierce it with a pipe to collect cactus juice in a flask. Go to the Abode of Heat.
Then you need to insert a stone of fire into the hole in the statue. Go to Maaron's house, where you need to pour cactus juice and take a potion.
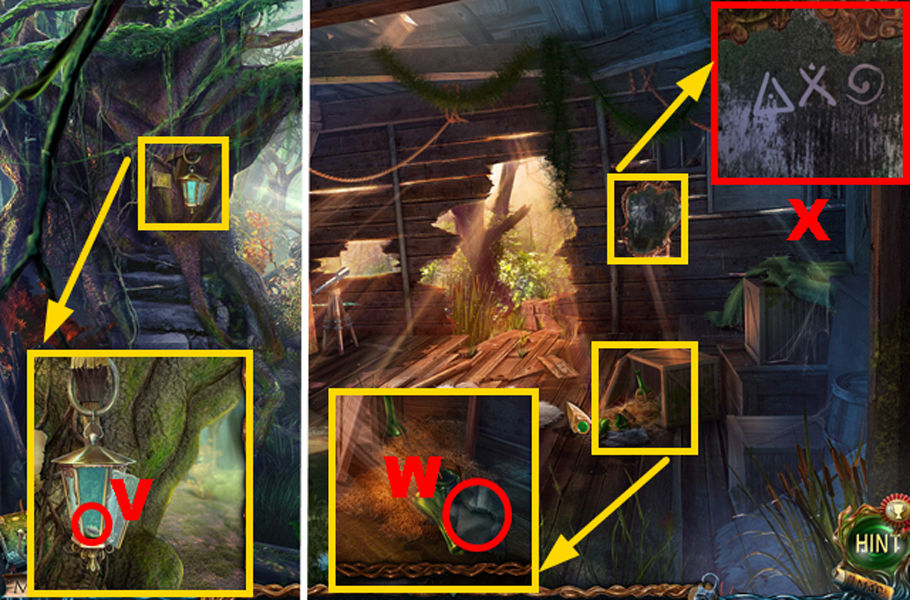
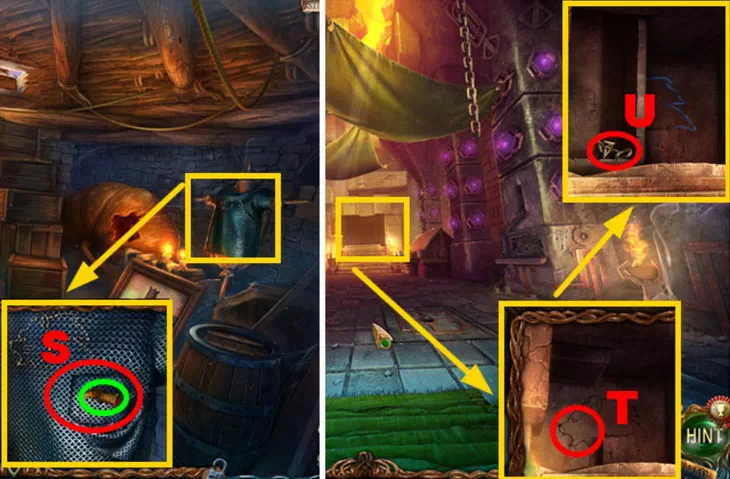
The heroine must go to the swamps to pour the lantern potion, and go further ahead. Taking a rag, you need to examine the symbols on the mirror.
After entering the code, you can take the gem. Using a hammer, you need to knock out a chip to pick up the cork.
Chapter 6
Where to get scissors?
To pick up a bottle of rum, you need to use a cork. Next, wipe the dirt off the mirror and pick it up. Go ahead to pick up the scissors. Pull the chain twice.
The gem must be set in place in order to access the tuning table. Pull the rope and go back two times. Place the table on a stand.
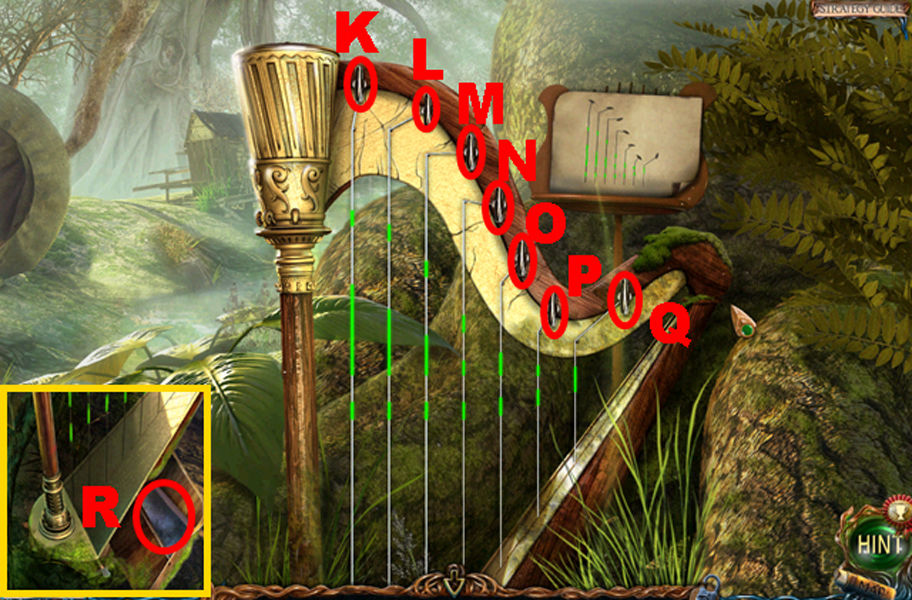
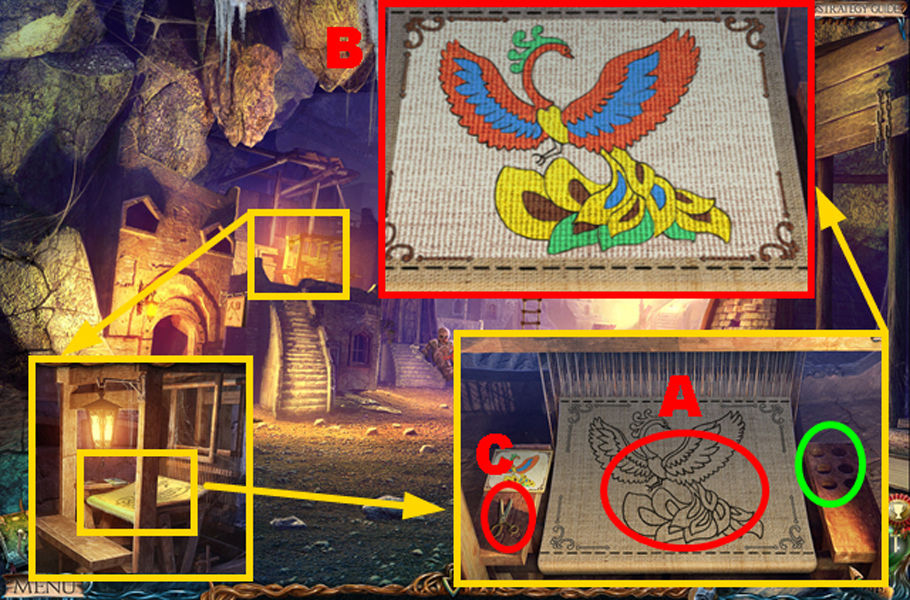
Important! To get the part for the fresco, you need to play a mini-game. Correct game decision: KKKKLLLMMMMMNNOOOOOPP PPPPPQQQQQ. After that, you should go forward twice.
After installing the received part in the fresco, you can go to the slums of the dwarves and put the scissors in place.

The heroine will have to read the instructions. Then open the door to pour coal and pour rum from the bottle. Go to the tent, where you need to install the handle and activate the mechanism. Wrap the bundle, pick up the stone and read the information in the note. Go back three times.
To install the red stone, you need to open the door. Next, take the jack and go left. With the help of a jack, it is necessary to push the bars behind which lies the bundle. Open the bundle with a knife, then open it and pick up the punched card. Then go to Maaron's house.
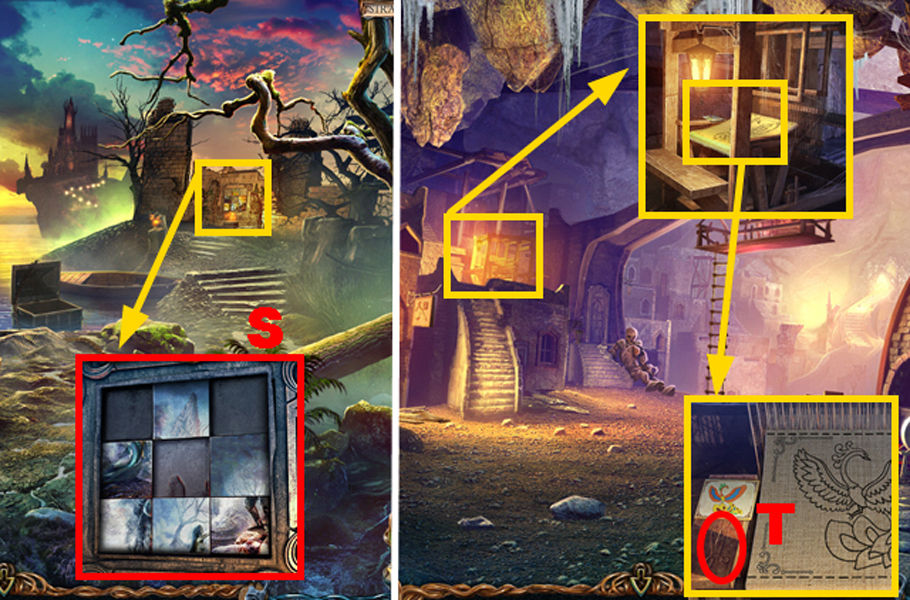
Putting the punched card, you need to unfold the book and go to the abandoned village. To get the key, you need to enter the characters in this order - FHEFG E. Then the heroine will go to the canyon.
Using the key, you need to open the box where the head of the chimera lies. Taking it, you need to go to the swamps, where you need to put your head back and pick up part of the fresco. Then you should go forward twice.
After installing the part, you need to play a mini-game.
Important! Correct puzzle solution: OPSRONQROPSRQNORUTQRU V.
Having captured a bottle of water, you need to go to the life-giving lake.
You need to talk with the mermaid, and then draw living water into the vial. Inspect the plate and go to the canyon, the area of \uXNUMXb\uXNUMXbwhich you need to explore.
Using the solution given above, you need to play a mini-game. Then get a boomerang and go to the swamps.
With the help of the resulting boomerang, you need to knock down the cage, from where the key and the note that you need to read will fall out. To get an easel, you need to open the lock with a key. Then go to the tower hall.
Now you need to set the easel in place and put the mirror. Remove the cloth to collect the rune. Travel back twice to place the rune in place.

Next, you have to go through a mini-game according to the solution given above. Pick up colored threads and a boar skin. Use a knife to cut the rope of the striker. Tear off the patch, and pick up the wolf figurine from under it. Go ahead.
Chapter 7
Walkthrough Lost Lands 2.
Having taken the pincers, you need to install the striker and hook the rope with a hook. Then go back to use the tongs to open the trap and pick up the wheel. Go ahead.
To raise the axle, you need to pull the stick. Then you need to put the wheel in place, pull the rope and push the striker. There is a chest in the attic that can be opened with a wolf figurine. You need to take a needle and go to the slums of the dwarves.
After laying out colored threads and a needle, you can play a game (the solution is given above). Use scissors to cut out the canvas to get a tapestry. Go to the fork.
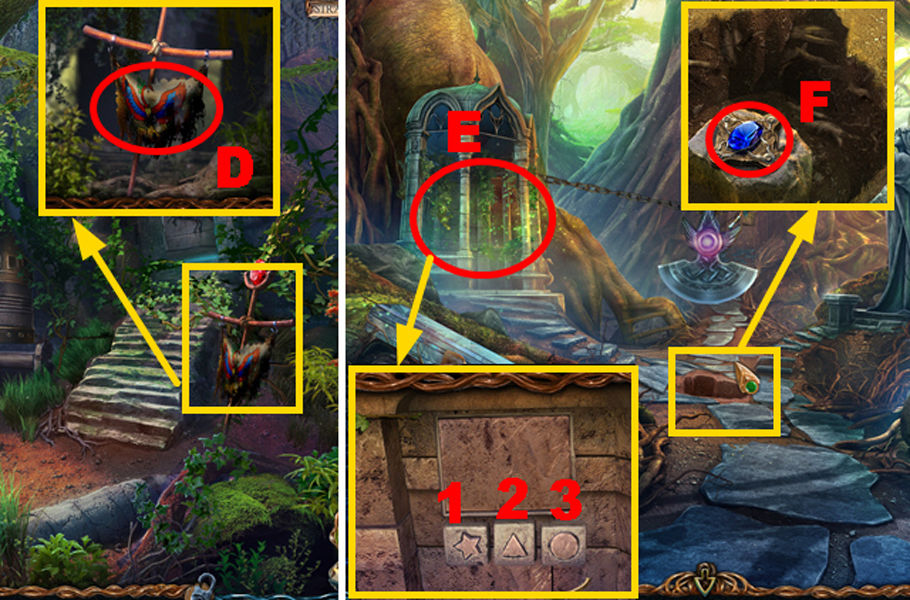
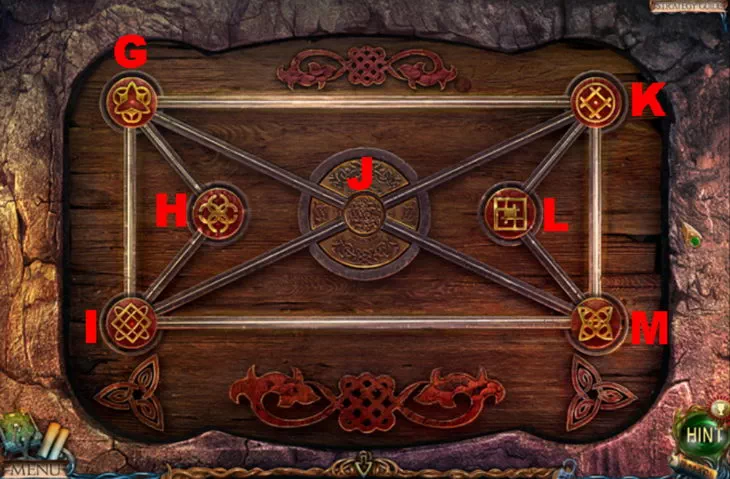
After hanging the tapestry, you need to go to the left. Here you need to go through a mini-game according to the example: 1 2 3 1 2 to get a pendulum figurine. Take the medallion.
Now you should inspect the arrow and solve the puzzle according to the solution proposed above.
After solving the puzzle, the heroine will receive a forest hunter's star, which must be placed on the pedestal after the note is read. We must pull out the ax and go back.
With the help of an ax, you need to cut through a stone slab and go to the left. On the way, talk to the centaur. Find wire cutters and a comb. Open the box where the stone of fire lies. Go to Maaron's house.
Having installed the figure of the pendulum on the shelf, you should go to the Abode of Heat. Place the stone in its place in the statue and go to the dwarven graveyard.
With the help of wire cutters, you need to bite the chains where the dwarven shield lies. Go to the village of centaurs, where you need to transfer the shield to one of the inhabitants. In return, the centaur will give you a crystal key. After that, you need to go back and go left.
On a note! Additionally, the centaur needs to give the skin of a boar.
Next, you need to use the crystal key and pick up the staff, with which you can activate the sphere. Take the bird out of the cage and go back.
It is necessary to release the bird into the tunnel and go to the left. There, place the medallion in its place in the stone, and then go forward.
Now you should take the poison, wrap the fish in a leaf and go to Mountgor's temple. With the help of the resulting poison, you need to drive away the ivy. The bag will contain part of the pattern.
To start the mini-game, you need to set the pattern fragment in place. Then take the Ontus figurine and go to Maaron's house.
Putting the resulting figure on the shelf, you need to get the key. Then go to the Dead Lake, where you need to open the box in the boat with the key. Now the heroine has a hook with which you need to go to the waterfall.
To get the hilt of the sword, you need to throw the hook on the tree and pull the rope. With the help of a knife, you need to cut a branch and pick it up. The eagle should be lured to the fish in order to pick up the sapphire symbol and feathers in its nest. Head back.
After taking the hilt of the sword, you must go back. There is a hole in the stone where you need to place a knife, after which the chip will open. Next, the heroine needs to go to the village of centaurs.
The branch of the tree must be given to the centaur, and the beater and stone of fire must be taken from the shelf. Feathers should be left on the table. With the help of leather, wrap the arrowheads and insert feathers. Go to the Abode of Heat.

Now you need to insert the stone of fire into the statue. Remove the fabric and wrap the torch with a soaked rag. Take a torch and light it with a fireplace. Go to the square.
Next, you need to place the sapphire symbol in place to get the key. Go to the right, where you need to hit the drum with a mallet, and then open the box. From it take a screwdriver and seal in the form of a roller. Go to the Abode of Heat.
The heroine must open the chest with the key and take a pickaxe from it. Then go to the top of the redwood tree to install a chip there.

To complete the mini-game, you need to follow this instruction: RURPRUP U.
Next, unscrew the bolts with a screwdriver and get a scroll that needs to be opened. Take cheese and a lens with you.
Attention! Cheese is the beginning of an important chain of actions.
Now you have to go back twice, where with the help of cheese you need to lure and pick up the mouse. Then go back two more times.
The mouse needs to be set on spiders, and with the help of a comb, remove the cobwebs. Move forward and to the right. Install the resulting comb with yarn and turn the handle. Take the bowstring that needs to be moved to the table. Go to the abandoned farm.
It is necessary to install the lens and go to the Abode of Heat. Use a pickaxe to knock out metal and go to the slums of the dwarves.
There you need to set fire to the coal with a torch and put the metal. Take molten metal and pour it into a mold. Open the mold and pour the blanks with cold water from a bottle. Take blanks and sharpen them to get full-fledged tips. Go to the village of centaurs.
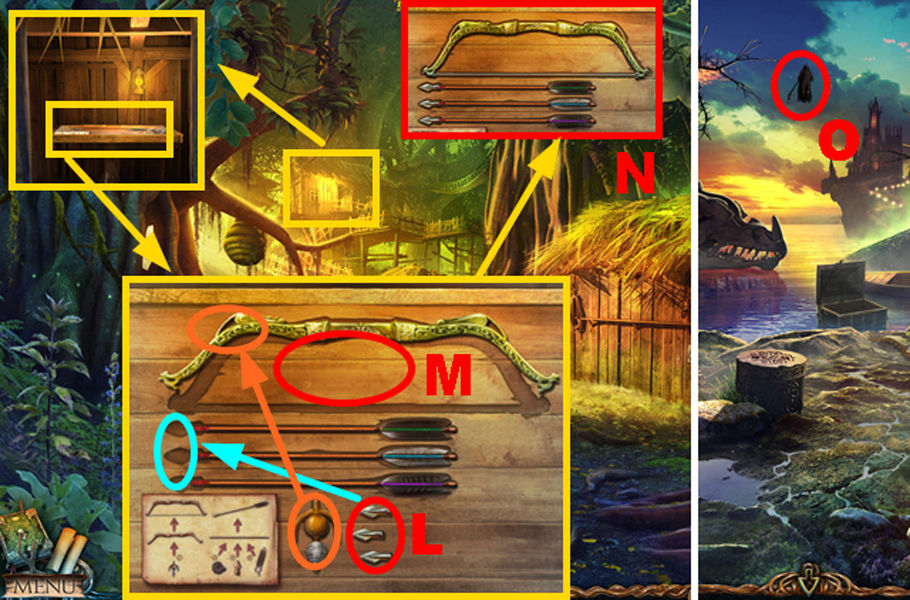
Now you need to put the tips on the table and put them on the arrows, then pull the bowstring on the bow and pour the arrows with living water. Take a ready-made bow and arrows to go to the Dead Lake, where you need to shoot a bow.
Chapter 8
Where to find a clean slate
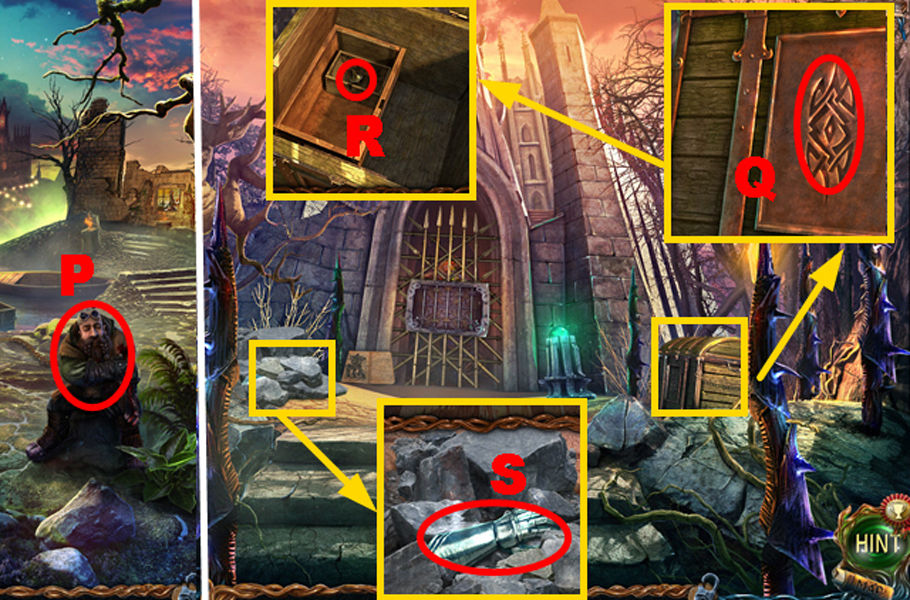
This stage begins with a conversation with the dwarf, who needs to give Mountgor's apple. Then you need to go ahead, where you need to attach a seal in the form of a roller to the chest. Open the drawers to pick up the spinning top. Move 3 stones to reveal a glove.
Then put the glove on the ball and take the skull figurine. Go back to put the top on the pedestal and activate it. Using a hammer, you need to pull out the eye.
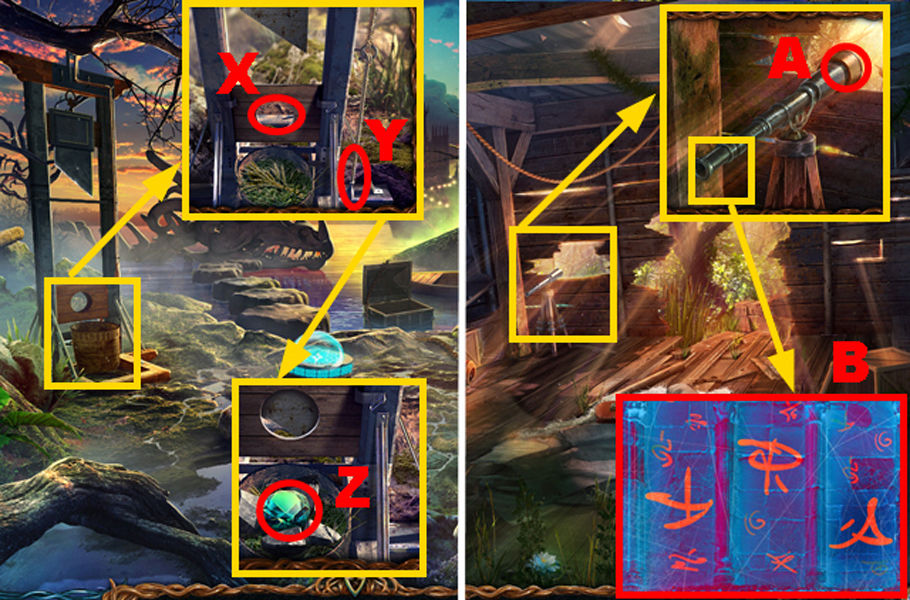
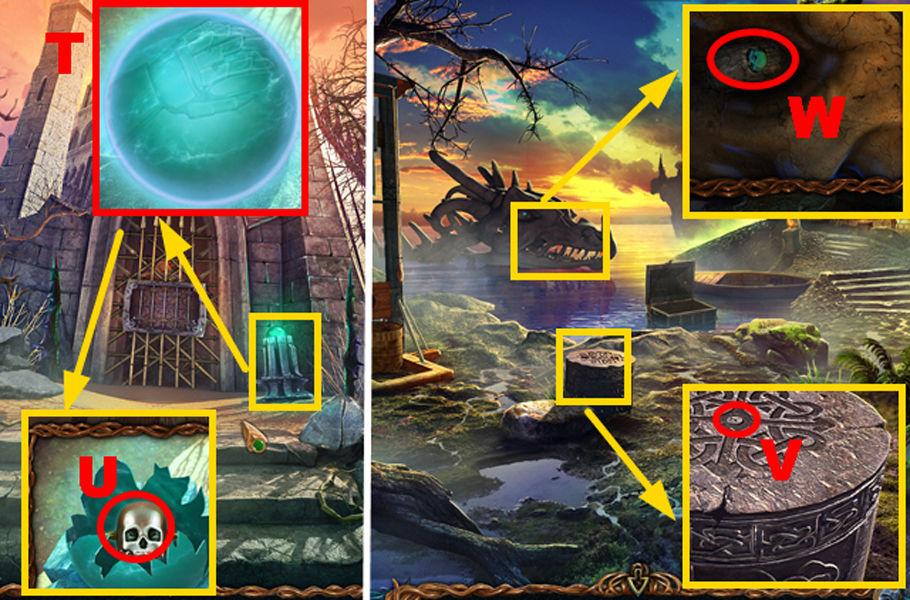
Place the eye in the guillotine and activate it. Take the dragon's eye and head back. Install the resulting eye and look through the telescope. Walk forward twice.
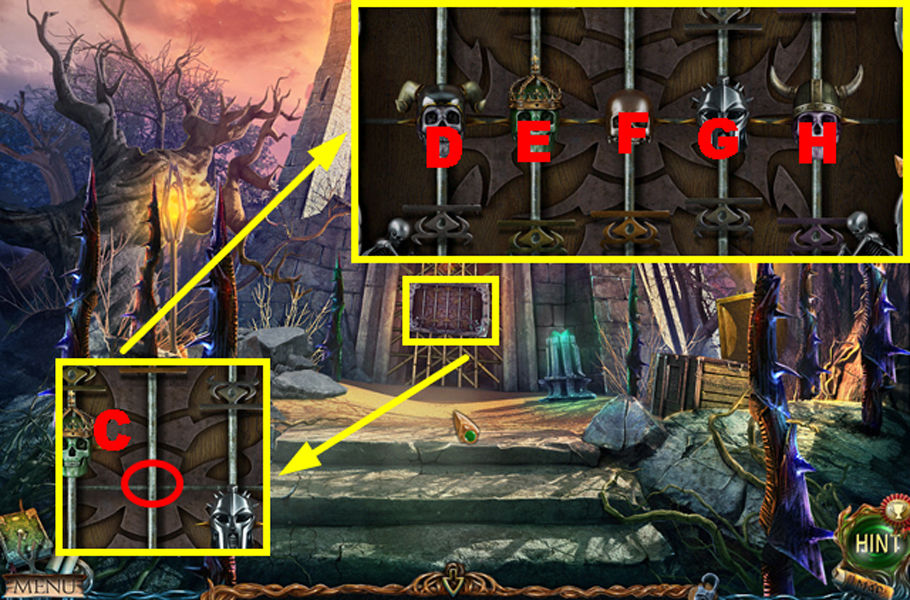
Next, you need to install a figure in the shape of a skull and play a mini-game.
Now you should knock out the heart with a hammer. Go to Maaron's house and give him the heart. In return, the man will give you a key and an aerosol. The heroine needs to go back.
Sprinkling with an aerosol, you need to take a flower. Go to the left, where you enter the code L and re-read the note. Go to the waterfall.
Then you need to pull out the tree and get the bag, which contains a wooden disk and a wrench. Go back to put the disk on the table. Walk forward twice.
Using a wrench, unscrew the bolts. Open the door, take a brush and a clean sheet. Travel to Folnur's hideout. There, put the brush in the installation, and then unlock the door with the key.
Pay attention! Keys are the main way to open doors in the game.
You need to go through a HOP to get a lens that you need to put down, then turn the handle and take the lens. Next, you need to go to Mountgor's temple and give him a flower to get a wooden sector.
Next, you need to lower the sheet into the bowl, take the finished scroll with the spell. Go to the glade of ontuses and put the sector on the table.
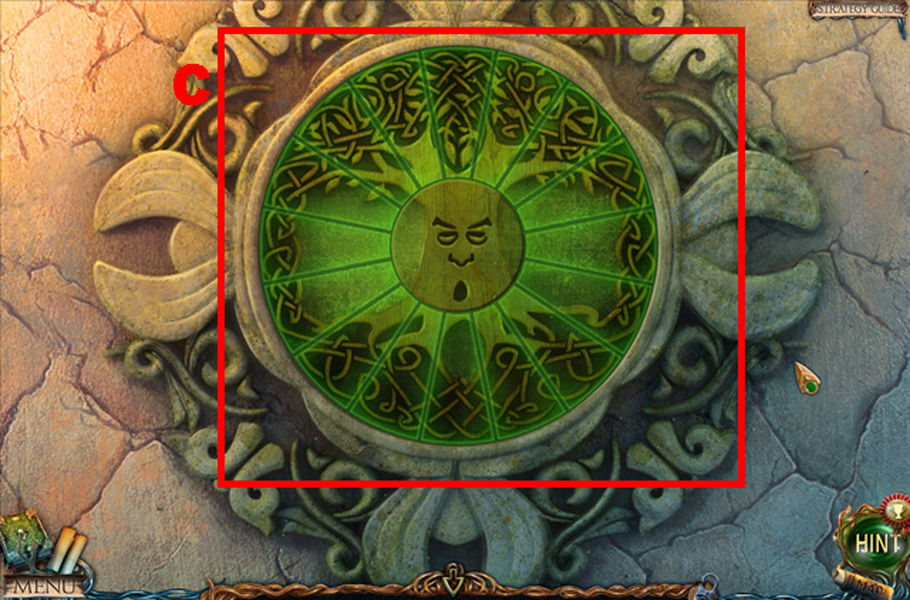
Then the heroine has to solve a mini-puzzle using C.
The lens must be laid out on the table, and then picked up and go to the tower hall, where you should talk with the men and go upstairs.
The lens is installed in the barrel, which then needs to be plugged. Next, the mountain must place a scroll at point I. This is the final game, after which only the bonus round will be available.
Bonus Chapter
1. Folnur's laboratory
Lost Lands 2: The Four Horsemen. Walkthrough
(The bonus chapter will open only after beating the main game).
First, we will see that Maaron wrote a letter, sent it by vacuum mail to the dwarf Folnur. We will play as a gnome, and we will see the events before he met the main character Susan.
J. On the top left, from the cabinet we take the round part of the labyrinth.
K. Bottom right, from the bottom shelf take the red burner.
LM. To the left on the barrel is a letter from a friend, next we take the seal of the door.
N. On the right we move the green curtain, next we insert a part of the labyrinth.
OP. Rotate the maze to bring the ball down from the center. At the fork, we lead the ball to the left side. A spiral staircase will open up.
2. Folnur's Refuge
Lost Lands 2 Hidden Object
QR. Let's go up to the wagon. Down in the center lies a knife, a bowl.
S. On the left we examine the trolley, under the rails we select the key.
T. We go back down, on the right we open the lattice door with the key.
U. There are 10 items to find behind the right door:
1. Bank without water - on the left on the cabinet shelf. On the open pipe in the center.
2. A can of water - after collecting water from a pipe, pour it into a container on the table.
3. Wire cutters - in the bookcase, behind the books. On the stairs to the right, on the nails.
4. Acid - on the left side of the cabinet shelf.
5. Wrench - Lower center, on the table shelf. On the pipe in the center.
6. Valve - in the center on the right, you need acid. To the door on the right.
7. Leaf - in the bookcase, behind the books. Into a book on the table.
8. Candle - on the lower right corner of the table.
9. Capacity - on the right under the stairs, wire cutters are needed. On the table.
10. Full container - put a container, water, acid on the table. On the valve.
Open the door on the right with a valve, take the wheel behind it.
VWX. In the center, put a bowl under the tap, pull the lever, take a bowl of water.
Y. Pour water on the letter, it will show the combination on the tree.

Z.A. We go up, insert the wheel into the trolley, remove the jack on the left.
B. Let's drive along the rails. Cut the rope in the center with a knife.
3. Lava River
CD. A catapult fell on the right, we cock it, we take a stone rune near it.
E. On the right above the lava, inspect the pipe, take the flywheel. Path to the island.
FG. Insert the rune into the chest in the center, take the cannonball.
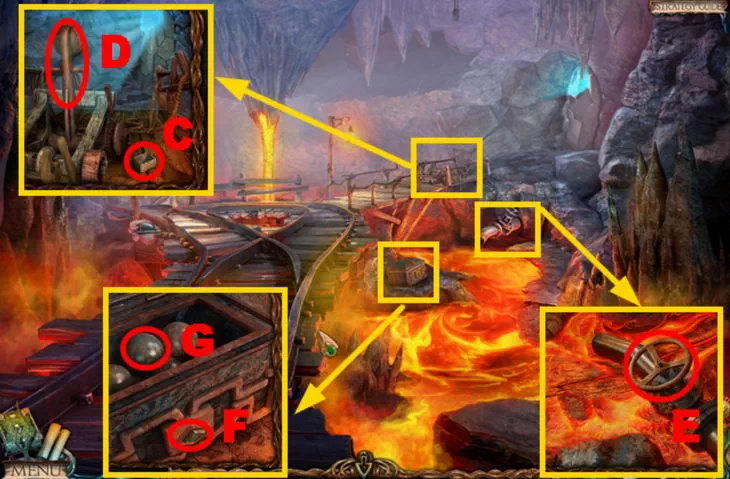
4. Area
Lost Lands 2: The Four Horsemen. Hyde
H. We load the core into the catapult, shoot. Let's open the way forward.
I. On the square, on the left under the board, we take the lever, we return.

J. To the left of the rails, insert the lever into the recess, switch the rails back.
K. We return to the laboratory, on the left we insert the flywheel into the door.

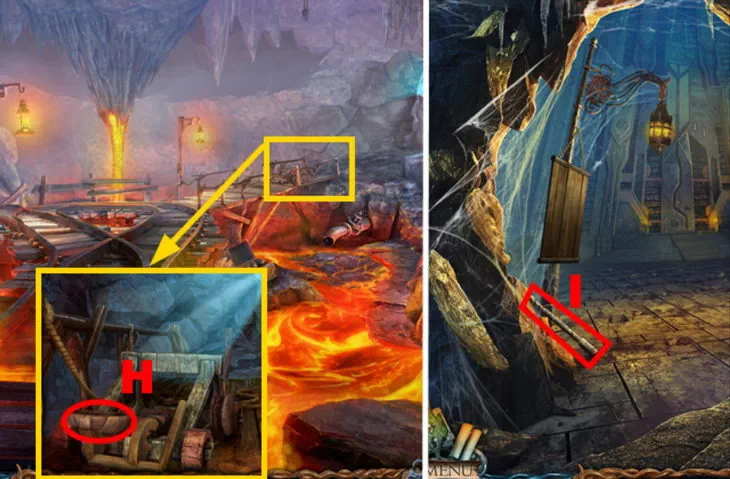
5. Underground corridors
Lostlands 2
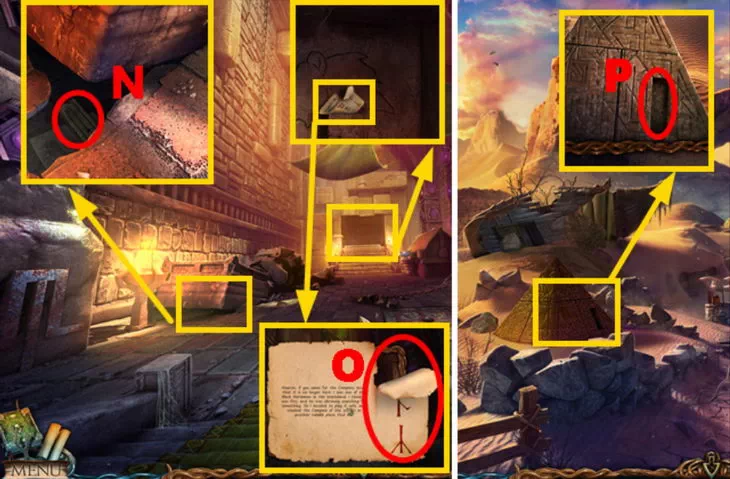
LM. Take the hammer from the bottom left of the cliff. Burning torch on the top left.
N. On the right, with a burning torch, we can set fire to oil, light up the corridors.
O. On the door, click on the patterns, as in the letter: left, right, top, bottom.

6. Halfling's cellar
Lost Lands 2. How to complete the game. Bonus
P. Move the box in the center forward to the ladder of boxes.
Q. On the top left from the rope we take the poppy fruit.
R. There is a hole in the wall on the left, hit it with a hammer.
STU. You need to dial 3 measures of sand. Solve the puzzle (8 moves):
9-pile, 9-5, 5-pile, 9-5 (4 measures in 5),
9-pile, 9-5, 5-pile, 9-5 (3 measures in 9). We take three measures of sand.
V. On the right is a large pumpkin, break it with a hammer, take the pyramid.
wx. We put a cup of sand on the scales on the left, take a hook from below under the scales.
Y. Remove the fabric from the bottom right, under it is a picture of the tower, remember.
Z. From the top in the center we climb the boxes, open the hatch on the ceiling.

7. Halfling's house
Lost Lands 2 Walkthrough
We will meet Maaron inside the house, he will ask Susan to help, for this we need to find a suitable weapon. We get a symbol from him.
A. On the left window, cut off the aloe leaf with a knife.
BC. On the chair we shift our head on the handle, in the cache we take the pliers.
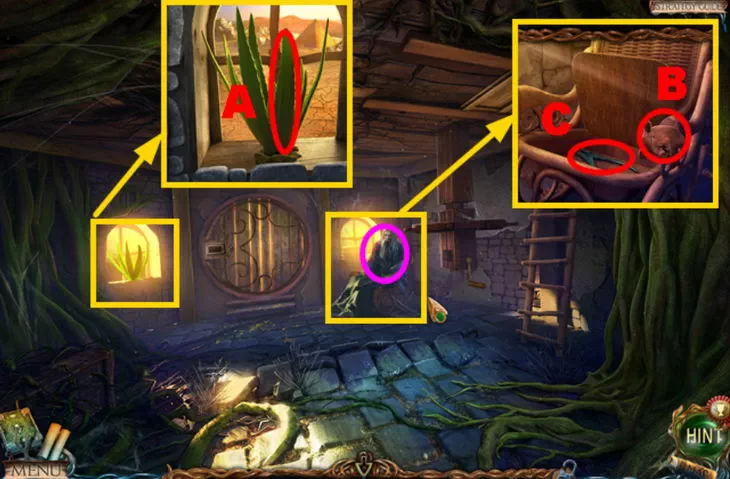
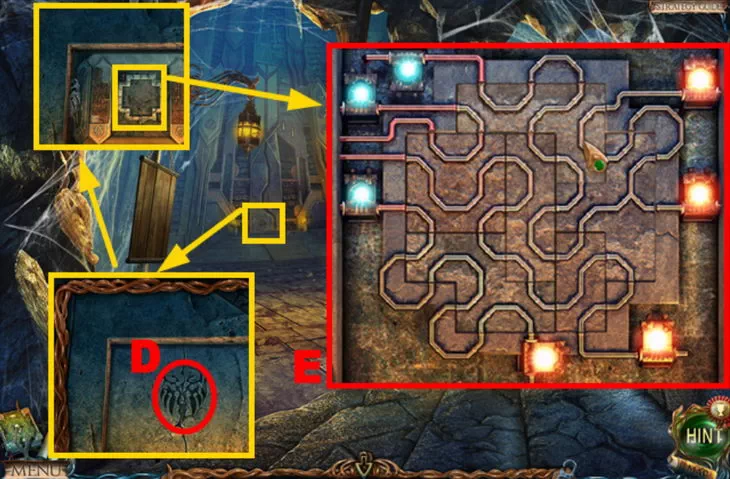
D. We return to the Square, insert the symbol into the gate.
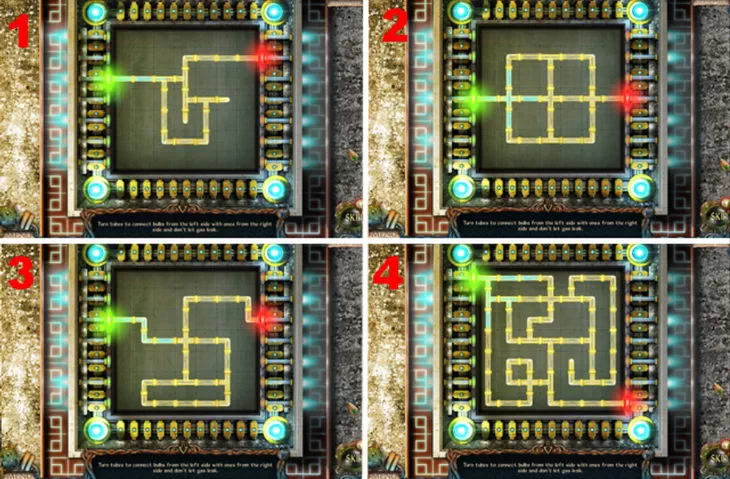
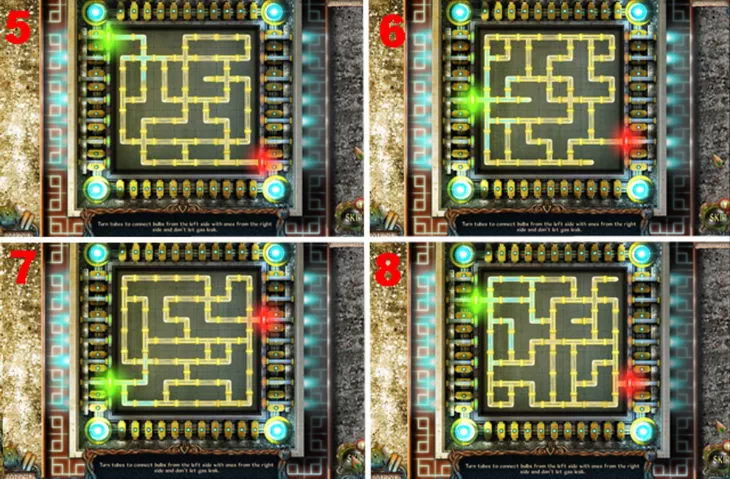
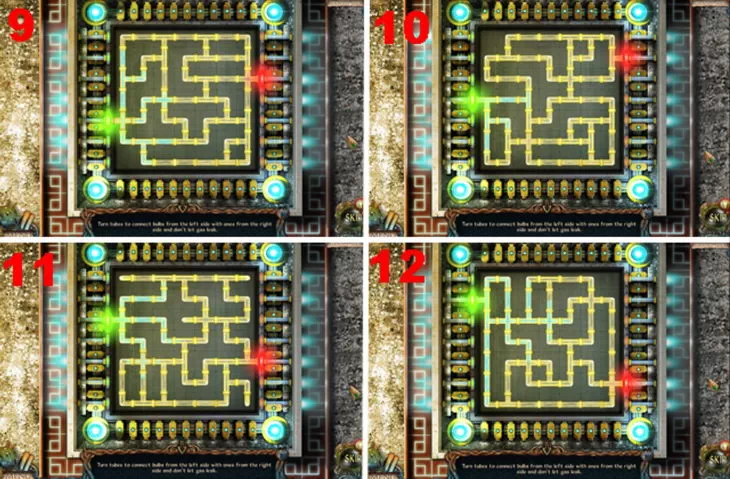
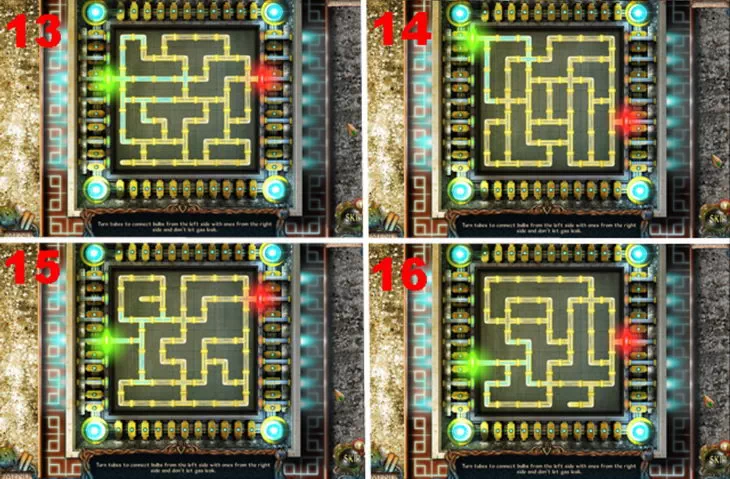
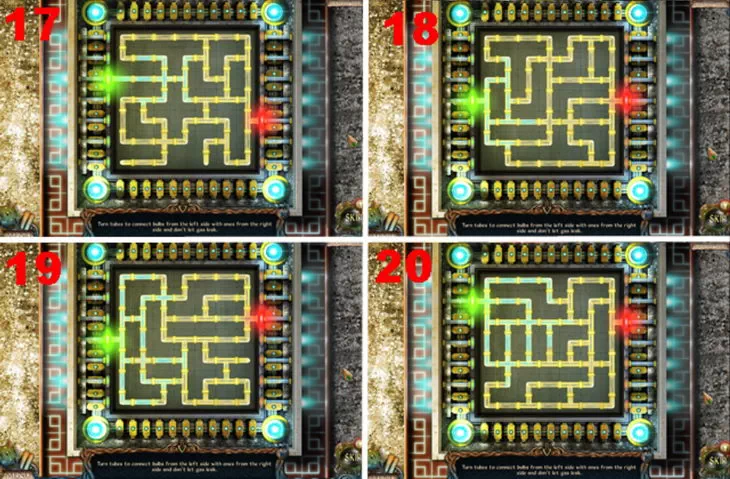
E. Put a puzzle on the gate to connect all the wires.
8. Undermountain Dwarven Realm
Lost Lands 2: The Four Horsemen
FG. On the left is a grate, pull a rope near it, use a hook on it.
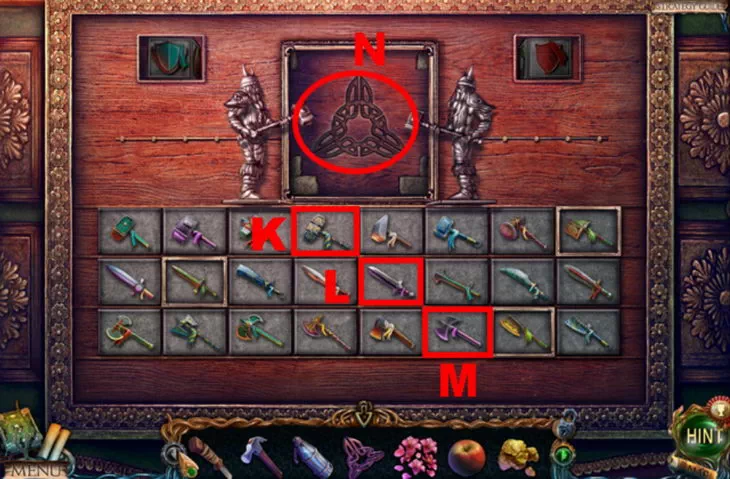
H. There are 10 items to find behind bars in the armory:
1. Horn - at the far wall, on the table. On the box on the left, on the elephant.
2. Bull's head - on the shelf on the right we place the weapon correctly:
I: 1) club, 2) golden axe, 3) scimitar, 4) axe, 5) sword, 6) ax down.
3. Camel's head - we break the right column with a chisel and a hammer.
4. Sword - on the left in the basket. On the shelf on the right.
5. Hammer - right under the shelf. To the far right column.
6. Shoulder - on the left box you need to arrange all the heads. For armor.
7. Brush - on the shelf on the right. On the table at the far wall, we will see the combination.
8. Gear - inside the armor, add a shoulder pad to it.
9. Ax - at the far wall, at the table.
10. Chisel - on the left side of the box. To the far right column.
J.K.L. We insert the gear into the floor, rotate the disks to get the correct patterns. Take the steel palm from the cache.
9. Slums of the Dwarves
Lost Lands 2. Where to get
M. On the right we insert the palm into the stone fist, the stairs will rise.
N. In the slums, on the left, melt the ice with a burner, take the mirror.

O. We return, insert the mirror into the central statue.
P. We solve the puzzle: you need to reflect all the rays into the remaining mirrors. After the solution, we get a magnetic stone.
10. Dwarven graveyard
Lost Lands 2: The Four Horsemen
Q. We go to the right, on the ice we attach a magnet to the chain, lower it into the water.
R. Pull the chain, pull out the plug, lower the water level.
S. We go further to the right, open the coffin with pliers, take the hand of the skeleton.
T.U. We go down, in the corridors we put our hand on the book, inside the 2nd palm.
V. In the kingdom, insert the palm into the upper fist, open the way up.

11. Durbran Tower
Lost Lands 2. Bonus. Walkthrough
W. King Durbran will meet us, instruct us to post an announcement.
X. On the left from the table we take the order of the king.
Y. We go to the square, on the left to the bulletin board we post the order.
12. Ice Mountain Peak
Z. We go to the king, he will talk about weapons and Tectonics, give a mace.
A. We insert the mace into the wall on the right, open the stairs to the surface.
BC. On the snow in the center we take the giant's tooth, around we select parts of the mosaic.
D. Ahead is a destroyed bridge, in front of it we cut off the root with a knife.
E. On the left, near the stairs, break the ice with a hammer.
F. We go to the cemetery, we apply parts of the mosaic to the crypt on the right.
G. On the crypt from the pieces you need to collect the image of the gnome.
H. Having collected the puzzle, we get a colored chip.

I. We go to the peak, add a chip under the ice, solve the colored spots.
5-18, 2-13, 1-17, 4-1, 6-2, 12-6, 11-4, 10-5, 13-10, 3-11,
17-13, 18-12, 9-3, 4-9, 8-4, 13-8 (16 moves)
JK. We find the recipe for removing the fire and the black book.

L. On the right above the burning goblet we burn the book, we take the goblet with blood.
M. We go down into the corridors, give the goblet to the bat.
N. At the dead end, after the mouse, take the eye of the cyclops, insert the pyramid.
13. Temple of the Dwarves
Lost Lands 2. Where to find
O. Let's go to the temple, in front near the panel we take the 3rd palm.
P. We go to the kingdom, insert the palm into the left stone fist. We go to the left.

14. Dig
Q. On the top left is a huge skull, insert a giant's tooth into it.
R. In the center of the table we take the master key.
ST. To the left of the table is a cauldron, we hit it with a hammer on its left side, we take coal.

15. Tectonics Cave
Lost Lands 2 Walkthrough
We go down below, we will talk with the mistress of the dungeons, she will demand to stop the wheel of the dwarves who ran away, but did not stop the mechanism.
U. To the left behind the rocks we take a rope with hooks.
V. Insert the eye of the Cyclops into the left statue.
W. On the top left, near the yellow crystals, take part of the glove.
XY. Above, on the top left, we throw the rope onto the platform. We pull the rope.
Z. We go to the kingdom, on the central cart we break open the chest with a master key.
A. Inside the chest is a decoction of mahogany bark.
BC. In the king's room, on the top right we put part of the glove, take the ring.
D.E. At the king, on the left we insert the ring into the table, we get a sheet of paper.
F. We go down to Tectonics, among the fragments of the cradle we take a blunt ax.
G. In the slums of the dwarves, on the right we grind, we get a sharp ax.
H. We go to the temple of the dwarves, on the right we cut off the wedge, the flywheel with an ax.
I. There is an instruction on the wall, put a sheet here, circle it with charcoal, take a diagram.

J. We go to Kopalni, on the right near the mechanism we weigh the instruction from the temple.
KL. We insert the flywheel, wedge, hammer, turn the flywheel.
M. We go down to Tectonics, for completing the task we will receive a diamond thread.
NO. From the top left, cut off the crystalline mushroom with a diamond thread.
16. Search for a hammer
Lost Lands 2. Bonus. Walkthrough
P. In the laboratory, put all the ingredients according to the recipe into the pot.
QR. Mix, close the lid. We get a potion of rapid growth.
S. We go to the Peak, pour the potion on the roots in front of the bridge.
T.U. Let's go over the bridge, near the tower we take a medallion, a palette.
V. In the hall of the king, on the left, insert the medallion into the slot.
W. Take the hammer shard from the crystal box.
X. In the box, turn the medallion 3 times, the beam will hit the throne.
Y. From the cache inside the throne we take the figure.

Z. Go to the Tectonics Cave. We put the fragment of the hammer on the table.
A. A little higher, in the mines, inside the skull, insert the figurine.

B.H. You need to move the figure to the exit on the right. Solution:
B right, C down x2, D left x2, E up, F up x2, G left, H down x2, B right x4.
I. After completing the task, we get the 2nd eye of the cyclops.
J. At the bottom, insert the eye of the cyclops into the statue on the right.
K. In the halfling's basement, paint on the painting. With black beauty you need to draw the entrance to the tower.
L. Climb the Peak, enter the tower, look for 10 items inside:
1. Crystal ball - bottom left, at the altar with a book.
2. Cross key - in the ball on the right, you need a circle, an arrow, 3 symbols. Left.
3. Key - on the right we move the curtain, to the left below from the lever. To the skeleton.
4. Circle with runes - top left, on the notch for the key. On the ball to the right.
5. Hook - inspect the book on the top left, near it. On the chain in the center.
6. Pedestal - on the right on the shelf. on the throne in the center, you need to raise.
7. Part of the lever - in the center we are looking for all pairs of images. To the right of the fabric.
8. Leaf - in the book by the skeleton. Top left of the book. We will see 3 characters.
9. Arrow - in the center on the shelf, in front of the panels. On the ball to the right.
10. Part of the throne - inside the skeleton box, you need a key.
Having collected everything, we press the lever on the right, turn the valve on the left, put the ball on the throne, the luminous part, take the hammer handle.
17. Looking for a way out
Lost Lands 2 Walkthrough
OP. In the cave of Tectonics we put the handle and the fragment, we get a whole hammer.
QR. We go to the Lava River, hit the rock from the bottom right, take the wire cutters.
S. We go to the basement, cut the chain mail with wire cutters, take the fang of the bear.
T.U. In the temple of the dwarves, use the fang on the image, we get the key.
V. In the Holfling House, open the hatch with the key. At the top we remove the stick.
wx. We twist the handle of the periscope, we will see the password and the rider on the surface.
Y. At the door of the house we enter the password we saw of 3 characters.
Let's go outside, hit with a hammer, and save Susan from the heat rider.
Bonus game
If we collect 35 device parts in the main game, then in the main menu, in the “Bonus” section, the last line “Bonus game” will open. At level 20, you need to rotate the water pipes so that they do not leak. No reward.
Achievements (20)
1. Main game (9 pieces)
Lost Lands 2. Achievements
Subject
 | Mechanic (Mechanical) Assembled mechanical installation with gears. Mini-game 4/21. Chapter 3 |
 | water caster (Water Whisperer) Completed the water level mini-game. Mini-game 7/21. Chapter 4 |
 | saved (Rescued) Save yourself from the dark rider. We get in the middle of the game, meeting the gnome. |
Mini games
 | Fulminant (blitz) Completed the mini-game in less than a minute. The easiest way to do it is on the 1st riddle. |
 | Clever (Witty) Completed 3 mini-games in a row without using the Skip button. We play without a hitch. |
 | Plodding (Diligent) Completed the mini-game in over 5 minutes. Toward the end there will be a mini-game "flowers", it takes a lot of time. |
Search for items
 | Faster sound (Supersonic) Completed the Hidden Object scene in less than 2 minutes. We do it together with the "sniper" achievement. |
 | Sniper (Snipers) Found 3 items in 3 seconds, in a Hidden Object scene. We are looking for 3 items, remember, and only then quickly poke. |
 | Orderly (Precise) Completed the Hidden Object Scene with no useless clicks. Better to do it on repeat. |
2. Specific places (3 pieces)
Lost Lands 2: The Four Horsemen. Achievements
If you didn’t manage to quickly complete the puzzles during the story, then later in the main menu, in the line “Bonus”, “Mini-games”, you can turn on any of the puzzles, and go through it to achieve there.
 | Beast Master (Lord of the Animals) Animal minigame completed in less than 70 turns of the knobs. Mini-game 1/21. Solution (58 moves): Q (bump), OPQ (moon), 2xO PQ (snail), OQPQ (wolf), 6xO PQ (mushroom), 5xO PQ (mouse), 7xO PQ (spider), 3xQ, OP (hare), OP (leaf), 7xO P (owl), 6xO P (snake) |
 | Scrabble (erudite) The mini-game with the symbols on the tiles was completed without unnecessary touches. Mini-game 3/21. Flip 40 tiles. |
 | Artist (Artist) Assembled a mosaic with a dwarf in less than 1 minute. Minigame 18/21. We train many times until we succeed. |
Show more
3. Secret items (3 pieces)
Lost Lands 2 Achievements
 | Historian (Historian) Collected all the pages of the book of the Lost Lands. 20 pieces. Not hidden, lying near plot items. |
 | Detail Master (eagle eye) Collected all ghostly objects. 35 pieces. 1 for each location. |
 | Master Technician (Master Technician) Assembled machine of magic. 35 pieces. 1 for each location. |
4. Style passing (5 pieces)
Lost Lands 2. Achievements
 | Story lover (Story Lover) Completed the main and bonus chapters without skipping dialogues or videos. We watch all conversations and screensavers. |
 | Persistent (stubborn) Completed the main and bonus chapters without using the hint in the silhouette scenes. We are looking for items on our own. |
 | Mystery Lover (Puzzle Lover) Completed the main and bonus chapters without skipping mini-games. Don't skip mini games. |
 | Messiah of light (Messiah of Light) Completed the main and bonus chapters without using the hint. Do not click in the lower right corner of the screen. |
 | Expert (Expert) Completed the main chapter on hard difficulty. Difficulty only affects item highlighting and tooltip recovery speed. |
Show more
Questions - answers
Lost Lands 2. What to do with the fish?
Wrap in a leaf, take it to the eagle at the top of the tree.
Lost Lands 2. What to do with the roller seal?
Near the Castle of Death apply to the chest on the right.
Lost Lands 2. What to do with a cactus, where to find cactus juice?
At the Top of the tower, take a flask and a pipe, use them on a cactus to get juice for a potion.
Lost Lands 2. What to do with the watering can?
In the desert, use an oil can to lubricate the mechanism on the left.
Lost Lands 2. Where can I get a mirror?
Inside the Abandoned Farm (a wooden building in the desert), first use 3 symbols from the mirror, and after solving it, wipe it, take a clean mirror.
Lost Lands 2. Where can I get moon dust?
In the Abode of Heat, on the throne, solve a Tetris-type puzzle.
Lost Lands 2. Where can I get tapestry scissors?
In the boat, in front of the Castle of Death.
Lost Lands 2. Where is the Abode of Heat in the game?
In the lower right corner of the screen, press the "Map" button, on the right, turn on the "Wasteland" tab, on the map screen, in the lower left corner, select the location "Abode of Heat", for the move you need a skull key.
Lost Lands 2. Where can I find a blank slate?
In Folnur's Refuge, to the right of the cart.
Lost Lands 2. Where can I get a potion lantern?
Find 10 items in the werewolf's attic.
Lost Lands 2. How to open a chest with a drum?
In the Centaur Workshop, take a mallet, knock on the drum.
Lost Lands 2. How to get a torch?
In the Abode of Heat, on the right, put 4 stones in the knight, wrap the torch with a new alcohol-soaked rag, set it on fire right here in the fireplace.
Lost Lands 2: The Four Horsemen. How to draw a tapestry
Click on the thread color, click on part of the pattern. It is necessary to color not only the bird, but also the white background, and brown patterns in the corners of the fabric.
Was the article helpful?