Passage of the game Lost Lands 9: Tales of the First Brotherhood 100%. All the secrets, puzzles, mini games, collectibles and achievements in one place...
Lost Lands 3: Cursed Gold – Walkthrough 100%
Passage of game Lost Lands 3: Cursed Gold 100%. All secrets, puzzles, mini-games, collectibles and achievements in one place.
Games series: Lost Lands
Content
General information. Walkthrough:
- Valley of the Druids.
- Floating Islands.
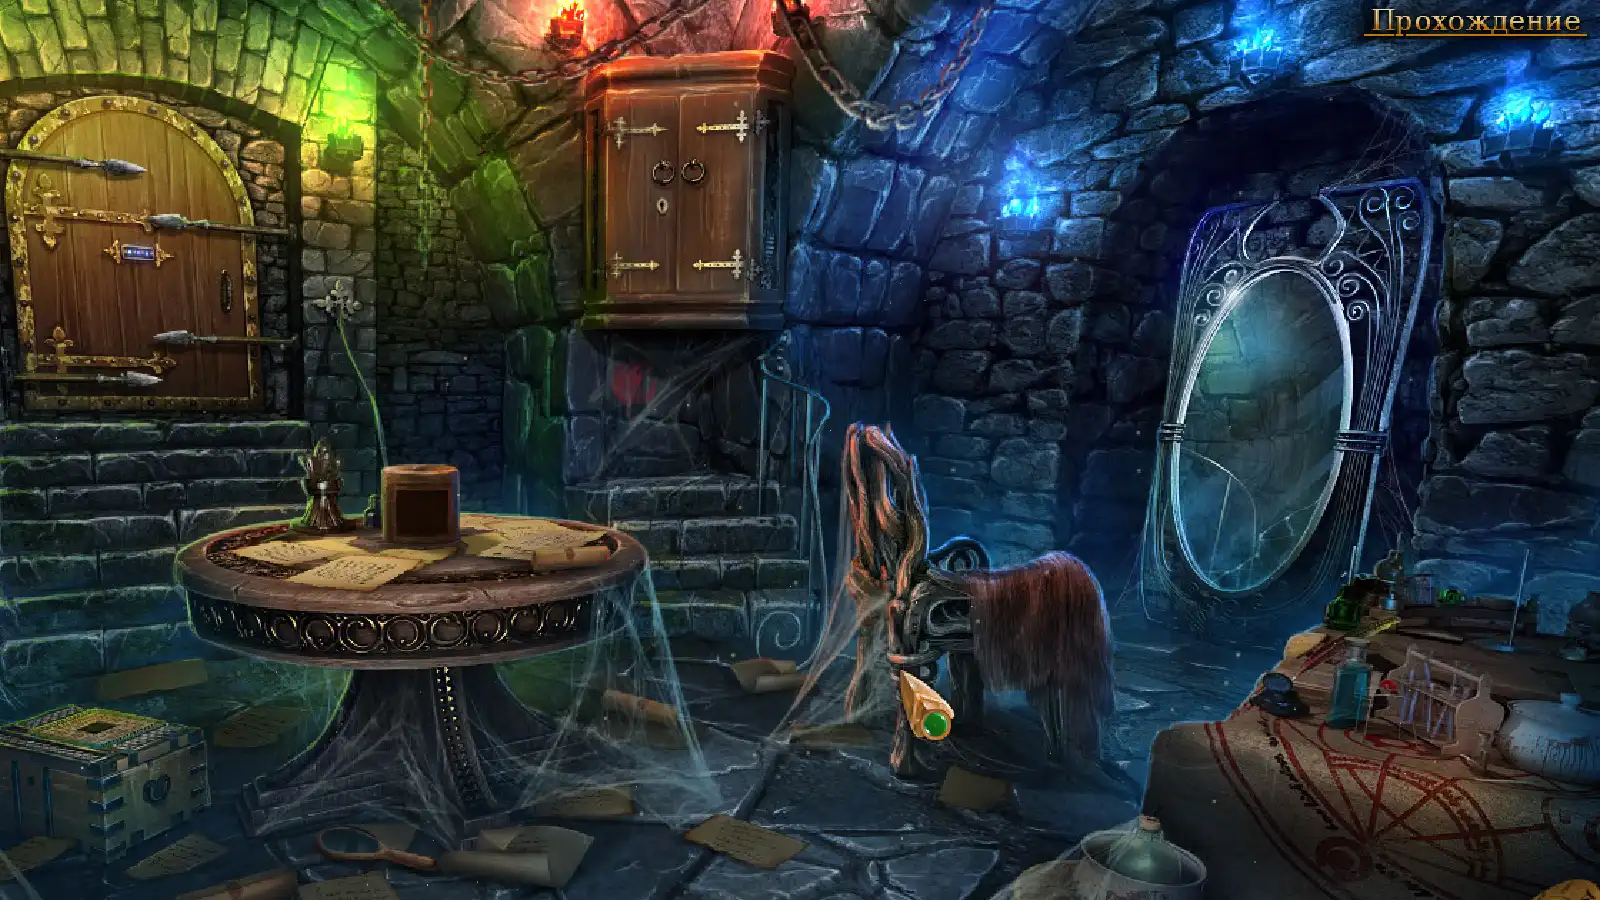
- Dungeon.
- Castle of Madness.
- Dark territory.
- Bonus chapter. Bonus.
- Achievements.
- Questions.
Lost Lands 3: Cursed Gold (Lost Lands 3) - An adventure game, go to the Floating Islands and descend into the depths of the Dungeon to explore diverse and unique places. Meet new characters, help them and they will not remain indebted to you. Immerse yourself in an unforgettable passage of an interesting story, solve dozens of interesting puzzles and plunge into the study of the history of the Lost Lands, and help Maaron get rid of the curse and defeat all the awakened demons. In times of oppression, the guild of druids is the only settlement that did not succumb to the siege of the conqueror for a long time. But in the end, the druids agreed to pay tribute to the dwarf. They collected all the gold that was in the village, put it in a chest and gave it to the enemy. Satisfied with another victory, Gorasar returned to his lair in Bashar and began a feast. In the process, He, Harpy, Naga, Minotaur, and Solidus each took one golden item from the chest and were petrified in a moment. The rest of the host realized that the druids had cursed the gold and fled in fear. The enemy seized lands, collected tribute from the peoples, and he destroyed those who did not obey. It all ended when Gorasar was deceived by the forest dwellers, accepting a chest of gold from them. Later it turned out that it was cursed gold. If you are stuck at any point in the game, you can use the walkthrough of the game Lost Lands 3. Cursed Gold. The walkthrough is written step by step and with pictures.

Chapter 1. Valley of the Druids
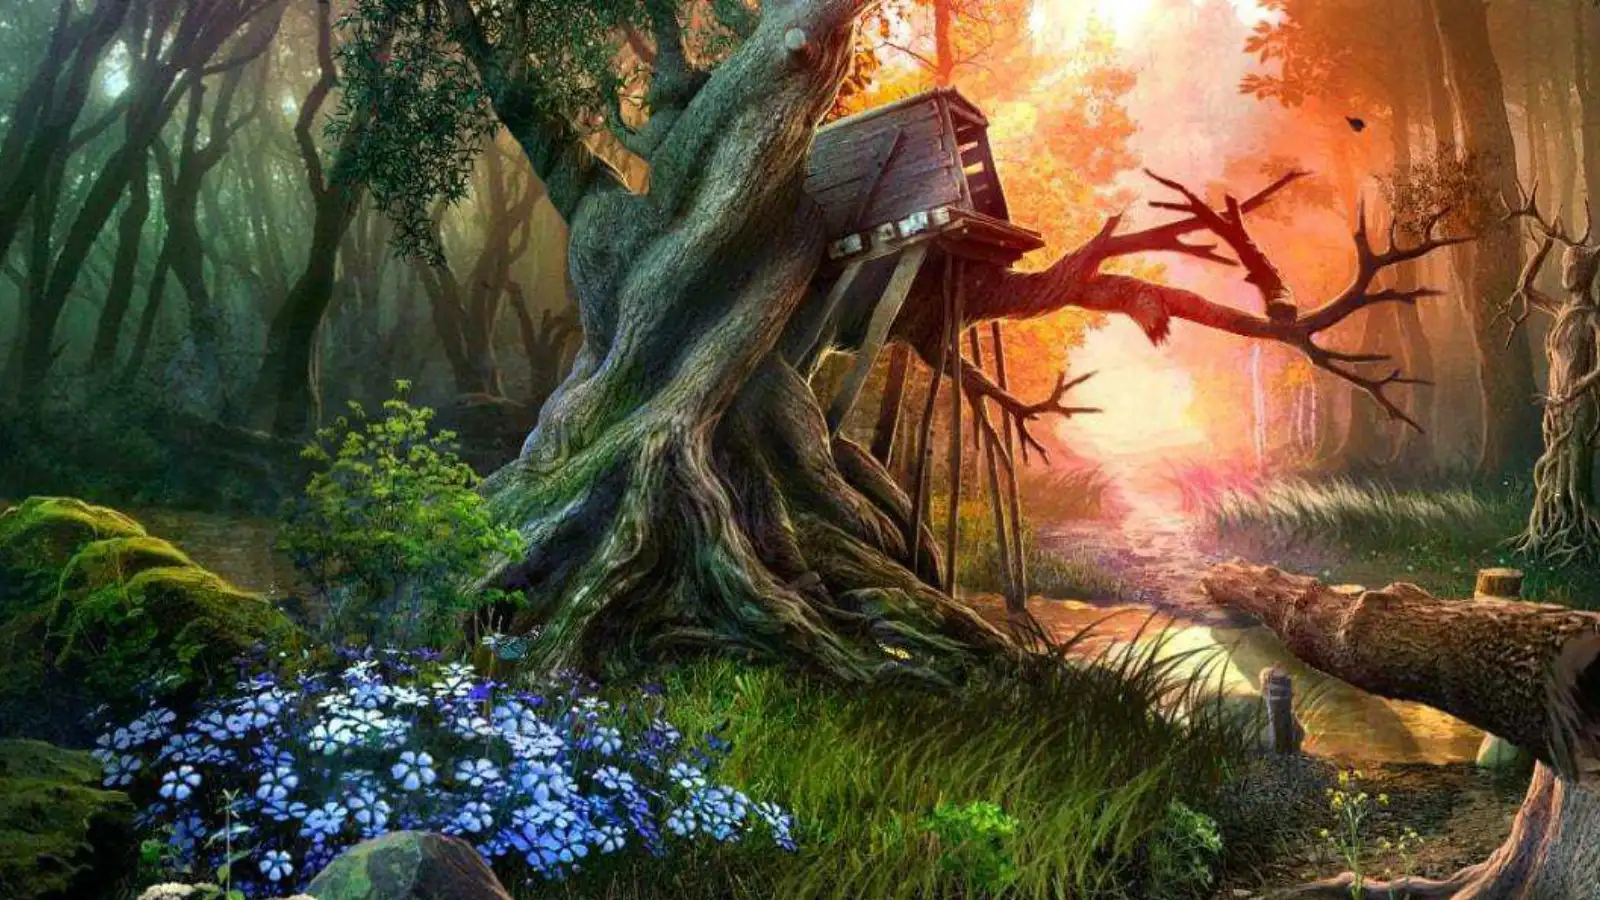
1.1. Forest
The sorceress cursed the chest of gold. Later, this chest was dug up by a researcher, picked up a coin, and turned to stone. From this, a harpy came to life in the Lost Lands, new problems began. We, in the role of the girl Susan, were walking around the museum, and, suddenly, through the mirror we moved to another world.
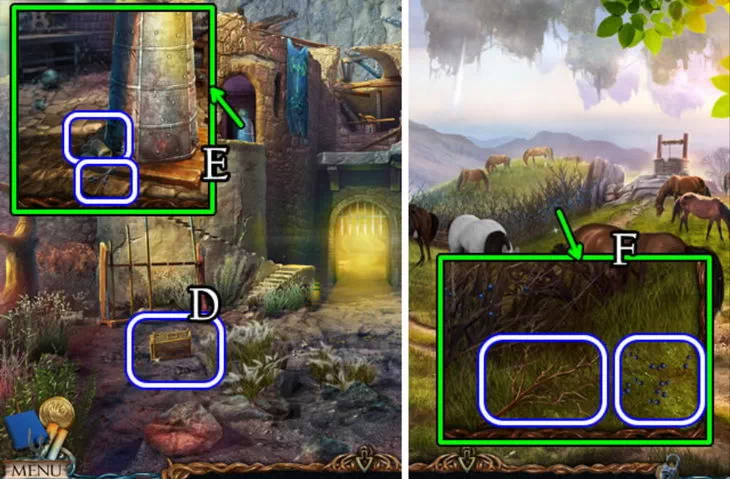
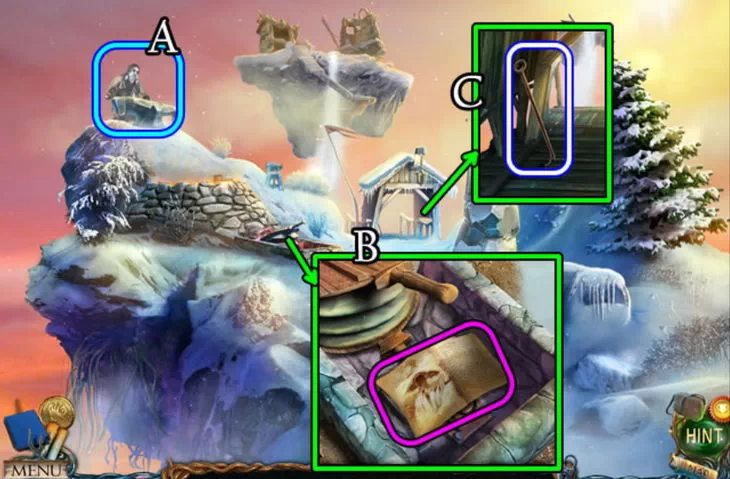
- A. We clear the branches in front of us, find our notebook (1/14).
- Secret. To the right of the stairs, in the grass is a ghostly snail (1/35).
- B. Having removed other branches, we select the handle of the hammer from the ground.
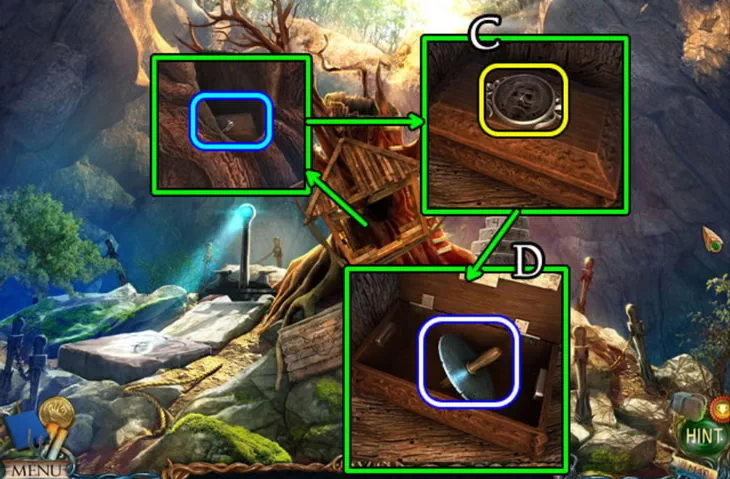
- CD. On the left we examine the disk, under it is a hammer (1/3), part of the map.
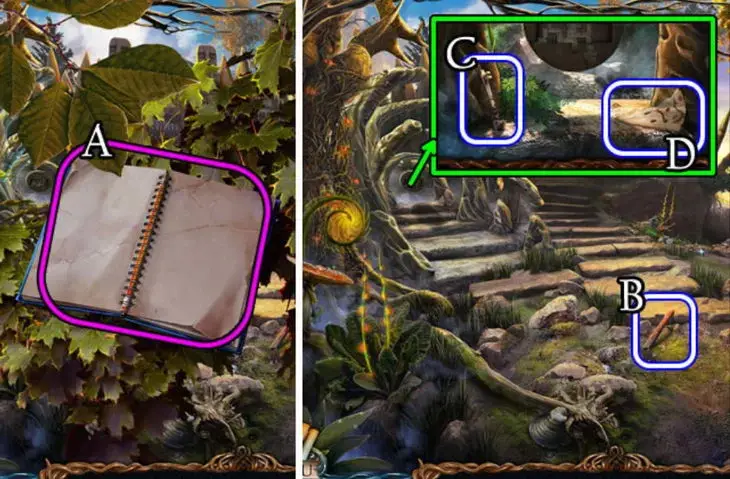
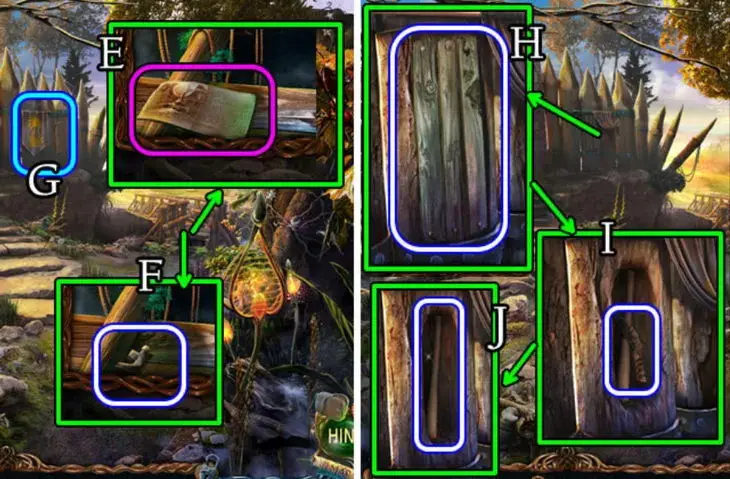
- EF. To the right is a destroyed bridge, in front of it is a manuscript (1/28), a hammer head. In inventory, combine the handle and striker to get a hammer.
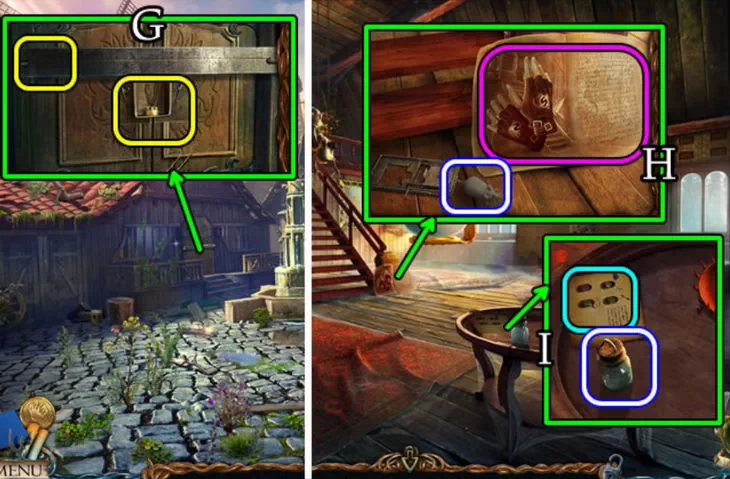
- G. To the right of the gate we move the flag, under it is a cache.
- H. We use a hammer on the cache, dismantle the nails, boards.
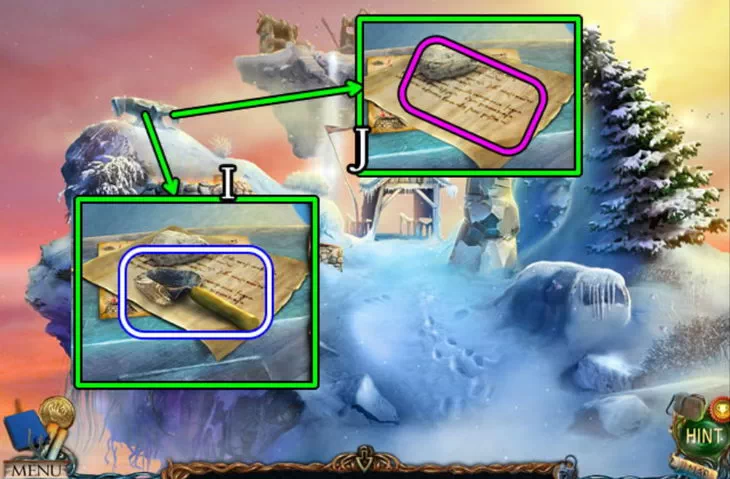
- IJ. Inside the cache lies a knife, a pickaxe handle.
1.2. hills
Lost Lands 3: Cursed Gold. Walkthrough
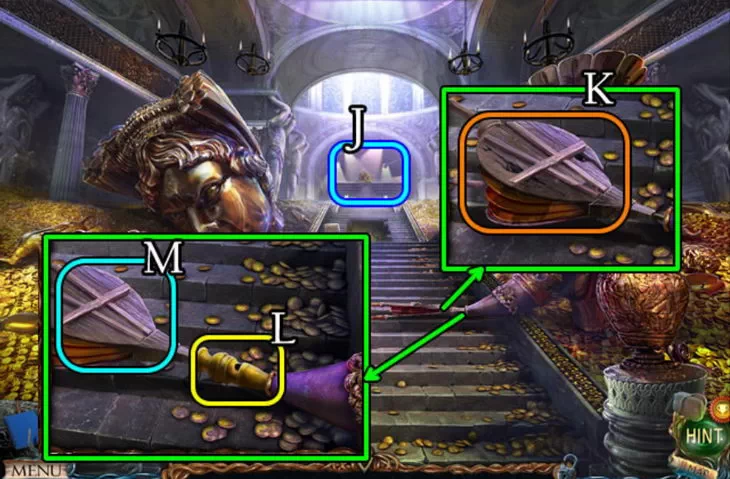
- K. On the bridge on the right we put the boards, insert the nails, nail it with a hammer.
- L. We will pass over the bridge into the field, from the well we will hear the cry of a girl.
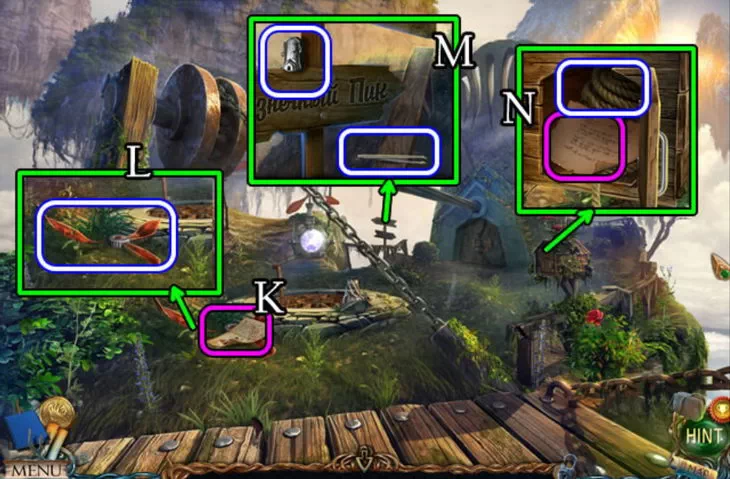
- Secret. Bottom left, on the road near the stone is a figurine (1/24).
- Secret. Bottom right, near the stone is a ghostly root (2/35).
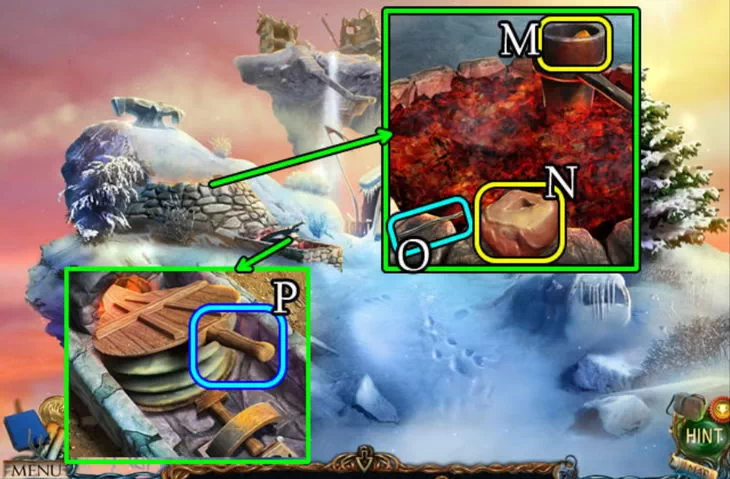
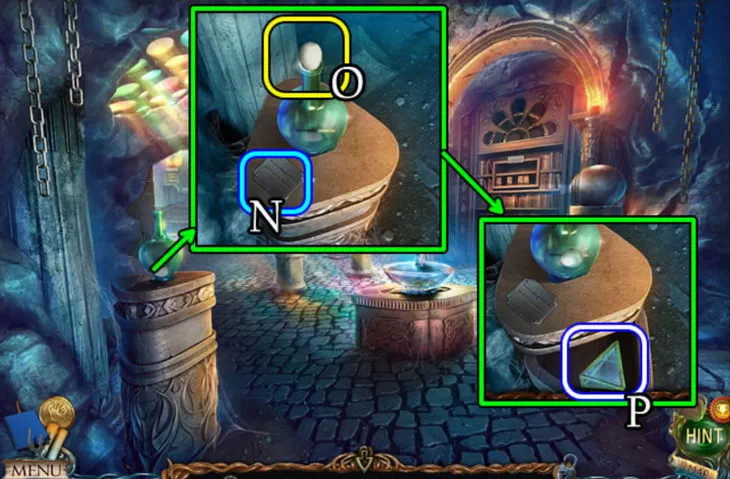
- MN. In the center from the trough we take the manuscript (2/28), the hammer (2/3).

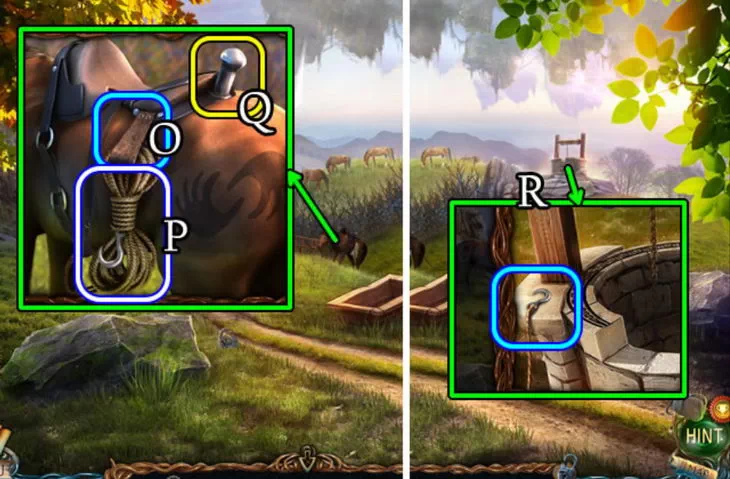
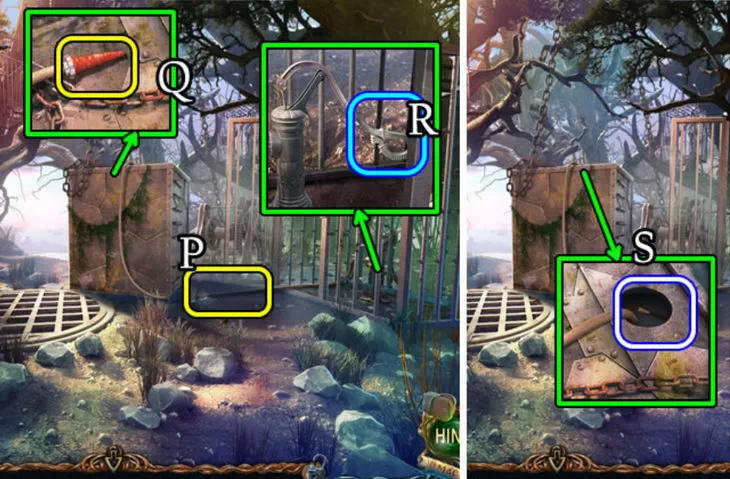
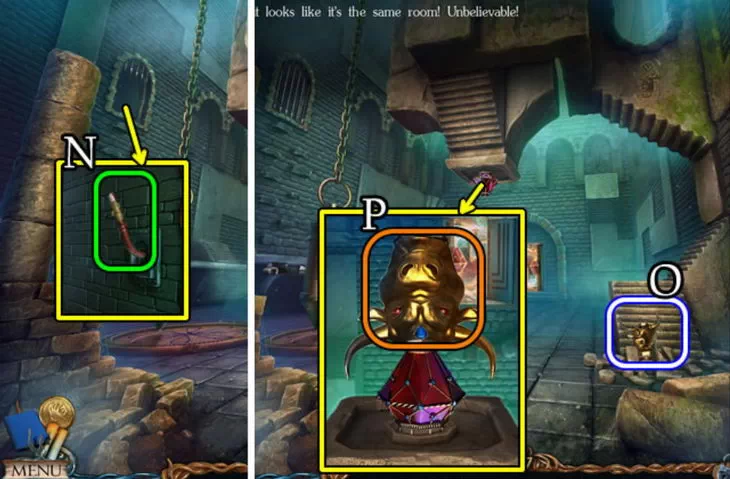
- OP. In the center we examine the horse, with a knife we cut off a rope with a hook from the saddle.
- Q. Immediately tie the rope to the top of the saddle.
- R. We hook the hook of the rope to the chain of the well.
- S. We clap on the sign on the horse, she will pull the child out of the well.
- T. The girl Fiora will give us a musical scheme for the gates of the city.
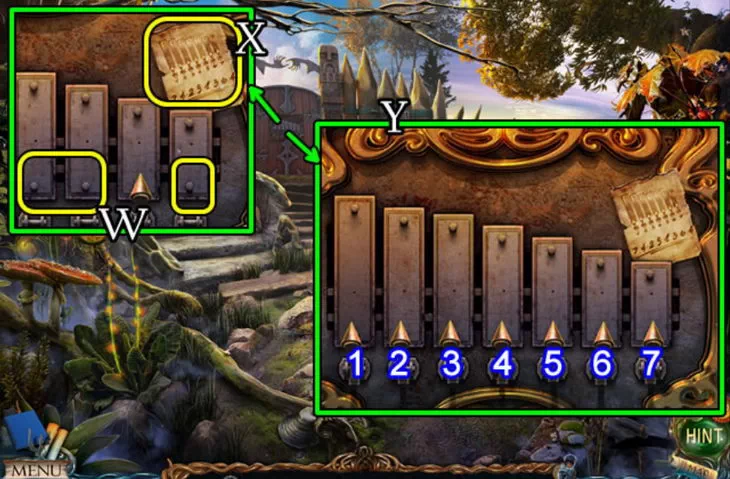
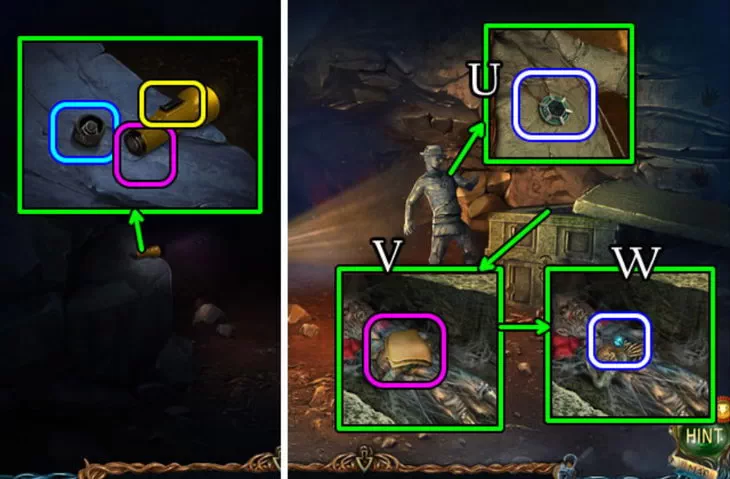
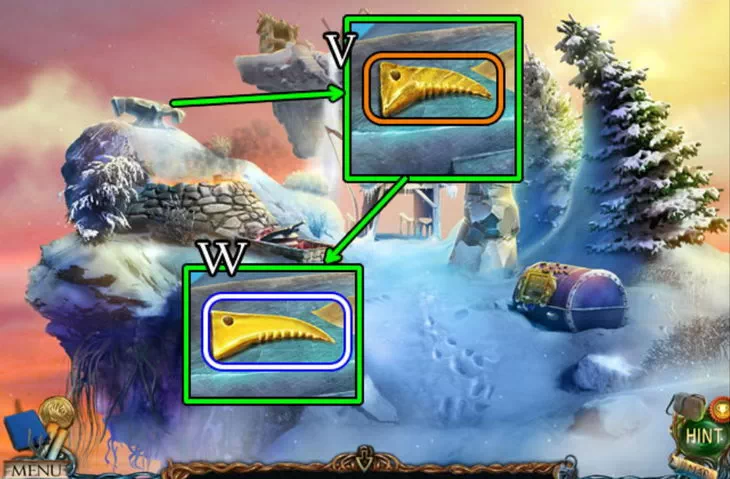
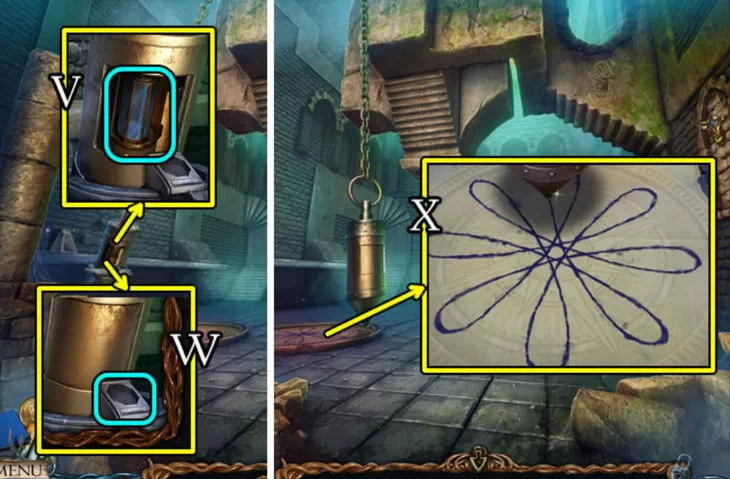
- UV. On the well we find a drawing, half of the wire cutters, a hammer (3/3).
- W. We go back to the gate, use the hammers and leaf.
- Y. On the hammer of the xylophone, enter the combination: 7-4-2-5-1-3-6-4.
1.3. Druid Village
Lost Lands 3 Guide
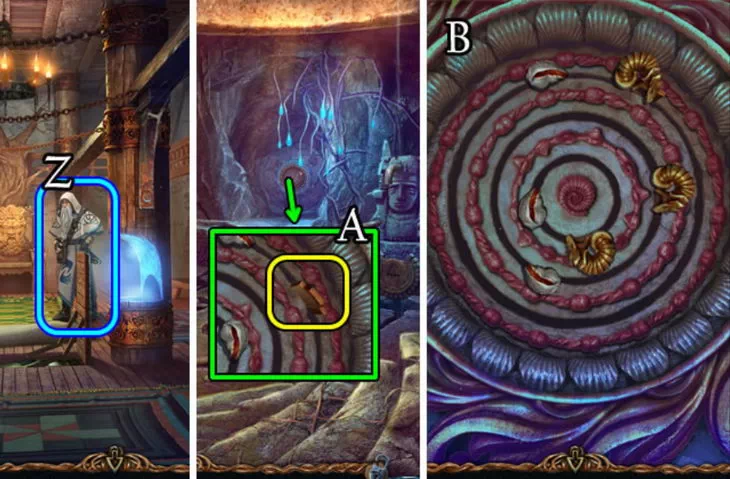
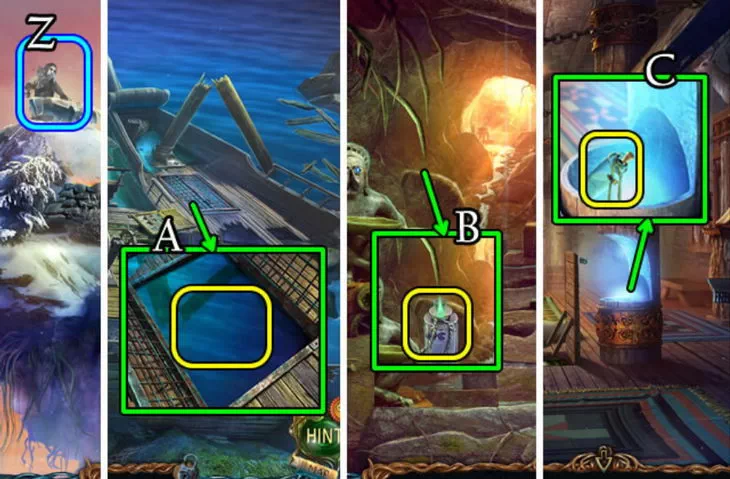
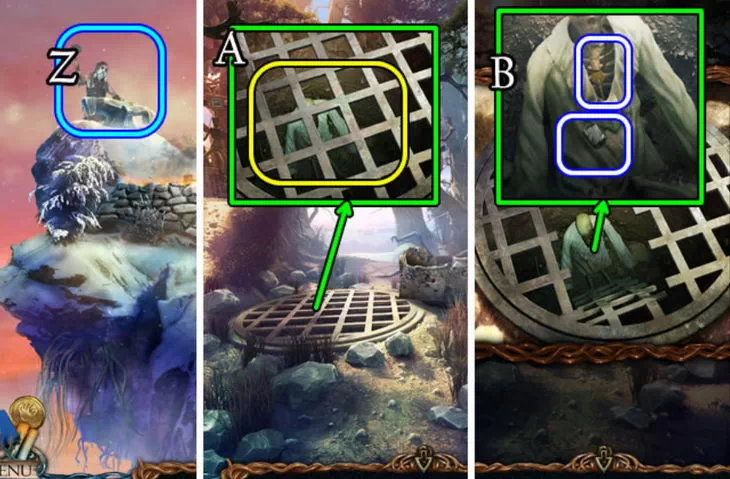
- Z.A. Inside the village we will meet Maaron - Fiora's great-grandfather. He will tell you about the harpy attack, ask him to heal the druid.
- Secret. On the bottom left, among the grass under a stump, there is a statuette (2/24) hidden.
- Secret. On the top left, on the window of the house is a ghostly pattern (3/35).
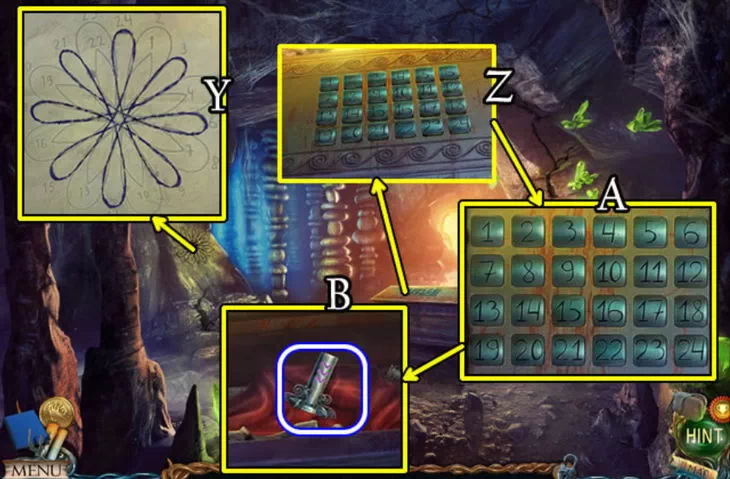
- BC. In the center we remove the blockage, take the manuscript (3/28), brackets.
- D. Take the 2nd part of the map from the fountain. We put brackets on the panel.
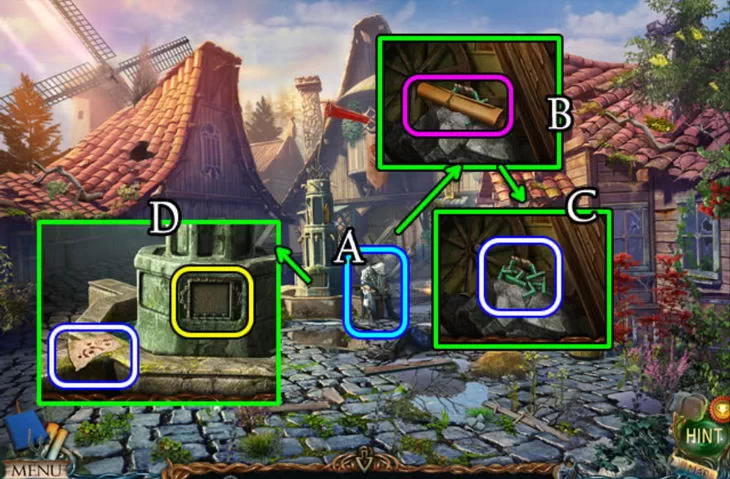
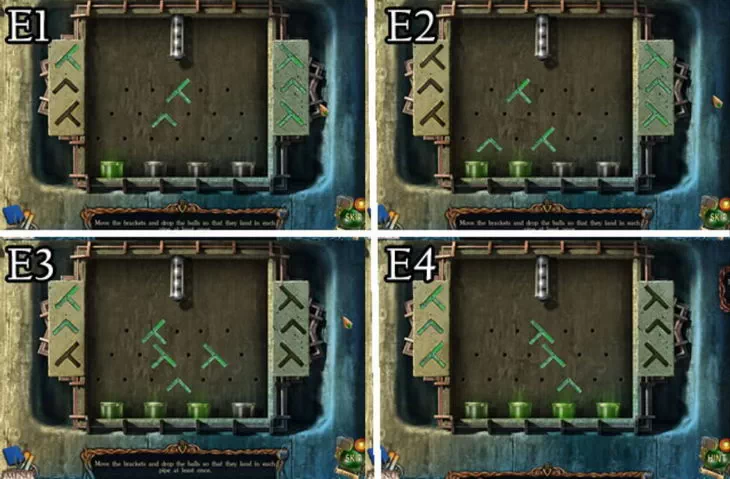
E. When placing the brackets, you need to roll the balls into all 4 holes at the bottom.
- F. On the left side of the stump are half of the wire cutters. We combine things, we get wire cutters.
- G. In front of the right house we will find a spear in the blood of a Harpy.

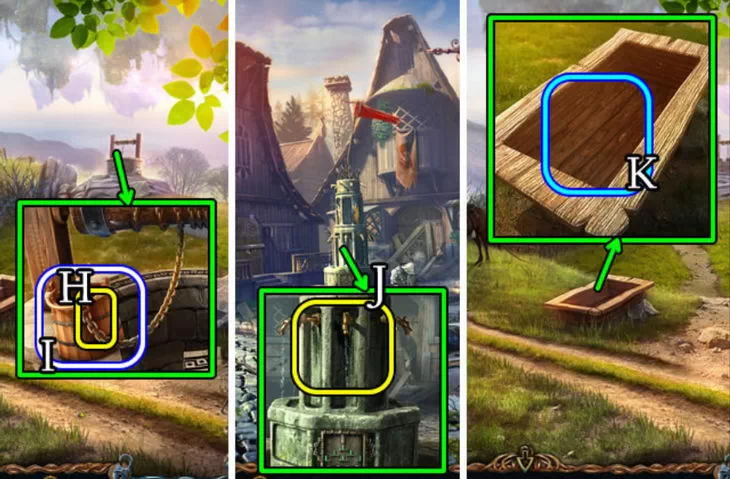
- HI. We go to the hills to the well, cut off the chain from the bucket with wire cutters.
- J. In the village we collect a bucket of water from the fountain.
- K. On the hills, in the center, pour a bucket of water into the trough. The horses will leave.
1.4. field of the dead
Lost Lands 3. Where to get
Secret. On the top right, above the chariot lies a ghostly shield (4/35).
Secret. On the left under the tent, near the stones, there is a statuette (3/24).
- L. Top left inside the tent to find 10 items:
- 1. Pincers - on the left on the top shelf, behind the jar. On the horse's skull below.
- 2. Bank - on the left on the middle shelf. To the container on the left.
- 3. Cloth - on the left side of the head of the skeleton. We put it under the container on the left, for honey.
- 4. Honeycombs - on the hive on the right, drive the bees away with smoke, cut with a knife.
- 5. Knife - on the left near the skeleton. We use it on a hive without bees.
- 6. Head - on the chest you need to find pairs of images.
- 7. Bowl - on the right side of the table with the skeleton. We put in front of a wooden barrel.
- 8. Burning broom - from above, on the lantern. Apply to the hive, drive the bees.
- 9. Tooth - at the bottom of the horse's skull, you need pincers. To the container on the left.
- 10. Broom - hanging from above on a rope. To the burning lantern above.
We put a bowl in front of the barrel, lay all the ingredients. We put the fabric, honeycombs on it, wrap it, squeeze it into a barrel. We close the lid, turn the valve, take the ointment.
- M. On the left near the cannon we select the core.
- N. Below in the center lies the manuscript (4/28).
- O. On the right under the chariot wheel we take stone feathers (1/6).
- P. From the top in the center, from the stone we take the broken pickaxe. We use a hammer on a pickaxe, knock out its old handle, insert a new one, hammer it with a hammer. Get a new pickaxe.

1.5. ancient cemetery
Lost Lands 3: Cursed Gold. What to do
Secret. A figurine (4/24) is hidden between the statue and the tombstone on the left.
Secret. To the left of the statue, in the background is a ghostly urn (5/35).
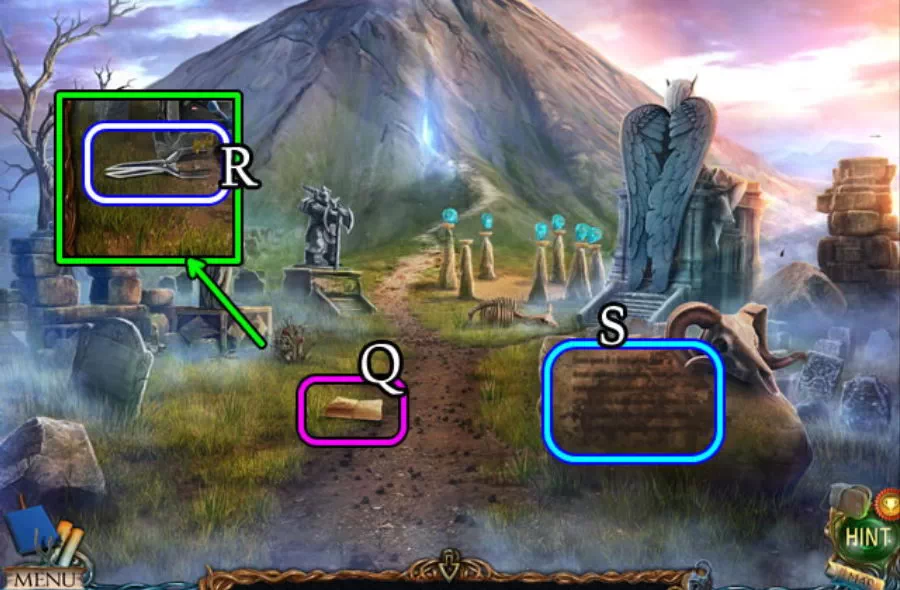
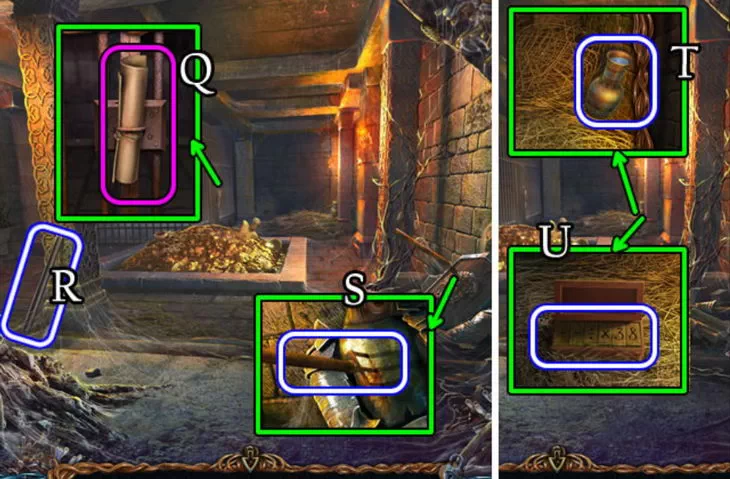
- Q. There is a manuscript (5/28) in the center on the road.
- R. On the left in front of the graves we tear out old flowers, we will find a pruner.
- S. On the right we read the inscription, you need to plant new flowers at the tombstones.
1.6. Volcanic cave
Lost Lands 3. Walkthrough of the game step by step
Secret. On the top left, near the top of the column is a ghostly object (6/35).
Secret. On the top left, on a horizontal rock, there is a figurine cannon (5/24).
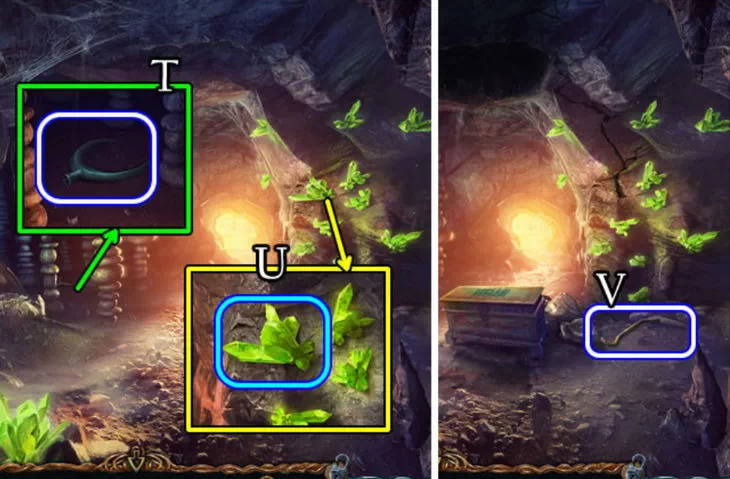
- T. Let's go to the cave. On the left under the columns we find the tip of the spear.
- U. On the right we inspect the rock, with a pickaxe we will get a volcanic crystal.
- V. On the bottom right on the ground we select a crowbar. Let's move on to the exit.
1.7. volcano mouth
Lost Lands 3. Where to find
Secret. On the right in the middle of the road is a ghostly idol (7/35).
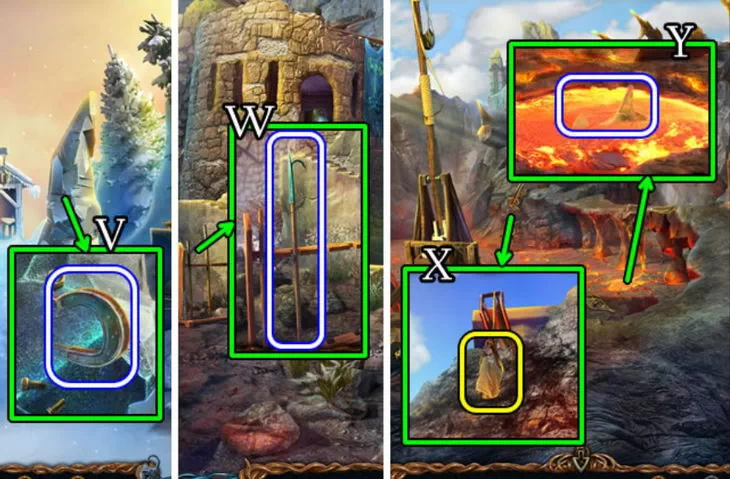
- W. There is a cliff on the way, inspect it, find a lever.
- X. There is a catapult on the left, lower it, take the belt, insert the lever.
- YZA. We put the core in the bag, press the lever, shoot at the rock.

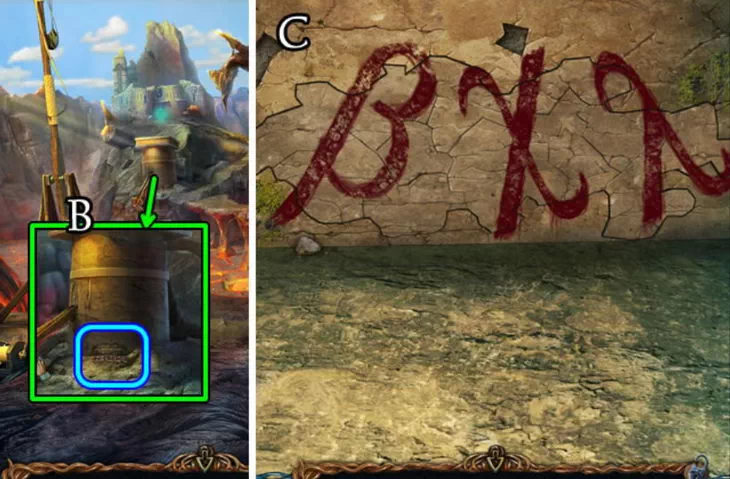
- B. On the fallen rock we can pass the cliff. We collect a puzzle near the tower.
- C. Memorize the symbols on the assembled puzzle: BXL.
1.8. Entrance to the arena
Lost Lands 3: Cursed Gold. How to do
Secret. Bottom center, near the left ladder is a ghostly barrel (8/35).
Secret. Bottom right, under the stairs is a statuette (6/24).
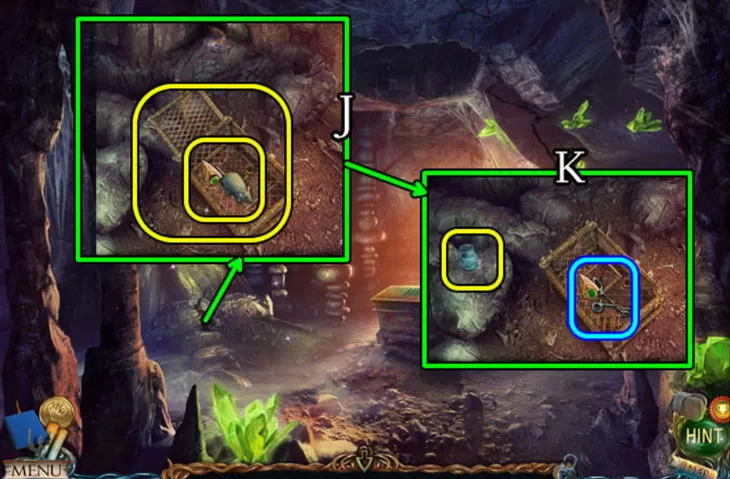
- D. Let's go to the castle, the gate will close. To the left on the ground is a trap cage.
- E. In the upper left window, near the iron maiden, there is a clip, a bandage.
- F. On the hills, cut off the thickets with pruners, pick up a branch, thorn berries.
1.9. Relic vault
Lost Lands 3. Passage of the game in pictures with a description
- G. In the village, on the left house we use a crowbar and a volcanic crystal.
Secret. Above, to the right of the shelf with candles, hangs a ghostly pattern (9/35).
Secret. On the left, under the stairs is a statuette (7/24).
- H. Inside, under the stairs we take the manuscript (6/28), the mouse.
- I. We take a vial from the table below, we read the recipe for the antidote.
- J. We go into the cave, put a cage on the left, put a mouse there, catch a snake.
- K. We put the bottle, with a clamp we transfer the snake to the bottle, we take the snake venom.
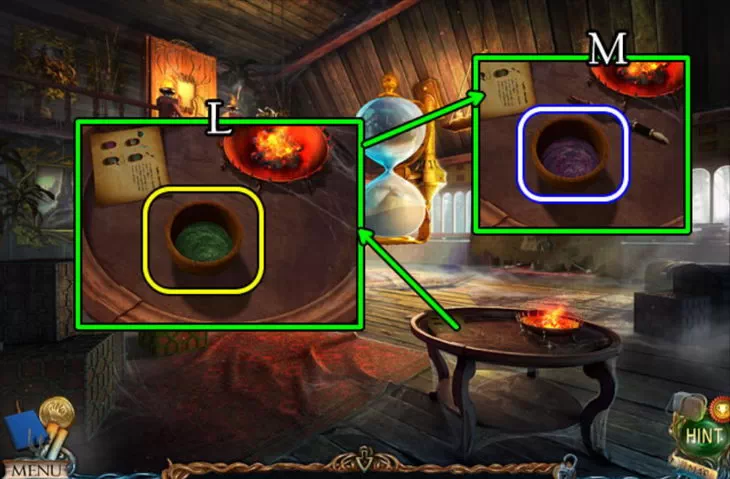
- L. We go to the storage, put the ointment on the table, add berries and poison to it.
- M. We stir the ointment with a spear with blood, we get an antidote.
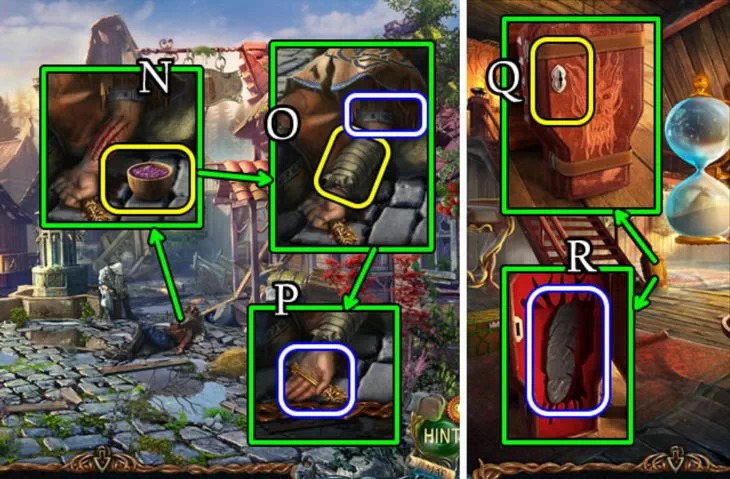
- N. On the street near the wounded put an antidote, lubricate the wound.
- OP. We bandage the wound, remove the 2nd belt from the top of the hand. We take the key from the hand.
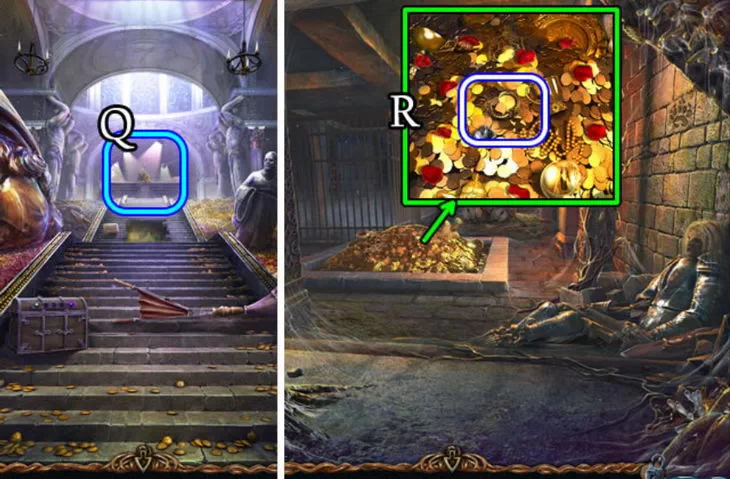
- Q. We go to the storage, use the key on the suitcase near the stairs.
- R. Take stone feathers (2/6) from the suitcase.
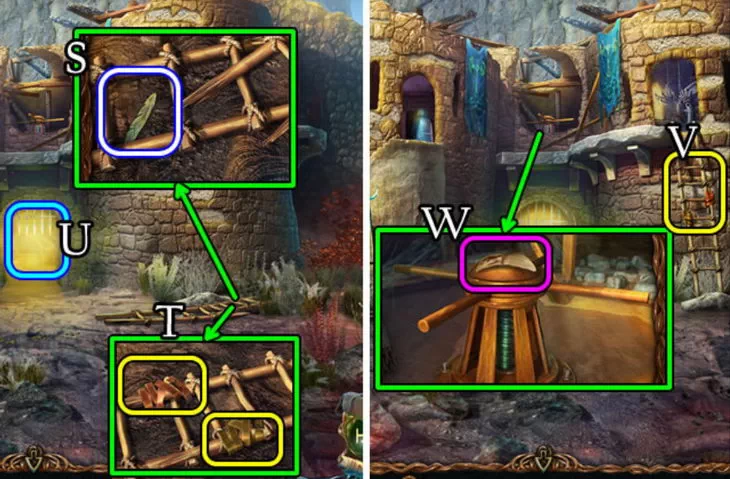
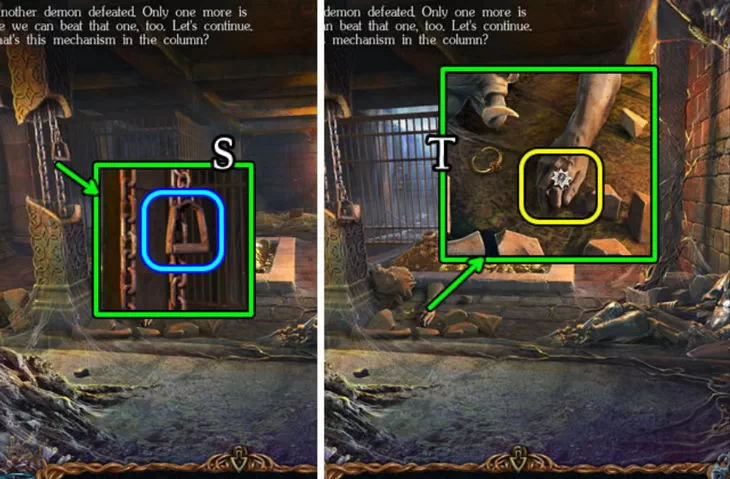
- S. We go to the arena, on the right near the stairs we take stone feathers (3/6).
- T. We fix the broken ladder with the help of belts, we get a ladder.
- U. If the gate is already locked, then on the right we can put a ladder against the wall.
- V. Above the stairs is a room where all our figurines are kept.
- W. At the top in the center we find the manuscript (7/28), turn the mechanism.
- XY. We put on the tip on the left of the spear, take two spears (2/2).
- Z. We insert two spears under the raised grate so that it does not close.

1.10. Arena
Lost Lands 3. How to assemble the mosaic
Secret. To the right, above the minotaur, on a column is a ghostly bear (10/25).
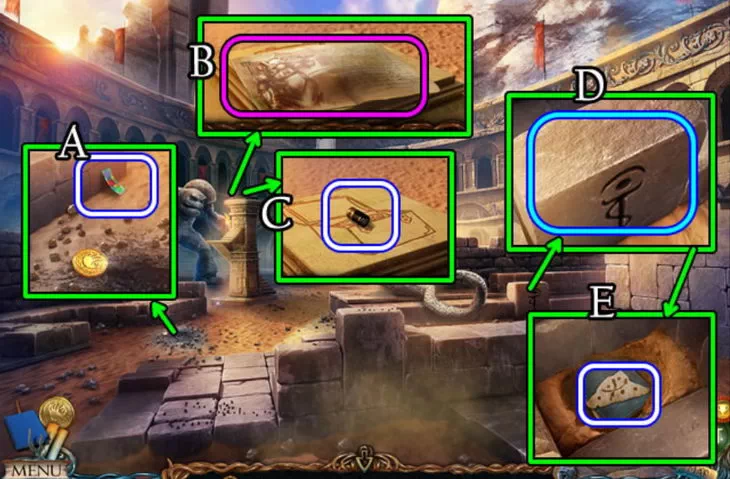
- A. On the bottom left, near the coin, we will find our chewing gum (2/14).
- BC. On the left column from the top we take the manuscript (8/28), the battery (3/14).
- D.E. To the right of the tail, among the bricks is the 3rd part of the map. We unite all 3 parts of the map. We chew the gum, in the chewed form we use it to glue the card.
1.11. Lepros dwelling
Lost Lands 3. Paint Passage
- G. We go into the cave, on the columns we use the collected map. After passing by the necessary columns, we will open the portal, we will get into an abandoned room.
Secret. On the top left, on top of the cabinet is a figurine (8/24).
Secret. To the left of the edge on the bedside table is a ghostly mug (11/35).
- H. On the right from the bed we take a canister of gasoline.
- I. On the left, open the cover of the generator, fill in gasoline, close it.
- J. Pull the red handle three times, start the generator, turn on the light.

- K. There are 10 items to find on the shelves on the left:
- 1. Insulating tape - in the center, near the safe. On the wire on the table, isolate.
- 2. Lever fork - in the barrel on the right, you need a hook on the chain.
- 3. Bowl - bottom left, stands on a box. Pour into the hole under the table.
- 4. Chain and hook - in the center on the top shelf. Apply to the barrel on the right.
- 5. Nippers - on the right on the 2nd shelf. On the wire from above.
- 6. Toggle switch - in the desk drawer, you need to saw off a piece of wood.
- 7. Hacksaw - add a canvas, saw off a piece of wood next to it.
- 8. Wire - on the top shelf, cut off with wire cutters. On the table below.
- 9. Hacksaw blade - in a box, you need a key. We use it on a hacksaw.
- 10. Key - under the table in the pit, you need water. On top of the box.
Having collected everything, enter the code into the safe: 279. We will get stone feathers from it (4/6).
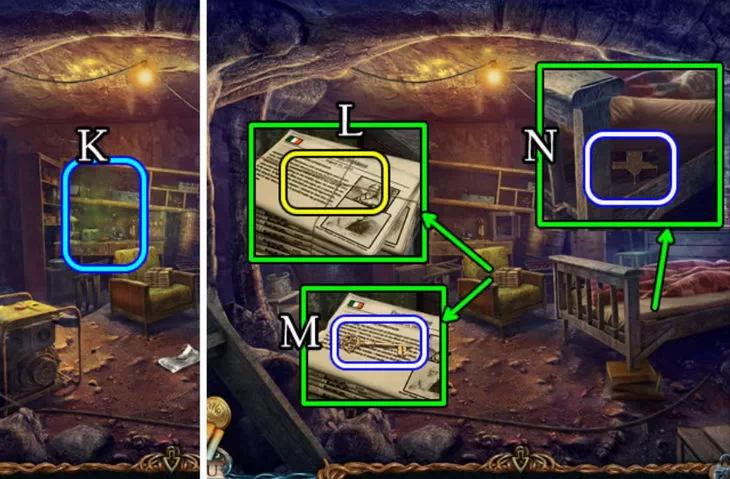
- L. In the center on the chair is a bunch of newspapers, cut with a knife, we read about the archaeologist.
- M. Find the key under the newspaper.
- N. Once again we examine the bed, at the angle of the mattress there is a stone figurine.
- OPQ. On the table with paint, use the key, get the puzzles.
- R. On the left on the wall is a circle of letters, enter the password from the volcano: BXL.
- S. A recess will open, place the puzzles there.
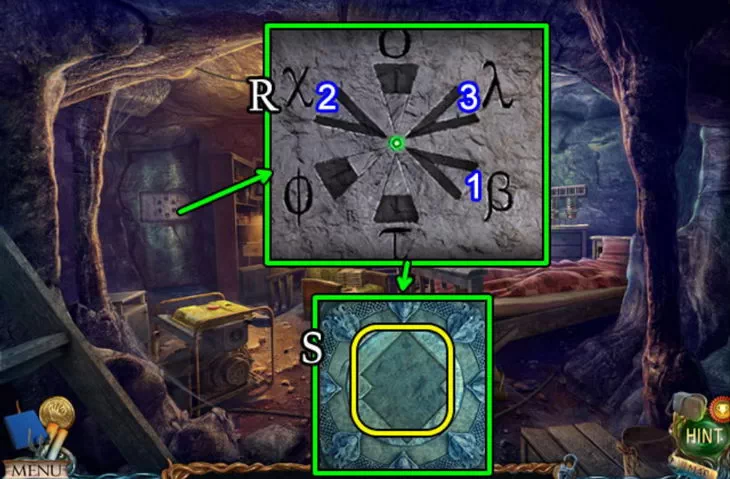
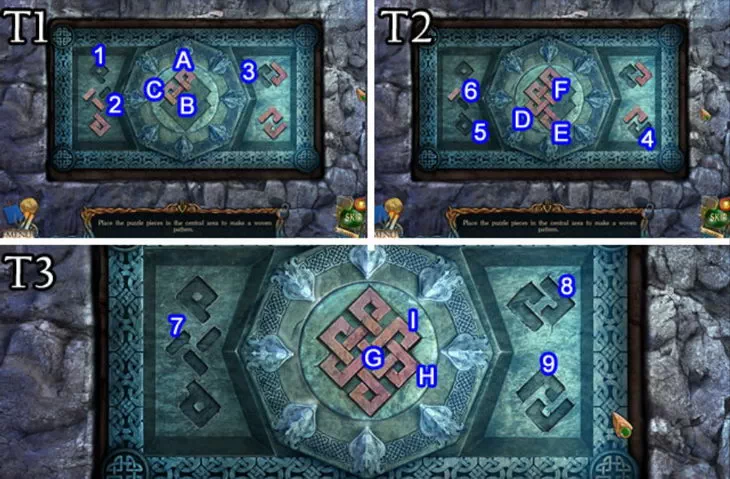
- T. We put the figures, focusing on the dents in the recess.
- (1-A) - (2-B) - (3-C) - (4-D) - (5-E) - (6-F) - (7-G) - (8-H) - (9 - I).
1.12. Tomb of Lepros
Lost Lands 3
Let's enter the dark cave. We disassemble the flashlight, take out the old one, put in a new battery (it lies on the Arena, on top of the left column). We close the flashlight, press its button, the light will appear.
Secret. To the left of the flashlight, a ghostly deer (12/35) is drawn on the rock.
Secret. At the bottom right, near the stone, there are columns - a statuette (9/24).
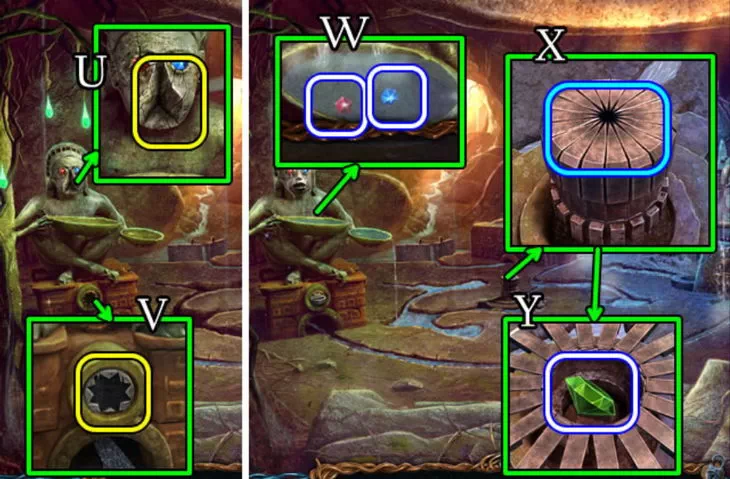
- U. From the neck of the petrified archaeologist we remove part of the medallion.
- VW. Inside the tomb is a manuscript (9/28), part of a medallion. We unite.
- X. In the village we speak with Maaron, we get stone feathers (5/6).
- YZ. In storage, turn the hourglass 2 times. On their upper part we use the combined medallion.
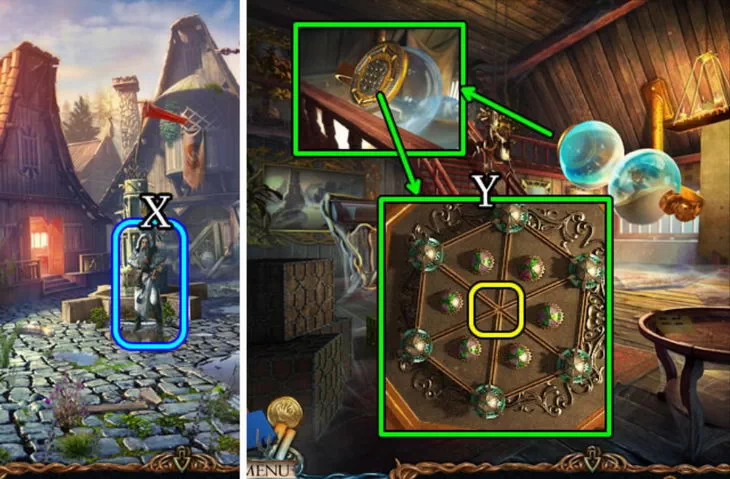
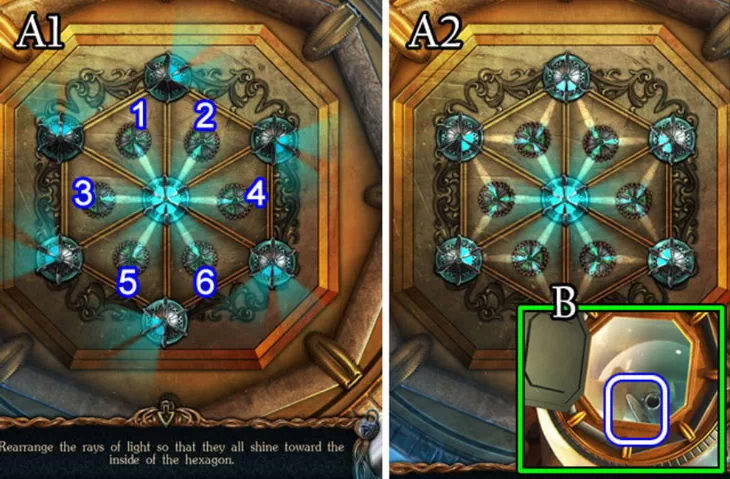
- A. Solve the puzzle on the hourglass. We rotate the small balls in the center so that on all the side balls the light is directed to the center. To achieve this, you need to do it in at least 7 moves. Solution: 6-1-5-4-3-6.
- B. For solving the problem we get stone feathers (6/6).
- C. We go to the cemetery, on the right we insert stone feathers into the wings of an angel.
- D.E. The crypt will open, take the 2nd figure, insert both of them into the recesses.
- F. Take the tree mask from the crypt.

- G. In the storage, on the top left, insert the mask into the slot, the cabinet will open.
- H. There are 10 items to find inside the cabinet:
- 1. Green chip - in the center on the wall, remove the flask, insert 2 medallions.
- 2. The left side of the medallion - on the left in a solidified substance, you need a hammer.
- 3. Stone - on the right side of the amulet, you need the tip of the amulet. For a bottle.
- 4. The key is on the right in the ball, you need a glass cutter. Apply to the box in the center.
- 5. Flask - hangs in the center, you need a stone from the amulet. In the box below.
- 6. Red chip - on the right in the ball, you need a glass cutter. In the box below.
- 7. Tip - on a hanging amulet, tear off the blue tip. to the center of the amulet.
- 8. The right side of the medallion is on the left near the scrolls. In the center, behind the flask.
- 9. Hammer - in the central drawer, you need a key. On the frozen left.
- 10. Glass cutter - top left, on the shelf near the figurine. On the ball to the right.
Putting 2 chips and a bottle in the box, we get anti-magic gloves.
I. We go to the Arena, select the cursed coin. All monsters will come to life. Let's go back to the village, a harpy will attack there and take away the girl Fiora.
1.13. Elder's House
Lost Lands 3 Walkthrough in Pictures
- J. In the village, you can now enter the central building.
- K. We speak with Maaron, he will send us to the Floating Islands.
Secret. On the top left, on top of the column is a ghostly lizard (13/35).
- L. On the left on the table we take our nail polish remover (4/14).
- M. In the center from the throne of the druids we take the buttercan.
- N. To the right of the book we take the manuscript (10/28), next to the right is a candle.
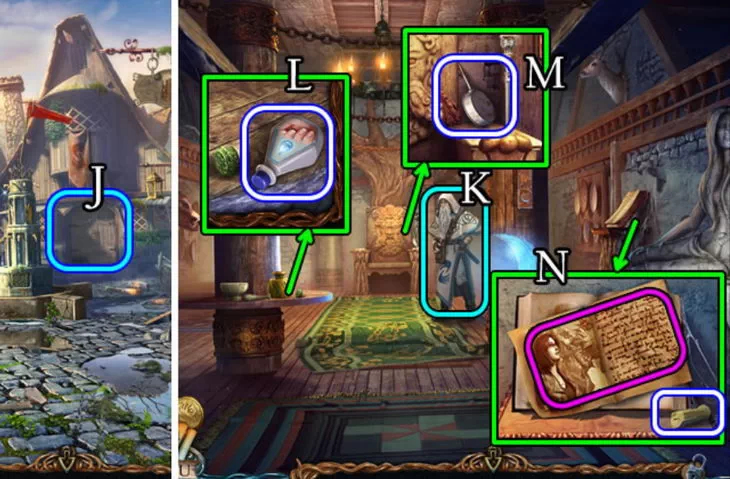
- O. In the vault, on the table we set fire to a candle, we get a burning candle.
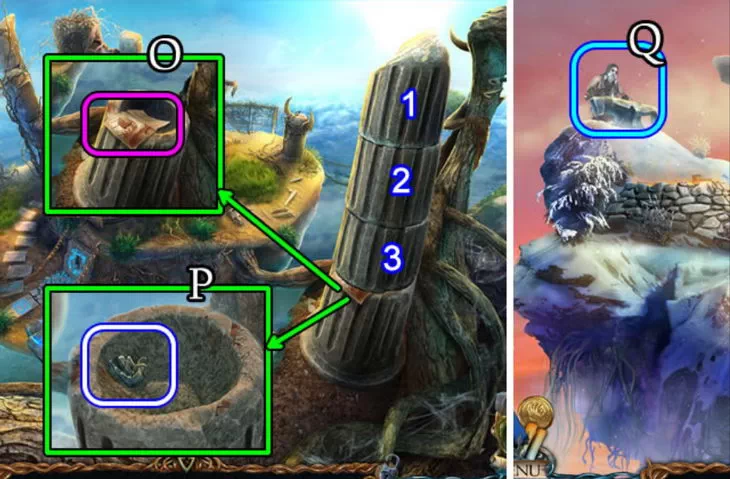
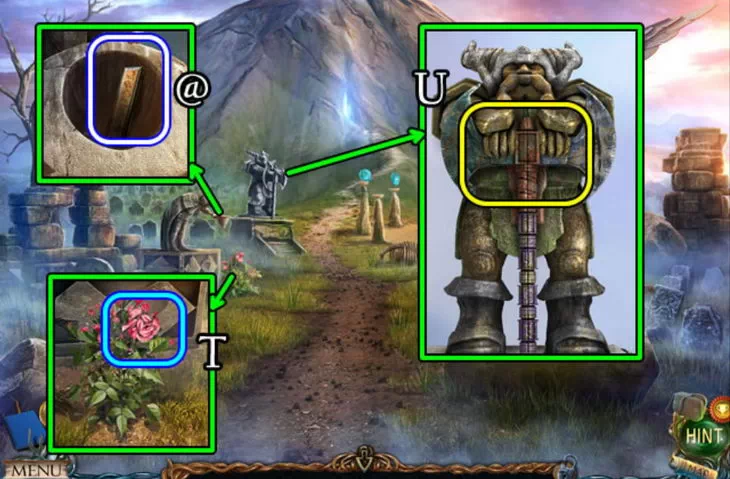
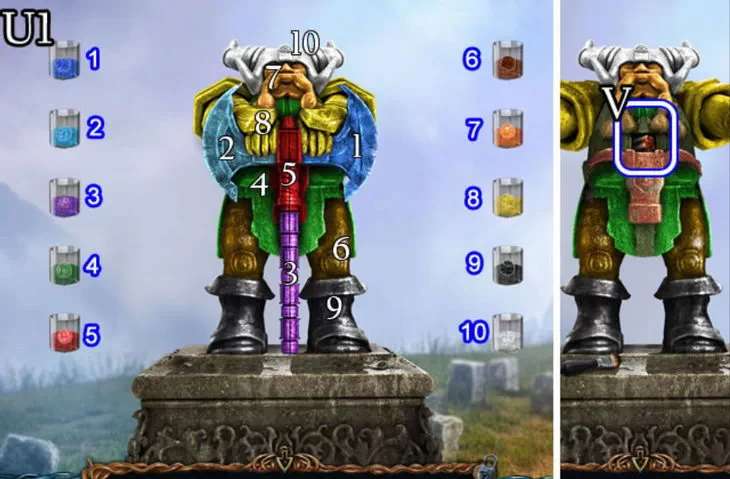
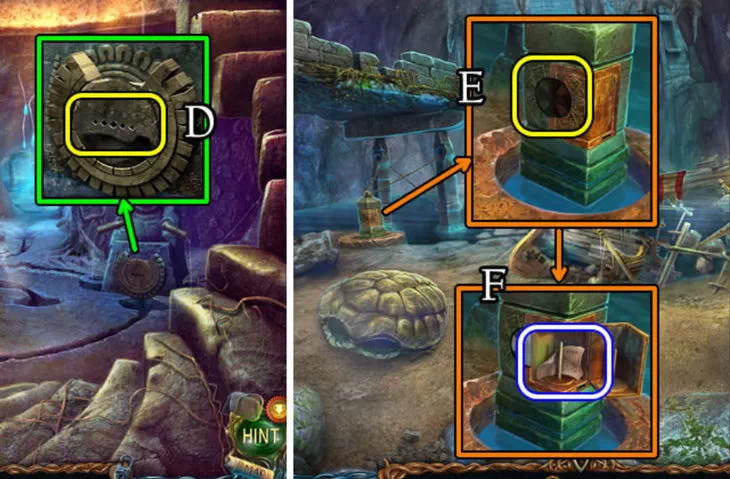
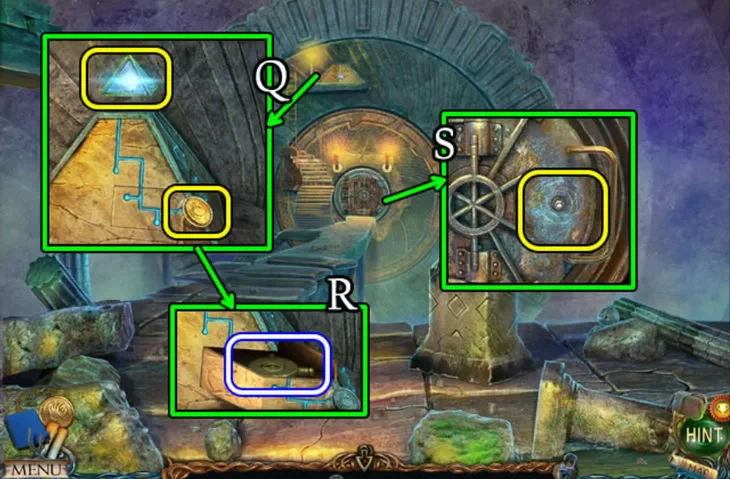
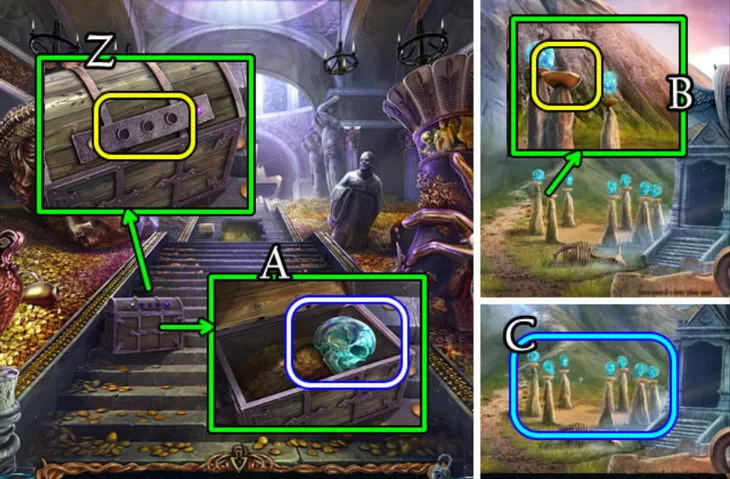
- P. We put a candle in front of the model of the tower, inside the powder flask.
- QR. We push the candle inside, at the top of the tower we will see a figure of a man.
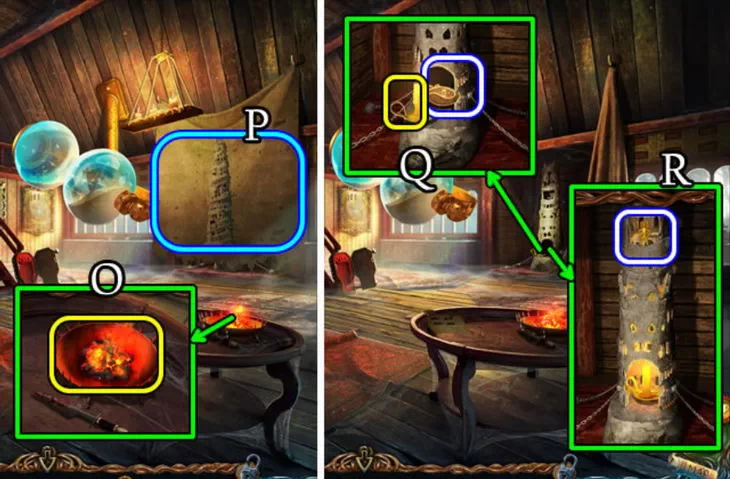
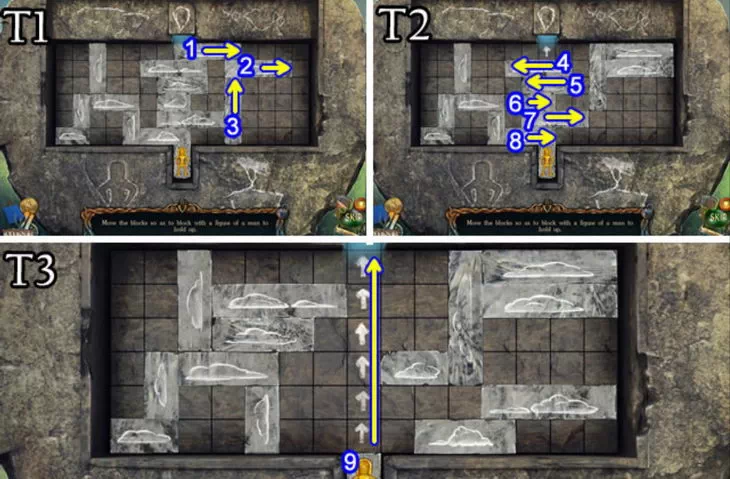
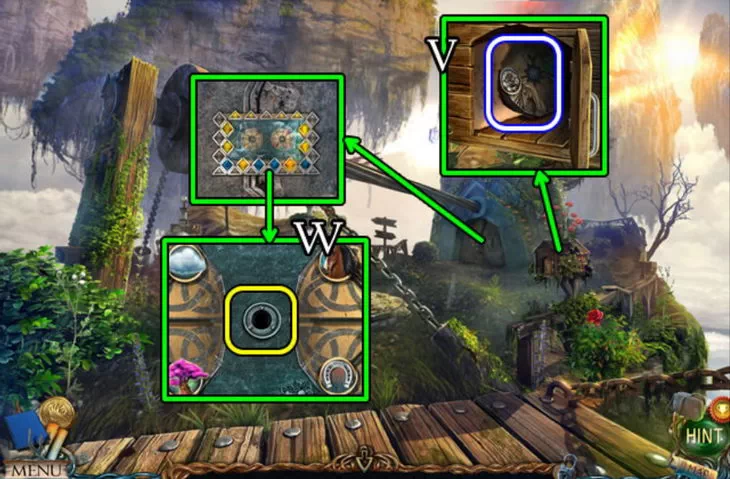
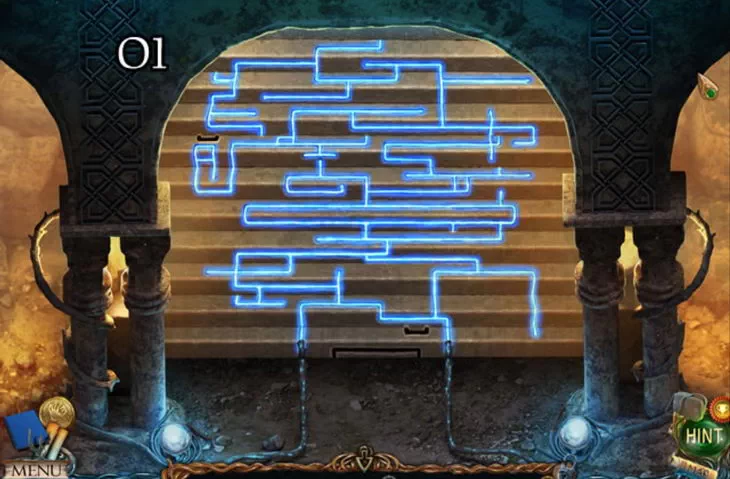
- S. We leave the village, on the left we insert the figure into the circle.
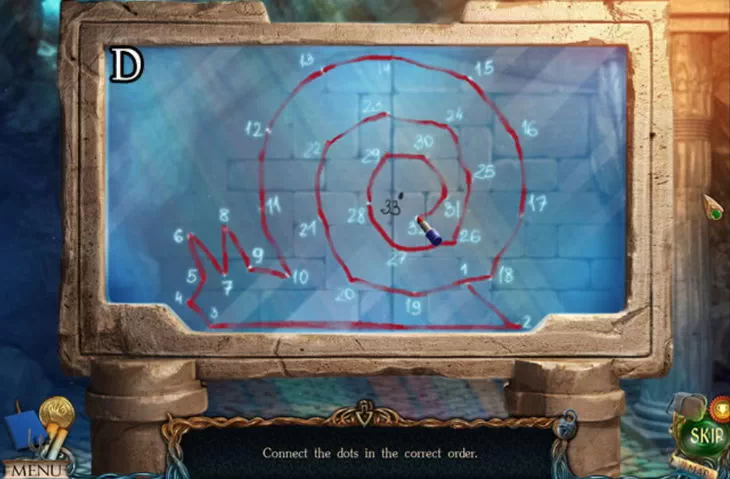
- T. Solve the block puzzle. We need to clear the way up for the little man. Solution: 1-2-3-4-5-6-7-8-9.
Chapter 2
A small settlement on the edge of the forest, built by a guild of forest druids. Mostly men live here, studying and practicing magic, alchemy, astronomy, potion-jam and many other sciences. As in any other society, the guild of druids has its own Elder. The last one appeared in the guild 20 years ago. At his death, he was brought to this village after a fight with the dark forces that threaten the Lost Lands. The druids took him out, he stayed in the guild and eventually became the leader he is to this day.
Secret. At the bottom right, above the stone, there is a statuette (10/24).
Secret. On the bottom left, a ghostly flower grows under a tree (14/35).
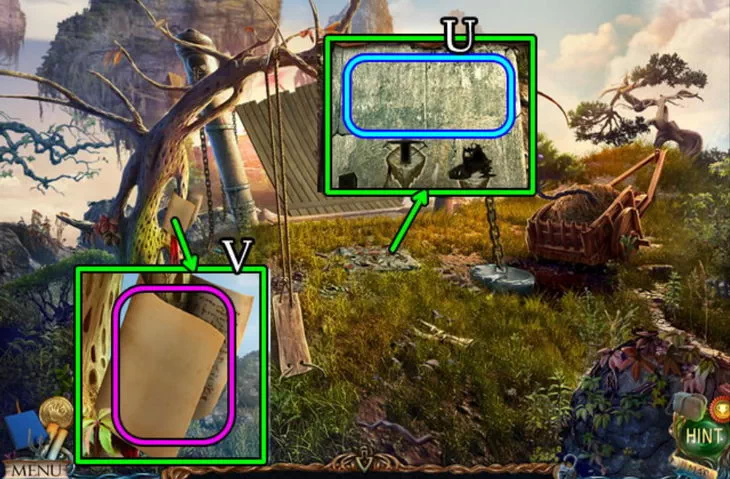
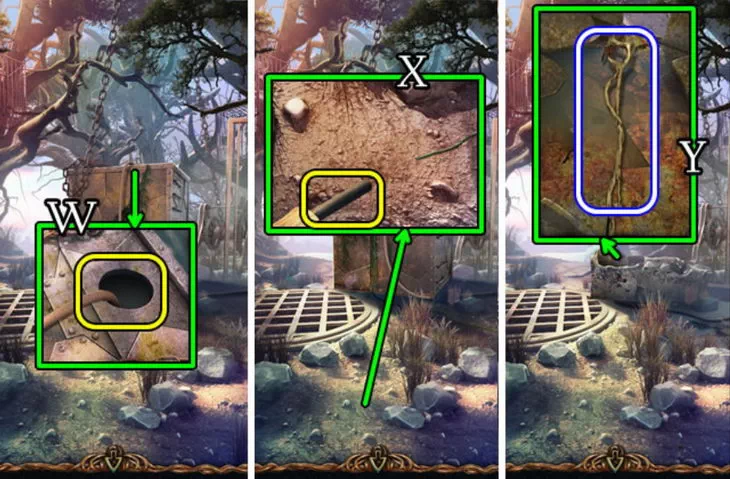
U. Through the portal we get to the island. In the center on the ground we read a map of the islands.
V. On the left from the tree we remove the manuscript (11/28)
W. On the left we inspect the swing, we tie the fallen rope.
XY. We swing the swing, hit the ax at the top, pick it up from below.
Z. At the bottom of the grass we raise the figurine.
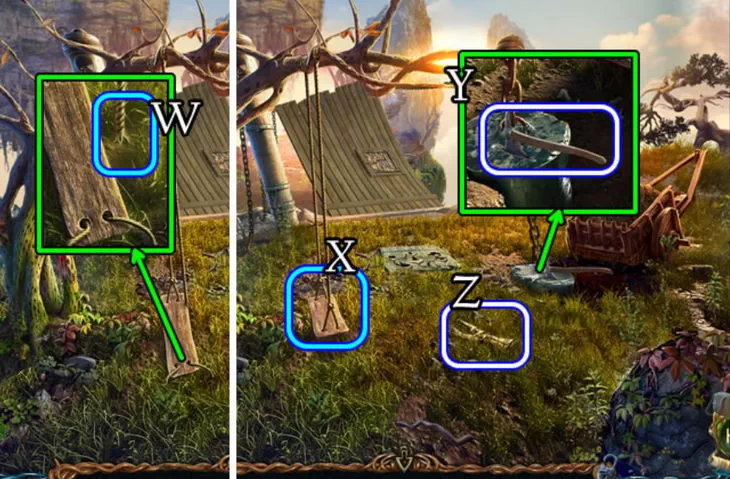
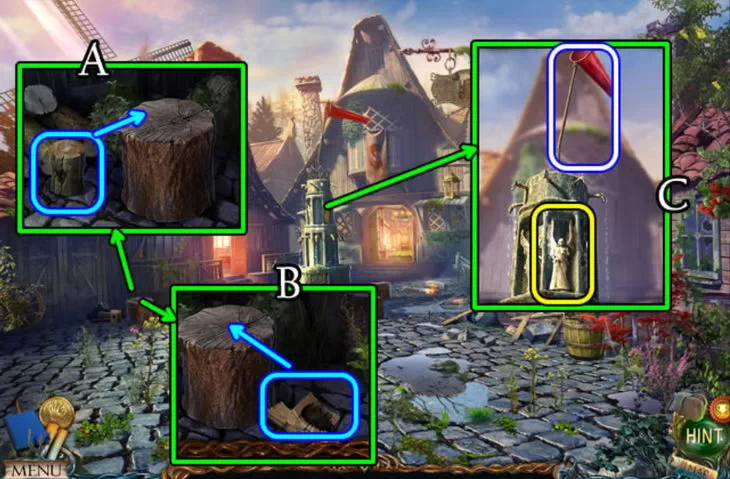
AB. We go to the village, on the right we use an ax 3 times to chop wood.
C. We put a figurine on top of the fountain, the fence will be removed, we remove the weather vane. AT
tie it in the inventory, you get a net.
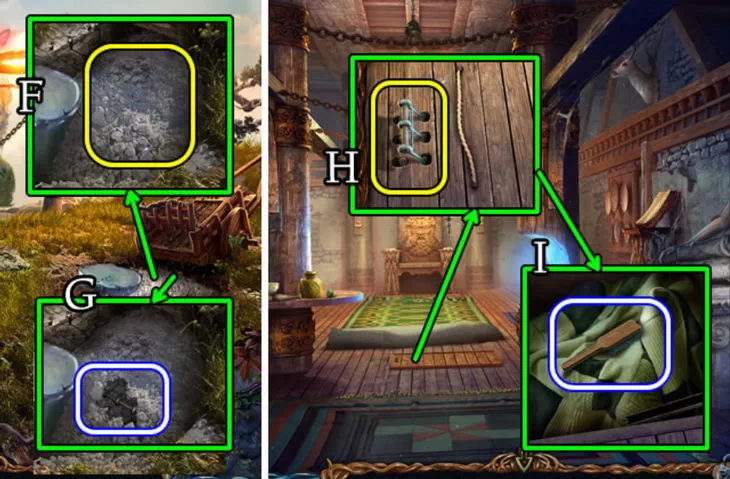
D. On the island, in a wooden wall, there is a hatch, lubricate its latch with an oil can.
E. Behind the hatch we will see a hanging seal, we take it out with a net.
F. We go to the volcano, on the right we insert the seal into the stone head.
G.H. Inside the stone we find the manuscript (12/28), the core of the flame.
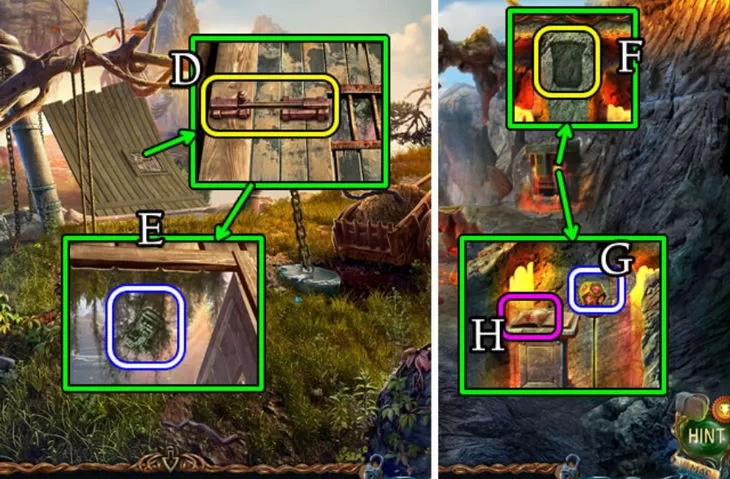
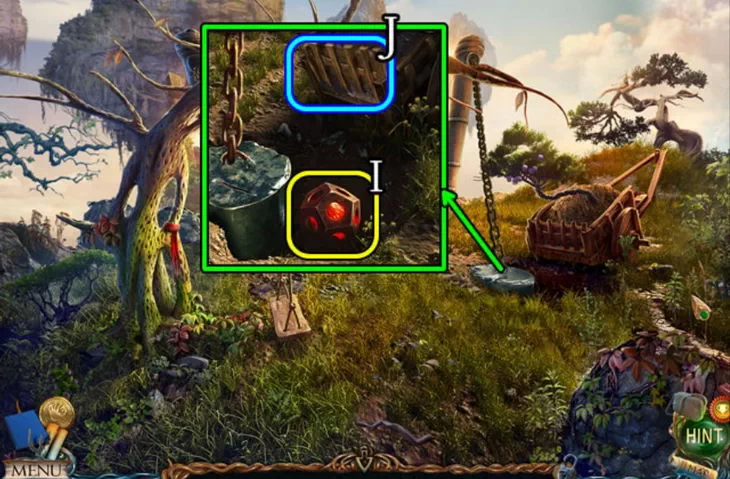
I. On the lower island, we put the core in a hole, we fill it with earth from the cart.
J. The soft metal will melt, opening a bridge to the next island.
2.2. Fork
Lost Lands 3: Cursed Gold. Walkthrough
Secret. On the left, a ghostly grape (15/35) hangs on the bottom of a pillar.
KL. At the bottom left we take the manuscript (13/28), broken blades.
M. We examine the pointer in the background, take the chip, tweezers (5/14).
N. On the right inside the mail we read the letter, we take the rope. Pour the remedy on it
removing varnish, you get an alcoholized rope.
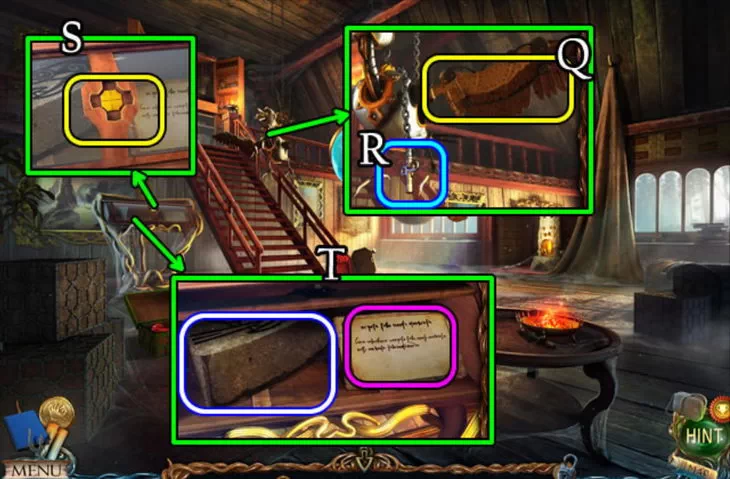
O. In the vault, on the left side of the chest, open the lock with tweezers.
P. Inside the chest, take a round firework.
Q. On the battlefield, put gunpowder into the cannon, insert the processed rope.
R. We roll a firework shell into the muzzle of the cannon.
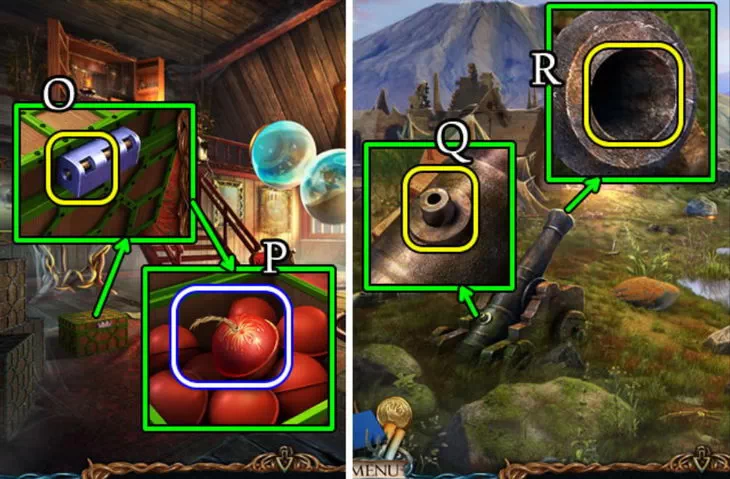
S. Throw the other end of the rope into the lava under the stone. The gun will fire.
T.U. On the top right, we drive away the crow with a branch, the skeleton has a mechanical eye.

VW. At the fork we look at the mail, after the signal in the form of fireworks, the gnome sent us
part of the mechanism. We insert it into the pendulum panel on the right.
X. On two circles, you need to arrange all the symbols so that they fit the drawings
outside of circles. To achieve this, you need to do it in less than 70 moves. Solution (49
moves):
ACB, ACCB, ACB, ACCB, ACB, ACCB, CB, AB, CB,
CCAA-AA-AAB, AACCCB, CCCCB, CB
2.3. blacksmith peak
Lost Lands 3 Guide
Secret. On the top left, above the stove and to the left of the flag, there is a statuette (11/24).
Secret. Bottom center, ghostly footprint in the snow (16/35).
A. We can go through the metronome, meet a gnome named Breiloff.
B. We examine the oven, take the manuscript below (14/28).
C. On the right inside the wooden balcony we take the hook
D. We go back to the dark cave, we will knock out a piece of coal from the rock with a hook.
E. We take the broken blades and coal to the blacksmith, we get the blades.
F. At the fork, install the blades on the windmill on the left. There will be a way forward.
2.4. Hanging gardens
Secret. On the right, under the cave is a statuette (12/24).
Secret. In the top center, near the boards are ghostly flowers (17/35).
G. There are 10 items to find in the cave on the right:
- The key is in the bowl, you need to get it with a rope with a nail. Box below.
- Stone with a picture - on the right behind the branches, you need an ax.
- Square key - lever on the cube in the center, we solve the tags.
- Rope and hook - rope on the right, we weigh it on a nail, pull it out with a crowbar.
- Rope - on the right, on a statue with a jug. We weigh on the nail on the left.
- Crowbar - in the center, near the stone cube. On a nail with a rope on the left.
- We put the square key and the stone in the wall on the left, we get the figurine of the mother.
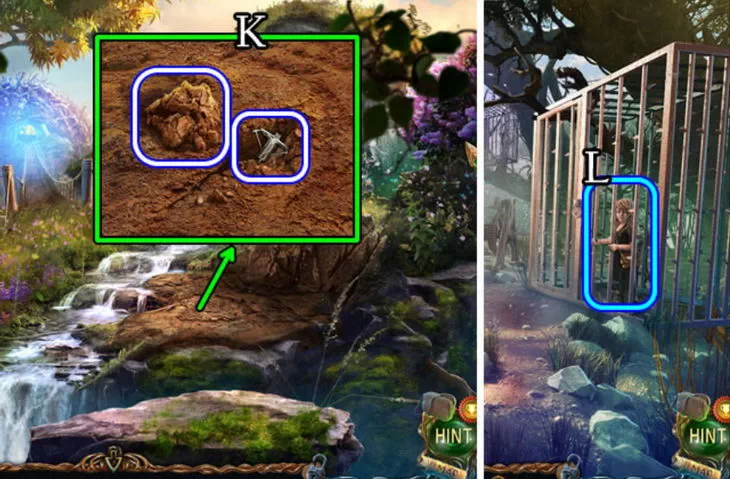
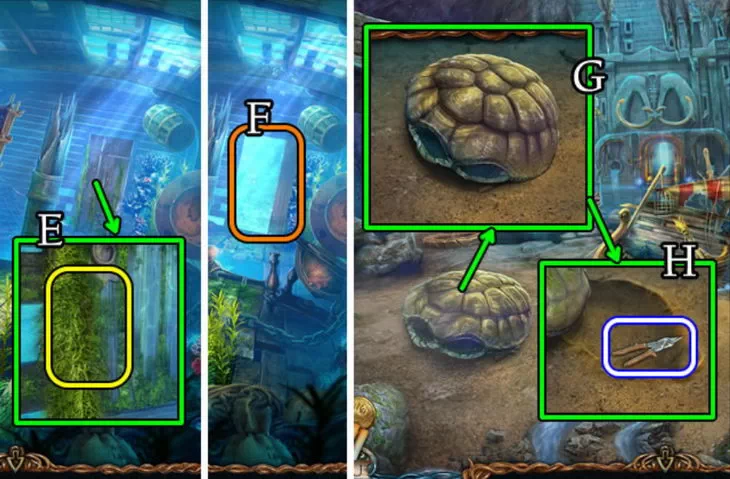
- H. Dig up a young rose bush in the center.
- IJ. On the left we examine the ballista, charge 4 arrows, shoot.
2.5. Isle of Exiles
Lost Lands 3: Cursed Gold. What to do
Secret. At the top right above the grate is a ghostly branch (18/35).
Secret. At the top in the center, under a tree with cobwebs, lies a figurine (13/24).
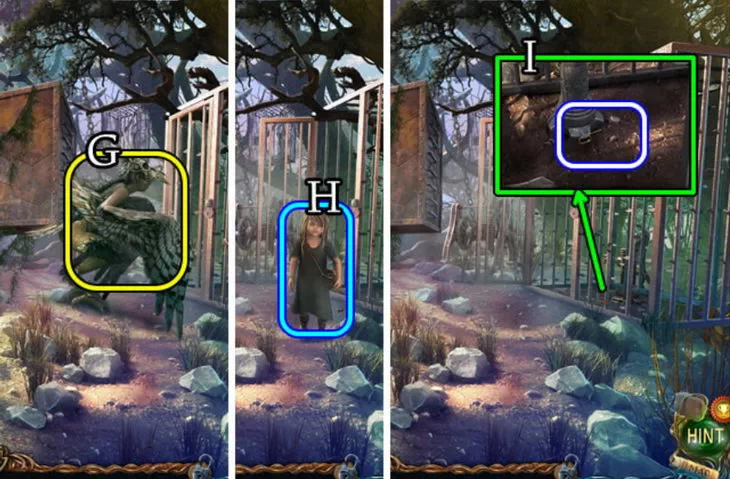
K. See a girl in a harpy cage, get a harpy claw. Let's see it, share it
on a cord, an amulet.
L. In the center we examine the winch, there is a manuscript (15/28) on it. Let's go ahead.
M. At the top in the center, on a tree with cobwebs, we will find a fishing hook.
N. On the left, a symbol hangs on thorns. We apply on it a harpy amulet, thorns
part, take a lemon. We examine it, cut it with a knife, we get half a lemon.
2.6. Harpy Nest
Lost Lands 3. Game walkthrough
Secret. Top center, under a tree with cobwebs, a ghostly object (19/35).
Secret. Bottom center, on the side of the island is a statuette (14/24).
O. On the right, we disassemble the column, from top to bottom. Under part 3 of the manuscript (16/28).
P. Under the manuscript in the recess lies the "Tower" chip.
Q. The blacksmith will help replace the harpy amulet if we find his hammer.
2.7. Tavern
Lost Lands 3. Where to get
R. We go to the village, they restored the tavern.
Secret. To the right, on a fallen chair, is a ghostly jug (20/35).
Secret. A figurine (15/24) is hidden under the table with weights on the left.
S. Bottom left, in the rift we find the manuscript (17/28).
T. Under the manuscript, we disassemble all the boards, we will find a chisel.
U. Ahead, near a large barrel is a fishing rod. In inventory, let go of the fishing line,
add a hook to it, you get a full-fledged fishing rod.
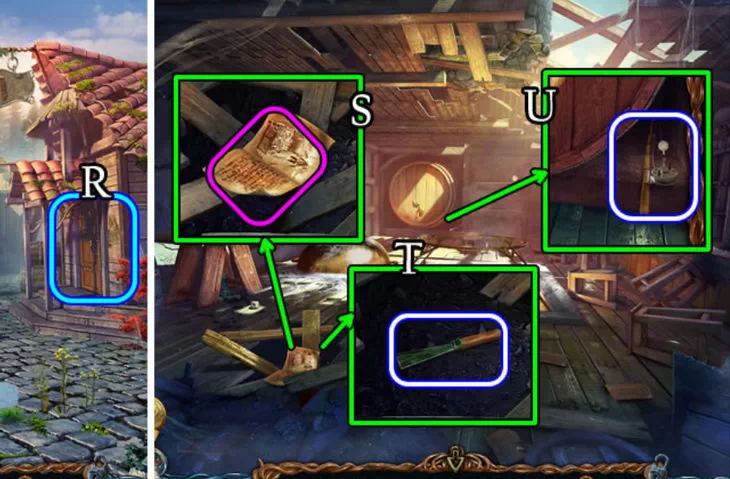
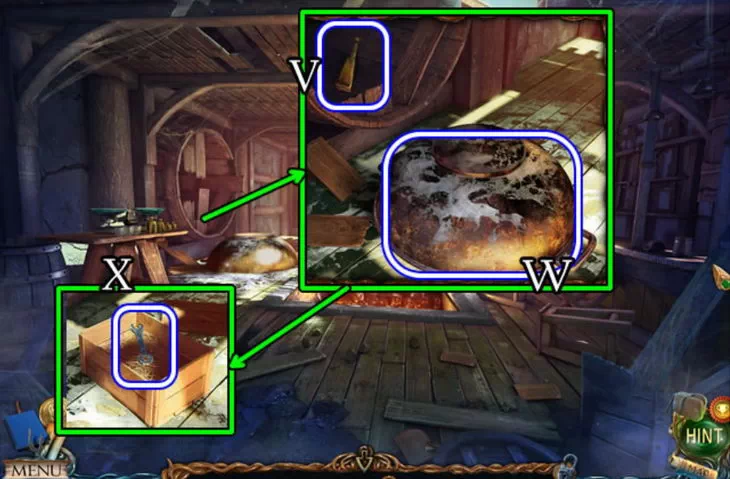
V. On the top left we break the barrel, inside we find a fan. W. On the left, turn over the wet vat, put it over the fire in the center.
X. Under the vat we search the box, inside under the hay there is a wrench.
Y. We go to the beginning, in front of the village, the camera will fall on the right on the cliff.
Z. Approach the edge, use the fishing rod to get the camera (6/14).
A. We will see one of the pictures in the camera.
B. In the graveyard with a chisel we scrape off the statue of a gnome, take a set of pigments.
C. We go to the shelter of Lepros, we place pigments over the paints.
D. With a wrench, unscrew the 2 right flasks.
E. Take the flask for white paint, for black paint.

F. On the lower island, use a white flask on the whitened earth.
G. After digging up some chalk, we will find a triple lever in the hole.
H. We go to the elder's house, use the lever on the floor, open the hatch.
I. A metal brush is stored under the hatch.
J. In the tavern we throw firewood into the central furnace, blow it up with a fan.
KL. The vat will become sooty, remove it, scrape it with a brush, we get a black flask.
M. A little man is drawn on the cleaned area, we take a picture of him.

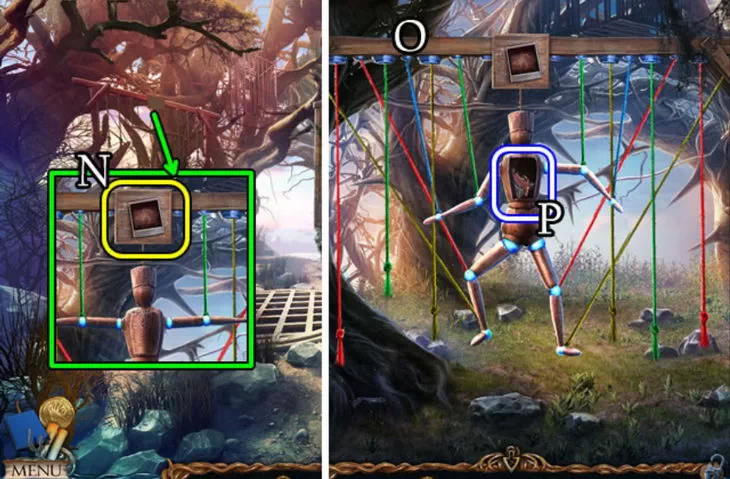
N. On the Island of Exiles, on the left we weigh a photo over a little man.
OP. Move the colored ropes up. We arrange the limbs of the mannequin in the same way as on
a photo. After that, we get a mechanical wing.
QR. We go to the storage, add a wing to the hanging bird, the key will fall out.
ST. Use the key to open the display case on the left, take the stone block.
Chapter 3
3.1. Cave
Lost Lands 3: The Golden Curse. Walkthrough
U. We go to the hills, insert the block into the well, a portal will open in it.
Secret. Top center, on the wall of the cave is a ghostly pattern (21/35).
Secret. Near the right statue, on the left near the rock, there is a statuette (16/24).
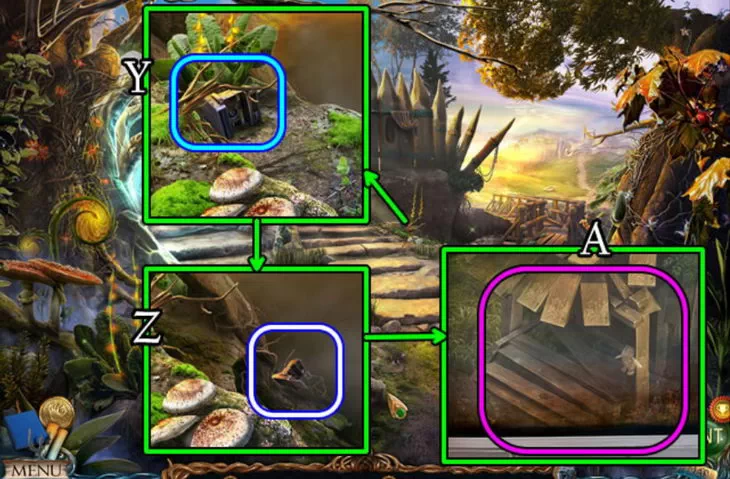
- VW. On the left under the waterfall we take the manuscript (18/28), push the barrier.
- X. In the center is a block with water, look behind it, find a step (1/4).

3.2. underground oasis
Lost Lands 3: Cursed Gold. Walkthrough
Secret. On the top left, a ghostly flower hangs on a tree (22/35).
Secret. At the bottom right, near the stones, there is a statuette (16/24).
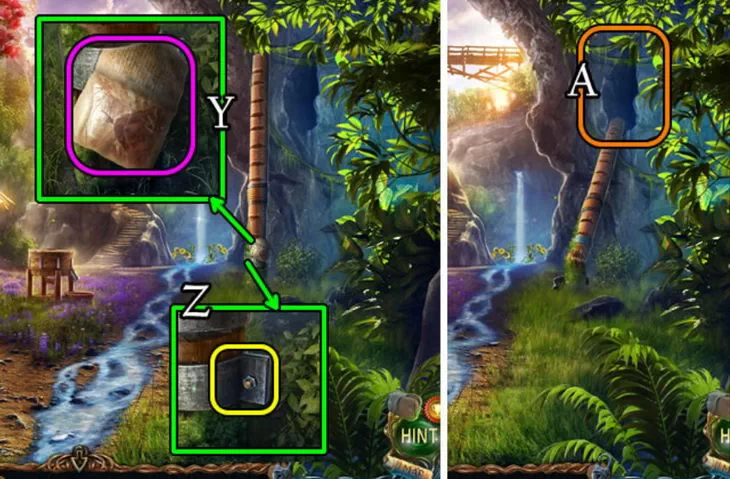
- Y. On the right we examine the column, on it is a manuscript (19/28).
- Z. At the base, unscrew the nut with a wrench, the column will fall.
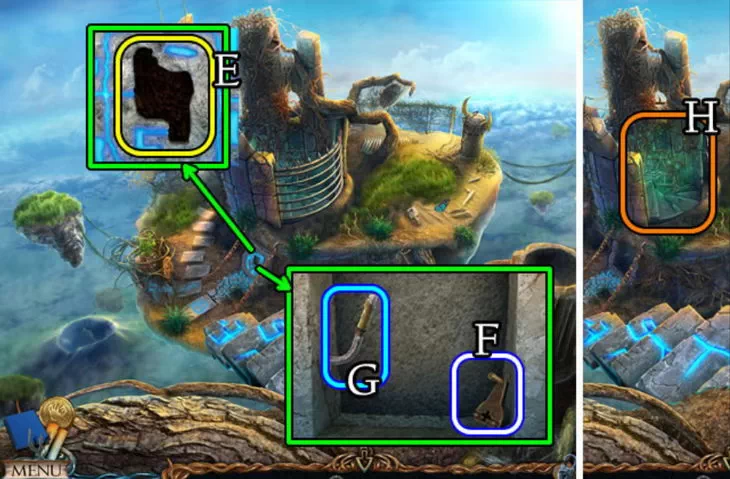
- A. Climb up the column into the cave, inside you need to find 10 items:
- 1. Stick - on the left under the wooden bars.
- 2. Wrench - in the center near the wheel. Top left, with nut.
- 3. Nut - inside the left crystal, you need to add. Screw on the left.
- 4. Stone - lies in the center from below. Apply to the crystal on the right.
- 5. Key - in the panel at the top, open it with a lever, take it out with a cane.
- 6. Cane - in the center on the floor. Use at the top to get the key.
- 7. Crystal - on the right, we beat off with a stone. For installation on the left.
- 8. Shovel - on the right in the dark, you need to turn the light. We dig out the door.
- 9. Saw - on the left under the crystal. We saw off the bars on the left.
- 10. Lever - on the left you need to saw off the timber. We insert into the wheel in the center.
With the key we unlock the dug out door on the right, we take the fertile water.
- B. Ahead under the waterfall grow sunflowers, cut off 3 pieces with a knife.
- C. On the left side of the door is a Fiora doll. In the inventory we examine it, from the pocket we will get the key-pedal.
- D. On the left, unlock the door with the key found on the doll.

3.3. Fisherwoman's hut
Lost Lands 3 Guide
Secret. Bottom left, in the roots of the tree is a ghostly saucepan (23/35).
- E. In the house, talk to the woman Sandra. Get a magic hammer.
- FG. On the right from the table we take the manuscript (20/28), a step (2/4).
- H. On the left from the stove we take a jug for oil.

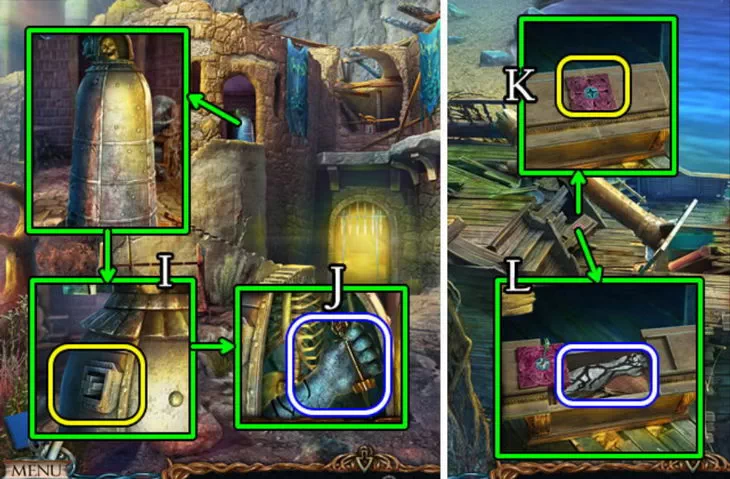
- IJ. Let's go to the peak, the blacksmith is gone. We read his entry, take a spatula.
- K. In the Hanging Gardens, on the right with a spatula, we get clay, a Ballista chip.
- L. Go upstairs, give Fiora her doll, get blacksmith tongs.
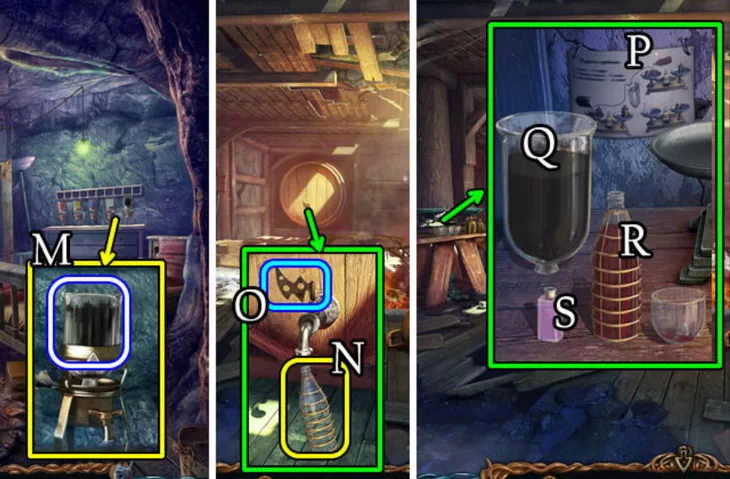
- M. In the blacksmith's furnace, put the cursed coin into the container.
- N. In the inventory roll out the clay, stick a harpy claw into it to make a mold of it. We put the resulting form on the forging furnace from below.
- O. We take a wire nearby, insert it into the clay, like a holder. We put in the oven.
- P. Just below 3 times click on the furs to fan the fire in the furnace.
- Q. We take molten gold, pour it into a clay mold.
- R. We take out the clay mold with the help of blacksmith tongs.
- S. Put the hot mold to the right on the frozen chest, it will melt.
- T. Take the pliers from the chest.
- U. We break the cooled mold with a hammer, take the blank of the golden claw. In inventory, inspect the workpiece, remove the wire with pliers.

- V. On the left top of the anvil we put a gold blank, hit it with a hammer.
- W. Take the golden claw. We thread the lace, we get the claw of a harpy.
- A. In the tavern, on the right, put sunflowers into the threshing machine.
- B. From below we substitute a jug for oil.
- C. Nearby we take a mortar, squeeze out the seeds, we get a jug of oil.

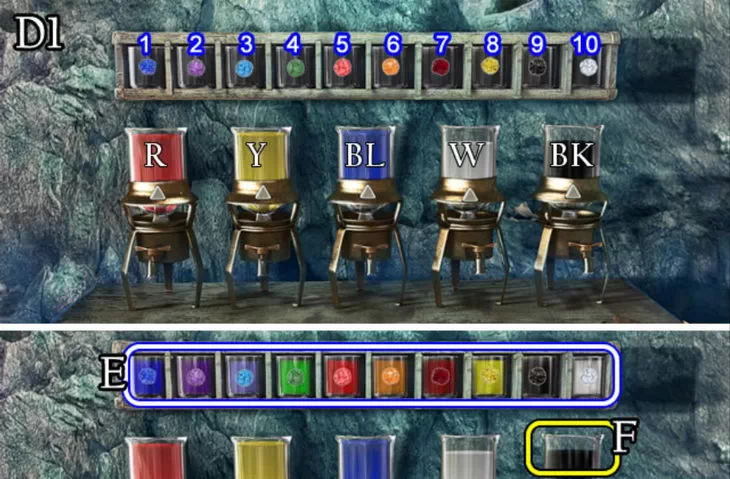
- D. We go to the house of Lepros, insert containers with paint, dilute them with oil. Arrange color pigments on top.
All flasks on top must be filled with a combination of colors from below. Solution:
1) Blue = blue + blue. 2) Purple = blue + red.
3) Cyan = blue + white. 4) Green = yellow + blue.
5) Pink = red + white. 6) Orange = red + yellow.
7) Burgundy \u8d red + black. XNUMX) Yellow = yellow + yellow.
9) Black = black + black. 10) White = white + white.
- E. From above we take a complete set of colors.
- F. Use the golden claw on the black paint to get a fake claw.
- G. We go to Fiora's cage, in front of her is a harpy. We throw a fake claw, the harpy will fly after him, petrify and break.
- H. Talk to Fiora, she will tell you that there is a staff in the container next to it.
- I. On the right in the cage, under the water pump, there is a paper clip (7/14). In the inventory we bend it several times, we get a clip-master key.
3.4. We get the staff
Lost Lands 3. Walkthrough of the game step by step
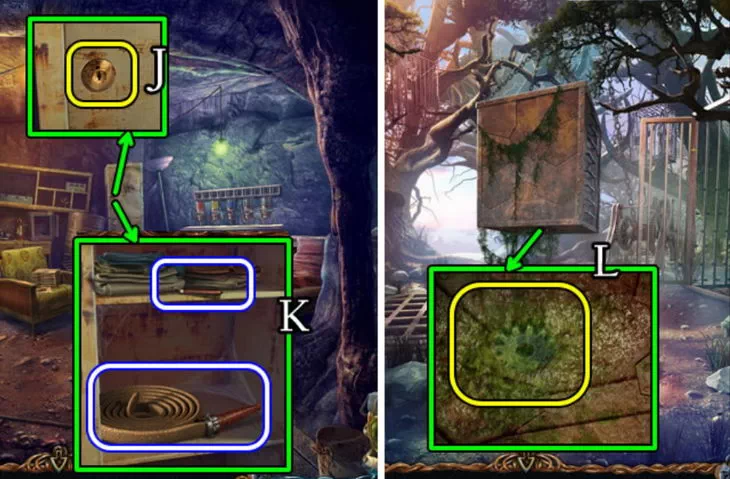
- J. We go to the house of Lepros, to the left of the paints we open the locker with a master key.
- K. Inside the locker we take a fire hose, flint and flint.
- L. We go to the Fiora grate, on the bottom of the container there is green slime, split it with citric acid from half a lemon, take the gear.
- MN. We use the gear on the mechanism, turn the handle, lower the container.
- O. Connect the fire hose to the pump inside the grate.
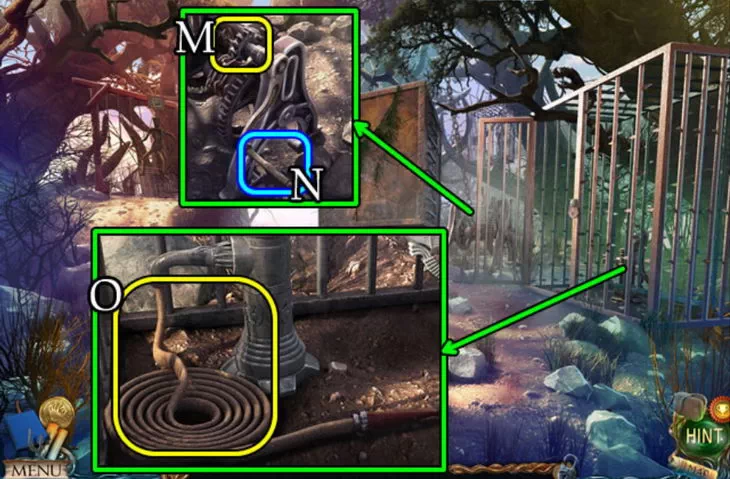
- P.Q. We stretch the hose out, onto the container, into the hole.
- R. On the water pump, press the lever several times, fill the container with water.
- S. We climb onto the container, on the surface of the water we take a makeup brush (8/14).
- T. In the cemetery, near the left statue, we plant a new rose bush, water it with fertile water. The statue will lean from the head of the statue; take the button. We take rose petals from the bush.
- U. On the adjacent statue, apply a set of paints, a makeup brush.
- V. Coloring the gnome statue. We get dynamite from the statue.
- W. We go to the container, lay the dynamite inside.
- X. A cord will appear at the bottom of the screen, set fire to it with a flint and a knife.
- Y. The container will explode, return to it, take Maaron's staff.
- Z. We go to the elder's house, give the staff to Maaron, take the dragon figurine.
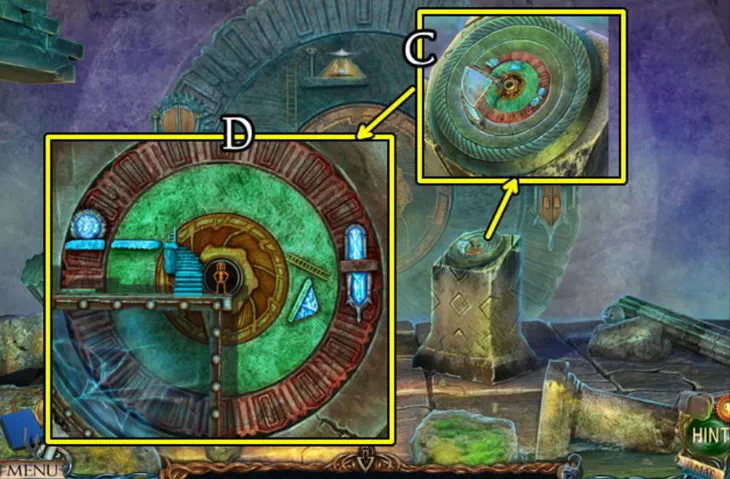
- A. At the beginning of the dungeons, on the right, insert the figurine into the circle.
- B. You need to rotate all the circles so that the 3 dragon figurines hit the 3 shell figurines with a beam. After the decision, we will open a new cave.
3.5. underground lake
Lost Lands 3: Cursed Gold. What to do
Secret. Top left, on a stone balcony, a ghostly shell (24/35).
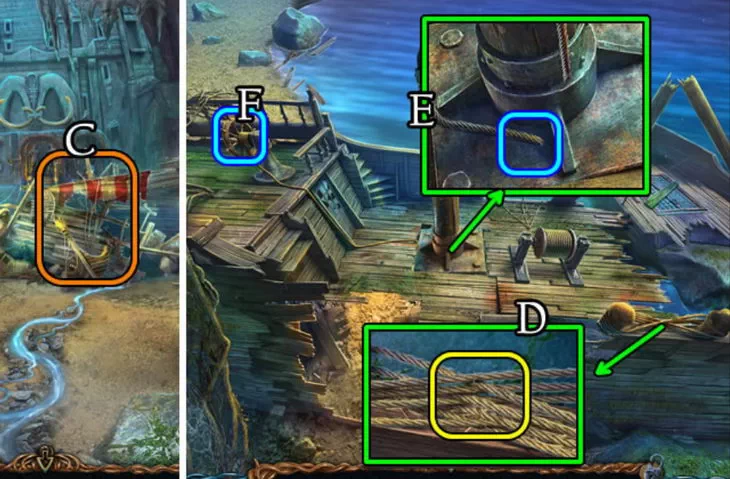
Secret. On the top right, on the wreckage of the ship, the steering wheel is a statuette (17/24).
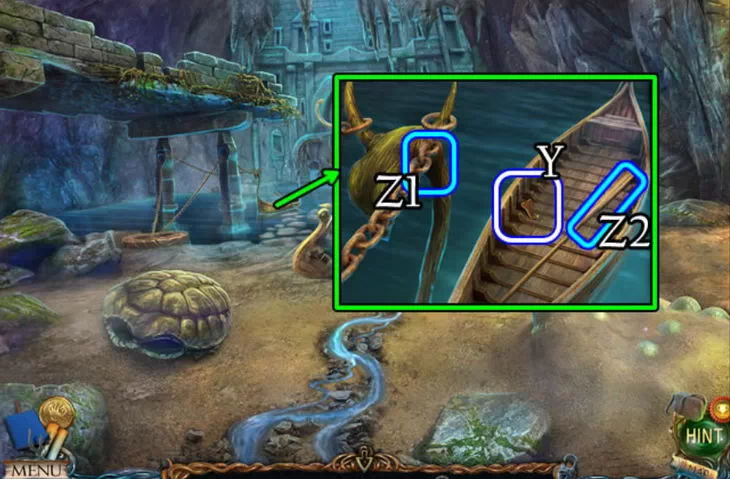
C. On the right we examine the ship, inside you need to find 10 items:
- 1. Hook - top center, hanging on the sail. On the rope to the right, and into the water.
- 2. Mask - bottom left, on the neck of the skeleton. Right to the box of water.
- 3. A bottle of rum - in the center, behind the boards, unscrew, punch.
- 4. Nail puller - on the right under the head, stuck into the board. On the boards in the center.
- 5. The key is in the chest, we are looking for a leaf, a switch, we enter a combination.
- 6. Switch - top right, inside the head. To the chest.
- 7. Leaf - bottom left, near the skeleton. Apply to the chest. To the chest.
- 8. Musket - on the right, on a box of water, you need to assemble it from parts.
- 9. Horn - on the right, on a box of water. Right up to the golden head.
- 10. The core is in the center, we examine the boards, under them. On the box behind the boards.
On the top left, pour rum onto the grate, shoot from the musket, open it with the key from the chest. From the open lattice we take a cauldron.
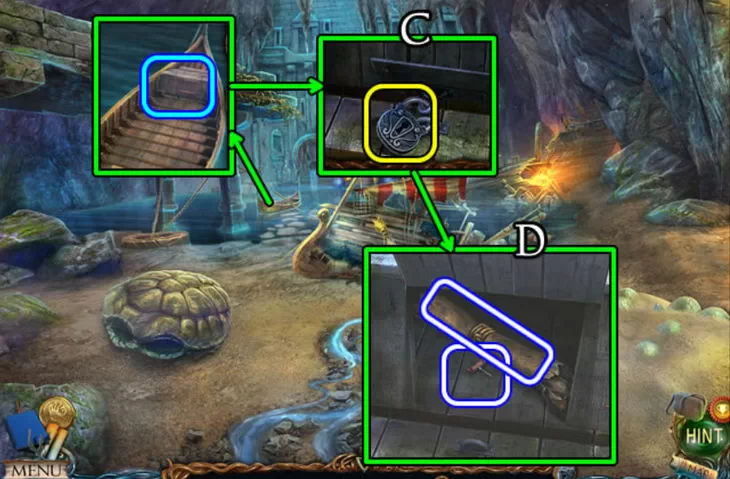
- D. We go to the ship, cut the ropes from the bottom right with a knife, there is a code under them.
- E. We examine the mast in the center, we tie two ropes.
- F. Turn the steering wheel on the left, pull the rope, the mast will fall.
3.6. Broken schooner
Lost Lands 3. Where to get
Secret. Top center, among the floating debris is a ghost (24/35).
Secret. Bottom center, to the right of the sand is a statuette (18/24).
- G. On the left we pick up the fallen steering wheel.
- H. From the bottom right, insert the steering wheel into the winch, turn it.
- IJ. On the left under the mast we take the door, the manuscript (21/28).
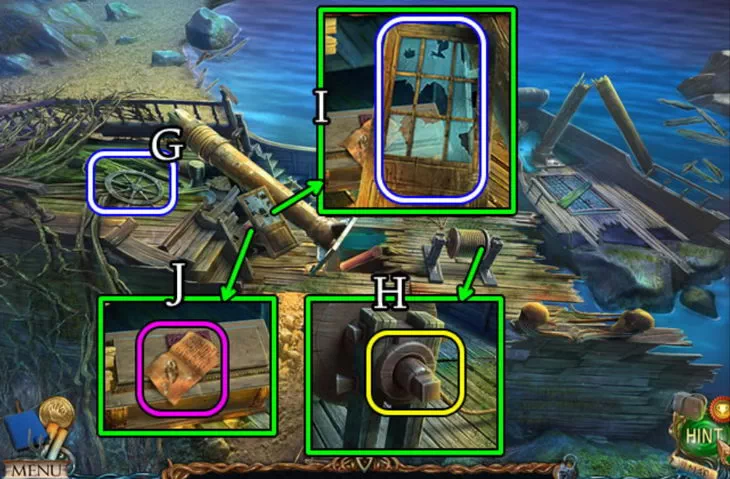
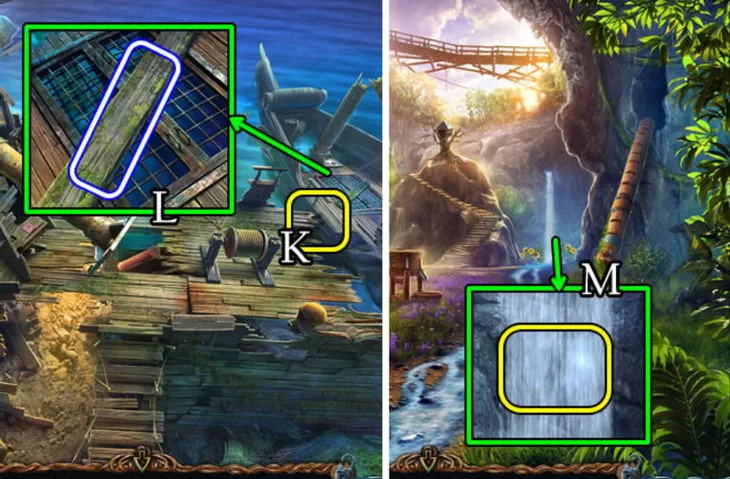
- K. On the right, put a door between the wreckage of the ship to go to the right.
- L. On the right fragment we take a long board, open the hatch into the water.
- M. In the underground oasis we go to the waterfall, we collect a cauldron with water.
3.7. Tree of Life
Lost Lands 3. Walkthrough of the game in pictures
Secret. Bottom center, at the roots of the tree is a ghostly chain (25/35).
- N. From the oasis we go up to the tree, collect 3 stone slabs around, place them on the right under the nest. There is no 4th plate yet.
- O. Upstairs in the treehouse silk scarf (9/14), step (3/4).
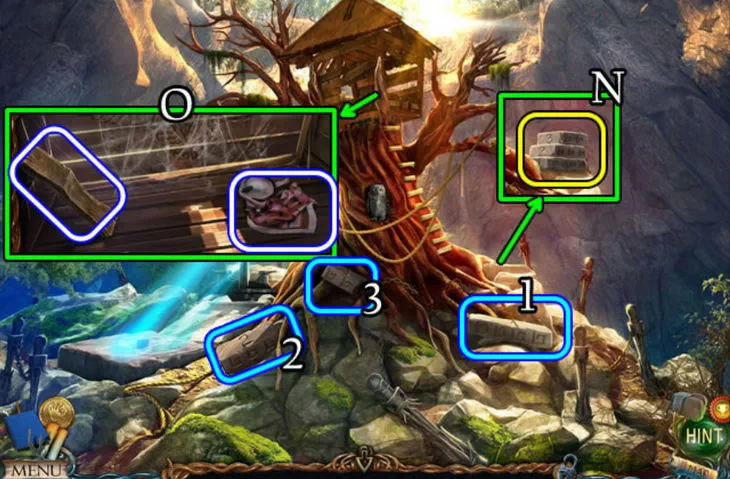
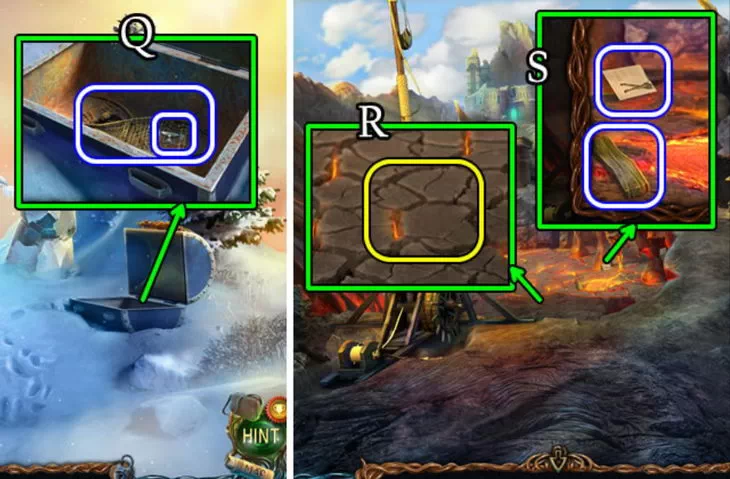
- P. We go to the blacksmith, on the right we insert the key into the chest, we enter into the combination:
5-3-7-2-4-6-1.

- Q. From the chest we get the "Anvil" chip, snowshoes.
- R. We go to the volcano, use snowshoes to get to the fragile lava.
- S. On the frozen lava step (4/4), tights (10/14).
- T. In the Fisherman's Hut, we place 4 steps on an inclined board.
- U. Go up the stairs to the attic, there you need to find 10 items:
- 1. Cane - on the left near the wheel. On the recess in the center.
- 2. Glove - top left, hanging on the net. Apply on the trough from below.
- 3. A figurine of a bird - in a labyrinth. On the bedside table in the center.
- 4. Clamp - in the trough, we take it out with a glove. On the bottle on the right.
- 5. Fishing rod - on the right on the shelf, you need to knock it out with a hammer. On the bottle on the right.
- 6. Hammer - in the center, under the ladder. Use it on the shelves on the right.
- 7. Ball - in the center, inside the box, you need 2 fish figurines. To the labyrinth
- 8. Fish figurine 1 - in the bottle on the right, we get it with a fishing rod. In a casket.
- 9. Valve - in the center from above, we get it with a cane.
- 10. Fish figurine 2 - in the center from above. In the center on the locker, in the box.
In the maze, you need to hold the ball down by moving the handles to the left and right. We take the figurine, insert it in the center, we will get the mechanical eye.
VWX. We go to the Arena, collect 3 cursed gold items: Naga mask, brass knuckles of Solidus, medallion of the Minotaur.
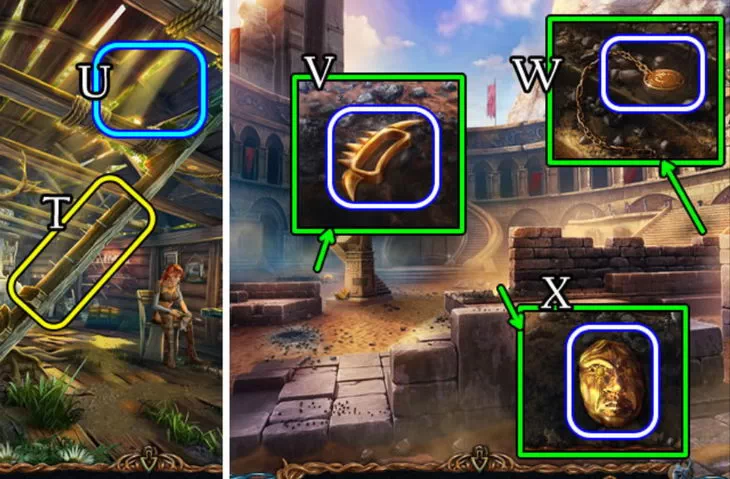
- A. At the entrance to the arena, on the top left we examine the iron maiden. We insert into the statue 2 mechanical signs, a golden mask. The head will open.
- BC. In the head of the statue is hidden a pyramid, a key tile.
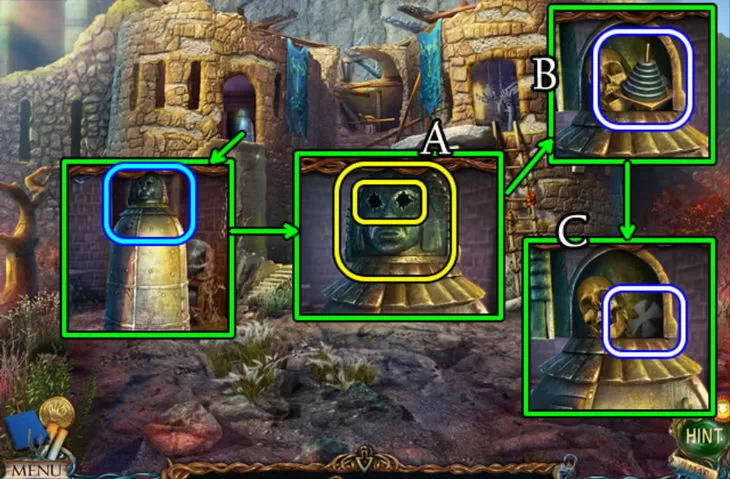
- D. At the beginning of the dungeons, on the right, insert the brass knuckles of Solidus.
- E. On the underground lake, insert the key tile into the column.
- F. Inside the column we find the glue recipe. We are trying to insert a pyramid there, but Naga will crawl in and drag the pyramid under the water.
3.8. We catch naga
Lost Lands 3
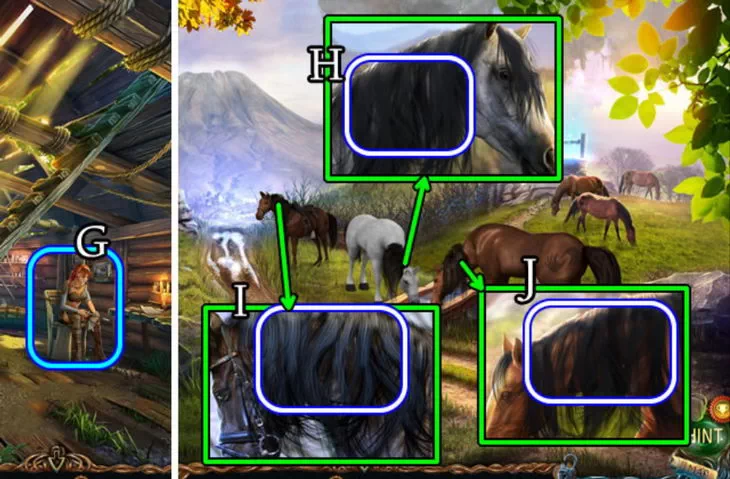
- G. We go to the fisherman's house. Sandra will tell you that the naga can be caught with a net of cursed gold. To connect the network, we will receive scissors from Sandra (11/14).
- HIJ. We cut horses on the hills, we get horse manes (3/3).
- K. On the Hanging Gardens, in the top center place a long plank to the tree.
- L. Cut off the bark of the cork tree with a knife. Behind the bark is a drawing.
- M. We return to Sandra, we give wool and bark. We get an axis.
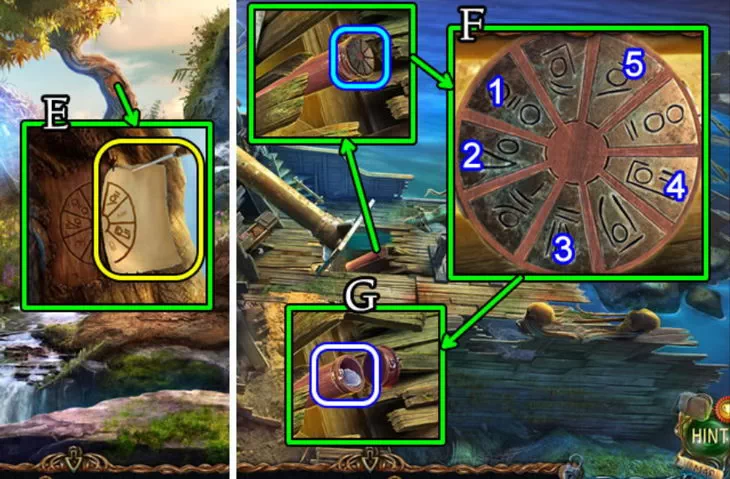
- NO. Outside, we put the axis at the top of the ladder, take the bottle from the roof. We examine in the inventory, we will find the recipe for underwater breathing.
- P.Q. From the millstone we take a broken millstone disk, wooden slats.
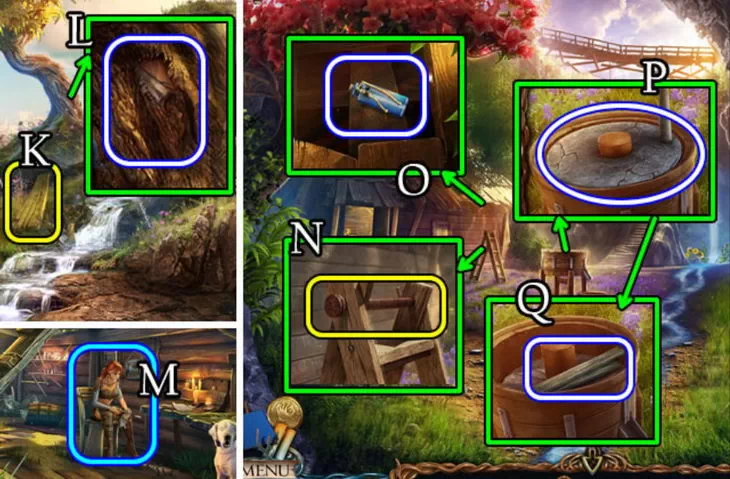
- R. We go to the blacksmith, we give the broken millstone for repair. We'll get a chisel.
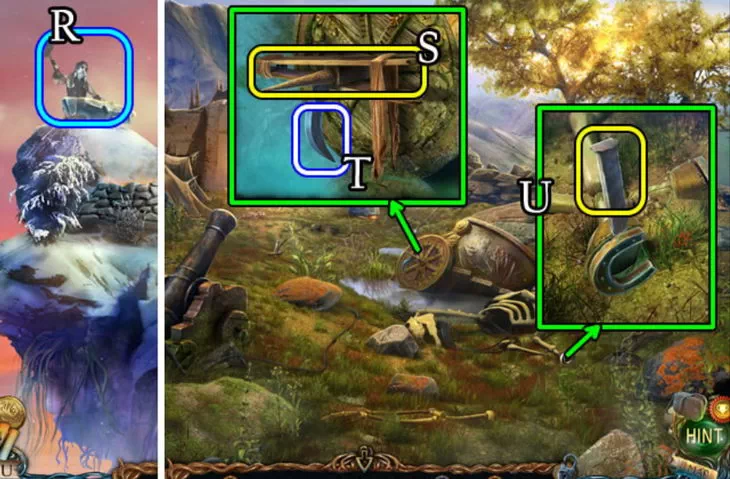
- ST. On the battlefield, you need to remove the hook from the wheel. In the inventory we inspect the rails, open the package of tights, cut them with a knife, tie the boards. You get a homemade valve, apply it to the wheel, get the blade of the hook. In the inventory we beat the blade with a hammer, you get just a hook.
- U. Next to the horseshoe we use a chisel and a hammer, we take a horseshoe.
- V. At the blacksmith, on the right, use the horseshoe on the magnetic rock, you get a magnetized horseshoe.
- W. At the entrance to the Arena, on the left we put a hook on a spear, we hammer it with a hammer, we get a makeshift gaff.
- X. On the volcano, in the center we examine the hanging bag, apply a hook on it, get a mitten, a part of the globe. In the inventory we combine the mitten and the magnet, there will be a magnetized horseshoe with a glove.
- Y. We use the horseshoe with a glove on the lava lake, we will catch the chain mail fish.
- Z. We go to the blacksmith, give the fish, he will return the repaired millstone disk.
- A. On the sunken schooner, we scoop up water into a bottle of water from the lake.
- B. At the beginning of the dungeon, on the left, add a green drop to the vial.
- C. Charge the vial of manna from the elder, take the potion of underwater breathing.
3.9. Flooded hold
Lost Lands 3. Where to find figurines
- D. On the sunken schooner, use the potion in the hatch with water, dive inside.
Secret. At the bottom right, to the right of the globe is a ghostly seaweed (26/35).
Secret. On the top left, above the plants, a box is floating - a figurine (19/24).
EF. In the center near the skeleton is a manuscript (22/28), a prosthesis hook.
- G. Open the chest on the left with a hook prosthesis, a bottle will pop up from it.
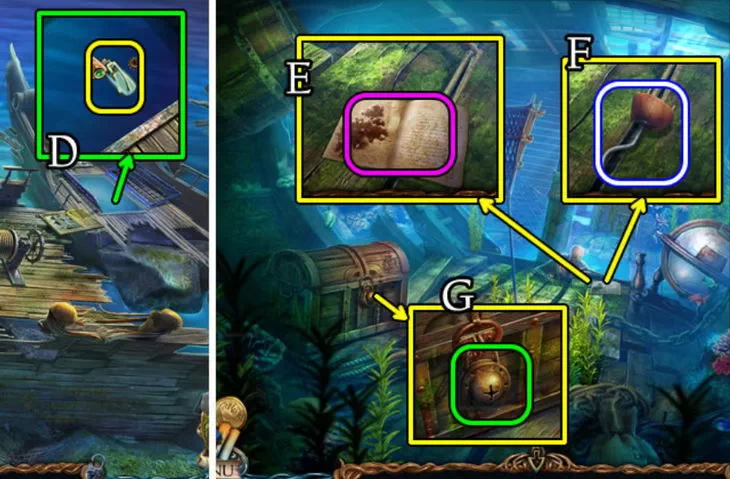
- H. Take the bottle with the letter on the top left. Until you open it.
- I. In the center of the top, open the grid, take the fish.
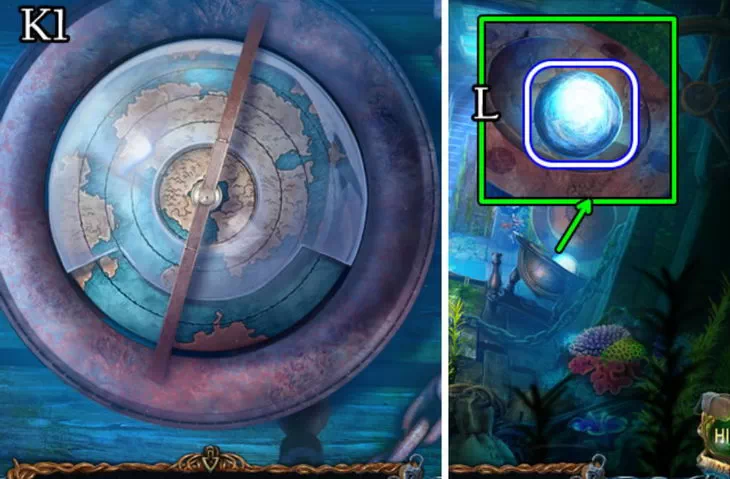
- JK. Add a round part to the right of the globe. We solve the puzzle.
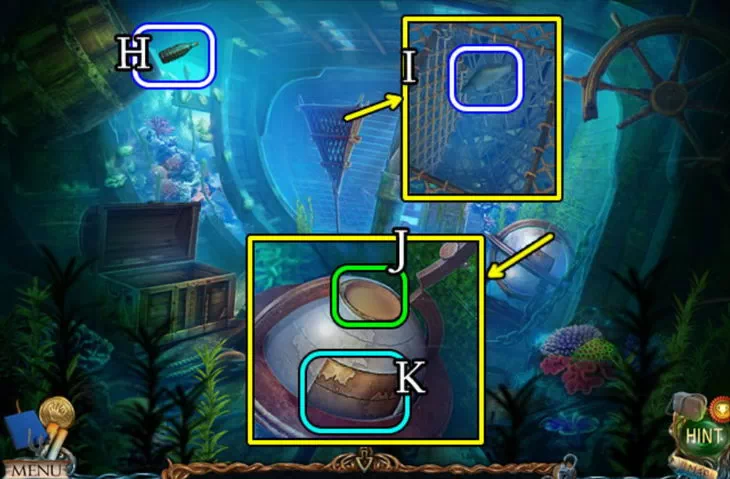
- L. Only the 2 lower discs can be rotated. But if you move the disk in one direction, then another disk will turn behind it closer to the center, and in the other direction the disk will rotate alone. After the solution, we get the energy sphere.
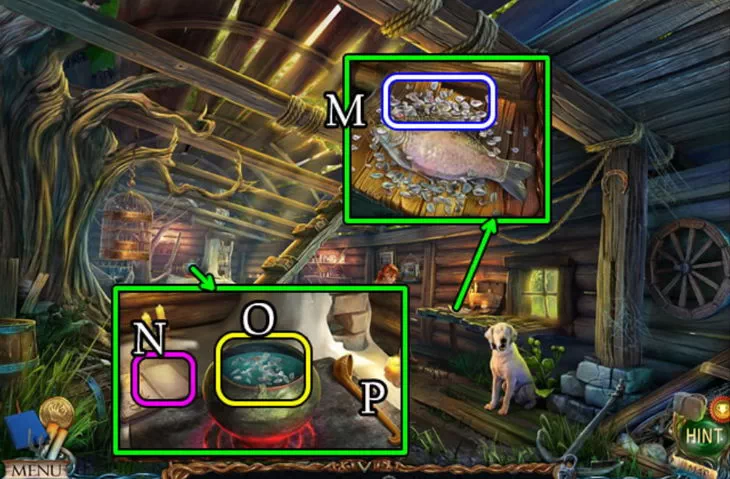
- M. We go to the fisherman's hut. Sandra has already woven a fishing net. We put the caught fish on the table on the right, clean it with a knife, we get fish scales.
- N. On the left side of the book, add a sheet where the glue recipe is written.
- O. Under the waterfall, fill the cauldron with water, put it on the stove on the left.
- P. Add fish scales to the cauldron, stir, dip the net there, you will get a glued net.
- QR. We put a golden mask in the millstones, put the millstone disk on top.
- S. Turning the handle, grind the mask into gold dust, dip the net into it, you get the damned nets.

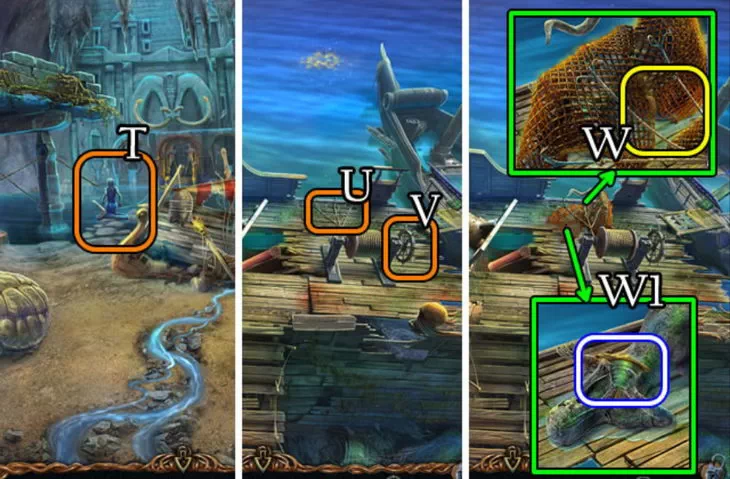
- T. On the underground lake, use the net to catch the naga. The monster will petrify, fall to the bottom, but the pyramid still needs to be taken away from it.
- UV. On the schooner we throw hooks into the water, turn the steering wheel on the winch.
- W. Pull out the net, cut it with a knife, knock out a pyramid with a hammer.
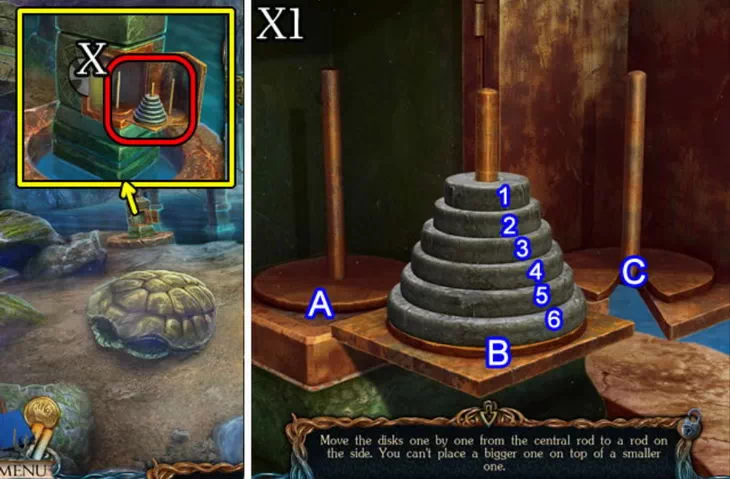
- X. We put the pyramid in the column on the left. Inside, you need to rearrange the pyramid from one axis to any other, but disks can only be placed on wider disks. To get the achievement, you need to complete it in 3 minutes. Solution:
(1-A) - (2-C) - (1-C) - (3-A) - (1-B) - (2-A) - (1-A) - (4-C) -
(1-C) - (2-B) - (1-B) - (3-C) - (1-A) - (2-C) - (1-C) - (5-A) -
(1-B) - (2-A) - (1-A) - (3-B) - (1-C) - (2-B) - (1-B) - (4-A) -
(1-A) - (2-C) - (1-C) - (3-A) - (1-B) - (2-A) - (1-A) - (6-C) -
(1-C) - (2-B) - (1-B) - (3-C) - (1-A) - (2-C) - (1-C) - (4-B) -
(1-B) - (2-A) - (1-A) - (4-B) - (1-C) - (2-B) - (1-B) - (5-C) -
(1-A) - (2-C) - (1-C) - (3-A) - (1-B) - (2-A) - (1-A) - (4-C) -
(1-C) - (2-B) - (1-B) - (3-C) - (1-A) - (2-C) - (1-C).
- Y. Having solved the puzzle, we will pull the boat to the shore, inside is part of the key.
- Z. On the boat, put the oar into the water, remove the chain on the left, swim to the castle.
Chapter 4: Castle of Madness
4.1. castle of madness
Lost Lands 3: The Golden Curse. Walkthrough
Secret. On the top left, under the arch, a ghostly chain (28/35) hangs.
Secret. To the right of the right column is a statuette (20/24).
- A. There is a wood saw on the rocks in the center.
- B. There is a stone tile on the left side of the spiral rack.
- C. On the right stand is a manuscript (23/28).

- D.E. We go to the Harpy's Nest, insert the tile into the blue panel.
- F. Inside the panel, take part of the key, combine it into a key in inventory.
- G. Inside the panel, press the lever, the lair will open outside.
- H. Inside the Harpy lair we are looking for 10 items:
- 1. Blue circle - on the right in the box, you need cubes, a hint.
- 2. Skull - top right, need to be lit with a torch. Insert into the floor.
- 3. Fabric - bottom right, lies on the floor.
- 4. Red circle - in the center in a bag, cut with a blade.
- 5. Skin with symbols - on the right, you need to light it with a torch. To the box.
- 6. Torch - take it on the table, set it on fire from a candle. On the dark side on the right.
- 7. Broom - in the center, under the table. Apply to the floor.
- 8. Green circle - in a recess in the floor, you need a broom, a skull.
- 9. Blade - on the left in the box, disassemble the bones, wrap with a cloth.
- 10. Cubes - bottom left, near the box. On the box on the right.
We insert all 3 circles into the table, we solve the puzzle. The circles need to be rotated so that the image of wings is formed from all 3. We are looking for elements of the wings, put them on the sides. We get the energy sphere.
- I. At the entrance to the Arena, on the iron maiden we use the key from two parts.
- J. Inside the sarcophagus is the hand of an Atlantean, examine it, take the key.
- K. We go to the schooner, unlock the dark red lock of the chest with the key.
- L. Inside the 2nd arm of Atlanta, examine it, take the diamond key.
- MN. In front of the castle we place 2 balls in stands on the sides.
- O. On the floor in the center, you need to connect 2 contacts.
On the floor we turn the steps to conduct energy from the bottom up.
4.2. Labyrinth
Lost Lands 3: Cursed Gold. Walkthrough
- P. We put the hands of the Atlanteans on the gate, we will enter the next room.
Secret. Bottom right, under the stairs is a ghostly column (29/35).
- QR. On the left on the floor we take part of the pattern, insert it into the recess on the right.
- S. On the upper right side of the stairs is a manuscript (24/28).
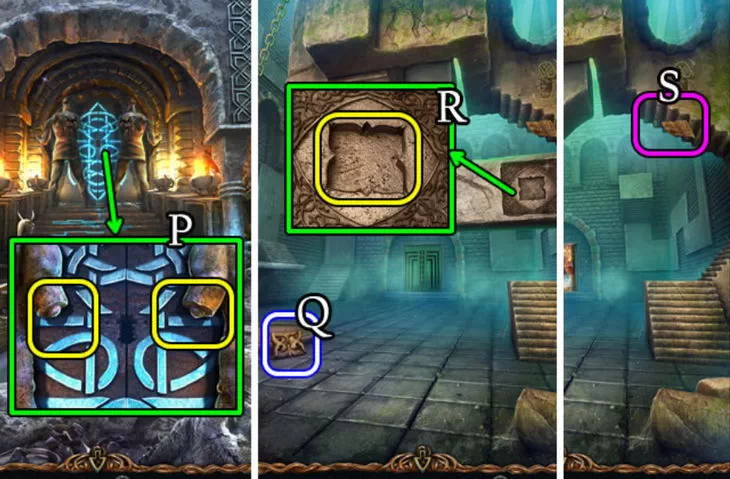
- T.U. Open the pendulum on the left, take the ink recipe.
- VW. To the left of the wall is a record, from above we take out a match of the “eternal flame”.
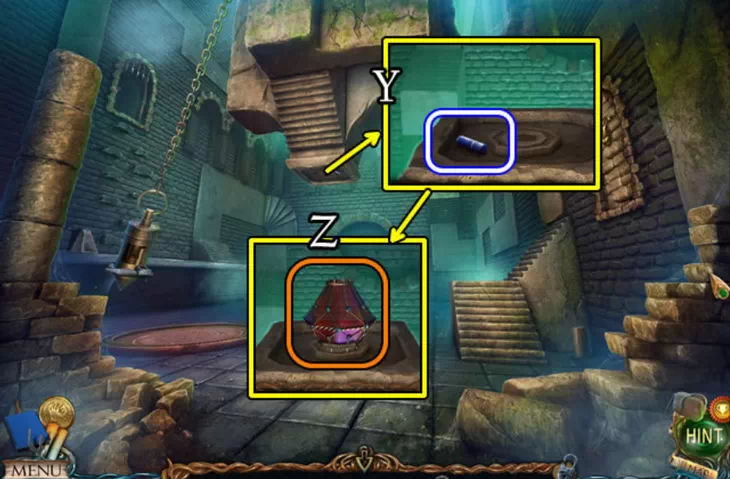
- X. To the right of the match, click on the brick, the path up will appear.
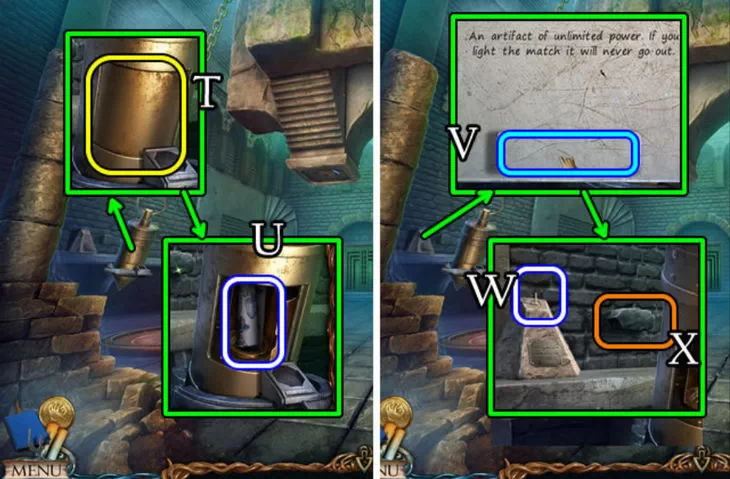
- Y. Climb up the stairs to the ceiling, take your lipstick (12/14).
- Z. We put the “diamond” key on this stand. The doors ahead will open.
4.3. Room of riddles
Lost Lands 3 Guide
Secret. Top center, at the top of the arch, a ghostly pattern (30/35).
- A. From the bottom right of the column we take our sunglasses (13/14).
- B. Take the lens from the left column.
- C. Dots are marked on the glass in the center, combine them by drawing with lipstick.
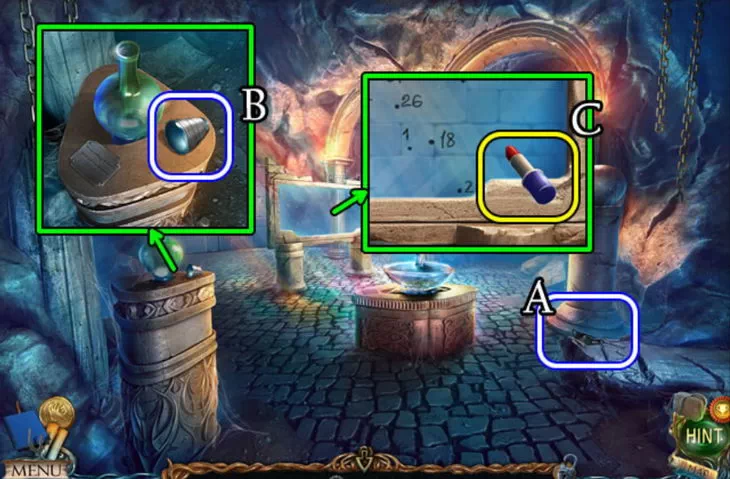
- D. On the glass you will get a picture of a snail.
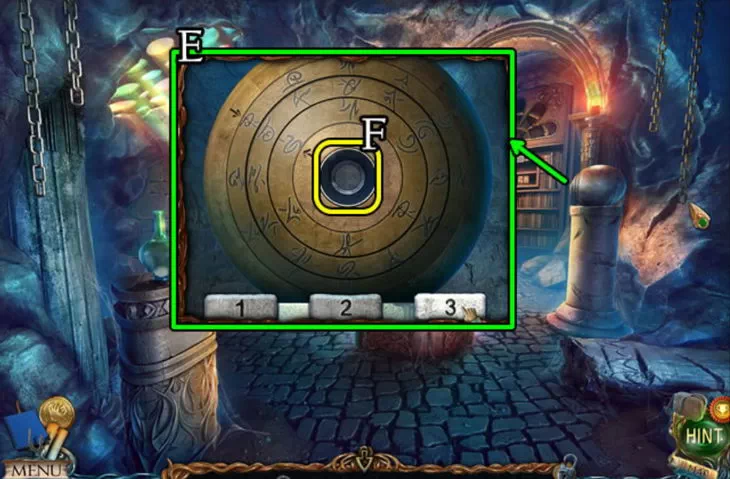
- E. Rotate the disks on the column to the right. Opposite the arrows, you need to set the symbols that you saw earlier, from left to right: RЖQ. Solution:
1(x2), 2(x10), 3(x6).
- F. Insert a lens into the center of the circle, it will illuminate the desired stone on the wall.
4.4. room of madness
Lost Lands 3 Walkthrough
- G. Click on the stone on which the center of the snail shines. Let's enter the hall.
Secret. On the left, at the beginning of the bridge, there is a dark ghostly pattern (31/35).
Secret. On the right, near the fallen column, there is a globe - a statuette (21/24).
- H. From the right column we take the manuscript (25/28).
- IJ. On the left on the floor we take a spoon, the 4th stone block.
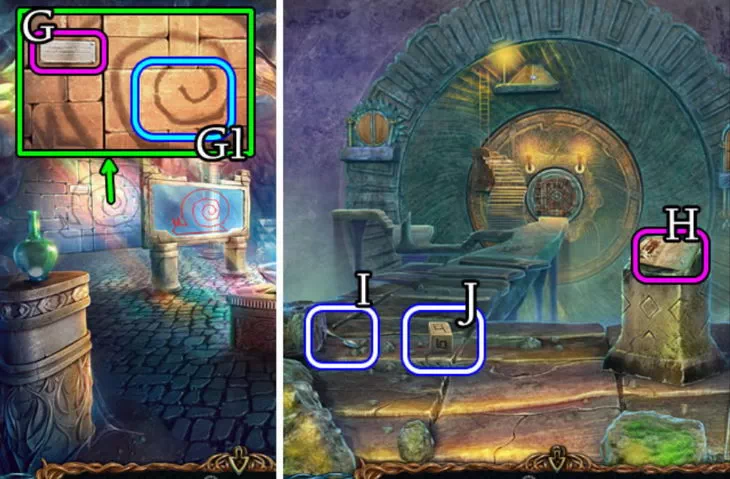
- KL. We go to the Tree of Life, put the 4th block under the nest, get the egg.
- M. In front of the castle, on the right, we lower the egg into boiling water, it will boil. We use the spoon to pick up the boiled egg, peel it.
- N. In the Room of Riddles, on the left we read the inscription, we are trying to insert the egg.
- O. We throw a lit match into the jug to burn the air, insert the egg.
- P. Having solved the riddle, we pick up the crystal pyramid at the bottom.
- Q. In the room of madness, examine the pyramid, add the pyramid.
- R. From the side we insert the medallion of the Minotaur, we get the key flywheel.
- S. Insert the flywheel into the round door in the center, move on.
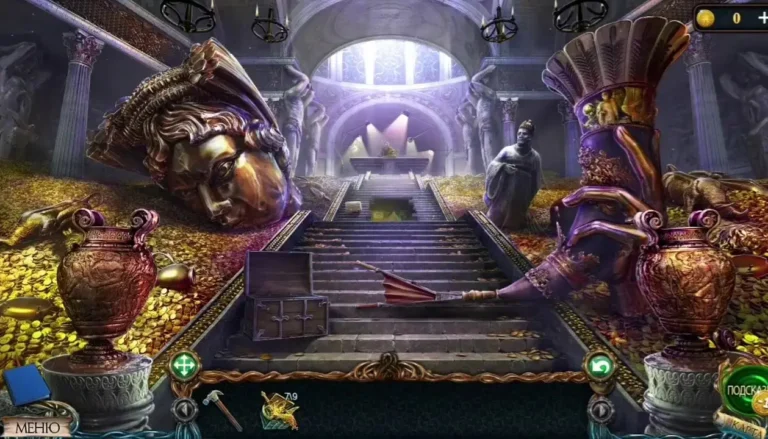
4.5. Safe
Lost Lands 3: Cursed Gold. What to do
- T. Jeweler Yujit is sitting in the treasury, he will tell you about the horn of the minotaur. The jeweler will give diamonds with grain and ask them to sort them.
Secret. On the top left, on top of the golden statue is a ghostly pattern (32/35).
- U. On the right on the forge, above the finger we read the manuscript (26/28).
- V. On the left from the chest we take the detail of the statue.
- W. In the center from the steps we select a bottle of perfume (14/14).
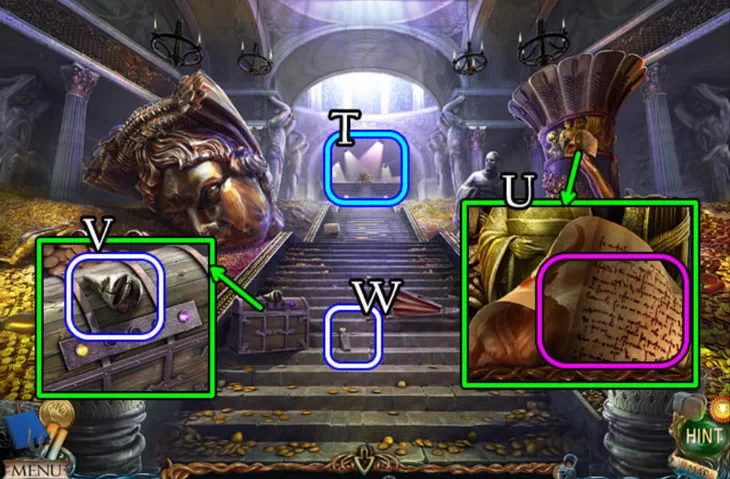
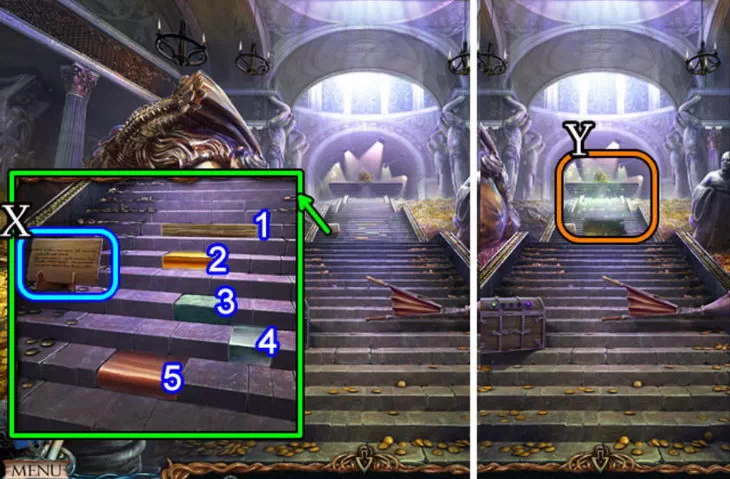
- X. On the top left of the stairs we read the inscription. You need to click on 5 steps, in order of material value: wood, marble, bronze, silver, gold. Decision 1-3-5-4-2.
- Y. From this, a cache will open under the stairs, inside we are looking for 10 items:
- 1. Books - on the left in the carriage, open with a screwdriver.
- 2. Magnifier - top right, unscrew with an angle key. For a couple of pictures.
- 3. Screwdriver - bottom left on the table. On the carriage on the left.
- 4. Pipette - on the middle floor, in the bank. On the picture on the bottom right.
- 5. Lever - set the time on the clock 11:10, pick up inside.
- 6. Trumpet - we arrange books in the library, as if on a table. At the clock upstairs.
- 7. Valve - on the left in a wooden box. On the lock to open the house.
- 8. Picture - bottom right, you need a pipette, tweezers. On the picture above.
- 9. Tweezers - on the roof top left. On the picture on the bottom right.
- 10. Corner key - at the bottom at the entrance to the house. Top right on the holder.
Having collected the picture, we weigh it next to the 2nd one at the top, we use a magnifying glass. On a pair of pictures you need to find 5 differences. After the decision, we insert the lever, we will take out an empty cartridge.
- Z. We go to the blacksmith to ask for new furs, we get a metal saw.
- A. On the island of exiles, on the ground with a saw we cut the grate.
- B. Under the bars we take the chip "Cube", the key.
- C. On the underground lake, on the boat, use the key to open the chest.
- D. Inside the boat, take a corkscrew, a roll of leather. In inventory, examine the bottle, open the cork with a corkscrew, get a note, an empty bottle.
- E. Place the found note on the tree in the Hanging Garden. Let's see the code.
- F. On the schooner, enter the code into the tube under the mast. Solution: 1,2,3,4,5.
- G. Take clean paper from the open tube.
- H. Give the blacksmith the dark glasses and the roll of leather. We get the key to the bolt.
- IJ. Below we insert the key, we can pick up the bellows.
- K. In the fisherman's house, on the left in the birdcage we put grain with gems.
- L. The bird will eat the grain, leaving only the diamonds.

- M. In the house of Lepros, we take a flask with black paint from the table.
- NO. In the tavern, near a large barrel, pour wine into an empty bottle.
- PQRS. In the tavern on the table on the left we put the recipe and all 3 liquids.
- T. Calculate the required proportions on the scales: Solvent (2) = 1+1.
Black paint (3) = Thinner +1. Red wine (4) = Solvent+1+1.
- U. After the decision, we take away the ingredients for the ink. Immediately fill them into an empty cartridge, you get an ink cartridge.

- V. We go into the labyrinth, insert the ink into the pendulum.
- W. From above we get the key, immediately insert it into the recess.
- X. The pendulum will begin to draw a pattern. We put a sheet under it, take a tracing paper with a pattern.
- Y. In the volcanic cave, on the left we put the tracing paper on the pattern. Let's see the numbers.
- Z.A. Enter the numbers next to the chest: 3-6-9-12-15-18-21-24.
- B. Take the element of air from the chest.
- CD. We go into the room of madness, on the right we set up the path to the round door.
- E. Place the element of air in front of the round door.
- F. Behind the door, take the vacuum container.
- G. On the Lower Island, use the container for paralyzing cones.
- H. We go down under the water, we release stunners on living plants.
- I. Open the shell with a knife, take the pearl.
- J. We go to the jeweler, we give diamonds and pearls. He will begin to create a nose ring for the minotaur, out of cursed gold.
- KL. We put a whistle and bellows under the big horn.
- M. Click on the furs, select the dropped lever. The minotaur will wake up.
- N. We go into the labyrinth, insert the lever on the left behind the doors, knock out the door.
- O. We select the dropped key "bull's head".
- P. Place the head on the crystal and the far door will lead to the minotaur.
4.6. Lair of the Minotaur
Lost Lands 3 Walkthrough in Pictures
Secret. On the top right, on the wall is a ghostly crack (33/35).
Secret. On the left wall, on a stand, there is a tree - a figurine (22/24).
- Q. In the lair of the minotaur, on the far grate is a manuscript (27/28).
- R. On the left, near the column, take the rails (1/2).
- S. On the right lies a dead warrior, we take a trident from him.
- T. On the top right of the hay is a jug of water.
- U. We disassemble the hay with the help of a trident pitchfork, we will find a set of chips.
4.7. Great Library
Lost Lands 3. Where to find figurines
- V. In the riddle room, on the right, add wooden chips.
- wx. We solve the problem so that there is an equality 2/2+2=3. Let's go to the closet.
Secret. On the left, between the curtains, there is a statuette (23/24).
Secret. Bottom left, among the books there is a ghostly scroll (34/35).
- Y. We examine the book from the bottom in the center, inside we will find the button from the box.
- Z.A. On the Tree of Life, in the house with a shawl, we remove the cobwebs, we will see the drawing.
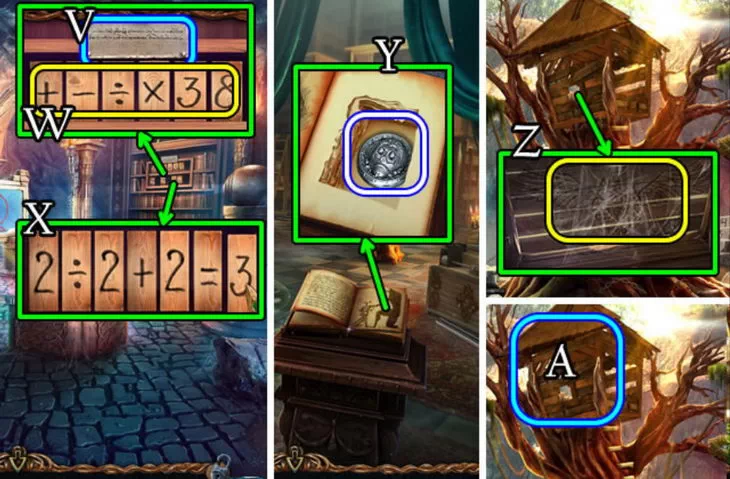
- B. The house will fall on the owl. In the dark on an owl we are looking for pairs of similar feathers.

- C. The owl will fly away, behind it is the box, insert the button into it.
- D. Take the circular knife from the open box.
- E. We dive into the sunken hold, use the circular knife on the door.
- F. There are 10 items to find behind the moss door:
- 1. Template - bottom left, near the skeleton. On the paper table.
- 2. Coin I - bottom left, behind the bandage of the skeleton.
- 3. Clip - top left, near the box. Plants in the center.
- 4. Key handle - on the right on the table, we need paper, a template, we decide.
- 5. Sword - in the upper left corner, hanging under the beam. To the box on the left.
- 6. Coin III - on the right near the chest. We insert into the chest.
- 7. Piece of paper - bottom center, near the drawers, under the table. On the table.
- 8. The key is on the right in the box, you need 4 coins, we collect the mermaid. Lever.
- 9. Lever - on the right on the wall, on the unscrewed bench in the center.
- 10. Coin II - in the center among the plants, you need a clip. To the chest.
Having unscrewed the bench, dismantled the garbage, we can take a piece of the bench.
- G.H. On the underground island, use the bench as a lever to turn the turtle over. Under it we will find scissors for metal.
- I. At the Minotaur, on the right we cut the armor with scissors, inside is part of the pattern.
- JK. In the Library, on the bottom right, rails (2/2). We put them under the stairs.
- L. Move the ladder to the right, reach the sarcophagus.
- M. At the top, you need to insert a part of the pattern into the sarcophagus.
- NO. Inside the sarcophagus is an empty beaker, manuscript (28/28).
- P. Beneath the manuscript are the caretaker's manuscripts.
- Q. We go to the safe, we give the manuscripts to the jeweler. He's already given the cursed ring.
- R. In the lair of the Minotaur we will see that he did not touch the ring. You need to find the cursed item among the rest of the gold. To do this, pour rose petals. We are looking for a petrified petal, under it is a cursed bull ring. Throw it at the Minotaur, it will turn to stone and smash against the wall.
- S. In the destroyed column, pull the lever, the ceiling behind the bars will open.
- T. Break the hand of the Minotaur with a hammer, take the signet ring.
- U. At the beginning of the dungeons, insert the missing part into the left statue.
- V. Insert the octagonal key under the statue.
- W. Eyes will fall out of the statue, we take away the ruby, sapphire.
- XY. Water will flow, a column will open in the center, we take the emerald from it.
- Z.A. In the safe, use 3 gems on the chest, take the jade skull.
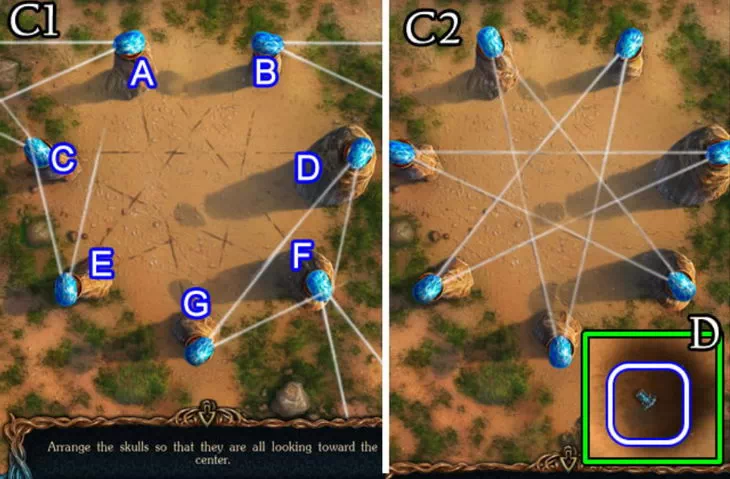
- BC. We go to the cemetery, insert the skull on the right, solve the puzzle.
We rearrange the skulls in places so that they all shine in the center. Skulls can only be changed in 2 directions indicated on the ground by lines. Solution:
(FA), (CF), (BG), (BE), (BG), (CD), (BE), (ED), (DC), (ED), (EB).
- D. After completing the task, we will receive the element of water.
- EF. In the room of madness, on the right we build a path to the large door on the left.
- GHI. Before the door we put the symbol of water, behind the door we take books.
- J. In the library, on the left, add books to the shelf.
- K. We enter those numbers that are not on the books: 4-12-17.
- L. A cache behind the cabinet will open, inside we are looking for 10 items:
- 1. Sheet 1 - on the left on the table. On the table to the right to the sheet.
- 2. Key 1 - on the right in the bookcase, you need to fold the sheet on the table.
- 3. Box with a lens - below, collect, add a lens. To the left of the candle.
- 4. List - on the right on the table near the candle.
- 5. Lens - in the center, rotate 4 figures. Down on the box.
- 6. Sheet 2 - in the center near the box. On the table to the right to the sheet.
- 7. Frame - bottom right, on a stack of books.
- 8. Key 2 - in the closet on the left, put the lens, collect the pattern. On the cabinet on the right.
- 9. Figurine - on the right on the table, in a drawer. On the figures in the center.
- 10. Sheet with figures - on the right on the table. On the figures, turn.
Having opened the cabinet on the right with two keys, we will get the book of spells.
- M. In the library on the left, pull the hanging flower pot.
- N. We select a hanging basket.

Chapter 5: Dark Territory
5.1. dark territory
Lost Lands 3: The Golden Curse. Walkthrough
- OP. In the room of riddles, pour a jug of water into a container, divide the grains.
- Q. A recess will open, inside a rope ladder.
- R. We go to Maaron, he will instruct to collect all the cursed gold in a chest, and give us a lever, a recipe for a potion of inspiration, to remove the curse from people.
- S. To the right of the pillar we take a broom.

- T. On the Underground island, with a broom from afar we break a clutch of eggs.
- U. From the wreckage we take the shell of dragon eggs, the switch.
- V. At the Crossroads, insert the lever into the center, the hatch will open.
- W. We throw off the rope ladder into the hatch, there is a “total eclipse” tile.

- XY. At the bottom, cut off the ivy branches with a knife, put a switch under them.
- Z. Near the blacksmith, go to the balcony, use the hanging basket on the cliff to get the half-eclipse tile.

- A. In the library, insert 2 tiles under the sphere in the center.
- B. Arrange the phases of the moon in order.

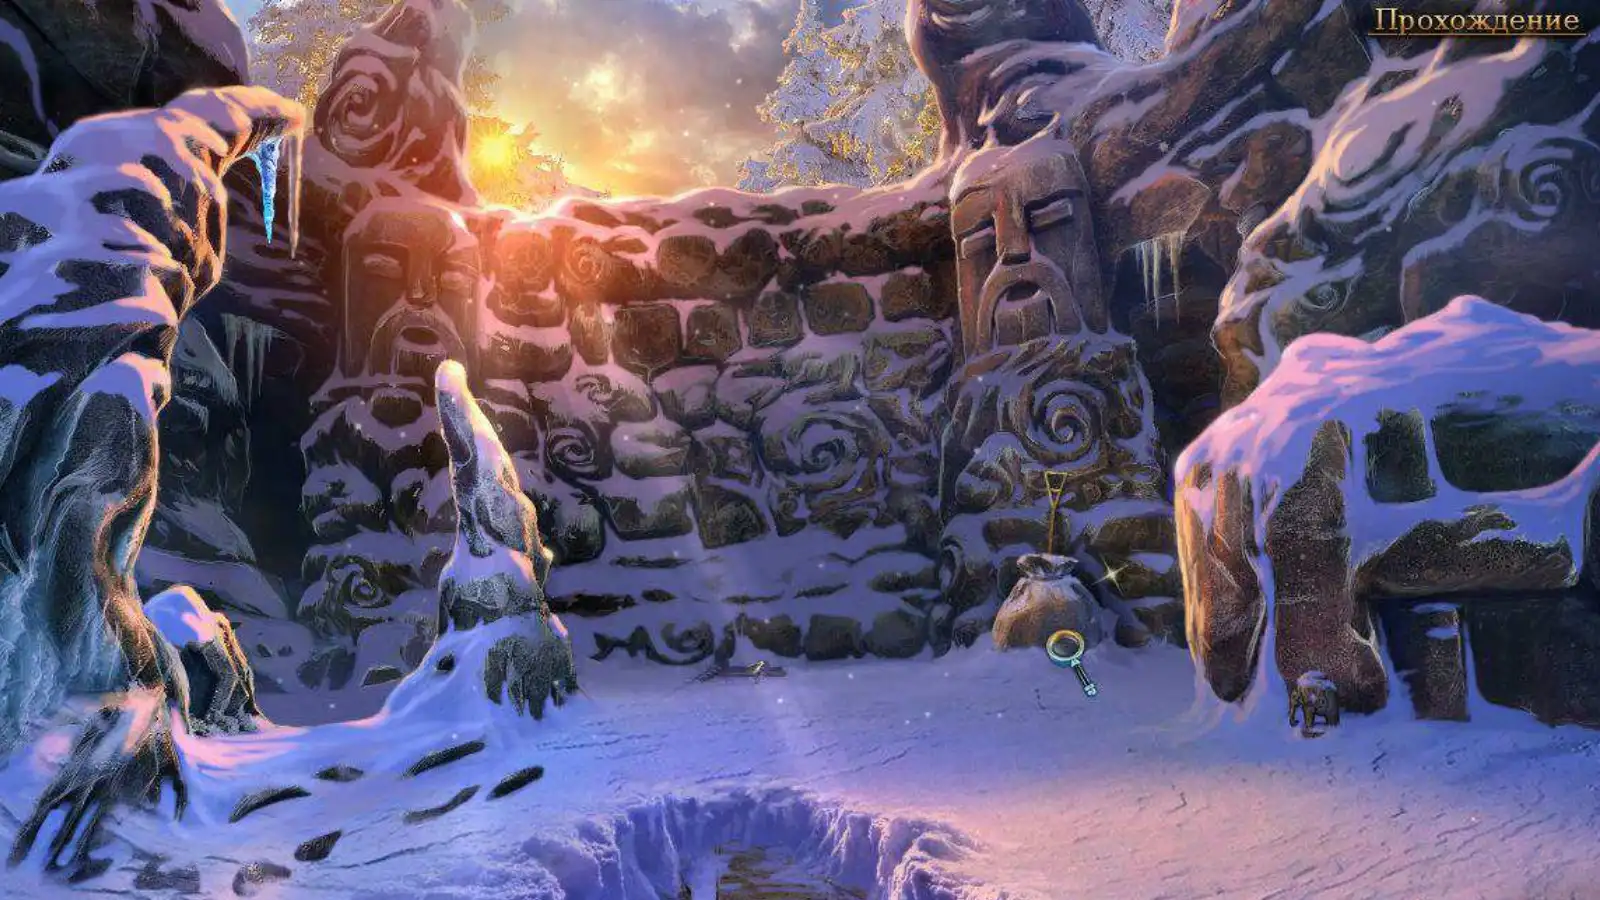
5.2. temple ruins
Lost Lands 3. Where to find figurines
- C. The layout of the islands will open, rearrange the largest one a little closer.
Secret. On the left side of the building ghostly skull (35/35).
Secret. On the right, above the drain lies figurine (24/24).
- D. From the blacksmith we go forward, we find ourselves near the ruins. On the left we are looking for 10 items:
- 1. Staff - on the right behind the stone, you need to solve everything else. We put in the center.
- 2. Dagger - in the left cabinet, you need a symbol. On the rope to the right.
- 3. Pickaxe stick - on the left near the cabinet. On the pickaxe on the top right, in the wall.
- 4. Pickaxe - a stick on a pickaxe. Use outside the window to break the ice.
- 5. Blue stone - in the left cabinet, you need a symbol. On the wall on the top right.
- 6. Red stone - top right, drops behind a pickaxe. On the wall on the left.
- 7. Rope - on the right, cut with a dagger. On the chip on the right on the floor. Lever arm.
- 8. Pincers - in the center on the floor. On the torch, you need a symbol to get it.
- 9. Symbol in the ice - above the window, knock out with a pickaxe. To the torch on the left.
- 10. Symbol - get the tongs out of the fire. On the cabinet on the left.
Having placed the staff in the center, we will open the cache, inside is part of the crown.
- E. On the left inside the drain lies a part of the crown, combine with the crown.
- F. A figurine of the father lies in the lower center.

- G. We go to the Tree of Life, on the left we put figurines of father and mother.
- HI. At the bottom left, press the button, we can get the fruit of the tree of life.

- J. At the elder, put a test tube on the statue on the right, collect the tears of the nymph.
- K. On the left side of the table we put 1) the recipe and all the ingredients. 2) We grind the fragments of eggs in a mortar, add to the jar. 3) Cut the fruit with a knife, pour it out. 4) At the end, add tears, you get an elixir of inspiration.

5.3. Collecting Cursed Items
Lost Lands 3 Guide
- L. We go to the Tomb of Lepros, we will revive the gnome with a potion. We'll get the key.
- MN. Use the key on the sarcophagus, take the chest with the cursed gold.
- OPQ. Here in the tomb we collect 3 gold items.

- RS. At the Crossroads, above the Metron, we open the door with the cursed key, we get a mechanical key. The used key will be added to the chest.
- T.U. On the Temple Ruins, insert the key from above, lower the bridge to the 2nd floor.

- V. On the top left on the floor we find the handle.
- wx. In the center we move the ball, under it we find the dice.

- YZ. At the elder we put a scepter on the throne, a glass punched card will fall out. We take the cursed scepter (3/9).
- AB. In the library, insert the handle into the tool, the spring will fall out.

- C. We examine the bottom of the globe, insert the spring, it will open.
- D.E. Inside the globe, take the symbol of fire.

- FG. In the Room of Madness, on the right, we build a road to the upper right door.

- HIJ. In front of the door we put the symbol of fire, behind the door lies a plank.
- K. In the Safe, put the assembled crown on the head of the statue.
- L. Take the stone tablet from the hands of the statue. We examine it, break it with a hammer, inside there is a wooden punched card.

- M. In the Lair of the Minotvar, we insert 2 punched cards into the lock of the lattice.
- N. Behind the bars you need to find 10 items:
- 1. Acid - bottom left in a box. On the bar on the top left.
- 2. Part of the maze 1 - in the far left corner on the floor. We put it in the center.
- 3. Lattice rod - top left, acid is needed. On the bricks on the left.
- 4. Magnet - by the statue on the right, you need a head and a horn. To the labyrinth in the center.
- 5. Bull's head - bottom right on the floor. On the statue on the right.
- 6. Toggle switch - in the center, you need to go through the maze. For 2 locks.
- 7. Knife - on the right on the stone. Apply to the column in the center.
- 8. Part of the maze 2 - behind the bricks on the left, you need a rod. We put in the center.
- 9. Leaf - in the center, you need to go through the maze. For 2 locks.
- 10. Horn - in the central column, you need a knife. On the statue on the right.
In the center there is a labyrinth of 4 parts, in each you need to hold the ball to the exit in the center, making up a program from the buttons on the right. Solution:
1) left, down, left, down, right, up, right, up, right, down.
2) up, left, down, right, down, right, down, right, down, left.
3) down, right, up, left, down, right, down, left, up, right.
4) left, up, right, up, left, down, left, down, left, up.
After the labyrinth, turn 2 toggle switches, take the spreader.
- O. From the wreckage of the Minotaur we take the cursed ring (4/9).

- PQR. In the Safe, we use the unclamp on the eye of the statue, take the lens.
- S. In the Harpy's Nest, put the lens on the stand on the right.
- T. A target will appear on the ground, insert the golden sword, a cache will open.

- U. In the cache is a box with a game, add dice.
- V. In the game, we roll the dice until we reach the finish line before the opponent. Everything depends on chance. We repeat until we win.
- W. For the victory we will receive a ratchet belt.

- X. Take the used golden sword (5/9).
- YZ. On the Temple Ruins, use the ratchet to move the drain bars apart.

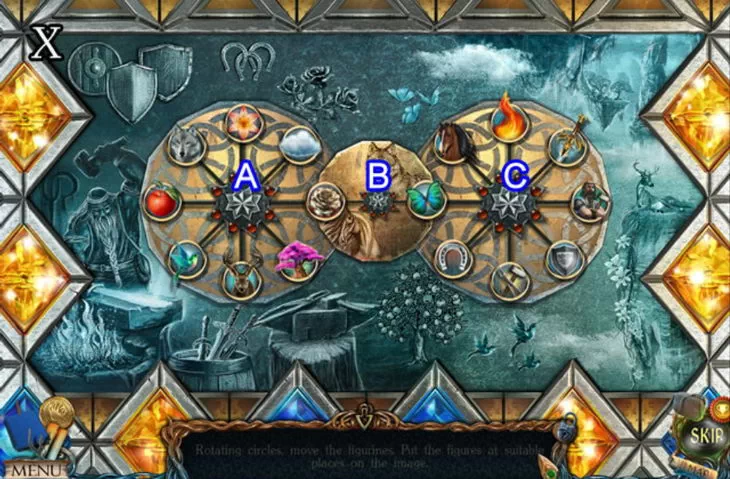
- A. Behind the bars is a puzzle, add a bar to it. You need to move 3 bars as seen earlier in the figure. Select 3 characters, from top to bottom: sun, butterfly, fire.
- B. After the decision, take the “Temple” chip from the cache.

- C. On the Lower Island, on the left, cut off a branch with a saw, there is a “Tree” counter in it.
- D. On the plate in the center we put chips from all 7 islands.
- E. Take the golden horn (6/9) under the slab.

- F. On the Hills, on the left is a broken harpy, take its cursed claw (7/9).
- G. At the beginning of the dungeons, on the right, take out the golden signet (8/9).
- H. On the schooner, the last cursed thing is a golden net (9/9).

5.4. Arena Final
Lost Lands 3 Walkthrough
I. We go to the Arena. We put a chest with cursed gold on the column in the center.
We will see the battle of Maaron and the fire golem. An animated gnome will come to the rescue, he will throw us a tile.
- JK. Open the bottom of the column, insert the tile.

- L. Tiles need to be turned over and searched for pairs of images among them.
- M. Having solved the puzzle "memory", we get the key.

- NO. Use the key on the ax hanging under the king.
- P. With the ax we hit the statue of the king, we will take away the cursed goblet of Gorasar.
- Q. Add a goblet to the cursed chest, and close it.
Maaron will send the chest and golem to the abyss. Rivers of lava will appear in the Arena. The old man will shout to us that he can handle it himself, and send us into the portal, back to the real world. All petrified people will come to life.

Bonus Chapter
1. The hold of the boat
Lost Lands 3: The Golden Curse. Walkthrough
We play as little Sandra, 20 years before the events of the main game. Our parents sailed to a new island, but were shipwrecked.
AB. In the hold, on the left we examine the table, we place all the gears on it.
C. Take the fur cape from the table.

D. We examine the rubble on the right, take the hammer. Haven't got a puppy yet.
E. Hammer knock out the latch at the top, get out of the hold.

2. underground lake
Lost Lands 3: Cursed Gold. Walkthrough
F. Outside, we go down, we will find ourselves at an overgrown intersection. Shawl on the left.
G. We go to the left, we rise to the Tree, we cover the wounded father with a cape.
H. Get the key to the doors, go back to the ship, unlock the doors.
I. Behind the door you need to find 10 items:
1. Sperm Whale - on the left behind the board, we pierce with a gun. To the box.
2. Knife - bottom right, on the barrel. Right up to the sink.
3. Whale - in the chest, you need a key. On the box on the top left.
4. Stone face - top center. On the left box, cut out.
5. Killer whale - on the top right, there is a sink in the box, open it with a knife.
6. Arrow - on the left on the middle shelf. On the gun on the right.
7. Ticks - top right, in a box with shells.
8. Shotgun - on the right, you need to add an arrow. We shoot at the board on the lower left.
9. Hacksaw - top right, near the box. Cut out the box on the left.
10. Key - in the box on the left, cut out. Open the chest in the center.
Having collected 3 figures of whales, we insert them into the box, we take the ladle.

J. We go to the Tree, break the ice of the waterfall with a hammer, collect a bucket of water.
KL. We give water to father. He will ask you to find a new prosthetic leg. We take a knife.
M. In front of the boat, on the left with a knife we cut the net, we can climb it.

3. Exit from the village
Lost Lands 3 Guide
NO. We take the lever, insert it into the winch. We'll take the elevator to the surface.
P. We pass through the market forward, in the courtyard we take a broken broom.
Q. The guard is sleeping on the right, take the cork from his hand, take out the corkscrew.

4. Forest path
R. On the doors of the outpost with a hammer we knock out the bolt, we go out into the forest.
S. In the forest, on the top left on the rock lies a handle. We get it with a part of the broom. We examine the broken broom, add the handle, tie it with a shawl, you get a whole broom.
T. On the right on the branch is a roller, we will reach it with a whole broom.

5. Tavern
Lost Lands 3 Walkthrough in Pictures
U. In the market, we insert a corkscrew into the door on the left, we will enter the building.
V. Inside the tavern, on the table on the right, we are looking for a ball under 3 glasses.
W. Having solved the problem, we will get a forged part from the box.

X. We go into the yard, we insert the forged part into the guard's belt.
YZ. We get the key from the belt, we open the door to the left with it.

6. Infirmary
A. Inside, meet a wounded Maaron while he can't help.
B. Take the nail puller from the basket in the center.
C. In the market, in the upper right corner on the tower, take pieces of the blueprint.
D. On the left in the tent we read the dough recipe, take the cleaver.

7. Mill
Lost Lands 3. Game walkthrough
E. On the right at the mill, above the window we take out a hairpin with an eye.
F. We use a nail puller on the glass, we get nails, we can enter.
G. Inside the mill, on the floor near the support, take a scoop for flour.
H. There is a blueprint on the wall on the right, collect it from pieces.

IJ. The assembled drawing needs to be smoothed out with a roller, we will see the password.
K. The hatch at the top is closed with a board, we break through it with a cleaver.

8. Top floor
L. A wedge is driven in on the left wall, we knock it out with a hammer.
M. We insert the wedge here, into the central mechanism.
N. On the right is an empty counterweight, inside it we will find a red circle.
O. Bottom right, on the round hatch is a medallion.

P. In the courtyard, on the watchtower, we look through the telescope, we will see the code.
QR. On the left we open the chest with a medallion, inside Maaron's bag.
S. We take the bag to the old man, we will receive from him the spell Light of Hope.

T. We go into the forest, insert the Light of Hope into the hands of the statue, we will be able to pass.
U. There is blood on the snow below, a knitting needle is near it. We bend, we get a hook.
V. On the tree on the left, cut off the glue with a knife.
W. On the right is a puzzle, add a red chip to it, solve it.

X. The pieces must be moved to the corner with the same color. First, we arrange the corner parts, then in the center we line up the chips in the right order, turn them in their corners.
YZ. After the solution, we get forest pollen.


9. Forest glade
Lost Lands 3 Walkthrough
AB. Through the forest we will go out to the clearing. On the right side of the pillar is an inscription, the blade of a scythe.
C. Through the window, with a curved knitting needle, we will get a master key. We break down the door.

10 Goblin Dugout
Lost Lands 3. Where to look
D.E. On the left behind the curtain you need to find 10 items:
1. Bone - we cut the meat leg with a knife. On the chest on the bottom left.
2. Mask - we will receive for all other actions. On the central wall.
3. Butter dish - top right, on the shelf. We put it on the table, add the root.
4. Oil - an oil can with a squeezed root.
5. Meat leg - hanging from the top left. We put it on the table in the center.
6. Knife - on the right, stuck in a yellow pumpkin. On the meat leg on the table.
7. Bolts - on the right, on a green zucchini. On the chest on the bottom left.
8. Rope with a hook - right in front of the vegetables. On the chest below.
9. The key is on the right, in white cabbage.
10. Root - on top, in the left pan. On the butter dish in the center.
From the bottom left we shift the boards, under them is a chest, insert the bone like a handle, close the clamps, insert the bolts, hook the rope, lift it up. We grease the lock with an oil can, open it with a key. Inside the mask, it is on the recess in the wall in the center. We'll get a sharpener. Immediately apply to the braid.
FG. Ahead on the table is a carnival, under it is a drawing with a code.
H. Bottom center on the hatch is a rope with a hook, examine it in inventory, make knots, get a rope with a hook and knots.

In the tavern, the 2nd circle is drawn on the barrel to the left.

I. In the dugout on the floor, we enter the password we saw from 3 circles.
J. Solution, towards the center: pizza, wrench, circle.

11. Dungeon
K. Below we will see a mother in a cage, in front of her is a large spider. We take a torch.
LM. We go upstairs, open the furnace, inside we get a lit torch.
N. We go back down, drive the spider away with a torch. He'll go through a hole in the wall.
O. We speak with mom, she will instruct to lay a wall so that the spider does not return.

P. We take a handle at the left wall, add it, we get a full-fledged braid.
QR. In the clearing, on the left, we cut the ice bush obliquely, take the egg.

12. Mill with flour
Lost Lands 3 Walkthrough
S. At the mill, screw the hook into the hatch on the floor.
T. We shift the bag of grain to the hanging platform.

U. On the top left, use a rope with a hook, climb to the weight.
VW. We shift the weight to the scales. Next we take the key.
X. On the top floor, press the lever.
YZ. On the elevator hatch you need to enter the numbers from the drawing: 34715.

A. On the elevator we will raise the bag, next we take the weight of the counterweight.
B. We hook the bag on the hook nearby.
C. Insert the weights into the wooden counterweight on the right.
D. The bag will move to the right, inspect it.

E. We cut the bag with a knife, pour the grain into the hatch, take the empty bag.
F. Below, at the right wall, we weigh the bag, remove the valve, remove the belt.
G. Inside the bag, take the trowel tool. We collect flour with a scoop.

13. Cooking the dough
Lost Lands 3
HIJ. In the market, in the tent on the left, pour flour, egg, butter, salt.
K. Stir the mixture to make a bowl of mortar.

L. We go to the dungeon. We put a bowl of dough near the break in the wall. We begin to lay the opening with stones. Let's eliminate the danger.

MN. On the right, we cut the cocoon with a knife, we get a sheet with a code, a key, a diagram.
OP. In the clearing, on the left, open the gate with a key, followed by a stick-hook.
Q. There is a red stone in the chest nearby.

R. We return to the dungeon, insert the stone into the skull on the floor.
S. From the skull we get the key to the cage, the spoon knife.
T. We unlock the cage, but the key will break, the mother will remain locked up.

14. Help father
Lost Lands 3 Walkthrough in Pictures
U. We go to the infirmary, on the right we insert a fragment of the scheme.
V. We rearrange the prostheses and their parts in the same way as in the diagram.
W. After completing the task, we get an unfinished prosthesis.

X. We go to the father, we show the prosthesis, he will ask him to finish it, he will give the key to the cage. We go to the ship, unlock the cage, inside we take the skin.
Y. Go to the tavern, use the hook stick, open the vat in the center.
Z. There will be a burner inside the vat.

A. In the market, put glue on the central table, melt it with a burner.
B. Place a piece of leather next to the press. We pour glue.
C. Close the press, press down, take out the finished insoles. We examine the prosthesis, add the insole, insert nails, hammer.
D. We go to the father, we give the prosthesis with the insole. We get a part of the page.

E. We go to the infirmary, add a page with the antidote recipe to the book.
F. At the fork, among the thickets, cut off a leaf of a drip tree with a knife.
G. Nearby we collect red berries of stupefaction.

HI. We use a spoon knife on the Tree of Life, we get shavings, a symbol.
J. We go into the dungeon, on the right we cut off the mushroom, we get the juice of the phosphorus mushroom.
K. Upstairs in the dugout, on the right, insert the symbol into the chest.
L. At the top of the chest we solve the puzzle.

It is necessary to draw lines through all points without repeating. Solution:
ADHCDEIHEBAEFGIFGB.
M. After the decision, we get matches, a lock from the cabinet.

NO. In the market, on the left, put a leaf of wood on the dryer. We set fire to the dryer with matches, pour oil into the tank, set it on fire again. We get a dry leaf.
P.Q. In the infirmary we insert the key-tree, we will get the elixir of grace.

After collecting all the ingredients, we go to the infirmary. 1) Put the berries in a bowl, 2) grind. 3) We put the mushroom in the crusher, 4) we press the handle from above. 5) On the left we take the mortar with tea leaves.
In the dugout, pour the tea leaves into the teapot, close the lid. Pour the liquid back into the cup, you get a mortar with tea.

R. We go to the infirmary again, pour the tea into the bottle, we get the medicine.
S. We take the medicine to the father, he will come to the mother.
T. Inspect the broken key again. Father will send us to the wizard.
U. Maaron will ask you to return his staff, give us a skull tile.

V. In the market, on the right of the van, insert the tiles, solve the puzzle. You need to look for paired images of skulls. To get the achievement, you need to do it without errors.

W. The van will open, inside we are looking for 10 items:
1. Nippers - behind the masks on the right, you need 2 halves of the mask. On the chain on the left.
2. Blade - will appear behind the boat, you need a wire. On the bag on the left.
3. Crowbar - bottom right on the corner. To the box on the right.
4. Knife - lies at the beginning. Cut the string on the curtain.
5. Left mask - on the left under the mushrooms, you need another mushroom. On the masks on the right.
6. Right mask - in the bag on the left, you need a blade. On the masks on the right.
7. Wire - near the masks. After the boat, we use it on fish.
8. Gear - on the left near the mushrooms. We insert into the boat.
9. Mushroom - in the box on the right, you need a crowbar. To the mushrooms on the left.
10. Valve - on the right on the far table. To the right of the recess behind the tree.
Having opened the doors on the left, we will get the staff of Maaron.
X. We go into the dungeon, use the staff on the lock, open the mother's cell.
Y. All together we will return to the ship, we will sort out the blockage, we will save the puppy Miki.
Our whole family will settle down in the Underground Oasis and build a house here.

Bonus game
If we collect 24 figurines in the main game, then in the main menu, in the “Bonus” section, the penultimate line “Bonus game” will open. At 20 levels, you need to connect the colored dots with lines so that they do not intersect. No reward.
Quiz
Lost Lands 3 Walkthrough
1. How many years between the events of the main and bonus parts? - 20 years.
2. What is the name of the magic table in the Great Library? - Geo-table.
3. In what year did Lepros Khon die? — 1955.
4. What is the name of the druid elder? — Maaron.
5. What happened to the sentry guarding the infirmary? - He is drunk.
6. What is the name of Breiloff's blacksmith's island? — Blacksmith's Peak.
7. What did the jeweler make for the Minotaur? - Bull ring.
8. Where is the Book of Spells kept? — In the Great Library.
9. What does the girl name her doll? - A flower.
10. How often can the Metronome be stopped? - Once a century.
11. What is on the highest floating island? - Temple.
12. What is the name of the volcano in the Dark Territory? — Bashar.
13. How many generals did the conquering dwarf have? - four.
14. Who did you fight in the previous part? — With the Black Riders.
15. How are Gorasar Khon and Lepros Khon related to each other? — Brothers.
16. What is the name of the girl we rescued from the well? — Fiora.
17. How many floating islands are there in the sky? — 7.
18. Who kidnapped Sandra's mom? - Goblin.
19. What is the name of the fish in the lava of the volcano? - Chain mail fish.
20. Where is Maaron's staff hidden in the bonus part? — In the carriage.
Achievements (22)
1. Main game (9 pieces)
Lost Lands 3. Achievements
Subject
| Connoisseur of mechanics (engineer) Completed the mini-game with balloons in the druid village. We get it at the beginning of the game. | |
| Dodgy (Cunning) The harpy is trapped. We'll get it in the middle of the game. | |
| Attentive (Careful) Collected all of Susan's lost things. We'll get it towards the end of the game. |
Mini games
| Fulminant (Lightning) Completed the mini-game in less than a minute. The easiest way to do it is on the 1st riddle. | |
| Clever (Clever) Completed 3 mini-games in a row without using the Skip button. We play without a hitch. | |
| Plodding (Diligent) Completed the mini-game in over 5 minutes. Toward the end there will be a mini-game "flowers", it takes a lot of time. |
Search for items
| Faster sound (Supersonic) Completed the Hidden Object scene in less than 2 minutes. We do it together with the "sniper" achievement. | |
| Sniper (Snipers) Found 3 items in 3 seconds, in a Hidden Object scene. We are looking for 3 items, remember, and only then quickly poke. | |
| Orderly (Thorough) Completed the Hidden Object Scene with no useless clicks. Better to do it on repeat. |
2. Specific places (5 pieces)
Lost Lands 3. Achievements
If you didn’t manage to quickly complete the puzzles during the story, then later in the main menu, in the line “Bonus”, “Mini-games”, you can turn on any of the puzzles, and go through it to achieve there.
| Skillful (Skilled) The beam mini-game in the relic vault was completed in less than 7 clicks. Mini-game 4/25. Chapter 1 | |
| Virtuoso (Virtuoso) The mini-game with associations at the fork was completed in less than 70 turns of the handles. Mini-game 6/25. Chapter 2 | |
| Architect (Architect) Assembled the Tower of Hanoi in an underground lake in less than 3 minutes. Mini-game 12/21. Chapter 3 | |
| Calculating (Thrifty) Collected all couples in the arena in less than 26 clicks. Mini-game 18/21. Chapter 5 | |
| Scrabble (erudite) Mini-game with tiles in the market, completed without unnecessary touches. Mini game 25/25. Bonus chapter. |
3. Secret items (3 pieces)
Lost Lands 3 Achievements
| Historian (Historian) Collected all the pages of the book of the Lost Lands. 20 pieces. Not hidden, lying near plot items. | |
| Collector (Collector) A collection of figurines. 24 pieces. Highlighted in orange text. | |
| Detail Master (Master of Details) Collected all ghostly objects. 35 pieces. Highlighted in orange text. |
4. Style passing (5 pieces)
Lost Lands 3. Achievements
| Story lover (Story Lover) Completed the main and bonus chapters without skipping dialogues or videos. We watch all conversations and screensavers. | |
| Persistent (Persistent) Completed the main and bonus chapters without using the hint in the hidden object scenes. We are looking for items on our own. | |
| Mystery Lover (Puzzle Lover) Completed the main and bonus chapters without skipping mini-games. Don't skip mini games. | |
| Messiah of light (Guardian of Light) Completed the main and bonus chapters without using the hint. Do not click in the lower right corner of the screen. | |
| Expert (Expert) Completed the main chapter on hard difficulty. Difficulty only affects item highlighting and tooltip recovery speed. |
Questions - answers
Lost Lands 3. What to do with paints?
Scrape the chisel off the gnome statue. Return to the paint room, place the pigments on top. Get black and white paint, dilute with oil, put. Make shades of colors. Repaint the gnome statue.
Lost Lands 3. What to do with the spring? what is the spring for?
Insert under the globe in the library.
Lost Lands 3. What to do with tights?
Open the package, cut with a knife, connect with two sticks.
Lost Lands 3. Where to find steps?
1) The cave at the beginning of the dungeon, in the center of the block with water, behind it.
2) Fisherman's Hut, on the right side of the table.
3) Tree of Life, in the treehouse.
4) Volcano, On hardened lava.
Lost Lands 3. Where can I find the horseshoe glove?
On the volcano, we examine the hanging bag, we get it with a hook.
Lost Lands 3. Where can I get a paper clip?
Island of Exiles, on the right in a cage, under a water pump.
Lost Lands 3. Where can I get a battery?
In the Arena, on top of the column in the center left.
Lost Lands 3. Where can I get a battery?
1) The battlefield, on the right under the chariot wheel.
2) Storage of artifacts, under the stairs in a suitcase.
3) Entrance to the Arena, on the right near the stairs.
4) Lepros' Dwelling, on the left on the shelves you need to find 10 items.
5) In the village we speak with Maaron.
6) Storage of artifacts, you need to solve the problem on the hourglass.
Lost Lands 3. Where can I find a lemon?
Harpy nest, on the left of the symbol in thorns, use the harpy claw.
Lost Lands 3. Where can I find blacksmith sunglasses?
Room of riddles, bottom right near the column.
Lost Lands 3. How to open a chest with a code?
It is necessary to turn on the pendulum in the Labyrinth, put clean paper under it. The drawn symbol is superimposed on the drawing on the left inside the cave. We will see the numbers that need to be pressed, multiples of three: 3-6-9-12-15-18-21-24.
Lost Lands 3. How to mix paints?
1) Blue = blue + blue. 2) Purple = blue + red.
3) Cyan = blue + white. 4) Green = yellow + blue.
5) Pink = red + white. 6) Orange = red + yellow.
7) Burgundy \u8d red + black. XNUMX) Yellow = yellow + yellow.
9) Black = black + black. 10) White = white + white.
Lost Lands 3. How to get through the labyrinth with a magnet?
1) left, down, left, down, right, up, right, up, right, down.
2) up, left, down, right, down, right, down, right, down, left.
3) down, right, up, left, down, right, down, left, up, right.
4) left, up, right, up, left, down, left, down, left, up.
Lost Lands 3. How to open a bottle?
Corkscrew. We'll find it much later than the bottle.
Lost Lands 3. What is a rope ladder for?
On the Crossroads island, go down into the hatch in the center.
Lost Lands 3. What are rose petals for?
Lair of the Minotaur, pour on a mountain of gold to find a cursed thing among them.
Was the article helpful?